Pages

Friday, May 24, 2019

Trimming the 1760's Sacque Back Bird Gown

I was making a sacque back gown, or Robe a la Francaise. Honestly, this has never been my favorite style of 18th century gown, and was definitely not what I expected to make on my first venture into Georgian dress making. However, as outlined in my previous post, this was the style of gown best suited for the fabric I had, and I already had an easy to use sacque back pattern on hand. Thus, a Robe a la Francaise I was making.


As I was making the gown, it didn't take me long to develop an appreciation for the beauty of the long flowing back pleats on this style of gown. And wearing the gown? That threw me head over heels in love with this style. There is something magical about walking with the back of your gown billowing out elegantly behind you.


Thus, my reservations on the shape and style of this type of gown disappeared as soon as I started making it. I only had one worry left. How would I be trimming the thing?? What really finishes off the look of a saque is self-fabric trimmings, pleated, gathered, or puffed, and stitched down the front of the gown. The process of trimming the gown sounded long, tedious, and rather exhausting to me. I appreciate the look of all the trimmings on extant gowns, and on other people's re-creations, but I was rather dreading trimming my own gown. Yet, I didn't want to skimp, so my Robe a la Francaise would be trimmed beautifully. I just had to decide what shape this trim would take. I visited the wild lands of Pinterest for inspiration.

1760 Gown and Petticoat (Robe à la française) | LACMA Collections

I found a picture of this 1760's linen (embroidered with wool) Robe a la Francaise and fell in love with the trimmings on it - relatively simple pleated trim with the edges trimmed (or bound?) in some sort of green material. These were the trimmings I wanted to recreate for my gown, so I went to Hobby Lobby and bought 6 rolls of green ribbon while ribbon was on sale 50% off.


I bought both 5/8" and 1 1/2" wide green grosgrain ribbon. The narrower ribbon would be used to bind the edges of all the self fabric trim, and the wider ribbon would be used to bedeck the stomacher in bows. Both ribbons are, of course, polyester, not silk, but as historical accuracy concerns had already been thrown out the window, that was fine.


After cutting out my gown, I didn't have a whole lot of fabric left over to use for trim. There was one large-ish piece of material left over. It was the full width of the fabric and just over a yard long, and it would need to be saved to make the petticoat to go with the gown. This meant my trim would have to be made from fabric scraps, not leftover yardage. Thankfully, I had two large scraps, about one yard long and 12" (ish) wide. Each of these was cut into three narrower strips, and the six resulting strips were pieced together end to end, giving me plenty of material for my trim.


I bound the raw edges of the fabric strips in the green ribbon, then began pleating the trim onto my gown. This was the one portion of making this dress that took the most time.


I referenced the pleat pattern of the trim on my inspiration gown, then spent a couple evenings in front of the TV pleating, pleating, and pleating, I used just about every straight pin in the house in the process. My long, pieced together, strip of material, turned out to be just the right length for the trim. 


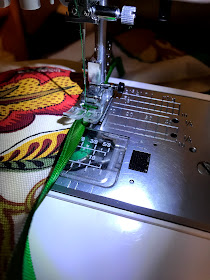
Finally, I machine stitched the trim to my gown, all along either side of the front opening and around the back neckline.


With the front trimmed, the second place the gown itself needed trim was the sleeves. The sleeves needed ruffles - lovely scalloped, self-fabric, ruffles similar to those seen on the extant gown I was using for inspiration. These sleeve ruffles are probably my favorite feature of 18th century gowns.

Woman's Gown and Petticoat (Robe à la française) | LACMA Collections
I cut out the sleeve ruffles using the pattern piece included with the Simplicity pattern I was using as my template. However, I made my scallops much less dense than those on the Simplicity dress. I would be binding my sleeve ruffles with green ribbon to match my pleated trim, so my scallops couldn't be too scalloped, or binding would be impossible.


Binding scallops sounded like a nearly impossible task, so I was surprised and thrilled when it actually went very well! Once the ruffles were bound in ribbon, I pleated them onto the sleeves and machine sewed them into place.


Ruffles on, there was one last thing the gown needed - lace sleeve ruffles! (Also called engageantes).


I looked through my lace stash to find something suitable for these wonderful ruffles. I came up with several possibilities. As my engageantes were to be made quickly the morning of the picnic, by sewing machine, I opted to use the lace I was least attached to from my suitable options and leave the lovely vintage pieces in my stash for future projects I would be able to spend a bit more time on.


As the fabric sleeve ruffles were asymmetric, longer at the back than the front, my lace ruffles needed to be asymmetric as well. To make the back longer than the front I cut out a half circle of netting for the back of each sleeve ruffle, and attached the pre-gathered lace for the back of the ruffle to that with a zig-zag stitch. 


I pleated the lace and netting onto a circle of cotton ribbon, cut to be the same circumference as the bottom of my sleeves. I zig-zag stitched the lace to the ribbon, and the engageantes were ready to go on my gown.


Out of time to do anything else, as I was needing to leave for the picnic that minute and still not dressed, I safety pinned the ruffles into the sleeves, and threw the gown on.


From the outside there is no hint of the safety pins and the sleeves are marvelously ruffly!


The ruffles and trim made my gown look finished - and much less tedious to make than I'd expected. 


Off to the picnic I went, with absolutely no regrets about the style of dress I made, or how I chose to trim it!




Saturday, May 18, 2019

The Simplicity 8481 Slytherin Dress

Several months ago, I made my brother a green shirt. But this blog post isn't about that. However, that green shirt directly influenced the making of this dress.


In preparation for making the green shirt for my brother, I pulled every single piece of solid green fabric out from my stash for him to pick from. He chose a very specific shade of green for the shirt, and the rest of the green fabric got left in a pile in my sewing room, rather than put back away right away.


One day, a week or two later, a fantastic fabric combination caught my eye. Laying on another pile, next to the green fabric pile, was a stained glass Hogwarts House quilting cotton, purchased on a whim at Joann's. The green broadcloth on the top of the green fabric pile perfectly matched one of the greens in the Slytherin house emblem on the Hogwarts fabric. Clearly, I had to use these two fabrics together to make something.


Personally, my Hogwarts house is Gryffindor. As the green material highlighted the Slytherin emblem on the Hogwarts fabric, I did not want to use these two fabrics in combination to make something for myself. My sister however, according to the sorting quiz on Pottermore, is a Slytherin. Thus, the fabric pairing would be turned into something for her.


I looked through my pattern collection for inspiration and Simplicity 8481 nearly jumped out of the drawer at me as the perfect pattern for this Slytherin inspired dress. I could make the bodice from the stained glass Hogwarts fabric, and the skirt and collar from the green.


This idea worked out beautifully! In the next week I cut out the dress and worked on sewing it up when ever I could snatch bits of free time between other projects. I told my sister nothing about it.


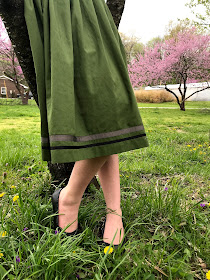
Slytherin House colors are green and silver, so, to really tie the Slytherin theme together, I trimmed the green skirt and collar with gray and black ribbon.


The bodice was finished off with three fancy black shank buttons, which I picked up on clearance somewhere at sometime or another.


Speaking of the bodice, the dart placement on this pattern is a bit different than any of the other darted bodice patterns in my collection. It's fitted with two darts on either side, which is normal enough. However, rather than one dart coming out of the side seam and one coming up from the waist seam, as is standard, one comes up from the waist seam and the other comes down from the shoulder seam. With this arrangement, the darts almost form a princess seam. A little different, but the bodice fit is very nice so I wouldn't hesitate to use a pattern with this dart arrangement again.


The dress fastens with a side seam zipper, and has wonderfully large pockets hidden in the skirt - the perfect place to stash a wand! (Wand pockets are very important in the Wizarding World)


Once I finished making the dress, I called my sister to my sewing room to present it to her. 


She was surprised and thrilled, immediately declaring she would wear it to her homeschool co-op meeting the following Monday - which she did.


She has been wearing this dress regularly ever since - but it took a couple months for us to get around to photographing it.


When I made the dress, winter still had its grip on the world, and snow was falling from the sky regularly. By the time we photographed it a few weeks ago, the world was alive with color and spring. No more bare, gray, trees and brown, dead, grass. The Redbud trees blossomed purple. The ground was littered with pretty little violets and dandelions were beginning to appear. The grass had turned green and little leaves were beginning to appear on the trees.


To really up the Wizarding World impression of the dress for the photo shoot, my sister pulled out the wand she carved herself, to go with her Beauxbatons' outfit. She had great fun with this prop.


I'm not entirely sure if she was hexing me, or charming me, while I told her to hold still for pictures.


Either way, her spells have had no lasting damage, and, months after making it, I still really like how this dress turned out!


Sometimes it's entirely worth not returning your fabrics back to their rightful place right away - as you never know what magical combinations you may discover when fabrics are out and visible!


Thursday, May 16, 2019

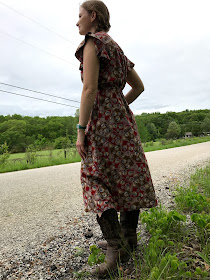
Globes, Ships, and Fluttery Sleeves - The Orchid Midi Dress

I enjoy testing PDF patterns. I really do. I appreciate the deadlines (I'm definitely someone who works best with a deadline), I like trying out new patterns and styles, and every once in a while pattern testing gives me an excuse to go fabric shopping. I am fond of fabric shopping. But you know what the best thing is? Signing up to test a pattern and realizing you already have the perfect fabric in your stash for it. As much as I love fabric shopping, stash busting is much more satisfying.


A few weeks ago, I applied to test an update for the Orchid Midi dress pattern by Chalk and Notch Patterns. The pattern size range was being extended and bust cup options were being added - I'm a huge fan of bust cup options on patterns! I've followed Chalk and Notch on Instagram for a while now, and admired their designs. I've applied to test a few patterns for them in the past, but never been selected as a tester. Thus, I was totally surprised when I was actually selected to test this pattern a couple days after I'd applied! Suddenly the thought "that would be a fun dress to make" turned into "time to find a fabric to make this dress!"


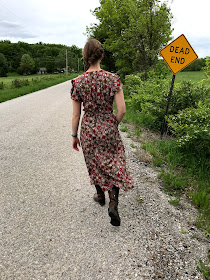
The Orchid Midi dress features a cross over bodice, beautifully large pockets, and the most fluttery of flutter sleeves. To be properly fluttery, these lovely flutter sleeves require the dress to be made from a fabric with a lot of drape to it, such as a rayon challis or a cotton lawn. A quilting cotton, poplin, or gingham would be too stiff. With this need for drape in my mind, I began shifting through my fabric stash to find 3-4 yards of a suitable material.


In my mind, I would be making this dress from a lovely large floral print material. Nothing in my fabric stash quite met that expectation however. Instead,  I found a fabulous, much more memorable, fabric with just the right amount of drape in a recently acquired section of my fabric stash.


A friend of my aunt had a mother who was an amazing, very prolific, seamstress. She sewed for her entire life and built up a wonderful fabric stash in the process. As she was cleaning out her parents' house after her mother's passing, my aunt's friend invited my grandma (who is a wonderful quilter) and me to come and go through the fabric and notions stash - selecting anything and everything we thought we might want to take home and use. She wanted the materials to go to people who would appreciate and use them. I came home with a lot of fabric, probably a lifetime supply of zippers, and some fantastic ironing tools such as tailor's hams and a clapper. 


It was in this collection of fabric that I found 4 yards of rayon challis for my Orchid Midi. When I was going through the original fabric stash, I almost didn't choose to bring this piece home with me. From a distance all I saw was a red and brown material, and that's not a color pallet I usually wear. Then, as I was picking up the fabric so I could see what was beneath it in the box, I too a closer look at it, and realized the print was ships and globes! This caught my interest immediately, as the fabric reminded me of  my map dress. In addition to that, the hand and drape of the fabric was just amazing. It feels like a rayon challis, but a much higher quality rayon challis than what can be found at Joann's today. I knew I'd find just the right project for this wonderfully soft travel themed fabric eventually, so I happily added the cut of material to my fabric stash.


It was about a month later, sooner than I'd expected, that I found the perfect project for the fabric in the form of the Orchid Midi. The rayon has the right drape for the flutter sleeves to lay perfectly.


The fabric is light enough to gather nicely at the drawstring waist, rather than being bulky.


And it's substantial enough to support the large pockets - very important since I will use those large pockets!


The Orchid Midi update test was a joy to be a part of. It was run a little differently than any other Facebook group pattern test I've done, and I really appreciated the way it was handled.


My measurements put me squarely in a size 6 with a C/D bust cup for this pattern. Before the pattern update, the Orchid Midi was only drafted for an A/B cup size and my bust measurement was a full two sizes larger than any of my other measurements. I would have had to do a full bust adjustment if I'd wanted to make this dress and have it fit perfectly. I don't like having to do full bust adjustments (FBAs). I generally avoid doing them if I can help it. Thus, any pattern featuring different cup sizes makes me very happy! All women are shaped a bit differently, and it's wonderful when patterns reflect that!


The only adjustment I had to do for this pattern to fit me perfectly, was a slight broad back adjustment.  This is way less involved than a FBA, and I really don't mind to broad back adjustments at all, so that was no problem.


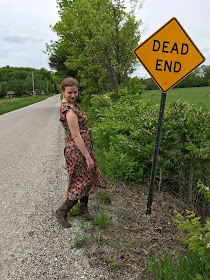
Fluttery sleeves, bust cup options, a perfect fit, and unique travel-themed fabric gives me a comfortable, pretty, new dress that I enjoy wearing. Just for the irony of it, I had to photograph this dress with the dead end sign at the end of my road.


As much as I enjoy making garments of all varieties, I'm really a dressmaker at heart. It's been a couple months since I made a modern dress for myself, and this was just the pattern to scratch that dress-making itch - while doing some stash busting at the same time! It's a modern design, but the skirt length and flutter sleeves gives it a slight 1930's feel to me, which I really like. Quite the satisfying project.


With the new update, the Orchid Midi dress is for sale on the Chalk and Notch website, 20% off through next Wednesday (5/22/19) with the code "orchid20".


*I received this pattern free of charge in exchange for testing it and giving my feedback. All thoughts and opinions expressed in this blog post are my own, and I was not required to write or share anything about this pattern.