Pages

Wednesday, March 30, 2016

The Easter Dresses

Jesus is Alive! Death couldn't hold him! He took on the sin of the world so we could be free, but even all that couldn't keep the perfect, holy, sinless Son of God down! Hallelujah! What a reason for celebration! To Church we go, all dressed up in our "Sunday Best."

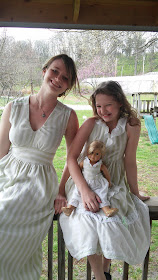
Seemed like a pretty good reason for me to make my sister and me the semi-matching green striped dresses I've been planning.


I bought a set of green striped sheets at a thrift store nearly a year ago. I loved the fabric and could easily envision a dress made from said sheets. Finally, a couple months ago, I designed the green striped dresses I wanted to make. I then decided Easter would be the perfect occasion for making these dresses.


For my dress I decided to use Simplicity 1801 view C, pretty much straight out of the envelope, no major design changes. I've used this pattern twice before with good, but not perfect, results. Once for the brown shirt (used in Tori's Ren Faire costume), and a second time as the base pattern for my purple shirty dress.  Both times the neckline gaped, so I had to add elastic or a drawstring to fix the issue. This time though, I didn't want to do that. I wanted a perfectly fitted neckline. I figured out how to fix the issue with the pattern itself, then promptly forgot to do so when I cut the dress out. Uggh. I decided to research how to shirr, thinking I might just add a couple rows of elastic thread around the neckline to fix the issue. I figured out how to shirr, then made my sister a shirt to practice the skill.

All that, and I actually wound up not needing to shirr the neckline of my dress! I altered the neckline facing to fix the issue, the pleated the extra fabric of the bodice itself into the facing. Issue fixed!


Due to my worry over the neckline, then the fact that I sewed the back skirt panel in upside-down so that I had to take apart and re-sew the entire skirt (with french seams, call me crazy) I didn't get my dress done until the night before Easter morning. What can I say? I sew well under pressure?


Now my sister's dress went together quite a bit smoother, despite some major design changes to my base pattern, McCalls M6736.


Several years ago I found this dress on Pinterest. 


I fell in love with it and made a similar one for my sister. She has worn and worn that dress. This year it was (sadly) officially outgrown! It could no longer be buttoned. My sister requested a replacement. So I did my best to make her Easter dress that replacement (updated).


So, I reshaped the skirt and added an eyelet ruffle. The eyelet was originally a curtain, picked up at a thrift store for a dollar or two. It added the perfect contrast to the white and green striped fabric.  


The second design change I made was to the back of the dress.


Yep, I shirred it. The pattern called for a zipper, so that's what I was going to do. The dress was nearly done, it just needed the skirt to be attached to the bodice and the zipper to be inserted. Then I learned to shirr, and I just had to put my new found shill to use.


So, I added an extra panel to the back of the bodice and shirred the back of the dress. No zipper required! 

Once that was done, there was one last alteration needed. The dress was supposed to be a halter dress, so that's how I made it. My sister, however, found that to be rather uncomfortable. To fix this I just criss-crossed the ties in the back and stitched them down. This solution met with my sister's approval so the dress was done!


As a finishing touch, Easter morning I whipped up a coordinating American Girl Doll dress for my sister's doll. We were then all outfitted for church and ready to celebrate the resurrection of our Savior!


Hallelujah! He is Risen! 


Happy (belated) Easter!

Thursday, March 24, 2016

Shirty Shirring

I'm smack dab in the middle of making Easter dresses. I have been all week. The plan? To get all three dresses done by the middle of this week. Yeah, that hasn't happened. They will get done, they're just not done yet. Why? Unsurprisingly I distracted myself. Unintentionally of course. No, really, it started because of the Easter dresses, the original distracting idea completely pertained to the Easter dresses. Well, one Easter dress in particular, mine. 


Anticipating a fitting issue with my dress, that I should have fixed while cutting out the dress, but failed to do, I started brainstorming ways to fix it. An idea popped into my head. I could use elastic thread to shirr the part of the dress with the issue, that ought to the potential problem! I already had elastic thread on hand, I just needed to figure out how to use it.


 A while back I read on a blog a mention of using elastic thread to shirr things and I wanted to try it. I bought some elastic thread, then proceeded to do nothing with it. So, this week, after the idea popped into my head, I proceeded to read a couple of tutorials, then try out this new found skill. Only my Easter dress wasn't (and still isn't) ready to be shirred yet. So, I pulled this men's button down out of my refashion bin instead.


I bought a couple months ago to make my sister another tunic, like this one. I just hadn't gotten around to making said tunic yet. This shirt looked like a pretty good base for my first shirring attempt. I cut a new (huge) neckline, finished it with bias tape, then got down to business.


 I hand-wound my bobbin with elastic thread, then threaded my machine like normal, putting my elastic bobbin in just like a normal bobbin. I lengthened my stitch length to the longest it would go, then started sewing, around and around the new neckline.


It worked! The elastic thread gathered up the fabric just like it was supposed to! I sent regular, 1/4 inch, elastic through the bias tape to stabilize the neckline, did some shirring on the sleeves and at the waist, ran out of elastic thread, then I was done!


Less than two hours, one shirt, one cut, one spool of elastic thread later, my sister had a shirred, puffed sleeved, tunic top!


I can't believe I've never tried shirring anything before! It's so easy and the finished product looks amazing. I love how this tunic turned out, so pretty and famine, yet so easy to make. The puffed sleeves really complete the picture I think.


Now, I might just have to re-design the Easter dresses to showcase some more shirring! Oh, wait, the Easter dresses are already cut out, and mostly sewn together. It might be a little late to do any redesigning. Or is it?


We shall have to see.

Monday, March 21, 2016

WWI Nurse's Dress

It's crazy the amount of attention my purple plaid wool dress draws, even at historical events where there are lots of people in period clothing.  Last fall at an event, one gentleman was so impressed with my dress that he insisted I had to go talk to his friend, a World War 1 nurse who needed a dress. So, I went over to the WWI encampment to talk to the nurse. She did indeed need a dress and was looking for a seamstress. We spent nearly half an hour discussing exactly what she was wanting and looking at period photographs of nurses.


I gave her my name and contact information and went on, hoping for the best and already mentally planning this dress. Then, in January she contacted me, saying she was ready to have a dress made, and was I still interested in sewing a dress for her? Of course! I was excited!

I looked at picture after picture of WWI nurse's outfits, figured out my pattern, bought the fabric, set my dress form to her measurements, and got to work. I used Butterick B6229 as my base pattern, and picked out a 100% cotton broadcloth in light grey to make the dress out of.


I started by sewing the bodice. I flat-lined it in white muslin, added a white collar (thank you 80's pattern from my stash for supplying the perfect collar pattern), and made some slight changes to the cuffs. On the skirt I wanted to get rid of the center front seam and buttons, so I moved the button placket and seam to the left-hand side. This adjustment made a so-called dog-leg closure, a common feature in dresses from that era.


I measured the skirt, hemming it to the exact length my client requested, then emailed her a picture to say the dress was done and held my breath. What if the dress wasn't perfect enough? What if it didn't fit just right? What if she didn't like it? Well, as is often the case, all my worry was for naught. The dress was picked up yesterday and my client loved it! It (somehow) fit her perfectly! No alterations needed! She paid for her dress with a smile on her face, and thanked me several times!

I was a little afraid that making this dress for someone else would take away some of my enjoyment in sewing a historical dress, since I had to worry if it would live up to someone else's expectations, rather than just mine. In reality though, I enjoyed the researching, planning, and sewing just as much as I've enjoyed the processes with my own historical clothing. It's fun to figure out how clothing was made back then, and to reproduce it (to the best of my abilities) now. I enjoyed researching a period I've never ventured into before. 

My other fear was getting the perfect fit, without being able to do multiple fittings along the way. My client lives several hours away so coming every week for fittings wasn't really an option. Thankfully, this dress style could be somewhat forgiving in terms of "perfect fit" thanks to the gathered bodice, but I was still worried. I set my dress form to her measurements and measured each individual piece as I was sewing. It worked! The dress fit her perfectly!

I'm so happy that my first attempt at making a historical dress for someone other than myself was a success! I'm hoping to see the dress in action at some events this year!


Saturday, March 19, 2016

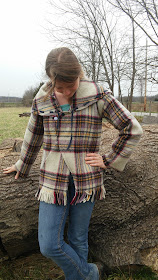
The Wool Blanket Jacket

I may have a bit of an obsession with wool fabric. It started a year and a half ago when I bought my bolt of purple plaid wool. After making a capelet out of my purple plaid wool last fall and lining it with what used to be a wool skirt, I've discovered what a great fabric source thrifted wool garments can be. Now no trip to a thrift store is complete with out a wander through the skirts to see what wool beauties I can find. Occasionally I find wool in other areas too, such as the linens. A month or two ago I happened upon this wool blanket.


It being all wool, and plaid wool at that, I couldn't leave it behind. What would I make out of it though? A couple weeks later I happened across this blog post about making a jacket out of a wool blanket. There, that is what I wanted to do.  A jacket, with an asymmetrical front closure. I sketched out my idea then got to work.


I started cutting up my blanket and draping it around myself. Yep, I wasn't going to use a pattern if I could help it.


I'm working on making myself less dependent on patterns. Sewing is fun for me because I can make it as challenging or as easy as I want it to be that day. I'm always learning, always trying to get better at my craft and master new skills. Currently that skill is draping and drafting my own patterns. With this blanket only costing me $4, it seemed like a good canvas for me to practice on.

The body of the jacket was was easy enough to figure out. It required about half the length of the blanket. The blanket was just wide enough to make the front and back of the jacket. I cut the front diagonal as I'd envisioned and cut slits for the arm holes. Looking back I should have shaped the arm holes more, but at the time I was trying to retain as much shoulder width as possible (commercial patterns are almost always too narrow through the shoulders for me.)


I stitched up the shoulder seams and tried it on, it worked! Next up, the sleeves.


I made two tubes from the other half of the blanket. I added a little bit of shaping to the sleeve head so that my sleeves would fit right, then sewed them on, attached the lining, made pockets, and added some buttons. In one evening I had a jacket done, and I wasn't overly fond of it. 

(sorry for the wonky mirror selfies, there was no one around to take pics for me)

The jacket needed something else, like a hood. Yes! That was it, my jacket needed a hood, or a shoulder cape-like thing. Oh! It needed a shoulder-cape thing that turned into a hood, just like on Simplicity 1254, a pattern I've admired several times but never bought. At that moment I was really regretting never buying that pattern, despite being tempted to many times. I had no idea how to make a cape thing that could convert to a hood thing. I searched for tutorials online. No luck. I considered waiting until Simplicity patterns were on sale again, then buying the pattern and finishing the jacket. Hmm, no. I really wanted to get this jacket done, and I'd come this far without a pattern, surly I could finish without one. So I took my scrap. . .


trimmed off the fringe. . .


and started draping the fabric around my shoulders. 


I had to piece together all of my scraps, but eventually, I had it! 


A cape. . .


That converts to a hood. . .


With the help of a drawstring woven through little button holes around the edge of the cape/hood.

The cape/hood was just what the jacket needed! I love it now!


The jacket closes with two buttons at the neck, and a third hidden button beneath those. 


I lined the jacket in a soft purple rayon I found at a thrift store.


The only thing a dislike about the jacket is how the pockets look. They work well, but they could look better. I have an idea of how to fix them, I just need to take the time to try my idea out.


Even with the less than perfect pockets, I've been wearing this jacket a lot lately. Giselle approves of it!


Speaking of Giselle, she has been growing like a weed and is quite friendly! I'm so happy to have this daughter of Sombrita.


Whenever I go out to the goat pen she runs over to say hi. I can't wait to see how she turns out as she grows!


A wool blanket to a snuggle-y warm goat-approved jacket. I can't complain about how this refashion turned out!


Wednesday, March 16, 2016

Kidding 2016- Done! (Katniss)

Katniss. Darned goat. She finally kidded. Before I get into that though, let me give you the back story. Katniss is loud, very loud. "Give me attention!" she screams every time she has reason to suspect a human is outside. Many times I have heard a goat crying as if something were wrong, only to run to the pen and find Katniss, perfectly fine. Another thing about Katniss, she only has three (yes just 3) hooves. "Why?" You ask, well, she hasn't always been that way, nor has she always been as talkative as she is now.


For the first 2 years of her life Katniss was a perfectly normal goat. A beautiful kid, a Grand Champion yearling at the County Fair , then a first freshener who had twin does and got them all cleaned up before I even got outside one snowy March day. A couple months after her first kidding, Katniss disappeared, just flat out disappeared. We walked the entire pasture looking for her. She was no where to be found. We search some more, still no Katniss. After two days we gave up and considered her gone. Part of the field was flooded at the time, so we figured she'd some how managed to get swept away by the flood (strange as goats avoid getting their feet wet at all costs and typically have enough sense to avoid flood water). A week and a half later Katniss appeared. She just limped into the lot one morning at feeding time. Imagine my surprise!

It looked like she had gotten something, most likely some sort of wire, wrapped around one of her back hooves. In the following weeks her hoof fell off due to having the blood supply cut off for those 10 days she was missing. To this day I have no idea where she was when she disappeared, but I'm very glad to have her back! Though no longer a show goat, Katniss is a very good brood doe, with some excellent bloodlines, so I keep her around.

Another thing about Katniss, It's nearly impossible before she kids to have any idea when she's gonna kid. I was saying "any day now" for three months last year! Almost as soon as she's pregnant, she looks pregnant, and by halfway through her pregnancy she's bagged up. Darned goat. I have had way to many interrupted nights of sleep thanks to having to check on her!

Finally last Wednesday, she kidded, bringing an end to my kidding season with twin bucks.


While most of the time she's very loud, while in labor Katniss is one of the quietest goats you ever saw. (which explains how we've missed two of her four kiddings) If I hadn't been outside Wednesday morning I never would have guessed she was in labor. She was acting normal, came with the other goats to eat and everything, just quiet. 


Then, when she was ready she just got down to business and had these babies, quiet as can be. Twin bucks. I would have loved a doeling out of her, but, I guess I can't really complain, because with three previous kiddings, she's only had one other buck. 


So, that concludes my kidding season, 10 does kidded, resulting in 19 live babies, 8 does and 11 bucks. I'm happy! (and very excited about the fact I no longer have to go outside at 2 a.m.to check on pregnant goats!


Friday, March 11, 2016

The Flowy Sleeved Dress

Once again, I found myself in the fabric section of Hobby Lobby when I went in for something else entirely. I stumbled across this remnant of printed cotton knit fabric, it appealed to me so I grabbed it and walked on to what I'd actually gone in to get that day.


When I grabbed this fabric I already knew exactly what I wanted to make out of it. Remember my shirt with half-circle sleeves I made a few weeks back? Well, my sister really wanted something with sleeves like that, preferably a dress. I only had a yard of this fabric. Surely, I could squeak a simple shift dress with half-circle sleeves out of that?  The dress though would hold so much more visual interest if I added a contrasting fabric. So I went on a search through my sewing room. I wanted a blue to match the larger motifs on the fabric. I dug looked through my fabric stash to see what I could find. I found a knit in the perfect shade of blue, but it was a slippery poly-knit, not what I wanted for this project. Next, I went through my refashion bin, nothing there. Finally, I headed to my closet. I found this shirt.


I'd had it since my freshman year of high school and haven't worn it in a couple years. It was nearly worn out. The shirt was the right color, and I wouldn't miss it if I cut it up. Perfect!


I used a simple shift dress pattern in my sister's size as my template, adjusting where necessary to make what I had in mind. The remaining fabric I cut into two half-circles for the sleeves. I had to piece together one sleeve due to the limited fabric amount. From the shirt, I cut a yoke for the dress and some other fun details.


The dress came together really easily and my sister loves it!


The flowy sleeves are her favorite part of the dress.


The deep v and the bow on the back of the dress are probably my favorite details.


I also really like the little ruffle on one side of the band at the bottom of the dress. I made the band by piecing together what was left of the shirt after I cut out the yoke. In order to get enough fabric for the band I had to cut into the ruffled neck band or make a narrower skirt band. I decided the little ruffle would be a fun, unexpected, detail on the side of the dress.


The dress came out a little on the large side, but that's ok. It's not way too big, so it just that means my sister can wear this dress for a little longer than she otherwise would. Hopefully it remains a favorite!


This dress came out a success, hopefully I can do just as well on the Easter dresses I need to make next week. Now back to sewing and baby goats I go!