Pages

Tuesday, June 26, 2018

Mocking Up and Cutting Out the 1890's Tea Gown

I made my apportioning rulers. I drafted the pattern. I sewed a mock-up. My long planned for 1890's, Professor McGonagall inspired, tea gown was going to become a reality!


Well, it would become a reality, after I perfected the pattern. It turns out measuring your own back length (nape of neck to small of back), all by yourself, does not produce very accurate results. Somehow, by doing this, I added over an inch to my back length. Then I used that too long measurement to make my back measure apportioning ruler. The result? My first mockup fit perfectly around, it was just much too long. It wrinkled horribly at the waistline and the skirt dragged on the floor.


The skirt length? That could be easily chopped and fixed. But the bodice length? That required some pattern alteration.


I pulled out my plastic pattern and folded an inch out of the bodice length, right above the waistline, on every single pattern piece. Then I made another mock-up.


Mock-up #2 fit better than mock-up #1, but it wasn't perfect. The center back length, from neck to waist, was just about right, but the side panels were still too long. So, I pulled out my plastic pattern again and folded another inch of length out of the side panels only.


That done, I made another mock-up, and it appeared that the third time was the charm!


No wrinkles this time!! The main tea gown pattern was good, and I could move on to perfecting the sleeves. Those took another 3 mock-ups. 


Eventually, I had a flounced sleeve puff thing that resembled the sleeves of my inspiration tea gown.


The very last thing I did to my pattern was make some minor alterations to the pleat arrangement on my under bodice pieces.


And with that, I could, at last, cut into my pretty silks and begin sewing my actual tea gown!


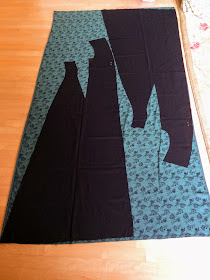
To give my tea gown the structure it needed, I flatlined the entire thing with black cotton broadcloth. The flat lining was the first thing I cut out, and it ate up an entire 8 yard bolt of black cotton!


After ironing and lint-rolling (black cotton is a magnet for wrinkles, lint, and pet hair!) each individual piece, I marked the "right side" of each one with a safety pin. (Both sides of the black cotton look and feel exactly the same.) I would be using my flat lining as the pattern to cut out my silk, so these safety pins would allow me to be extra sure I wouldn't cut out any pieces backwards. I didn't have enough of my green and black silk jacquard to make any cutting mistakes! 


When I bought the fabric in Malaysia, I didn't buy enough for a tea gown the first time I was in the fabric shop. I only bought 2 meters, and I had no specific plan for the fabric. Upon returning to my Airbnb with my purchase, I realized it was the perfect fabric for the tea gown I'd been dreaming of! I was going to have to go back to the fabric shop to get more! Well, it was a week before I managed to do that. When I returned to the shop, all that was left of my silk was a remnant that was a little more than a meter. So, I bought that and another silk jacquard remnant, that happened to be the same colorway, but a different pattern. Thus, when it was finally time to cut out my tea gown, I was just hoping I would have enough fabric. Thankfully, I did!


The front pieces fit on my 2 meter length of fabric. With a bit of piecing, the back pieces were able to be cut from the smaller length of fabric. The under sleeves were cut from the coordinating jacquard.  And finally, the train, over sleeves, under bodice, and under skirt were cut from my black streaked satin.


I kept the back cotton securely pinned to my silk until I attached the two layers together permanently using my serger.


Yes, using a serger is not historically accurate, but I was willing to sacrifice accuracy in this department. Serging the edges not only had the advantage of attaching the flat lining to the main fabric easily, it also finished the edges of my very fray-prone silk, before that could become a problem. I have no regrets about using my serger on this project. In the end, it made my fabric easier to work with and had no effect on the over all look of my tea gown.


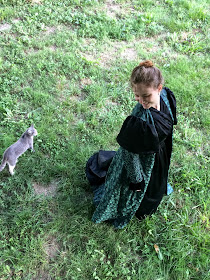
After nearly a year of dreaming, months of planning, three mock-ups, and some very careful cutting, I could finally construct my tea gown!

Monday, June 18, 2018

The Rabbit Costumes

The past two weeks have been insane. Costuming a children's play, while working full time, and also testing 3 different patterns at the same time is insane. Oh, and my last two goats decided to kid as well. I think I lost my mind - but hey, my sister got a rabbit costume out of the deal! (And I got 2 new baby goats, 3 new shirts, a new skirt, a new dress, and almost no sleep, but that's another story.)


Anyway, on to the costumes! The wonderful woman who has been directing the homeschool group plays for the past 10 years decided to do a children's theater camp this summer! For two weeks 25 kids would come to an all-day camp where they would play games, make crafts, have fun, and produce a play. This all culminated on Saturday when the kids preformed "The Legend of Mulan" for an audience.


Soon after deciding to do this children's play, the director approached me about costuming it, and I eagerly agreed! (Forgetting at the time that I would be working full time when summer rolled around.) So, at the end of May, auditions took place and the play was cast. The following week I began sewing costumes and theater camp commenced. In two weeks I would costume the 25 kids in an assortment of kimonos, tunics, and animal costumes. The animal costumes were by far my favorites as with those I could let my imagination run wild!


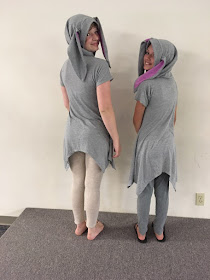
My sister and her friend were cast as rabbits in the play, and their costumes were surprisingly easy to make! (Which is good because I had less than one night to sew them!)


I decided to use the Beltaine Fires Tunic pattern as my base and add a belly, hood, and ears to make it look rabbit-y. As I just tested this pattern a month ago, and made several tunics from it, I knew the pattern would be a quick sew - even with the fun costume additions!


 I used a gray cotton jersey knit sheet as the main fabric for the costume base. The tunic front and back were each cut as one solid piece with a hanky hem and no waistband, color blocking, or pockets. The front neckline was cut extra high, almost as high as the back neckline, to accommodate a hood.


 The hood was made using Burda 6406. I added a front band to the otherwise basic 3 piece hood pattern so it would accomodate rabbit ears.


I self-drafted the ear and belly pieces and made those from a pink lycra-type fabric I found at Goodwill.


The rabbit costumes were surprising quick to make and looked absolutely fabulous on stage Saturday afternoon. Both girls hoppity-hopped across the stage and delivered their lines perfectly!


What good bunny rabbits these girls made! And designing their costumes was a ton of fun - even with a limited time frame!

Friday, June 15, 2018

Remaking the Brother's Favorite Patriotic Shirts

Back at the beginning of the year I decided I was going to make more clothes for my brother. I made him a camo jacket, and he loved it. Then I made him a flannel and corduroy shirt, and he was less enthused. So, at that point I set out to find something I could make him that he would actually like and wear regularly. Something that wasn't a jacket. Something he could wear year round. I decided to make him T-shirts. 


Yep, it sounds a bit boring, but really, T-shirts don't have to be boring, not if you have the right pattern at least. I needed a T-shirt pattern basic enough my brother would be comfortable wearing it everyday, yet interesting enough I would enjoy sewing it. This perfect pattern turned out to be McCall's 7486, a paneled raglan tee that just begged to be colorblocked. 


I bought the pattern on sale, then used it to whip up a black and camo shirt for my brother - and he loved it! So, the following week, I made him a few more in some other colors. Those too, he liked and wore! Success! I'd found the ideal garment to make my brother. My mind was  full of all the possible color combos I could make. Soon my brother's closet would be full of shirts made by me! Unless I got distracted with more pressing sewing projects. Yep, that's exactly what happened. After that initial run of shirts, I didn't get around to making anymore for my brother - Until I found a pressing reason to do so. I signed up for a blog tour to motivate me to sew more shirts for my brother.
So welcome to my stop on the Guys and Patriotic Vibes blog tour, hosted by Made for Little Gents!


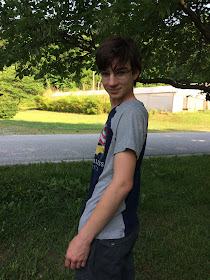
My brother had a couple of patriotic T-shirts he loved, and outgrew. As he talked of replacing his very favorite camo American flag tee an idea hit me - I could make him something out of his outgrown shirt. I could turn it into a shirt that would still fit him! I explained my idea to to the little brother and he agreed, presenting me with two of his favorite outgrown shirts, ready to be re-fashioned!


First I very carefully trimmed the neckbands off both shirts - I would re-use those on the new shirts.

Don'tcha love my fancy canned good pattern weights?
Then, I cut apart both T-shirts at the side seams. This allowed me to lay both the front and back out flat and fold them in half lengthwise for cutting. I carefully centered the pattern piece over the front design and cut the front panel of McCalls 7486 from the front of the original shirts. Once that was done, I cut the center back panels from the back of the shirts.


 Finally, the sleeves and side panels were cut from light gray cotton jersey knit flat sheet, and I got the shirts sewn up one evening after work.


When the shirts were done, I practically danced up to my brother's room to present them to him. I was thrilled with how the shirt refashion had turned out!


And, upon inspecting the finished product, my brother seemed pretty pleased as well. Now I fully anticipate seeing him continue to wear his favorite patriotic shirts for another couple of years at least. 

That is, unless he hits another growth spurt soon, as teenage boys are apt to do. Well, even if/when that happens, I can still rest easy knowing I extended the life of his favorite shirts a little bit.


And a little bit is better than none at all!

Guys and Patriotic Vibes Blog Tour hosted by Made for Little Gents 
Celebrate America with the rest of us! Follow along with the Guys and Patriotic Vibes Blog Tour hosted by Made for Little Gents by viewing each blog contributor below. 
Mon. June 4 | Family of Makers 
Tues. June 5 | Made for Little Gents 
Wed. June 6 | Paisley Roots 
Thurs. June 7 | My Sewing Roots 
Fri. June 8 | EYMM 
Mon. June 11| Ellie & Nels in Stitches 
Tues. June 12 | Custom Made by Laura 
Wed. June 13 | Our Play Palace 
Thurs. June 14 | Sew Cute Couture by Kathy 

Sunday, June 10, 2018

Making Apportioning Rulers ( For Patterning the 1890's Tea Gown)

Plan formed. Design picked. Fabric acquired. Next step? Finding a suitable pattern that could be used to make a reproduction 1890’s tea gown.


I had several ideas for this pattern. I could drape it. I could mash together a bunch of commercial patterns to get the general look I was going for. I could majorly alter one pattern. I could find a pattern online. Or I could look through my books of historical patterns, find one that resembled my inspiration tea gown, and size it up. I picked the last option.


I found the patterns I needed in “59 Authentic Turn-of-the-Century Fashion Patterns”. A reception gown design furnished the pattern pieces for the back, sleeves, and front overdress portions of the tea gown. A walking suit design supplied the pattern for the cross-over under bodice. The front underskirt was something I could easily draft myself. Thus, I was all set to go. Pattern drafting could begin!


The patterns in “59 Authentic Turn-of-the-Century Fashion Patterns” are laid out on planes. You start with a central point in the top right corner and measure down and out, marking specific points and then connecting the dots until you have a full - size pattern piece that matches the small one in the book. Now, there's only one issue. If you follow the exact measurements given in the book the resulting pattern will fit approximately a 29" bust - and that's a bit too small for me. Thankfully, there's actually a very easy way to size these patterns up or down. If you make the patterns using an apportioning ruler, the sizing should come out perfect!


So what is an apportioning ruler? Magic, that's what! Or at least, it feels like it.

Most of the patterns in the book give the instruction to "draft according to bust measure. Ok, great, but what does that mean? The patterns all seem to have a 29" bust, but I have a 38" bust. Do I just randomly add width where I feel it's needed, or what? To figure this quandary out, I optented for the 21st century method of problem solving - google. I searched for "How to use the patterns in "59 Authentic Turn-of-the-Century Fashion Patterns"' Right off the bat I discovered what I needed to draft this pattern was a 36" bust  apportioning rular. 

Apportioning rulers are rulers where 1" doesn't equal a true inch. Rather, it equals a little more or a little less than 1 real inch, depending on if you need to size the pattern up or down. So, for the purpose of my pattern drafting, I essentially needed a 38 inch long ruler that was divided into 29 equal sections. Each section would be an "inch". By using this ruler to make my pattern, I would get a pattern specifically drafted to fit my measurements, no grading up or down required! Now, for the next question, how could I acquire this fabulous tool?


Some Late Victorian/Edwardian pattern books contain apportioning rulers for the owners convenience. Mine, unfortunately, did not. Thus, I decided to make one for myself. First, I did some math. I divided 38 by 29. I got 1.3, which is approximately 1 5/16ths of an inch, or 2 5/8" for every 2 inches. 


So, I needed to make a ruler where every "inch" was actually 1.3 inches. Once I had this figured out I took scrap piece of paper and marked every 2 5/8" (as this was easier to measure than 1 5/16"). Then I want back and marked the halfway point between each set of marks. This gave me a piece of paper with several "inches" marked on the edge.


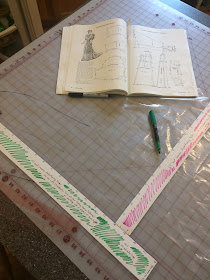
I cut a 2" (2 real inches, not apportioned) strip of posterboard to be my ruler. Using the scrap paper with my apportioned "inches" marked on it as a template, I marked those "inches" all down one side of my ruler.


Then I took a 1 "inch" piece of paper and folded it in 8ths. I transferred these 1/8th markings onto the first 2 "inches" of my ruler. (it would have been better to mark 8ths all along the ruler but I didn't take the time to do that)


And with that, I had an apportioning ruler, and I was ready for pattern drafting! Almost. I read on this blog that pattern drafting with apportioning rulers works best if you have two - one for your bust measure and one for your back (nape to waist) measure, otherwise your pattern may come out too long. So, I divided my back measure by the back measure marked on the patterns in the book (the ratio was smaller than the ratio of my bust measure divided by the book bust measure), and proceeded to make a second apportioning ruler.


I labeled and color coded each ruler so I wouldn't get them mixed up. Then, finally, I was able to start my pattern drafting!


I used the back measure apportioning ruler for all length measurements, and the bust measure ruler for all width measurements. In less time than I expected, (This pattern making system is actually ridiculously easy once you get the hang of it!), I had a fully functional tea gown pattern and I was ready to make my first mock-up!