When the fabric arrived. I immediately knew the black wool needed to be an 1840's dress. Never mind that I've already made two 1840's dresses, and one happens to be wool. Clearly I needed a black 1840's dress, something definitely inspired by Jane Eyre, in my collection as well. I began to get serious about historical costuming with an early 1840's project, and that era of dress still fascinates me immensely as I come back to it again and again.
With this decided, all I needed to do was figure out the style of gown my black wool would be made into. The style of my purple plaid wool dress dates from about 1838 through 1842, and is a prime example of the transition between the romantic 1830's fashions and the gothic 1840's fashions. My previous project is completely hand sewn from a single sheet. That dress is in the fan-front style, based on examples from the late 1840's. I was severely tempted to turn the black wool into another fan front gown, as I dearly love that style, but I decided it really needed to be made up in a style I hadn't yet attempted. Something new to me, but still quintessentially 1840's. I turned to my costuming books to figure out what that style would be. Other than the fabulous fan front bodice, what are some other hallmarks of 1840's fashion?
Some features of 1840's fashion include a basque bodice (pointed front waist), straight sleeves, a cartridge pleated skirt, and piping, lots of piping. I found a pattern for a dress featuring all of these elements, plus more, on page 164 of Cut of Women's Clothes by Norah Waugh.
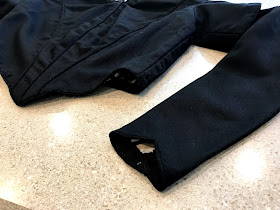
This early 1840's bodice pattern contained all the above features, plus a couple others which are rather specific to this decade as well. Front bodice seams which run from shoulder to waist (a feature seen both on day dresses and evening dress in 1840's but only on evening dresses through out the remainder of the century) and sleeves with a shaped wrist opening (What should I call this shape, an inverted point? An upside down heart?) rounded out this excellent specimen of an 1840's dress bodice - just what I wanted for my black wool, Jane Eyre inspired, evidently gothic, early Victorian dress.
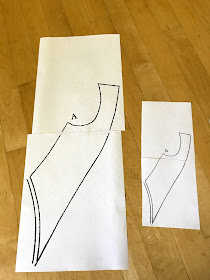
With the design dating just after the era of my purple plaid wool dress and just before the era of my fan front dress settled on, I got to work. First, I sized up the pattern diagrammed in Cut of Women's Clothes 800% on my copier. Not necessarily the most precise method of sizing up patterns from books, but it worked.
Then I measured the pattern and compared it to the scale in the book and found it to be about 90% of the size it was supposed to be. I decided this was close enough to full size for me to be able to successfully grade the sized up pattern out to my measurements.
I used the slash and spread method of grading to get the pattern pieces to the correct size for me. Then I made a mock-up, which fit surprisingly well for a first try!
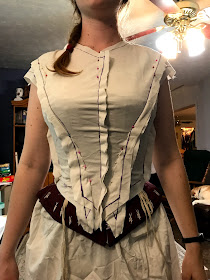
After trying on the mock-up over my corset, I made a few alterations, and then a second mock-up.
After a few more minor alterations, I cut a final mock-up out of what would become the flat lining of my bodice, just to triple check my pattern was good to go before I cut into my black wool. With only 5 yards of wool, I didn't have much extra fabric for making mistakes!
I messed around with my sleeve pattern a bit more, then I was ready to go - to Japan.
That's right - this project was coming with me to Japan! I would be hand sewing this dress, which, in addition to being historically accurate, is a very travel-friendly occupation. The day I was to leave, I hurriedly cut out the bodice and packed the pieces, along with a sewing kit meeting TSA regulations, in my carry on. I began the dress by sewing the piping as I waited at the airport for the first flight of the trip.
Over the course of the next two flights and one layover, I succeed in making all the piping and basting together the wool and flat lining for all the bodice pieces. Once I arrived in Japan I was ready to begin constructing the bodice.
Thus that is what I did during my spare time over the next two weeks. During my down time at the church, on long bus rides, and on the flight back home, I sewed. By the time I got home, the bodice itself was constructed. I was ready to do a fitting, then set the sleeves and finish the bodice with piping around the waistline, neckline, and sleeve cuffs, add boning, and closures. (I'd actually meant to add the boning and boning casings while in Japan, but I'd forgotten to pack the cotton ribbon for the casings and the boning itself.)
The bodice fit!! So I went ahead and finished it up. Honestly, finishing the bodice took longer than the actual constructing did. (Probably because I was home by this point and distracted by other projects.)
I'd intended to finish this dress for the Historical Sew Monthly June challenge - favorite technique, as the finished dress will feature my two favorite historical sewing techniques, piping and cartridge pleats. (These are the features of 1840's dresses which draw me back to this decade time and time again.) However, that did not happen, as I didn't get around to finishing the bodice itself until mid July.
Having missed the end of June deadline, I then intended to finish the dress by the end of July for the Historical Sew Monthly "Unexpected Feature" challenge. Then I wound up making the skirt way more complicated than any 1840's dress skirt I've ever made before, so it wasn't done by the end of July either.
Full details about why this project would have qualified for the July challenge, and all the complicated-ness of the skirt, will be in my next blog post about this dress.
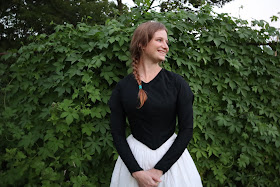
Meanwhile, let me leave you with some pictures of the finished bodice. No, when we took these pictures I had not yet finished sewing on all the hooks and eyes down the back.
Rest assured, all closures are now sewn on, and the bodice generally fits well - not too tight, or too loose.
The one exception to this statement would be the sleeves, which are very nearly too tight in the forearm. I may go back and let those out a hair.
The upper sleeves however, and the short over sleeves, called "jockeys" according to the Norah Waugh book, are just fabulous.
A solid black dress could be considered plain, but these sleeves definitely keep it out of that territory! Now please forgive the cat hairs. . .
Our quick "lets run outside and take pictures of this bodice because I have it on right now for a fitting" photo shoot, began with this. While adorable, it turns out a black wool bodice and a pale gray cat don't actually mix that well. . .
Now, onto actually finishing this dress!
As, at the time of writing this post, the overly complicated skirt is still not fully attached to the bodice.
Good luck you say? Well thank you, I will need it! (And a good thimble, but more on that in a future post!)


Sewing by hand is very relaxing and I love it. I've learnt a few sewing expressions ... Of course, I am very courious about the skirt. Can't wait to see it here. Regula
ReplyDeleteIt's so relaxing! The more I sew by hand, the more I enjoy it!
DeleteLooks great! Nice fit. I love the detail of the cuff shape!
ReplyDeleteBest,
Quinn
Thanks! The cuff shape is one of the things that really drew me to this pattern :)
Delete