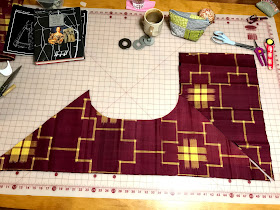
Now, this magenta and yellow slubby silk with a cross-hatch pattern really isn't historically accurate for the early 1800's in the western world. Among other things making the fabric rather historically inaccurate, Japan wasn't even opened for trade with the western world until 1853, 50 years after the era of the garment I wanted to make. So, yes, Japanese silk. The year 1801. Technically they don't work together. But did that stop me? No, and I don't regret it one bit!
I brought home the silk with a vague idea in the back of my mind about what I wanted to make from it. I began by looking at Regency era fashion plates and extant garments online to see if I could find something close to the idea I had - and I did!
Saved to one of my Pinterest boards I found this 1804 fashion plate. The yellow sleeveless spencer jacket thing was exactly what I had in my mind!
 |
| Source |
For the bodice of the garment, I decided to adapt the drop-front gown bodice lining pattern from Patterns of Fashion 1, by Janet Arnold, which I'd used to make my Regency gown 3 years earlier. As I'd already altered these pattern pieces to fit me and used them successfully in a previous project, I decided to just skip the mock-up and go straight to cutting out the final garment. Amazingly, this worked out fine!
First I cut the bodice lining from the same pink striped linen/cotton blend shirt I'd used to line my turban cap with. (The fabric from that old shirt is now completely used up!) As I wanted the front of this sleeve-less spencer jacket type thing to fasten right under my bust, I lowered the front neckline considerably.
After I cut out the lining from the linen, I cut out the silk from the same pattern pieces.
The bodice front pattern pieces were a bit too big to fit on my narrow silk, so I had to piece together the front pieces. No big deal - piecing together narrow fabric to cut out large pattern pieces is period accurate!
I didn't use any pattern for the skirt section of the garment. I formulated a rough idea in my mind of how the skirt panels must be shaped based on how the skirts lay in the fashion plates, measured a couple things, then cut right into my silk.
The back skirt is cut almost like a triangle with a half circle cut out at the waistline. The side seams are cut on the bias, at a 45 degree angle, to get those delightful "points" which I fell in love with in the fashion plates. The front skirt panels are cut as straight widths of fabric with no shaping except for the side seams, which are cut at a 45 degree angle for the points.
On the finished garment I'm very pleased with how the back skirt turned out, but I do wish I'd patterned the front skirt differently and given it more shape. Oh well, it turned out well enough and I can't be bothered to change it now.
I sewed together all the main pieces by machine, then took the garment with me to Uganda and finished up all the hand sewing on that trip.
Before I left I pressed under 1/4" around all the edges of both the lining and the silk. While I was gone I slip stitched the edges together.
 |
| Sewing away a layover on my way to Uganda. |
The skirt didn't require hemming as I'd cut the bottom edge on the selvage to save myself the bother. I did, however, have to narrowly hem the edges of the front opening. That went pretty quick.
With the construction done, I moved on to the trimmings - tassels, made from silk thread, to attach to the points!
I made the tassels and attached the tassels, and then, 3 nights into my trip to Uganda, the thing was done and wearable.
If I'd realized how quick it would go together I would have hand sewn the entire thing on the trip rather than machine sewing the long seams before leaving!
The one thing I didn't get done on my trip to Uganda was add some sort of fastening to the front overlap. I just couldn't find any buttons or anything I liked for this project!
Thus, for the time being, I opted to skip the fastenings. I wore the newly finished garment safety pinned closed in the front to my sister's birthday party the day after I returned home from Uganda. It worked.
Safety pins and all, I love how this thing turned out! It was just the thing to dress up my plain white regency gown!
Fabric bought in Japan. Design based on French fashion plates. Sewn in Uganda. Worn in America. What is this thing actually?
Is it a sleeveless spencer jacket with a skirt? A waistcoat? A short open robe? Well, according to the French description on the 1801 fashion plate, helpfully translated for me by a friend in the Saint Louis Georgian Sewing Society, the technical name is "A Tunic with Points".
So there you go, this trans-continental garment is a Tunic with Points - and I love it!


Simply lovely! Thanks for sharing this!
ReplyDeleteThank you! I'm glad you like it!
DeleteLooks great! It's fun to see an unusual garment recreated. :)
ReplyDeleteBest,
Quinn
Thank you!
Delete