Pages

Wednesday, November 27, 2019

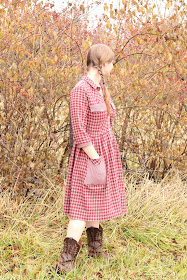
A Country Christmas Collared Shirt Dress

I don't know about you, but when I think "Christmas Dress" I recall the velvet, taffeta, and satin confections of my childhood. Oh how I loved my Christmas dresses! I'd wear my new dress for Christmas, then just about every Sunday after that for the rest of the winter. Christmas dresses were the best dresses.


Now this year I do have plans, well dreams really, of a truly spectacular Christmas dress which would make my childhood self jump with joy. There are only a couple issues with this plan. First, I don't know if I'll have time to actually get it done. Second, this fabulous dress would be a bit, umm, much to wear to most Holiday festivities I will find myself attending this season. For these reasons, I decided to join the Winter Wear Designs Holiday Blog Tour and make myself a more casual Christmas dress to start the season off with.


I picked the "Collared Shirt Dress" pattern for this casual Christmas dress, decided I wanted to make it in maroon to be properly "Christmasy", and set about raiding my fabric stash for the perfect maroon fabric.


Well, it turns out there's not a lot of maroon to pick from in my fabric stash, so I choose the one piece of maroon fabric I thought might just be long enough to make a dress from. A maroon plaid homespun cotton I picked up at Goodwill a year or two ago. And just in case there wasn't enough of this plaid homespun to make a full dress from, I found a yard of a second maroon homespun deep in the recesses of my stash. This one was a gingham, which I thought might accent the larger plaid nicely.


Pattern picked, fabric sorted, I was set to sew the dress. For once I intended to sew the dress exactly as the pattern recommended. No alterations, except to do my standard broad back adjustment for fit.


As you probably already know however, I'm really, really, really, not good at just sewing a pattern exactly as it's written. Once I pick a pattern, the creative part of my brain takes over and I think of all the ways I could change the pattern. And, more often than not, once I finally sew the pattern, I've added my own twist to it.


This particular pattern is only supposed to have a button placket on the bodice, none on the skirt - and that's exactly how I was going to make it! Until I saw a beautiful, plaid, 50's inspired, full button shirt dress in one of the vintage sewing groups I'm a part of on Facebook. Once I saw that dress I decided I wanted a 50's inspired shirt dress with a full button placket all the way down the front. Thus, my dress got a full button placket, and I cut my two skirt panels a bit wider than the pattern recommended (the full 44" width of the fabric, really) to get more of a 50's silhouette.


Soon after the full button placket was a decided fact, the idea struck that it would be cute to add patch pockets to the skirt to coordinate with the patch pockets on the bodice. So, I made a set of large patch pockets, and onto the skirt they went.


The finally alteration was to the sleeves. I decided I didn't want to be bothered making sleeve plackets and proper cuffs, so I widened the sleeves slightly, cut them at 3/4 length, and finished them off with a narrow bias cut "cuff"


In the middle of sewing the dress, I started to worry. Between the two different plaids, the homespun texture, and the patch pockets on the skirt, I was afraid I was making a dress which would look horribly "countrified" and "cutesy". Countrified and cutesy were not what I was aiming for!


By the time I started to worry about this however, I decided I was already in much to deep to stop. So I finished the dress. I tried it on. I looked in the mirror.


I breathed a sigh of relief. 

Sorry for the closed eyes - but look how well Maisy is looking at the camera!
It wasn't near as bad as I was afraid it would be! I actually liked it! I found my new casual Christmas dress to be sweet and a little vintage looking - and I can't wait to get a ton of wear out of it this holiday season!


Of course there is one thing I would change about this dress - but there's always something. As I chose to cut the center front panels on the bias, I was worried they might stretch out of shape before I got around to attaching the button placket. So I stay-stitched the center front edge as you are supposed to do with edges in danger of stretching out of shape. Unfortunately, my stay stitching gathered up that center front edge slightly, and I didn't realize this until after I'd attached the placket and sewn all the button holes. At this point I was not going to be bothered to go back and fix it. Thus, the center front of the bodice pulls upward. It's not a pretty situation, but I can live with it.

  
Bodice pulling and all, I still, really, really, like my new Christmas dress!


It may not be taffeta and velvet, but it will sure get plenty of wear this Christmas Season!


I hope you have a joyful, non-stressful, start to your holiday season! Happy Thanksgiving!


Don't miss out on any stops along the tour:


November 25


November 26


November 27

Alyssa of the Sewing Goat Herd


November 28

Patricia of Sew Far North


November 29

Livia of Liviality


Monday, November 25, 2019

The Orange Linen Dress

After making and wearing my dress for the Renaissance Festival, I decided I needed an orange dress for modern wear in my closet. Orange was a color I'd more or less ignored until this point. I had no orange clothing in my closet, and very little orange material in my fabric stash. It wasn't a color I thought I looked good in, or even liked. The orange wool Ren Fest dress, however, changed that opinion somewhat.


After the Ren Fest, I discovered some shades of orange were quite delightful, and I needed to add orange to my wardrobe. I had a gift card to Stonemountain and Daughter Fabrics burning a hole in my pocket, so I decided an orange fabric for a new fall dress was exactly what it needed to be used for.


I won the gift card back in April with the "Sew Bibs" Instagram challenge. I'm unaccustomed to winning anything in these online challenges/contests, so it was quite surprising to receive an email informing me I'd won one of the "Sew Bibs" prizes!


I hung onto the gift card for months, trying to decide what I wanted to use it on. Every couple of weeks I'd scroll through the Stonemountain and Daughter website to see what caught my fancy. There were so many pretty fabrics to choose from so I was afraid of making the wrong decision! I knew I wanted to use the gift card to get a special fabric - something I couldn't get locally - and I decided it would probably be best for me to wait to use the gift card until I had a specific project in mind.


The orange dress idea qualified as a "specific project" so I decided to see what sort of orange fabrics were to be had on the Stonemountain website. After looking through page after page of fabrics, I found the perfect orange material. A beautiful linen woven with green threads running one direction and orange running the other direction, so the color looked different depending on the angle you saw it at. It was different than any other fabric I'd seen before, and appeared to be a delightful, interesting, shade of orange on my computer screen, so I went ahead and ordered three yards of it.


When the fabric came it was just what I'd hoped it would be! My orange dress plans were ready to take shape!


I decided to use Simplicity 8916 to make my orange dress, and add sleeves to it (since I wanted a fall dress) using Simplicity 8506, view F.


When I initially saw Simplicity 8916 in the pattern book it did not appeal to me at all. The sample dress fits the model horribly, making the whole dress just look blaaah. I passed the pattern by without a second thought. Then someone in the McCall's and Simplicity Patterns Facebook group made the pattern and shared a picture of her finished dress. It fit her beautifully, completely changing my opinion on the design! I picked up the pattern at the very next pattern sale.


Now I knew the pattern would not fit me well right out of the envelope, so I went ahead and did a full bust adjustment first thing. I should have then made a quick bodice mock-up to make sure I'd added enough room to the bust and everything fit correctly, but I didn't. I went straight from pattern alterations to cutting out my final dress. As a result, the bodice fit isn't quite right, I should have done a larger full bust adjustment. Oh well. The fit isn't great, but it's decent enough I'll still wear the dress.


The other pattern adjustment I needed to make was for the sleeves. The sleeve add-on pattern comes with an armscye template to trace onto what ever bodice you will be adding the sleeves to.


I traced the new armscye onto my dress front and back bodice pieces and that was it. The sleeves went on easy-peasy!


My very favorite design feature of this dress is the closure method. It wraps across the back and ties in the front, making the fit very adjustable.


I have a soft spot for dresses which wrap across the back rather than the front.


Rather than knotting the ties in the front, I decided to fasten them with a slide buckle from my stash. A knot just felt too bulky, and I appreciate the interest a buckle adds.


The bodice is lined with a robin's egg blue cotton lawn, and the full circle skirt is finished off with robin's egg blue lace hem tape.


So, all-in-all, what do I think of my orange dress? Well, I love the color and the fabric. The fabric was definitely worth using my gift card on!


As for the pattern, I like the overall design, but I'll definitely make a few more fit adjustments if I use it again. It needs a larger full bust adjustment and I'd want to add a couple inches in length to the bodice as a whole so the waist actually hits me at my natural waist rather than at the bottom of my rib cage.


And that is my orange linen fall dress - the first orange dress in my closet, but not necessarily the last!

Saturday, November 16, 2019

A Wrap Top for Getting Ready - Butterick B6285

I finished all the sewing I needed to do for my brother's wedding on Thursday. The wedding was on Sunday. That's right, I completed all necessary sewing several days in advance, no last minute sewing for this event!


On Friday I felt somewhat at loose ends with no wedding sewing to do! As I was thinking through what I should do with my new found free time, I realized I needed a shirt to wear while getting ready on Sunday. Something that would not need to be pulled off over my head when it was time to change into my bridesmaids' dress.


Sunday morning I needed to be at the wedding venue bright and early to get my hair and make-up done. Now I could have just worn a button-down shirt for getting ready that morning, but I don't like any of my button down shirts. None of them fit right. All are either too tight in the shoulders, or too tight in the bust, or both, and too big everywhere else. Very annoying.


And thus, on Friday afternoon, I decided I might as well make myself a shirt, which wouldn't have to be pulled over my head, to wear on Sunday morning. When I got home from work that evening I looked through my pattern collection to see what struck my fancy.


I decided the wrap top from Butterick B6285 would suit my purposes well, so I picked out a fabric from my stash, threw it in the washer to prewash, and cut out the pattern that night.

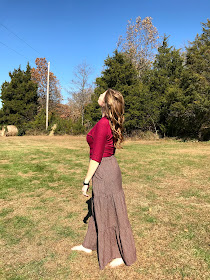
Arg, very bright, blinding, sunshine!
On Saturday, in between other necessary tasks, such as running errands and helping my sister with photo booth props, I leisurely cut out and sewed the shirt. By evening, I had a brand new wrap top.


Most knit tops are pretty quick and easy, slap-dash, affairs. This one, however, required construction methods more often seen in woven garments, such as darts, a full lining, and a bit of hand sewing to finish up. It was still a rather quick and easy top to make, the finished top is just "more" than I would expect a simple knit top to be - and I quite like it!


As this top is fully lined, it requires a *bit* of fabric - right around two and a half yards. Most of the cuts of knit fabric in my stash measure 1-2 yards, so this could have been problematic. However, I currently have such a scarily large fabric stash (Must. Not. Buy. Any. More. Fabric.), it turned out to be a non-issue. I had a 4 yard cut of a light weight magenta sweater knit (a 4 yard for $4 bundle obtained from Wa-lMart), which I decided would work for this top. It is very thin sweater knit, so doubled up it was the perfect weight for a late fall top - warm and snugly on that chilly November morning, but not too heavy. 


The back of the top is shaped with waist darts, giving a nice close fit, and there are no shoulder seams on this garment, just side seams and a center back seam. All the seam allowances are hidden between the two layers of fabric, so both the inside and the outside of the top look exactly the same. It could be fully reversible if you used two different fabrics.


My only complaint about this top is how short it is. I was not expecting it to be this short! Even with my highest-waisted skirts and pants the hem of the shirt doesn't meet the waistband of the bottoms. Thankfully, I can wrap the extra-wide waist ties of the top a bit lower than the hem of the top to make up for the length deficiency, but, if I make this pattern again, I will definitely be adding a few inches of length to the hem!


Will I be inclined to make this top again? I don't see why not! The neckline doesn't gape at all and feels very secure, something not always guaranteed with wrap tops. Even with the full lining it doesn't take long to sew up, and it really does give the most beautifully finished end garment. I really do want to try making a reversible version I think! 


My spur of the moment, lets make one more thing before the wedding, top turned out almost better than I expected! It was perfect for wearing to get my hair and make-up done that morning. No regrets, what so ever, about not just pulling an old button-down out of my closet for the occasion.


And a big thank-you to my friend Erentry for coming along early the day of the wedding to help set up, and allowing me to drag her outside into the blinding sunlight to photograph my new top and my hair in its freshly curled glory before I changed into my bridesmaids' dress!


Wednesday, November 13, 2019

There Was a Wedding

We added someone new to the family a few days ago.


My little brother got married last weekend.


The bride was stunning, the groom was handsome, the day was beautiful, and the couple seemed pretty darned crazy about each other.


The wedding day dawned sunny, warm, and beautiful - perfect for an outdoor fall wedding! The following day was icy cold and very snowy - Thank God that weather didn't appear 24 hours earlier!


The past few months have been a blur of wedding preparations. 


My sewing room was overtaken by all the wedding clothes in the two months leading up to the big event!


I altered the wedding dress and made the bridal veil for my new sister-in-law. On her wedding day the dress fit her beautifully and she looked like a princess. My brother cried when he saw her.


I made my mom's mother of the groom dress, 


And I thought she looked pretty darned spectacular on the wedding day as well.


My mom and I worked together to alter my sister's pretty floral dress for the wedding.


My mom hemmed the dress and I made a matching capelet to cover my sister's shoulders just in case the November day proved too cold for wearing a strapless sleeveless dress.


And finally, I made my own bridesmaids' dress - finished the week of the wedding.


The idea of making my own bridesmaids' dress was much less stressful than the idea of shopping for such a garment - so no regrets there!


All in all, everything went very well on the wedding day, and I couldn't be happier for my little brother and his wife! They are off on their honeymoon, and I'm recovering from the craziness of the last couple months - slightly at loose ends now that all the wedding sewing is done! 


For now I'm enjoying sewing whatever the heck I want, before I take on any more projects with deadlines. And, once I have access to the good pictures taken on the wedding day (rather than just my cell phone pictures), I'll blog a bit more in depth about most of the wedding-related sewing projects I did.


But for now - Congratulations to my brother and new sister! I'm beyond happy for the two of you!