I came away that afternoon with several costume patterns and modern patterns, but the crowning jewel was several vintage, un-printed, mail-order patterns from the 1940's. (I think. None of them actually have dates on them.) Now, I'd never actually used a vintage un-printed pattern before, but I was excited to give it a go! Unlike modern patterns, which generally come on large sheets of tissue paper, with several sizes printed on them so you cut out the size you need, these vintage patterns came with one size per envelope. The pattern pieces came already cut out, and there were no ink markings on them. Instead, each piece was marked with different perforations and notches telling what each piece was, what the grain-line was, and where darts and tucks and such were to be sewn.
Of course, it took me much longer to get around to actually using these patterns than I'd hoped it would. Fall came and went, and the entire winter passed before I finally pulled the pretty blue vintage pattern box off the closet shelf to pick a pattern from. What induced me to finally use one of these patterns? The gift of 3 yards of lovely cotton a friend brought me from Japan.
On a mission trip to Japan last fall, this friend went fabric shopping, and picked out 3 beautiful lengths of fabric for herself, which she commissioned me to turn into dresses for her at the beginning of the year. Along with her dress fabrics she also picked out a nice navy Japanese cotton for me. As soon as I saw it, I knew this fabric needed to be used with one of my vintage patterns! So, once I completed my friend's dresses, out came the un-printed patterns for me to pick from. The first pattern to catch my eye was the one pictured above, with a button-up bodice, what I think is a winged collar (yeah, I'm not very familiar with the names for different collar styles), and beautifully large external pockets. This pattern happened to be in my bust size, so I thought it would be a good one for my first attempt at using an un-printed pattern - no re-sizing required!
When I had a couple free evenings to spend actually making this dress, I pulled out the pattern and was delighted to find that it was complete - all the pieces were accounted for. (With the exception of the back neckline facing, but that was easy enough for me to re-draft.) It was fun to examine the pattern pieces and learn a bit about the original owner of this pattern. She must have been a rather petite woman, as several inches of length were pinned out of each skirt panel. As I'm not exactly petite, I unpinned the pieces and smoothed out the folds. I wonder how long those pins had been in this pattern!
Pattern pieces ready to go, I cut out the dress with no alterations, then sewed it together. It proved to be a rather quick and easy sew. I finished it in about 3 evenings.
When I tried on the nearly finished dress to check the skirt length and figure out button placement, I found it to be a bit too big in the waist. So I added an inverted box pleat at the center back to take it in a bit.
This pleat looks like it was always supposed to be part of the design, and greatly improves the overall fit.
For a little extra something, I decided to trim the pockets and collar of my dress with some daisy trim from my stash.
To match the white trim, I picked white buttons to close the bodice with.
I had one card of 3 of these buttons, which I picked up at a flea market a couple years ago. Just the perfect amount for this project!
The dress was finished off with a cloth belt.
I found a silver buckle of about the right size in my stash and used flower shaped eyelets to match the daisy trim.
And once those eyelets were pounded into place with a rubber mallet, my dress was done and I immediately tried it on.
I loved it!
The fit is perfect.
The dress is comfortable.
And I really like the over all shape!
This dress has no darts - which is really nice.
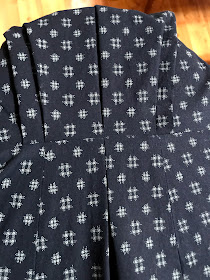
Instead it's fitted with tucks at the waist in both the front and the back.
And there is a tuck across each shoulder as well.
I'm excited to now get to wear this beautiful fabric my friend brought me back from Japan!
I was pleasantly surprised by how quick and easy this project wound up being.
I wore this dress all day the day after I finished it.
And I think I might just need to make a couple more dresses from this pattern.
It's both pretty and practical - and dresses don't get much better than that!
Though perhaps I ought to try out a few more of the vintage patterns in my stash before making any repeats. . .


Super cute! It's a lovely match for the special fabric you used, too.
ReplyDeleteBest,
Quinn
Thanks!
DeleteOH MY MY!!! THAT is just FANTASTIC, your blog is informative and interesting, your dress is AMAZING, thank you for taking the time to share!
ReplyDeleteThank you! I'm glad you appreciated my post!
DeleteWow..it's beautiful. I love the lace details. Looks really elegant. I came across your blog from FB group, btw :)
ReplyDeleteThank you!!
Delete