I returned home after my quarantine and my sewing room had moved.
I got home and immediately started carrying stuff downstairs and setting up a nice, workable, sewing space. My dad and brother had already moved my pattern dressers to the basement for me, which was a huge help! Down went my sewing table, sewing machine, and books. Down went a filing cabinet for patterns in large envelopes, and my ironing board. Down went my closet and costume accessories. A day in I wore myself out and had to take a long nap, but I was back at it that evening and the following morning. Then I wore myself out again and had to take another long nap. At this point I decided to slow down a little bit so I wouldn't have a corona virus relapse.
As I slowed down and looked around my new sewing room, I noticed a pattern on top of my pattern dresser that hadn't been put away yet. It was a 1970's unfitted dress pattern with angel sleeves. Every time I was in my new sewing room it seemed to be calling to me "make me! make me! make me!". Now, I could have just put the pattern away in the correct drawer and solved the problem here, out of sight, out of mind, but I chose to go a different direction.
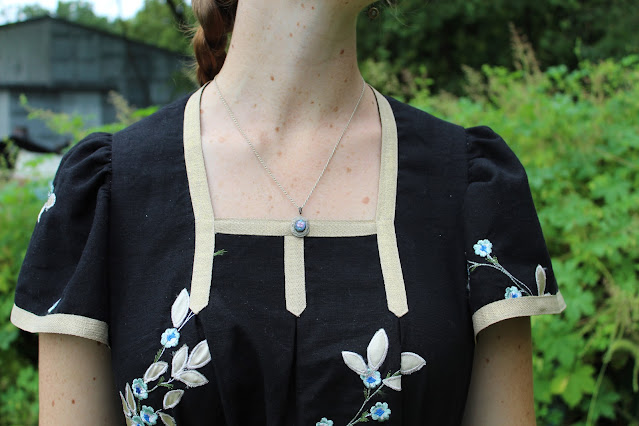
After a couple days of this pattern calling to me from the box on top of the dresser, it suddenly struck me that I could use a very particular fabric for this dress. (One advantage of moving your sewing room, you get reacquainted with your fabric stash!) Nearly 3 years ago I acquired just shy of 3 yards of a beautiful embroidered linen from a "fill a bag for $5" bin at a small Amish store. This fabric has been begging to become a dress ever since, but what sort of dress could I make from under 2 yards of 50" wide fabric???
After a couple days of staring at this old Simplicity pattern every time I stepped foot in my sewing room, I began to suspect it might just work with my long hoarded 2 yards of embroidered black linen. A quick look at the back of the pattern envelope confirmed my suspicion. It would be tight, but with a bit of finagling it ought to be doable.
The single-sized pattern was actually a couple sizes too big for me, so I was able to remove a couple inches of width from the center front and center back, which saved me some fabric. I added a center back seam, rather than cutting the back on the fold, shortened the sleeves a touch, and scrapped the tie belt idea entirely. With all these minor alterations all my pattern pieces fit on my limited amount of fabric and I cut out my new dress! From the scraps I cut a pair of patch pockets.
So yes, I took a bit of a break from moving my sewing room to do a bit of sewing in my new sewing room. I justified it by saying I needed to check and make sure everything I'd already moved was arranged in a way cohesive for sewing.
I cut out the dress one morning, and started sewing it. I went to work that afternoon, came home, milked goats, ate dinner, then went back to sewing. By the time I went to bed that night, the dress was done!
The pattern called for trimming the dress with bias tape. Plain bias tape just didn't "fit" with the embroidered fabric I was using, so I decided to use some metallic twill tape from my stash instead.
It pairs nicely with the shiny embroidery on my fabric!
To tie in my added on patch pockets (Because all my dresses must have pockets!!), I trimmed them with some of the metallic twill tape to match the neckline and the sleeves.
I considered using the twill tape to make a matching belt as well, but after trimming the dress I only had about 6" of tape left from my original 3 yard roll, so that wasn't going to happen.
Instead I decided to pair the dress with the belt from my map dress, and in the end I think that was a better choice than a shiny belt would have been. With the embroidery and the shiny twill tape, this dress needed a little toning down.
It's definitely different in both silhouette and material than my standard style, but I really like this dress!
It was a nice quick and easy project to get back into the swing of things at home and test out my new sewing room.
I wore this dress the day after I made it, and my sister took pictures for me.
I was a little worried the metallic twill tape on the sleeves and neckline would be itchy, but after wearing this dress all day I didn't find that to be the case. Yay for non-itchy sparkles!
I'm glad I decided to make this dress rather than ignoring this pattern's call. It's a fabulous fall addition to my wardrobe, and I'm thrilled to finally get to wear this fabric after 3 years of it languishing in my stash!


Wow. Sewing demon! Or maybe sewing queen! You look great and I love the style and colour in you!
ReplyDeleteFabulous pattern & dress, truly classic.
ReplyDelete