Pages

Friday, November 20, 2020

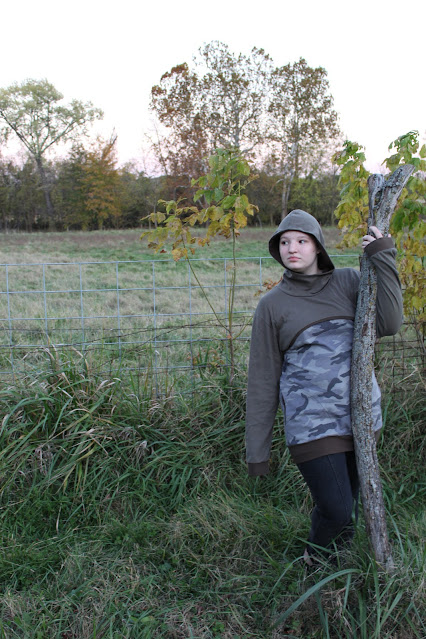
No Armor, Only Cozy Camo

Well, my brother was supposed to be the recipient of two new hoodies last month when I tested the newest Mother Grimm pattern. But things changed. 


My sister now has a new favorite hoodie. 


It doesn't have armor, but, judging by the amount my sister has worn it in the past month, it is super cozy.


When I signed up to test the Sir Gwalchmai Knight Hoodie, I agreed to make two different versions of it. One with armor, and one without.


First, I made the armored version for my brother. He loved it and I immediately got pictures of it. Then, my brother got quarantined at school. He would not be around to model the non-armored version of the hoodie.


After talking with my brother on the phone, asking how he was feeling, inquiring about how quarantine was going and if he needed anything, I mentioned the hoodie I was supposed to be making him. I asked if he really wanted a second hoodie. He told me he was beyond pleased with his armored hoodie, and didn't think he needed a plain hoodie right now. After an armored hoodie, everything else kind of falls flat. Thus, I moved on to my next sibling.


I told my sister all about the hoodie I'd been meaning to make my brother, and asked if she wanted it instead. 


That was a yes.


The body of this hoodie is made from a lightweight camo french terry I found in the remnant bin at Hobby Lobby a while back. 


The top of the hoodie, including the hood, and the sleeves, is made from an olive green interlock, bought as a pre-cut at Wal-Mart and left over from the Mahina Cardigan I made myself last year.


The piping, hood lining, pockets, cuffs, and bottom band are all made from cotton-spandex jersey. I ordered this "Olive Green" solid with a lot of other solid colored jerseys to make baby clothes from. When the fabric arrived it was a lot less green, and more brown, than I was expecting. This green-ish brown did not at all appeal to me for making baby clothes. Thankfully, it looked pretty decent with the camo french terry I was using for the hoodie, so I was able to use it anyway and keep it from lurking too long in my stash.


And that is the story of my sister's newest hoodie.


Things didn't exactly go as planned, but I think they turned out even better!


My sister loves and wears this hoodie way more than my brother would have.


And, she looks absolutely adorable in it!

Saturday, November 14, 2020

It's a Hoodie! No, It's Armor! ~ The Knight Hoodie ~

Who doesn't want a sweatshirt with armor??


A comfy knight costume suitable for all occasions?


When I mentioned in my last blog post that I'd have a new historical costume to share this week, an armored hoodie probably isn't what you were picturing. It's not what I was picturing either.
Things happened and something came up that took precedence over attending the outdoor event with the Saint Louis Historical Sewing Society. So my outfit I was desperately trying to finish for that get-together? Yeah. It's still not done. Honestly, once the other thing came up and I discovered I couldn't attend the event I was a little relieved. I was going to miss seeing everybody, but there was just no way I would have gotten my costume finished to my standards before the event. I'd put off too much until the last minute. It would have been a rather cobbled-together affair in the end. Now I have time to finish it properly - and that is actually happening! This week, in fact, I finished the skirt! But, more on that in future posts. Right now, let's get back to THE KNIGHT HOODIE!!


It's not an 1860's ensemble, but it is a costume-like piece, and it is historically inspired!


For the past couple of years I've admired the Sir Gawain Knight Top pattern by Mother Grimm. A kid's sweatshirt with armor? A knight costume that does not involve an ill-fitting, uncomfortable plastic breast plate and too-small plastic helmet? My siblings and I would have loved to have knight costumes like this when we were growing up!!


My brothers and I went through multiple sets of that plastic armor, which got loved, played with, broken, and discarded. Armored hoodies would have been way better!!


Thus, I've long admired the Mother Grimm knight hoodie patterns. When Mother Grimm announced earlier this year that she would be releasing the knight hoodie pattern in adult sizes, I excitedly went and found my youngest brother.
"Hey! Would you wear this?? Should I make a hoodie like this for you??"
He gave me a resounding "Yes!" 
I immediately signed up to test the pattern.


You can choose how much armor you want to add to your hoodie. Crest? Visor? Pauldrons? Spaulders? Gantlets? 
My brother told me he wanted all the armor. And I mean allllll the armor.


The pattern includes options for either one or two sets of Pauldrons on the shoulders.  For maximum impact (and possibly because I misread the pattern instructions) we combined those two options and went with three sets of Pauldrons on my brother's hoodie.


Combine that with the Spaulders sewn into the sleeve caps and there are 4 layers of armor across the shoulders. My brother tells me he loves how solid the shoulders feel. If you're gonna make an armored hoodie, you might as well go all out!


The shoulder armor is made from cotton-spandex jersey, and stiffened with a heavy fusible interfacing to keep it's shape. The Pauldrons are attached with heavy-duty snaps, so they technically could be removed if my brother felt so inclined.  I don't see that happening however.


Moving on from the shoulder armor, the sleeves feature Gauntlets to protect the forearms. 


Like the shoulder armor, the Gauntlets are stiffened with a layer of heavy fusible interfacing, sandwiched between a layer of cotton-spandex jersey and French terry.


Now I think the hood armor might be my favorite part of this hoodie - just look at that silhouette!


A visor, which snaps into place and can be raised or lowered as the knight chooses, and a proud crest on top!


 The hood armor is stiffened with fusible fleece. This is actually the recommended stiffening for all of the armor, but I only had a limited amount in my stash, so the hood is what got it. I appreciate the flexibility of the fleece. It's amazing for the visor, and I think it would have worked well for the shoulder armor too if I'd had enough. However, I wish I'd used the same heavy interfacing I did in the rest of the armor for the crest as well. The crest is a little floppier than I'd prefer, and I think a stiffer interfacing might have helped with that.


My brother's favorite color has always been green, and his Hogwarts house is Slytherin, so I opted to make his knight hoodie silver and green.


I love the green cotton-spandex jersey I used for the armor and hood lining. It's the most perfect shade of deep forest green! I ordered several one yard cuts of solid-colored cotton spandex jerseys from Purple Seamstress fabrics over the summer, with the intention of using them for baby clothes. I wish I'd ordered way more than a yard of this particular color. Between one pair of baby pants and the accents on this hoodie, I used up every last scrap of green jersey, and now I want more!


Deep in my stash I had a small remnant of metallic silver French terry, which I opted to use for the flat piping on the front and back of the hoodie. A knight needs a little bit of shine in his armor!


The rest of the hoodie is made from French terry out of my stash, picked up from Wal-Mart at some point in the past at an excellent price. Any time I find French terry at Wal-Mart I grab it! It's good quality fabric and my favorite thing to make hoodies from!


All the armor does not make this hoodie a quick sew - but I think the finished result is worth the extra time!


A Knight Hoodie! What could be cooler?


*I received this pattern free of charge in exchange for testing it out and giving my feedback.
All thoughts and opinions here are my own. I was not required to write this blog post.
If you're interested in this pattern for yourself, it can be found here.
I highly recommend it for the casual knights in your life! 


Thursday, November 5, 2020

Orange Ruffles and Plans

 Orange is a fall color, right?


So sharing an orange ruffley crop top the first week of November isn't *too* unseasonable, correct?


It was actually 70 degrees outside yesterday, and it's supposed to stay that warm through the weekend, so theoretically, I could actually wear this top right now and be reasonably comfortable. (Yes, it did indeed snow last week. Our weather has a mind of it's own.)


Now will I wear it this week? Probably not. I'm spending the next couple days holed up in my basement sewing room, only emerging to eat and go to work. The basement room is a little chilly, even on warm, beautiful, days, so I'll probably be wearing shirts with sleeves instead, as I'm not a fan of feeling cold. 


Now why am I hiding in the basement rather than enjoying the gloriously warm weather? Because, for the first time this year, happening this weekend, is a costume event with the Saint Louis Historical Sewing Society!!


Outdoors, socially distanced, masks required - and we actually get to see each other in person!!! And dress up! And have fun! 


I fully intend to have a new ensemble for this occasion, though I certainly waited a little longer than I should have to begin making it. Thus, the plans to hide in the basement for the next couple of days. 


Hopefully I'll be sharing about this new historical outfit in the next couple of weeks, but for now, back to the subject of this blog post.


Orange Ruffles!!!!


If the design of this top looks familiar, that's because it's actually the bodice/ view A of the Flor Dress, by Bella Loves Patterns, which I tested this summer.


In the first week of that pattern test, Isabela, the pattern designer and maker, requested that we all make a quick mock-up of the bodice to make sure things fit ok and no big changes needed to be made to the pattern itself. A solid plan.


I could have, easily, just grabbed an old sheet and done the quick, unfinished, never to see the light of day, mock-up thing. However, I was very excited about this pattern, and wanted to be able to wear it as soon as possible! So I went a different slightly more complicated, but very worth it, route.


I decided to make a fully finished, wearable, top for my mock-up. If it didn't fit right? Well, I'd jerry-rig it until it did fit ok.


Thankfully, no jerry-rigging was required, as this top fit beautifully right off of the sewing machine!


The fabric was a 2 yard cut of quilters batik my grandma gave me a while back. It was in my "maybe I'll make a top out of this eventually" fabric stack.


2 yards of 44" wide fabric is a little less than is recommended for this top pattern in my size, and I just barely managed to make it work. I was proud of myself once all the pattern pieces were cut out! There certainly wasn't room to make any mistakes here.


If I ever make this pattern as a top again, I'll try to have at least 2.5 yards of fabric to work with!


All the pieces squeezed out of my fabric, I sewed up the top in one morning. I cut a few corners by not bothering to finish my seams. Batik is tightly woven, so I wasn't concerned about it raveling too much in the wash, and this was technically a mock-up anyway. . .


I tried on my new top and was absolutely thrilled! The ruffles were as awesome as I'd thought they'd be, and thanks to the cup size options, the fit was amazing! No gaping necklines with this wrap top!


I could now proceed to cutting my Flor Dress out of the colorful batik I bought in Japan with full confidence that the finished garment would be amazing!


And I had a brand-new, ruffley wrap top to wear with all my favorite high-waisted skirts and pants!