Well, almost. A few minor pattern alterations still needed to happen before the scissors touched the pink silk.
 |
| Evening dress ca. 1901 from the Munchner Stadtmuseum |
The longer I stared at the single photo I have of my inspiration gown, the more I became convinced that the skirt was just slightly gathered at the waistline. Thus, I needed to add just a touch more width to the waistline of my Edwardian circle skirt pattern so it could be gently gathered down to the length of the waistband.
To do this, I trimmed three inches off the top edge of my skirt pattern. With the way a circle skirt is drafted, this made the waistline several inches larger all the way around.
The skirt pattern was now the correct length and width, ready to be slightly gathered at the waist, but I still wasn't ready to cut the pink silk.
To do this I measured and marked 6" up from the bottom of my newly altered skirt pattern.
I cut along that new line, which gave me a pattern piece for the main part of the skirt and a pattern piece for the bottom band of the skirt.
Finally, I measured the top and bottom edges of this bottom band pattern to establish exactly how much fur I would need to trim this skirt with.
And once that was done, the pink silk could be cut! Well, actually, I probably should have made another mock-up at this point to double check my newly altered pattern, but I didn't bother. (And I don't really regret not making a mock-up, so all's good.)
Now my skirt pattern was very wide, and my silk was not. Narrow fabric is a historically accurate issue, so I used the historically accurate solution. I pieced my fabric together, selvage edge to selvage edge to get enough width.
Once my fabric was cut out and seamed together, I went ahead and assembled the main part of the skirt before worrying about the bottom band and fur trim. I referenced Authentic Victorian Dressmaking Techniques, a Dover re-print of a 1905 dressmaking manual, to answer a few questions I had on the proper construction of an Edwardian skirt. (As the original manual was published in 1905, this book should be called "Authentic Edwardian Dressmaking Techniques", as the Victorian era ended in 1901, but oh well. At least the book has good information for constructing turn of the century clothing, even if it's not accurately named.)
The book recommended no lining at all for skirts. Quite a change from the 1890's skirts I'm better acquainted with, which are lined and structured within an inch of their life to achieve the fashionable silhouette. The early Edwardian silhouette is softer overall than that of the previous decade however. So skirt linings can be dispensed with, and only a soft cotton flannel hem facing is recommended, according to the book.
Thus, I proceeded to assemble my skirt without a lining. I made a beautifully finished hook and eye placket following the directions from the Truly Victorian 1906 10 Gore skirt pattern.
As all of my dresses and skirts must have pockets, I cut out one ginormous pocket for this skirt.
As this skirt style lacks side seams, I put the pocket in the center back seam. along side the placket.
There are multiple examples of pockets placed here in 1890's and early 1900's skirts in both Patterns of Fashion 2, by Janet Arnold, and Costume in Detail, by Nancy Bradfield.
Once the placket and one ginormous pocket were done, it was onto the waistband.
I made a simple 1" wide waistband, stabilized with cotton twill tape. I gently gathered the skirt to fit it.
Goodness gracious, it was hard to get those gathers to look right!
I wound up quite pleased with the gathers on one half of the skirt and considerably less pleased with the gathers on the other half of the skirt.
After I finished the waistband, the more I stared at those gathers the less pleased I became with them. I realized I'd patterned this skirt wrong as the shape and drape didn't really match that of the original gown at all.
What I'd thought were gathers on the original skirt were now obviously not. The more I stared at the skirt the more I became convinced those "gathered" sections were't gathered at all, rather that appeared to be where the skirt was cut on the bias. It was the drape of the fabric, and the way it pulled at the bias verses the straight of grain that gave the appearance of gathers. Also, the original appears to be made out of silk satin, which has a very different drape from my silk lustring.
At this point I considered re-patterning and re-making the entire skirt. However, I didn't really have enough fabric for that. And I didn't want to re-make the skirt after all the work I'd already put into it. And, I couldn't change the drape of my fabric, so my silk lustring skirt would never look exactly the same as the silk satin skirt. I decided to just leave the skirt on my dress form and ignore it for several days, until I came to terms with it.
I began by deconstructing the fur coat I'd picked up at my local antique mall/flea market.
Upon removing the lining, I discovered the coat was made out of lots of narrow strips of fur seamed together. Perfect!
I separated all those strips of fur from one another in the front and sleeves of the coat. I left the back panel whole as I didn't need quite that many strips of fur. The back can be used for another project later on.
Looking at the measurements I'd written down when I patterned the skirt, I figured out how many of my strips of fur I would need to piece together for each band on the skirt, and bundled those together.
I whip stitched the strips of fur together end to end, until I had two bands of fur, ready to be sewn onto the skirt.
With a thimble, this fur was easier than I expected it to be to hand sew together! The leather backing was quite thin and supple.
Once my strips of fur were the correct length, it was go time! I sewed the first strip of fur onto the bottom of my skirt using a zig-zag stitch on the sewing machine.
Then I sewed on the bottom 6" band of silk, sandwiching the fur between the two layers of silk.
I sewed the second band of fur to the bottom of the band of silk.
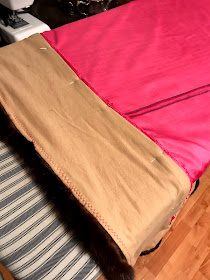
Then added the cotton flannel hem facing recommended by Authentic Victorian Dressmaking Techniques.
After hand sewing the upper edge of the hem facing in place, I finished up the skirt with some cheap nylon lace, sewn along the hem on the inside of the skirt to protect the fur from dragging on the ground.
Cheap nylon lace is definitely not historically accurate, but it seemed like a good idea for protecting the fur.
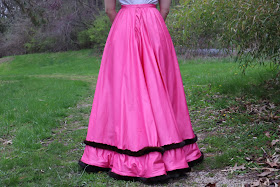
And with that, the skirt was done!
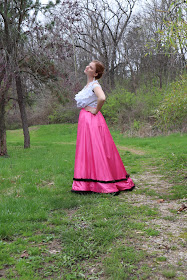
Worn over my petticoats and hip padding, the shape is just amazing!
Very Edwardian - just as it should be!
No, it is not an exact match to the original skirt, but that actually doesn't bother me now like it did when the skirt was still under construction.
I'm very pleased with the finished product.
Thrilled, actually, with how it all came together.
It's so easy to get caught up on the little imperfections when you're making something and closely analyzing it.
Once it's done however, when you can step back and look at the full picture, those little things often don't matter anymore.
And such it was, with this skirt.
My fur-trimmed, pink silk, Edwardian beauty.
Which happens to look good with cowboy boots, if the outdoors happens to be too muddy for it to be photographed with nice shoes.


I love your skirt, especially with the cowboy boots! With your sassy pose and corset cover exposed, you have a very Wild West vibe going on ;)
ReplyDeleteFantastic! I love it
ReplyDeleteMy grandmother always told me to make something about a project my own and never just copy someone else's work. Reading your story brought that advice back to mind.
ReplyDeleteIt is so easy to get caught in what we know we were trying to do and not see how what we actually did. And I have left many garment hanging on my dress form until I could see them more favorably!
Your skirt is gorgeous! and I love the boots!