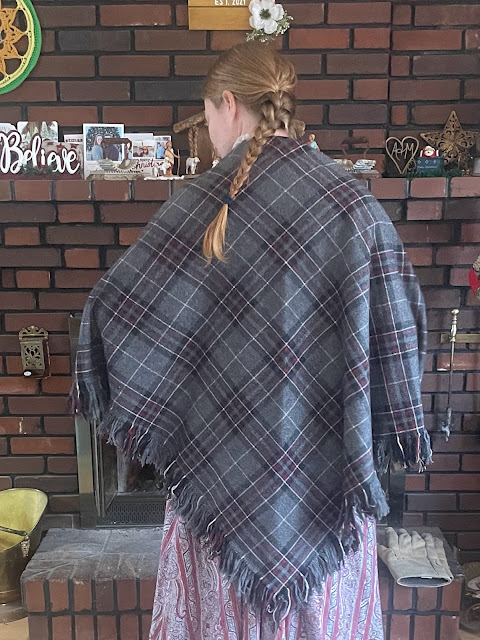
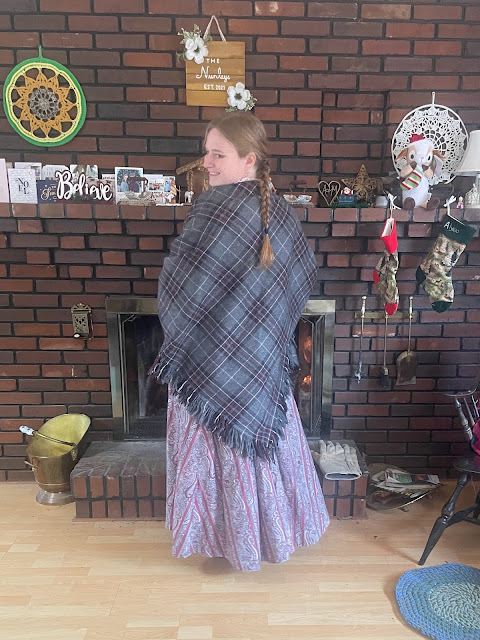
In the fall of 2019 I came up with a brilliant idea - I would make a shawl to wear with my new 1840's wool dress! A nice large woolen shawl, it could be worn with all sorts of different dresses from throughout the 19th century - it would be perfect!
I dove into my books to research shawls. If I was going to make this thing I was going to make it right! My family had a re-print of an 1890's Sears catalogue we'd recently picked up and I read all the descriptions of the shawls for sale in the catalogue.
60" by 60", plus fringe, most of the descriptions read.
I went to my wool stash to see what my fabric options were. After rejecting several fabric cuts because either there wasn't enough yardage, or I had the fabric earmarked for something else, or I didn't like the plaid for this project, or the fabric was too narrow, I finally decided on a gray and red plaid wool I'd picked up from a thrift store for a couple bucks a few years earlier. (I picked it up at the same time I snagged the wool that became this skirt)
The fabric was a full 60" wide, and there was enough of it to cut a full 60" square and still have some fabric left over. So I cut out my square. (And a few months later I used the leftover fabric to make my Hogwarts-inspired bonnet.) Now all I had to do was fringe it!
Now the "proper" way to fringe a shawl is to un-ravel the fabric for a couple inches all around the perimeter. But is that what I did in 2019? Oh no. I was unaware. I made my life much harder than that. Don't get me wrong, I did unravel fabric. . .
A lot of fabric, but. . .
It was not along the edges of my shawl.
I was worried that if I unraveled the edges that would reduce the dimensions too much, I really wanted that 60"x60" + fringe shawl, so I decided at add on fringe instead of unraveling my fabric.
Along the two edges of my shawl that were not selvedge edges I sewed a very tight zig-zag on my sewing machine to keep the fabric from unraveling. Like I said, there would be absolutely no unraveling the edges of my shawl!
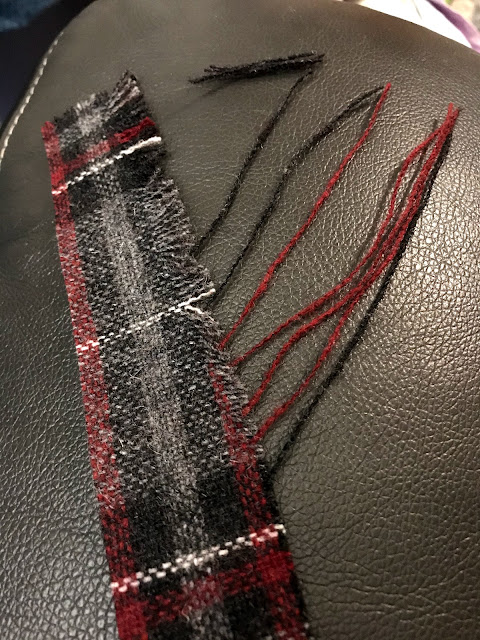
Then, I unraveled my fabric scraps, and cut my unraveled threads to a uniform length.
I sorted the threads by color, then threaded a couple at a time onto a large craft needle.
And I used the needle to thread the threads through the fabric along the edges of my shawl.

Then I knotted the little bunches of fringe in place.
Making sure, of course, to match the fringe color with the color of the plaid at each location.
This way, when all was said and done, it would look like the fringe had been created by just unraveling the edges of the fabric.
Yep, just by unraveling the fabric, with a few extra steps thrown in.
Honestly, at the beginning it was pretty relaxing and fun, matching up the colors and knotting the fringe onto the shawl.
The completed sections of fringe were just so satisfying to look at!
I started the shawl on a Monday, thinking I'd have it done by that Saturday to wear to a Halloween party. (Thank you date stamps on photos and old blog posts to remind me of the details!)
I did not. In fact, one month later, I only had about 18" of the fringe done. 18" on one of four 60" sides. That's less than one-eighth of the way around the shawl! Barely more that one-sixteenth if my math is correct!
Unravel the fabric.
Cut the threads to the correct length, sort by color.
Knot onto the edge of the shawl and repeat. I definitely lost momentum. This "fringe the shawl" idea became very tedious. I wished I'd just unraveled the edges of my wool like a normal person! But it was too late to do that now. I'd started the shawl this way, I was going to finish it this way! I'm stubborn like that.
For the next 4 winters (2019/2020, 2020/2021, 2021/2022, and 2022/2023) I picked up the shawl between other projects and continued adding fringe. Honestly, knotting the fringe on wasn't too bad. It was the running out of fringe, or running out of one particular color of fringe, and having to unravel more fabric part that got annoying.
Finally, a couple years in, I figured out a method that worked really well for me. Rather than knotting on the fringe one section at a time - dark gray, white, dark gray, red, dark gray, light gray, dark gray, red, dark gray, white, dark gray, lots of light gray, white, more light gray, and repeat (I bet it was tedious just reading that.) - and having to stop every time I ran out of of one particular color to unravel more, I would just work with one color at a time. I would knot on all of that color I had unraveled.
Then I would pick another color and knot on all of that color that I had unraveled.
Until I has whole sections filled in! (As time went on I also became less obsessive about making all the fringe the exact same length.)
I made some real progress with this method! And finally, last January, over three years after I began this "It should only take me 5 days of knotting on fringe in the evenings while watching TV to finish" project, I actually finished it, by knotting the final bunch of fringe - one strand of each color - onto the final corner of the shawl.
It was done. My big woolen shawl was finally, finally, finished and ready to wear with all the costumes. And what did I do with it?
I put it away in the closet. After over 3 years I was tired of it. It took too much time!
This winter however? It's finally doing what it was made to do.
It pairs quite wonderfully with my 1890's wrapper (Which I wear around the house "just because" probably atleast once a week!) It's just the thing to throw on over the wrapper on mild winter days to run outside and do quick animal chores.
And on these very, very, cold winter days we've had recently, I've been wearing it even in the house, while sitting by the fire.
Despite the literal years it took me to make, I've very glad to have this thing - though I will never, never, make a shawl like this again!
Every single year I worked on this thing I picked a Historical Sew Monthly theme it would fit if I could get it done in time. After many themes (it would have been perfect for) came and went, I was left with the 2023 options, and I picked challenge #3:
Focus on the Fabric!
Because really, what else is there to this shawl? It's all just one single piece of fabric, with fringe, made from the fabric, knotted on to match the design woven into the fabric.
What the item is: A fringed Shawl
The Challenge: Focus on the Fabric
Material: Wool Plaid
Pattern: None, just the dimensions of the shawls in an 1890's Sears catalogue as reference
Year: Pretty much the whole Victorian era
Notions: none, all the fringe came from unraveling scraps of fabric, so it's really all just the fabric.
How historically accurate is it? The fabric and dimensions are accurate. My fringing method? Probably not. I believe it would have been more accurate to unravel the edges of the shawl to make the fringe, rather than unraveling fabric scraps to get the thread then knotting those threads onto the edges of the shawl to make the fringe. When I began this project 4 years ago I valued dimensions over method. Thus a project that took way too long to finish.
Hours to complete: Too many. 4 winters of working on this thing between other projects.
First worn: This winter I guess. I don't have a specific date I can recall.
Total cost: The fabric cost me $4 at a thrift store years ago.


Girl you went to a heck of a lot of work on that thing. 😀😏😊. I’m sure you learned a lot also. It’s very nice!
ReplyDelete