

My first plan was to make an 1840's inspired witch bonnet, as that's a decade I seem to return to a lot in costuming. Then I decided I wanted to do something different, and a little more dramatic. I would make an 1830's inspired witch bonnet, with a magnificent huge flared brim.
 |
| 1830's Bonnet, LACMA |

Even though it's not the shape I was going for at all, I decided to start with the one structured bonnet pattern I had in my stash - McCall's M5129. (This is the pattern I used to make the bonnet to go with my purple plaid wool dress, and before that a bonnet to go with my first Civil War Dress.) As much as I really ought to draft my own patterns from scratch, I'm lazy and prefer to start with a pre-existing pattern, slightly resembling the image in my head and hack it out of recognizable and into whatever the heck I want.

For this particular project, I decided to start with the bonnet brim. 1830's bonnets tend to have large flared brims with rounded edges. So I started with the brim with rounded edges from my pattern. It wasn't flared at all, but I could fix that! I traced the brim pattern onto plain brown paper.


I laid this slashed up brim piece on top of more brown paper, folded in half. I lined up the "on the fold" edge of the pattern piece with the fold of the paper, then flared out that brim pattern by spreading apart the slashes at the outer edge of the brim while leaving them connected at the inner edge. This gave me a half-circle-ish shaped brim pattern.


I removed the pattern from my Styrofoam head, folded it in half again, and cut in down several inches.
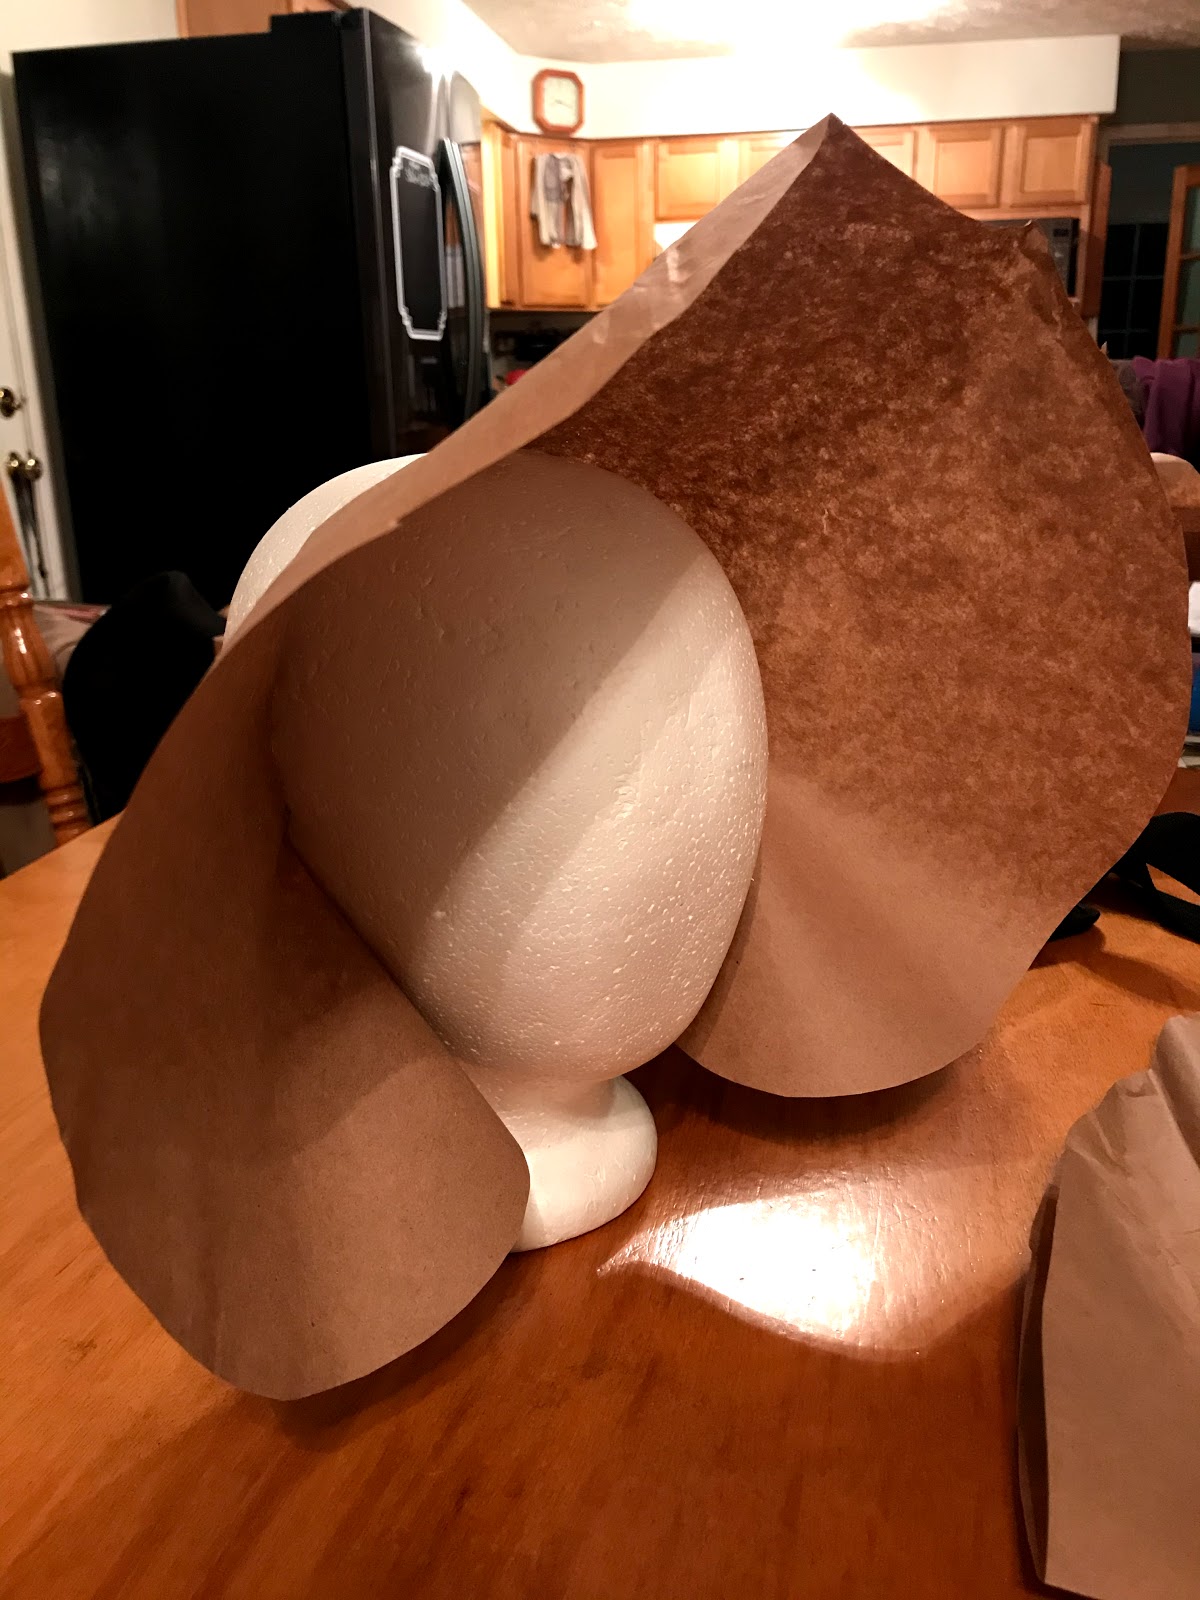
I tried my pattern back on the Styrofoam head and was a bit more pleased - my pattern was much closer to resembling the shape I was going for here. It just required a bit of perfecting as it was a bit too flared in some areas and not flared enough in others.

I proceeded to do a bit more slashing and spreading where I wanted more flare.

Followed by slashing and overlapping where I wanted less flare.

Eventually I was quite pleased with the shape of the thing.

I decided I had a brim pattern which would work and moved on to the crown.

For the crown I required no starting pattern. As this was to be a Hogwarts-inspired witch bonnet, the crown just needed to be in the shape of a pointy witch hat. The crown of a witch hat is really just a partial circle, super easy to draft yourself.

I cut about 3/8ths of a circle out of brown paper, taped together what would be the seam line, and pinned it to the Styrofoam head along with my brim. A touch of finangling and I was satisfied.

I removed all the brown paper from the head and laid it flat - I had my pattern!
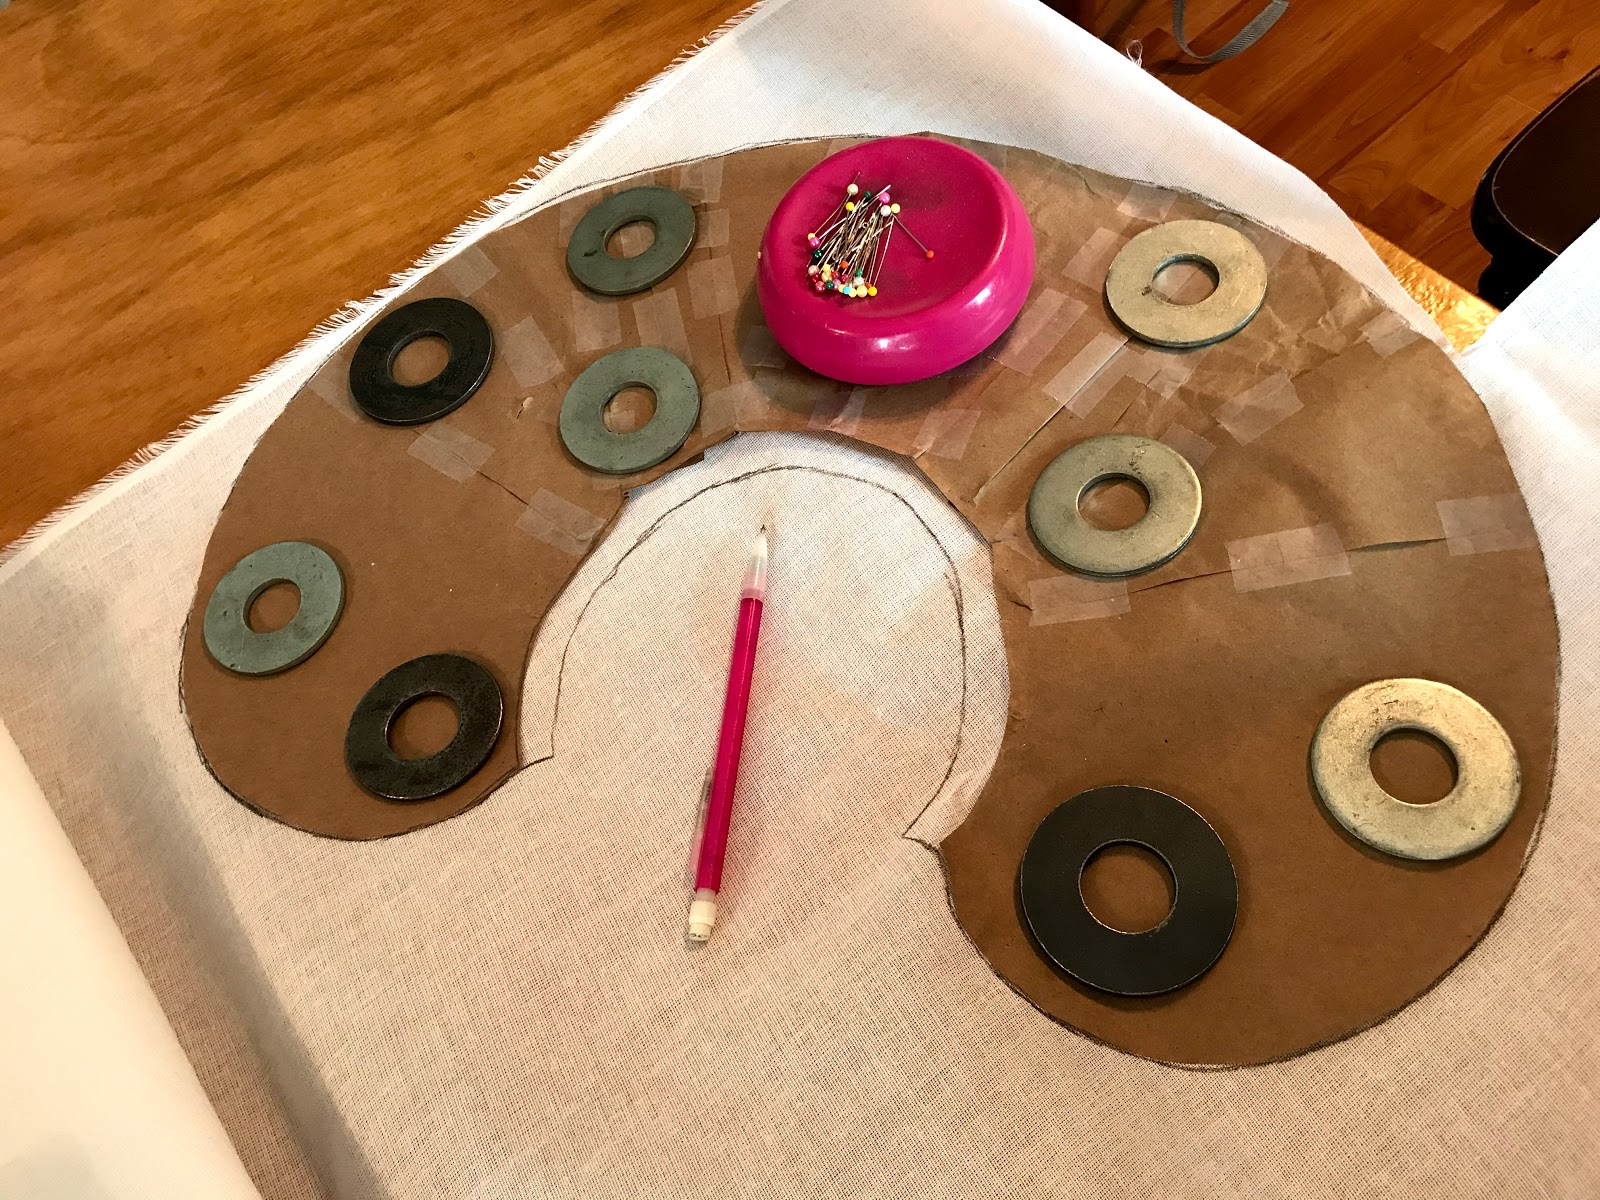
I added seam allowance to each piece and cut it out of buckram and wool. For the lining I used a scrap of silk I'd dyed dark red for a project a year ago. It did not turn out the correct color for piping my 1898 jacket, but it did match the red in my wool plaid quite well, so it was perfect for my bonnet lining! The crown lining was cut in the same shape as the buckram and the wool. The brim lining, however, I cut as a long strip, as wide as the widest part of the brim and as long as the circumference of the outer edge of the brim.

One edge of the strip of silk was pinned flat to the outer edge of the brim. The other edge was gathered up to fit the inner edge of the brim.
 |
| 1830's bonnet, sold by Christie's (I believe, it was hard to find info on this one - but look at that beautiful brim!!) |

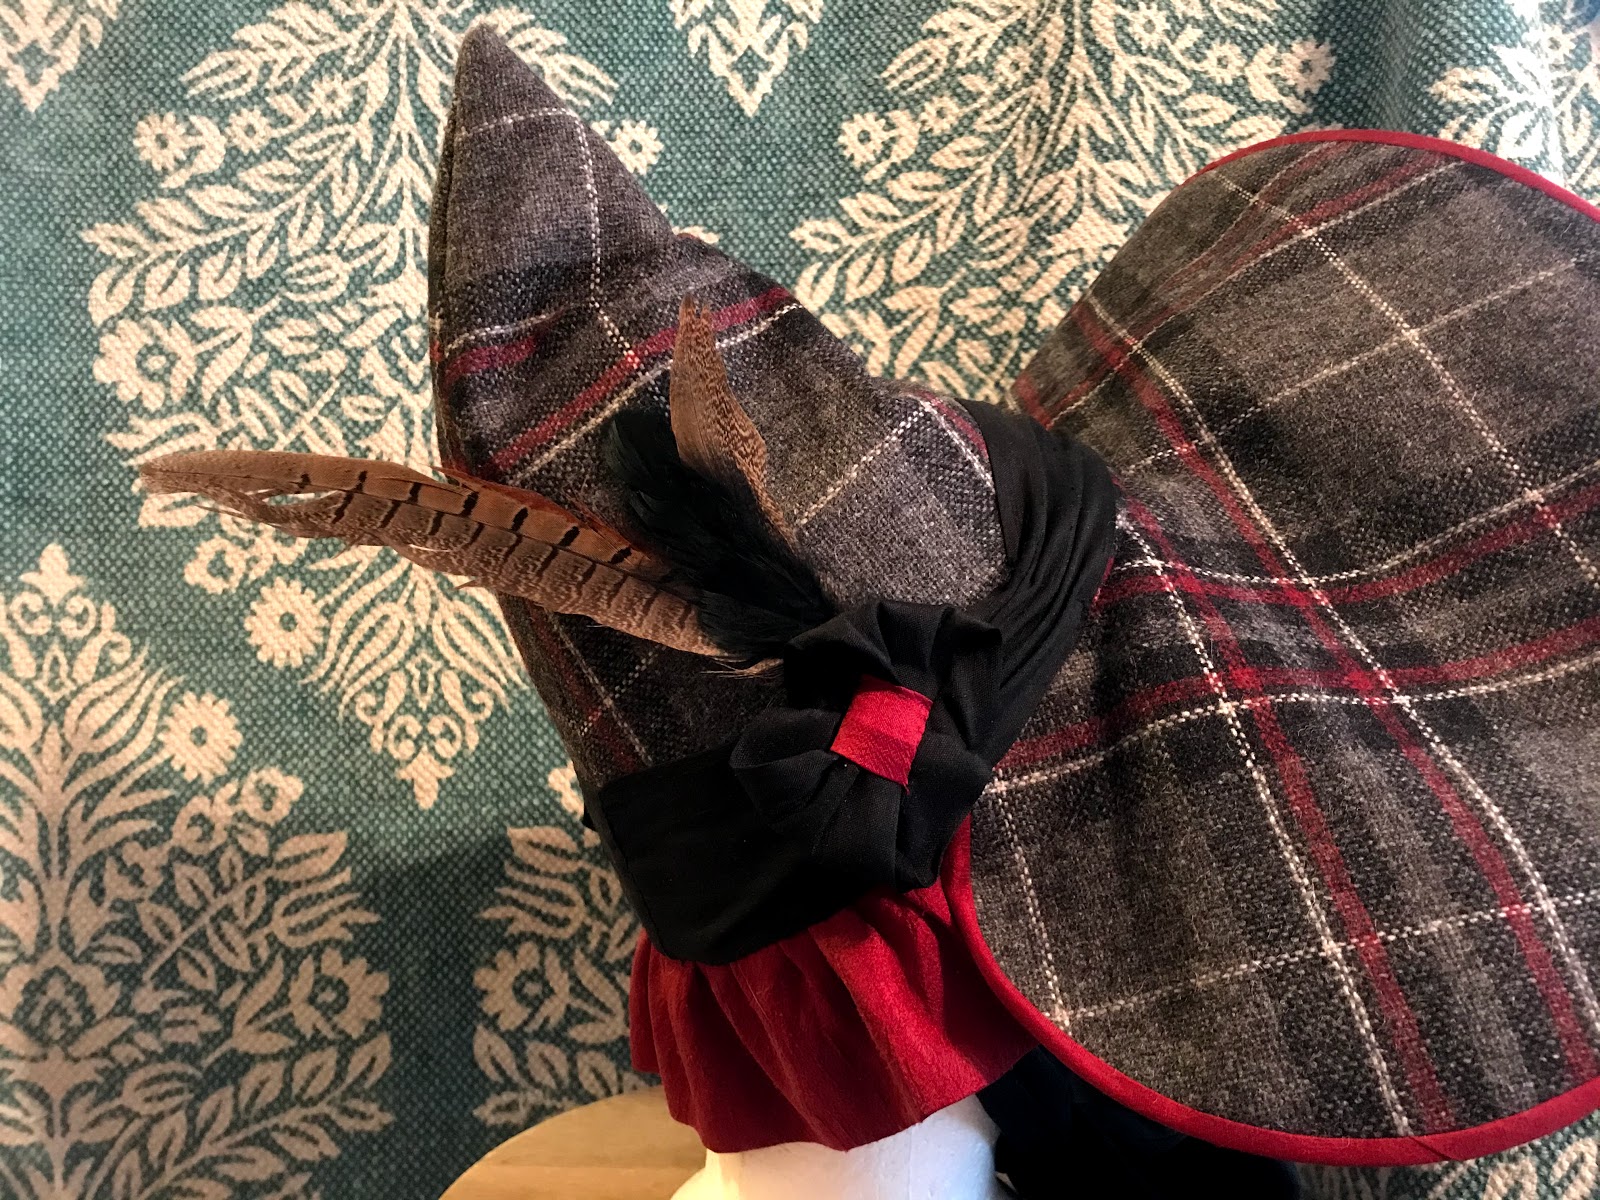
I basted together all the layers of the brim by hand, then did most of the bonnet assembly by machine. I sewed up the back seam of the crown, then sewed the crown to the brim and added a ruffle at the back where the brim ended. The crown lining got slip-stitched in place to cover the seam between the crown and the brim and ruffle.

I bound the outer edge of the brim in bias tape made from scraps of my red silk and added wire to help the brim keep its shape. I used millinery wire harvested from a thrifted hat - and oh my goodness! Millinery wire is amazing!!!! In the past I've used whatever wire I could get my hands on locally for hat and bonnet making, and it's never worked quite right. Always either too bendy or too stiff and hard to shape. Millinery wire though has just the right body for the job, making it a joy to use. Now I need to find a source for it and buy this stuff in bulk!

Once the wire was in and the brim was done the bonnet was structurally done and ready for trimming! I tried it on, and the youngest child I nanny enjoyed taking bonnet selfies with me. (I mostly cropped him out of this picture though, as I avoid posting pictures of other people's kids on the internet.)

I used some black silk dupioni from my stash to make ties. At first I made these a bit too short, so I had to add about 6" of length to each one after I'd attached them to the bonnet. (Yes, I could have removed them and made whole new ties the correct length, but I didn't want to waste fabric.)

For trimmings, I took the left over dupioni from the ties and the scraps of red silk I had left and just played around with them until I wound up with something I liked.

I did my trim configuring and sewing while sitting on the couch and watching the 1994 Little Women movie with my sister. We went and saw the new Little Women movie (in costume!) when it came out in December so it was fun to watch the old movie again and compare the two.

Once the silk trim was on and I was satisfied with it, the final touch was a couple pheasant feathers. You can't have a witch bonnet without feathers!

I am absolutely thrilled with how the bonnet turned out! It's even better than I expected it to be!
It was a really fun creative project to design and execute.

A mixture of history and fantasy all my own, in a slightly different medium than I usually work with.

A fabulous project to get me out of my usual "rut", whatever that is.

This exercise in creativity has made me very excited to do more bonnet making - which is good because I really do need more head wear in my historical wardrobe!

Once I finish fringing the matching shawl, I'll take some pictures of the bonnet and shawl actually being worn with one of my historical dresses, but for now I only have a bonnet and cat selfie to leave you with. (The cat remained in my lap the entire time I was trimming the bonnet - I do believe she approves of it!)

I'm now all set for Halloween when it rolls around in 8 months. Perhaps between now and then I can find a couple other excuses to wear my witch bonnet as well, because this thing is too fabulous to only be worn once a year!
I love it!! It's going to look wonderful with the finished shawl!
ReplyDeleteFarthingales has millinery wire, which they sell in big coils:
https://www.farthingalescorsetmakingsupplies.com/Millinery-Wire-is-Hat-Wire-s/1848.htm
Thank you! I'll check it out!
DeleteDo you sell the pattern for this hat?
ReplyDeleteI wondered too. Did you ever get a responses
ReplyDeleteHi! I’m sorry, but no, I don’t sell any patterns, I’ve not learned to digitize them. For this particular bonnet, the crown is just a cone shape with a few tucks added after the cone was constructed. I showed pictures above of what shape the brim ended up being, and the brim lining was just a long strip of fabric gathered along one edge to fit the inner curve of the brim. I hope that helps!
ReplyDeleteAlyssa