Thursday, March 23, 2017

Hair Dye and Fabric

Sometimes things happen on the World Race, such as finding red hair dye at a market in Haunuco, Peru. You buy said hair dye because you have been unable to find any henna to re-dye your blond roots red. A few days later you find yourself sitting on a chair in the kitchen while your teammate dyes your hair. 30 minutes later you have Arial red hair!


So, it's a bit brighter and less natural looking than I was intending, but I love having completely red hair again rather than several inches of blond roots at the top of my head! Man, I was really tired of that blond, so I have no complaints about my new hair color. Also, I hear it will fade a bit as time goes on. Now, hopefully in Africa next month I can actually find henna!


Now, sometimes things happen at home too, such as finding yourself in a little fabric store in the middle of nowhere and bringing home a ton of fabric! Back in December my mom, sister, and I made a day trip to a Mennonite community to go to a specific store. At said store we heard about a little fabric store not far away, so of course we had to check it out! Well, it was a little store filled floor to ceiling with fabric, and I loved it! Most of the fabrics were poly/cotton blends. Typically, I avoid polyester. However, I was heading into 11 months of living out of a backpack (nearly 3 months months down now, 8 left to go!), so I figured that the no-wrinkle aspect of polyester could be a nice thing. Thus, I bought a lot of fabric and spent my last 2 weeks at home turning that fabric into clothing.


The store had a wide selection of no-wrinkle plaid shirting fabrics, and I had a hard time choosing just one to get! I already knew what the plaid would become, if I could ever pick one. After staring at all the pretty plaids for quite a while, I finally picked this one. I loved the blue/green stripes in the plaid!

 
From the beginning, this fabric was set to become a second Gypsophelia Peasant Top, like the one I made over the summer. This pattern is really quick and easy to make, and I have no complaints about the final results. With this shirt I even took the time to match the plaid on the front and back seams (something I typically don't have the patience to do), but I forgot to match the plaid at the shoulders and down the sleeves!


Maybe one day, when I return home to my sewing machine (and my family!) in about 8 months, I'll get good at matching plaid. Imperfect plaid matching and all, however, this shirt is getting plenty of wear on the World Race! It matches my skirts, doesn't wrinkle, and breaths well despite the polyester content. 

Now, red hair dye wasn't the only thing I found in the Market here in Peru, there are also a few really awesome fabric stands! So I think I know where most of my spending money will go this month!

Hasta Luego! If you want to know what I'v been up to in Peru (other than shopping at the market and dyeing my hair) check out my World Race blog! 

Tuesday, March 7, 2017

How To Add Hidden Patch Pockets

I forgot to put pockets in my rain coat. Yep, I'm a little ashamed of myself. Me, the pocket lover, who adds pockets do everything, failed to put pockets in her rain coat. Honestly, with all the fitting issues I had when I made this rain coat, I didn't have time to add pockets too. Plus, I wasn't really sure how to make water-proof pockets. Still, the first time I wore my raincoat in Colombia I really regretted the lack of pockets and immediately decided I would add some to my rain coat, as soon as I obtained some fabric.


Then, on a very crowded bus ride back to out Colombian home, one of my teammates had her iPhone stolen out of her jacket pocket. Yikes! That made me re-consider my pocket plan for my rain coat. 
I'd been planning on adding side-seam pockets (like the ones in my jean jacket here), but after the pick-pocketing incident, I decided I needed something a little harder to get to.

Back before I left home my friend, Erentry, asked me to help her figure out how to add pockets to most of the items in her wardrobe. One such item was a cardigan. It wouldn't have worked very well to add side-seam pockets to this cardigan, nor would it have looked all that great to add patch pockets to the outside of the cardigan. So, my idea was to add patch pockets to the inside of the cardigan. Useful, but invisible. 

I remembered this as I pondered what to do with my rain coat. Suddenly, I knew what I was going to do, as soon as I found the fabric! Thanks to an impromptu refashion 2 weeks later, I had my fabric so last week I set to work. The process was pretty simple.

Step 1: Cut out 2 squares or rectangles of fabric the size you want your pockets to be, plus a little extra for hem and seam allowance.


Step 2: Hem the top edge of each pocket. (Thanks to using recycled fabric, my pocket pieces were already hemmed so I was able to skip this step! A wonderful thing since I'm currently sewing machine-less.)


Step 3: Fold over the remaining pocket edges about 1/4 inch and pin. Then pin the pockets where you want them on the inside of the garment.


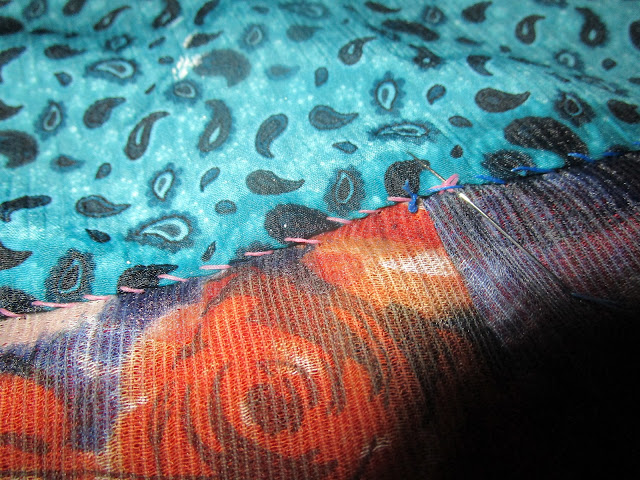
Step 4: Hand sew in place. I used a whip-stitch so you can't tell from the outside of the jacket that anything was added!


Step 5: Enjoy having pockets! The first time I wore my rain coat after adding pockets, I stuffed them full of sandwiches for lunch!


I have loved having pockets in my rain coat, and they were so easy to add! If you have a jacket, cardigan, or coat that lacks pockets, or just needs a couple of extra pockets, I encourage you to add your own hidden patch pockets!


Hasta Luago! Next time I blog it will be from Peru! As always, if you're interested in keeping up with what I'm doing this year, check out my World Race blog and subscribe!


Saturday, March 4, 2017

A Red Rain Coat

On my first day of ministry work here in Quito, Ecuador I spent 40 minutes standing on a street corner, in the rain no less, waiting for a bus. Thankfully I was wearing my rain coat, and the hours I spent fighting with the dumb thing to make it exactly what I wanted were suddenly worth it.


When I saw "a rain coat" on the World Race packing list, I knew right away I would be making a rain coat. How hard could it be? I picked up 3 yards of waterproof nylon and started looking at rain coat designs. I was ready to get started! 

I decided that since my raincoat needed to be, well, waterproof, I should probably do a bit of research about how to make a good rain coat before I just jumped in. That was a good decision. There's apparently a lot that goes into making a rain coat water proof.


For example, you don't want any pin-holes in your fabric, because those could let water in, so rather than simply pinning my pattern pieces to my fabric and cutting out the rain coat, I used Dr. Seuss. Yep, I was at work when I cut the jacket out, and these books were the closest things I could find to pattern weights. They worked! I used the books to hold the pattern pieces down, then traced around each pattern piece with tailor's chalk, removed the books and pattern piece, and cut the piece out. This process took an entire 3-hour nap time.


Now, the next step in making a rain coat water-proof would probably be to make sure you don't cut it out to small. Sounds simple right? Well, some how I managed to mess up on that step. I used a Simplicity pattern (I can't remember which one, sorry. It's in my sewing room in the states, I'm in Ecuador), with some alterations, that had been in my stash for years. I cut out a size 12, my standard size in Simplicity patterns, and it was too small! Yes, I should have measured myself and checked the size chart first, rather than just assuming I knew what I was doing.


See the pretty piping down that sleeve? It wasn't supposed to be there. I'd originally made the sleeves all one piece (less seams, more water proof), not four. When I tried on the jacket to check for fit prior to adding the hood and inserting the zipper, I discovered the sleeves were too short and too tight! So, I cut the sleeves in half down the top of the arm and added a strip of fabric with piping on either side. That was not fun to do, it took way to long, but it worked! Fixing the length issue was easier. I just added an extra band of fabric to the bottom of each sleeve. Those alterations did the trick! Once done, the sleeves fit perfectly! Next up, the rest of the jacket . . .


The rest of the jacket was too small as well, so that had to be fixed. I added an extra panel down the center front of the jacket and made the zipper off center. I'm calling that a design feature, and honestly, I really like it!


Fit fixed, I added the hood, and discovered I'd made that too shallow! So, I added a brim. Thankfully, that was an easy fix. Now the hood does its job and keeps my head and face dry!


Due to the fit issues, this jacket took nearly all of my last week at home to finish, but it was worth it!


I love my rain coat, it keeps me dry, and I've received all sorts of compliments on it! Also, despite the fit issues, I did a few things right on this rain coat. I piped every seam with another type of water-proof fabric, thus making the seams pretty darned water-proof. As an extra measure on the inside of the jacket every seam is coated in seam-seal. (I picked this up at wal-mart in the camping section)


Although you can't see it when I'm wearing the jacket, the lining is one of my favorite features of my rain coat.
The lining encases all of the interior seams, except for where the hood is attached, so I finished that seam with some homemade bias tape I has on hand. (I used the same bias tape to make the hem facing, which I didn't get pictures of)


I found this light-weight rose-print rayon in the clearance section at Joann's, and fell in love. It's soft, and pretty, and totally unexpected on the inside of a raincoat! (Everyone who has seen the lining has commented on how much they like it!)


So, it's safe to say I learned a bit while making this rain coat, and all the frustration was worth it! I have a fabulous, one of a kind rain coat that will keep me dry all over the world!


*All photos taken by my awesome squad-mates in Bogota, Colombia and Quito, Ecuador
**If you want to know what I've been up to the past 2 months and keep up with my journey over the next 9 months check out my World Race blog and subscribe!