Tuesday, May 25, 2021

1950's meets 18th Century - Wildflower Designs Coquelicot Skirt

 Back in the early days of my engagement, before I knew how entirely wedding planning and wedding sewing would take over my life, I volunteered for a couple different pattern tests. We can all laugh now about how naïve I was when it came to the amount of time wedding preparations would require of me. Regardless,  I had committed to these pattern tests, and I am a woman of my word, so I completed them. Sometimes late at night, at the expense of a few hours sleep, but I completed them. And I must say, I'm glad I participated in these pattern tests as both added some great garments to my wardrobe, which I have been wearing regularly ever since!


Now one of these pattern tests can't be shared quite yet. The other however. . . let me tell you all about it!


Sometime this winter Wildflower Design on Instagram started sharing pictures of a self-drafted every day skirt they'd made with heavy historical influence. It was constructed like an 18th century petticoat with the front and back panels of the skirt attached to different waistbands. The back waistband wrapped around and tied at the front, while the front waistband wrapped around and tied at the back.


Beneath this double wrap situation, there was another fantastic detail. HUGE pockets resembling those of the 18th century, accessed through the side slits of the skirt.


Oh yes! This skirt absolutely enthralled me!


A month or so later, a call for pattern testers for this skirt came up on Instagram, and I jumped to apply!


I was accepted and began looking through my fabric stash, trying to pick a material for my new skirt. There were two different views of this pattern, both inspired by 1950's skirt silhouettes, and I couldn't decided which I wanted to make. This indecision made picking my fabric considerably harder!


View A was a half circle A-line shape, while view B was a gathered full circle skirt. Both would be welcome additions to my wardrobe! Which should I make?


After a week of dithering, I couldn't make up my mind, so finally I decided to just make both!


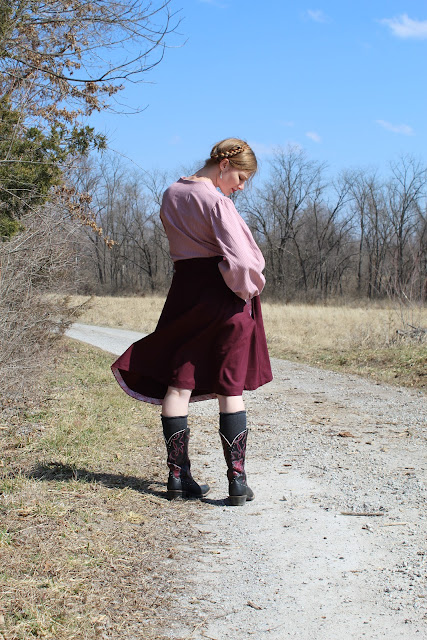
With that figured out, now for the fabric choices! I opted to use a very, very, soft maroon wool from my stash for the A-line version.


I only had a yard and a half of this fabric, picked up at a thrift store once upon a time. That was a little less than the pattern called for in my size, but I figured if I used a contrasting cotton for the pockets and bias hem facing it just might work!


And it did! With careful cutting I managed to squeeze all the main pattern pieces out of the wool, and I used a pink quilting cotton from my stash for the unseen portions of the skirt.


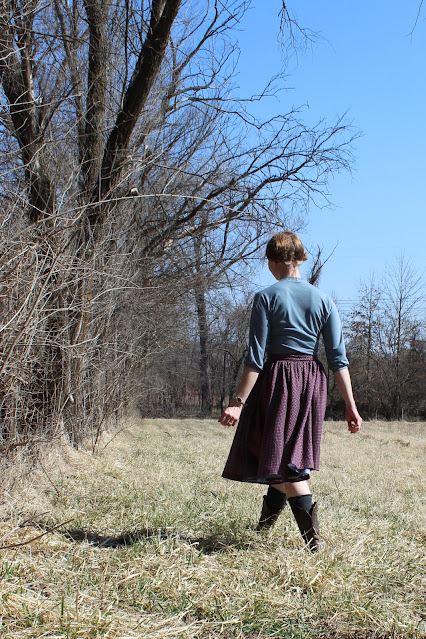
My plaid wool skirt has seen constant wear every winter since I made it, so I'm very happy to add a second wool skirt to my closet! And this one is such a versatile color and silhouette!


For the full circle skirt, I picked another thrifted fabric from my collection. 


A maroon polyester print with a rather open weave. 


Yes, polyester. It does have the advantage of not wrinkling, so I rather like having some polyester every day skirts in my closet.


Of the two skirts, I think this one is my favorite. It's just so full, and floaty, and fun!


And it's suitable for most seasons! I've worn this skirt almost weekly since I finished it.


I really liked how the contrast hem facing looked on my wool skirt, so I decided to do the same thing with this one, picking a blue gingham for the job.


And that's that! Both of my skirts turned out to be just as awesome as I'd hoped they would be, and I'm very glad I decided to test the pattern! I look forward to playing with it more after the wedding, when I have some free sewing time again!


If this skirt design fascinates you just as much as it did me, the pattern can be found here, on the Wildflower Design website!

*I received this pattern for free in exchange for testing it and giving my feedback. This blog post was not required or requested. All thoughts and opinions shared here are my own. 

Tuesday, May 18, 2021

A Pair of White Wool Embroidered 18th Century Mitts

 In 3 weeks I will be a married woman. Woah, this engagement thing has flown by fast! My wedding dress is finished and ready to wear. The bridesmaids dresses are done. My mom's dress is done. This week I'll make the flower girls' dresses and the ring bearer's vest and then all the wedding clothes will be done. After 4 months of craziness, it's wild to realize this season is drawing to a close, and just about everything is actually ready for this wedding I've been planning and dreaming of.

Now, my past 4 months of sewing have been almost entirely wedding focused, with an occasional quick project thrown in here and there. At the beginning of this year, prior to my fiancé proposing, I had grand plans for all the historical projects I would complete in 2021. I began the year as I intended to continue, by picking a project off my long, long, list and making it happen. I started small, thinking I would work up to the bigger projects on my list, just wanting to complete something quick to kick off 2021. Thus, I spent a week hand sewing a pair of mitts for myself. 


The idea for these mitts came about last summer when I was planning my "Felicity Work Dress". On the cover of the 6th Felicity book Changes for Felicity, Felicity is wearing her work dress (which I based my dress off of), her red cloak, and a pair of white mitts. Of these garments, I only managed to make myself the dress by my self-imposed October deadline, but I did intend to get around to the other two eventually.


The cloak is a rather large project which will involve me dying a bunch of tan wool from my stash red with madder. This is intimidating to me. I'll do it eventually, it just hasn't happened yet. The mitts on the other hand, would be quite simple. Grab a piece of white worsted wool and sew the mitts according to the instructions in The American Duchess Guide to 18th Century Dressmaking. No dying large, bulky, quantities of wool with natural dye required. (That said, if anyone does have advice on how to evenly dye large bulky quantities of wool, I'm listening!)


Simple. That was the plan for the mitts. Then. . . Facebook happened?? I read multiple threads in the 18th c Facebook group all about how woven wool mitts weren't historically accurate. There are extant examples of woven silk, cotton, and linen mitts, of leather mitts, and of knitted wool mitts. Rumor has it however, that woven worsted wool mitts, like those I was planning on making, did not actually exist in the time period and are a modern costumers invention. Uh-hu. Yep. That's what they say. Well, this train of thought definitely postponed my mitts project by a couple months. 


I didn't want to be horribly historically inaccurate. Maybe I shouldn't use wool. Maybe I should use leather. Leather, however, sounded like a pain to sew. Maybe I should use silk. What silk? The only white silk I had in my stash was the 8 yards I was saving for my wedding dress, and I didn't want to cut into that yet. (Yes, I bought my wedding dress fabric months before my fiancé proposed, but more on that in wedding dress posts I'll be sharing this summer) Also, silk mitts didn't seem quite right to go with a "work dress". Linen perhaps? That didn't seem warm enough for winter wear, and Changes for Felicity is set in the middle of winter. Cotton? Same issue as linen. Perhaps I should knit some wool mitts? Yeah, no. That wasn't happening. 


Thus, the Facebook threads derailed my mitts plans for a little bit. Research is good and all, but sometimes too much research can scare one out of doing a project entirely for fear of doing it wrong. And that is not great.


Fast forward a couple months, and I watched the Dixie DIY video at the end of December where she sewed herself a pair of mitts. Wool mitts. Watching this video, I decided my hesitations were silly. I wanted a pair of white mitts. I had white worsted wool in my stash. Even if it wasn't completely historically accurate, it would suit my purposes just fine.


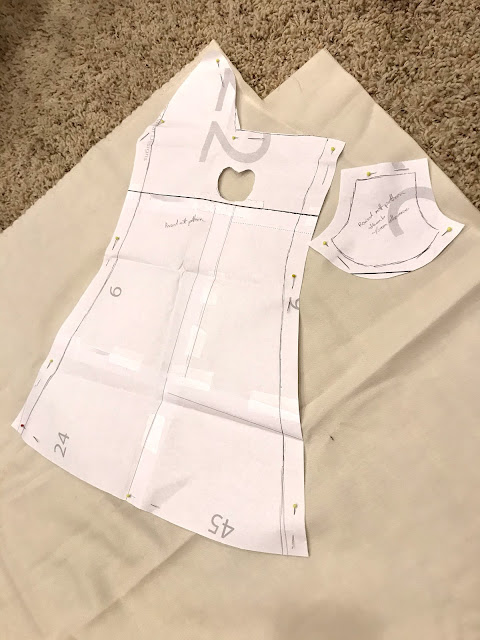
I used the pattern from The American Duchess Guide and cut out my mitts on January 4th. 


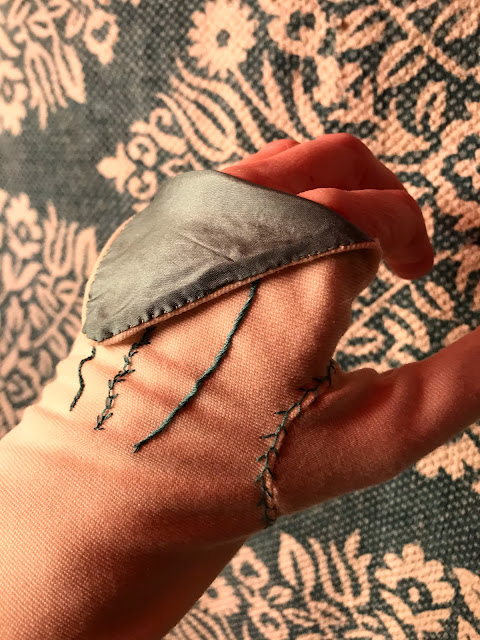
I pulled out some silk taffeta scraps, left over from the dress I made my mom for my brother's wedding, to cut out the point linings for my mitts. 


I had a hard time picking what color silk scraps to use for my points, until I came across this pair of white leather mitts with green points on Pinterest. Even if my materials are a bit questionable from an accuracy stand point, at least my color combination is good!


Then, I pulled up the Penny River Costumes 18th Century Mitts video, referenced by Dixie DIY,  and followed along with it to make my mitts.


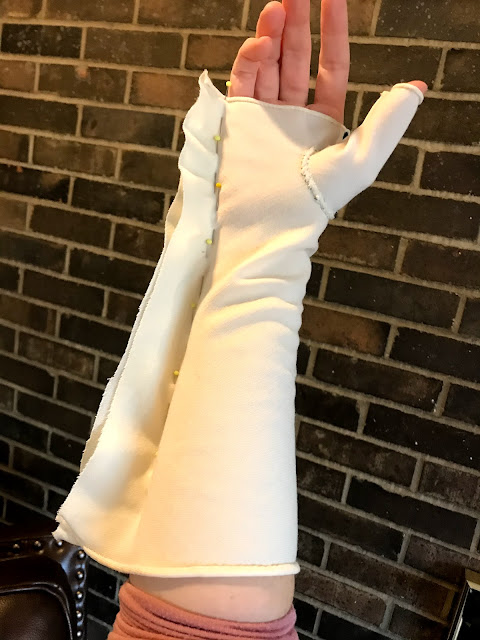
First, I sewed the thumbs. I may have made them a bit long. Oops.


Next I hemmed the tops of the mitts themselves and sewed the silk points linings in place.


Then I set the thumbs.


And sewed those in place.


Once that was done, I had a chance to practice my embroidery skills!


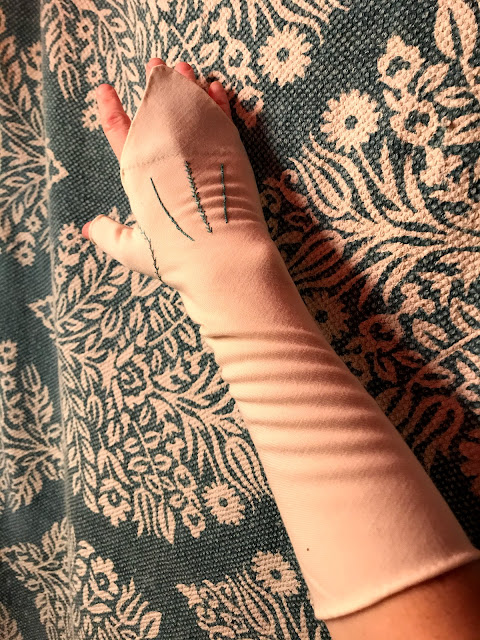
I did a feather stitch around the base of the thumb, then one line of feather stitches down the back of the glove and two lines of stem stitches, influenced by some extant examples of embroidered mitts I found on Pinterest.


All the embroidery was done in Gutterman silk thread. 


I just happened to have a spool in my stash which matched the silk I used for the points perfectly!


Embroidery done, it was onto the finishing touches!


The bottom edge was hemmed, then I fit the mitts to my hands and arms.


I sewed up the seam with a back stitch then felled the seam allowance. 


After snatching bits of hand sewing time throughout the week, on January 10th, barely a week after I began them, my mitts were finished!


My first completed sewing project of 2021!


And, so far, these are my only completed historical project of 2021.


However, I'm sure that will change!


After the Wedding!

Meanwhile, here are the Historical Sew Monthly details for these fantastic wool mitts!

What the item is: 18th Century Mitts

The Challenge: Small is Beautiful - these are a pretty small item that I focused on making beautiful with some simple embroidery. They’ll be a great addition to several different ensembles!

Material: worsted wool outer, silk taffeta for facing the points

Pattern: American Duchess Guide to 18th century dressmaking, altered to better fit my hands.

Year: possible for any time in the 18th century, but mostly the second half of the century.

Notions: cotton thread for construction, silk thread for embroidery.

How historically accurate is it? The pattern is good, the materials are plausible, but there is no documentation for woven wool mitts rather than knitted mitts. Cotton thread is not accurate. The construction is good, all hand sewn with what I know of period stitches. They would be recognizable in the era. I’ll say 80%

Hours to complete: About one week of hand sewing, not sure on the hours - whatever I could squeeze in between making sure the kid was getting his virtual school done
!
First worn: Not yet 🙂

Total cost: All the materials were left over from other projects, so essentially $0! The wool was gifted to me from someone de-stashing, the silk left over from a dress I made my mom. The only thing I personally paid for was the thread, for previous projects. Great scrap buster project!


Saturday, May 8, 2021

A Dress for My Bridal Shower Tea Party

 There's this thing about sewing a wedding dress. It takes a heck of a lot of time. A heck of a lot. For a solid 4 weeks, I sewed nothing but my wedding dress. So. Much. Silk. And. Lace. I love it. The dress is coming out just as beautifully, if not better, as I always dreamed it would. Four weeks of only working on one thing however? That is exhausting. I needed to sew something else. Something a little more instantly gratifying than this gorgeous gown I've been dreaming of for over half of my life. I love it, but I needed a break from it.


Thus, at the end of the fourth week of wedding dress making, I took that break. My sister and mother were hosting a bridal shower for me on Sunday, and I decided that was as good a reason as any to switch gears in the sewing room. On Friday I would not touch my wedding dress at all, instead I would make myself a new dress to wear to my bridal shower.


I don't know about you, but personally I have an endless list of sewing projects I'd like to get around to. I have patterns and fabrics from my stash all paired up in my mind - and sometimes even on paper - I just lack the time to do everything I want to do. Thus, when I decided I was taking Friday to make myself a bridal shower dress, I ran through my mental list of these fabric and pattern pairings to pick something suitable. I wanted my new dress to have a white background (to be appropriately bridal and all that) which narrowed down my endless list considerably, and within a few minutes I knew just what I would be making.


Simplicity 8731. Now the coat is the real eye-catcher when one looks at this pattern, but give that dress a second glance. It has some really neat seamlines and the potential to be amazing all on it's own. I picked up this pattern on sale when it first came out, and shortly thereafter my best friend's mom gifted me 4 yards of a rose and butterfly print quilting cotton, which someone else had gifted her. It wasn't something my best friend's mom could see herself using, but she figured I might just enjoy it. And she was right! Immediately the fabric was earmarked for this dress. Less immediately, it was sewn.


So, after a couple years of not getting around to making this dress, I decided it was time. I would sew the dress on Friday and wear it on Sunday. My best friend's mom would even be at the bridal shower on Sunday to see and appreciate what the fabric had become. It was perfect! Thus, on Thursday night I cut out the dress.


This dress featured an under the bust seam, which I knew from experience with Simplicity patterns, would hit me mid-bust as drafted, rather than under the bust. So, before I cut into my rose and butterfly cotton, I slashed the front bodice piece right above the bust darts and added about an extra inch of length there. The darts on Simplicity patterns are generally a little too high for me, so I figured this would fix both the too high darts and the too high under bust seam all at once. I added the same amount of length to the back bodice piece at about the same level so the front and back would still match up properly, then cut out my dress, hoping for the best.


Friday morning I got the bodice and skirt assembled before work. Friday afternoon, I pleated the skirt and pinned it to the bodice while sitting in a school pick-up line. I then managed to get the skirt sewn to the bodice using my boss's sewing machine while the kids were occupied and playing nicely. That evening when I got home, I hemmed the dress and put in the zipper. I'd done it! I had a new dress to wear on Sunday!


I was thrilled! Not a single seam was finished in this thing, but that was fine. I'd made myself a wearable dress! Possibly the first casual dress I've made myself this year! (Getting engaged in January really slowed down my normal sewing for the year. . .) I loved it! Well. . . almost. It was definitely missing something. 


I put the dress on and stared in the mirror, trying to figure out what that "something" was. I threw on a net petticoat under the dress. That certainly helped, but it still needed something else. A belt? Not quite. What did this dress need?


The following morning it hit me. The problem was the fantastic seamlines were disappearing in the print. Those seamlines needed to be highlighted. The dress needed trim. I pulled out my collection of ribbon, lace, buttons, and bias tape and started playing with different options. Nothing was quite right. 


  I told my mom about my struggles and she pulled out her collection of trims, passing me anything that might be about the right color. After considering quite a few options, I settled on a couple small lace appliques and some robin's egg blue bias tape.


Neither my mom nor I had any ribbon the right color, so I used the bias tape in place of ribbon to highlight the under bust seam. Thanks to my pattern alterations, this seam did indeed hit me properly under the bust!


I used the lace appliques to highlight the way the skirt seam curved upward to the under bust seam. 


I sewed the trims in place Saturday night, then tried the dress on again.


The trim was just what the dress needed!


This time I truly loved the dress!


No reservations!


On Sunday I put on the dress.


My sister-in-law spoiled me by doing my hair in a vintage-inspired style.


And we proceeded to have a fantastic time at the out door tea-party bridal shower my sister has been pain-stakingly planning ever since I got engaged.


We played games, talked, drank tea, and just generally enjoyed the company of friends and family we haven't been able to see in a while!


My sister did a wonderful job planning this party!


And my best friend's mom did indeed recognize my dress fabric!


She was happy it had been put to good use!