Tuesday, September 29, 2020

The Accidental Floofy Orange Dress

 I had no plans to make this dress. None. Zilch. Nada.


I had this dress 2/3rds of the way cut out before I decided to actually make it. No forethought or planning went in to this.


So, this orange pin dot fabric. It's a cotton I picked up at a thrift store years ago. How much of it did I have? I don't know. That's part of the reason this dress came to be. I have no idea how much of this fabric I had, but it wasn't enough.


This fabric paired beautifully with a fabric I'd picked for the accent pieces (cuffs, collar, ruffles, pockets, those sorts of things) of a dress I wanted to make. So, I pulled the fabric off my shelves, looked at it and decided there was probably just about enough for the the dress I had planned, and proceeded to cut the bottom ruffles for said planned dress.


After I cut those bottom ruffles I discovered I'd miscalculated. There was not enough fabric left for me to cut out the remainder of the dress. Crap.


At this point I figured "Well, I've already got two tiers of ruffles cut, why not just cut a third tier and make a tiered skirt for myself."
So I cut out the top tier of ruffles. 


After that top ruffle was cut I still had a little bit of fabric left, so I thought "Hmm, maybe I can make it a dress."
I proceeded to look through my pattern collection to see if I could find a bodice pattern that would pair well with a floofy ruffley skirt and not require much fabric. I found Vogue 1696, a reprint of a 1954 pattern and decided the airy bias cut bodice with ribbon straps was just the thing.


With careful positioning, I managed to squeeze the bodice out of my remaining fabric. Once the bodice was cut, I was thrilled to discover I had just barely enough fabric left to cut two patch pockets.


Nearly every scrap of fabric used, the dress got sewn up, and by the middle of the following day it was ready to wear! 


The patch pockets were inserted into the second tier of the skirt. Each skirt tier was lightly gathered into the tier above it and the bottom hem was finished with a bias tape facing.


The bodice was fitted with two tucks in each side seam rather than the more standard darts.


This is different, but I do like it. Those tucks might just be the one detail that induces me to use this bodice pattern again. The bodice feels relaxed, but not shapeless, and fits excellently! The only alteration I made was to add an extra inch of length to the bottom of the bodice as it looked a little short to me.


The finishing touch of this dress is the ribbon straps that tie in a bow at the back.


I picked a wide dark green ribbon from my stash for these ribbon straps as I thought it paired nicely with the pale orange. I considered adding green rick-rack to the skirt to match the ribbon, but decided against it. This ribbon is entirely removable, just threaded through casings at the front and back of the bodice so I can easily swap it out in the future if I want straps of a different color. By leaving the skirt plain and untrimmed, I'm keeping the possibility of different colors open.


I love the look of the ribbon straps and the bow in the back, but I must admit it is a little annoying to have to tie up the straps at the correct length every time I put the dress on. 


It's kind of hard to tie a bow by yourself in the middle of your back, so I generally enlist a family member's help. I love the look of the ribbon straps however, so I'm willing to deal with the annoyance.


For a dress I had no intention of making, this one sure did turn out well!

Thursday, September 24, 2020

My Wildwood Wrap Dress of Gingham

 Nearly a year and a half ago I got an email from Peggy of Sew House 7 patterns asking if I'd like to test a wrap dress pattern for her. I have a soft spot for wrap dresses, so of course I said yes!


In late spring of 2019 I tested the pattern and sent my feedback off to Peggy along with all the other pattern testers. Since then, she has altered and adjusted the pattern, added another sleeve and and skirt length option, and extended the size range of the pattern. After all that hard work, finally this week, the pattern was ready for it's debut.


It's called the 
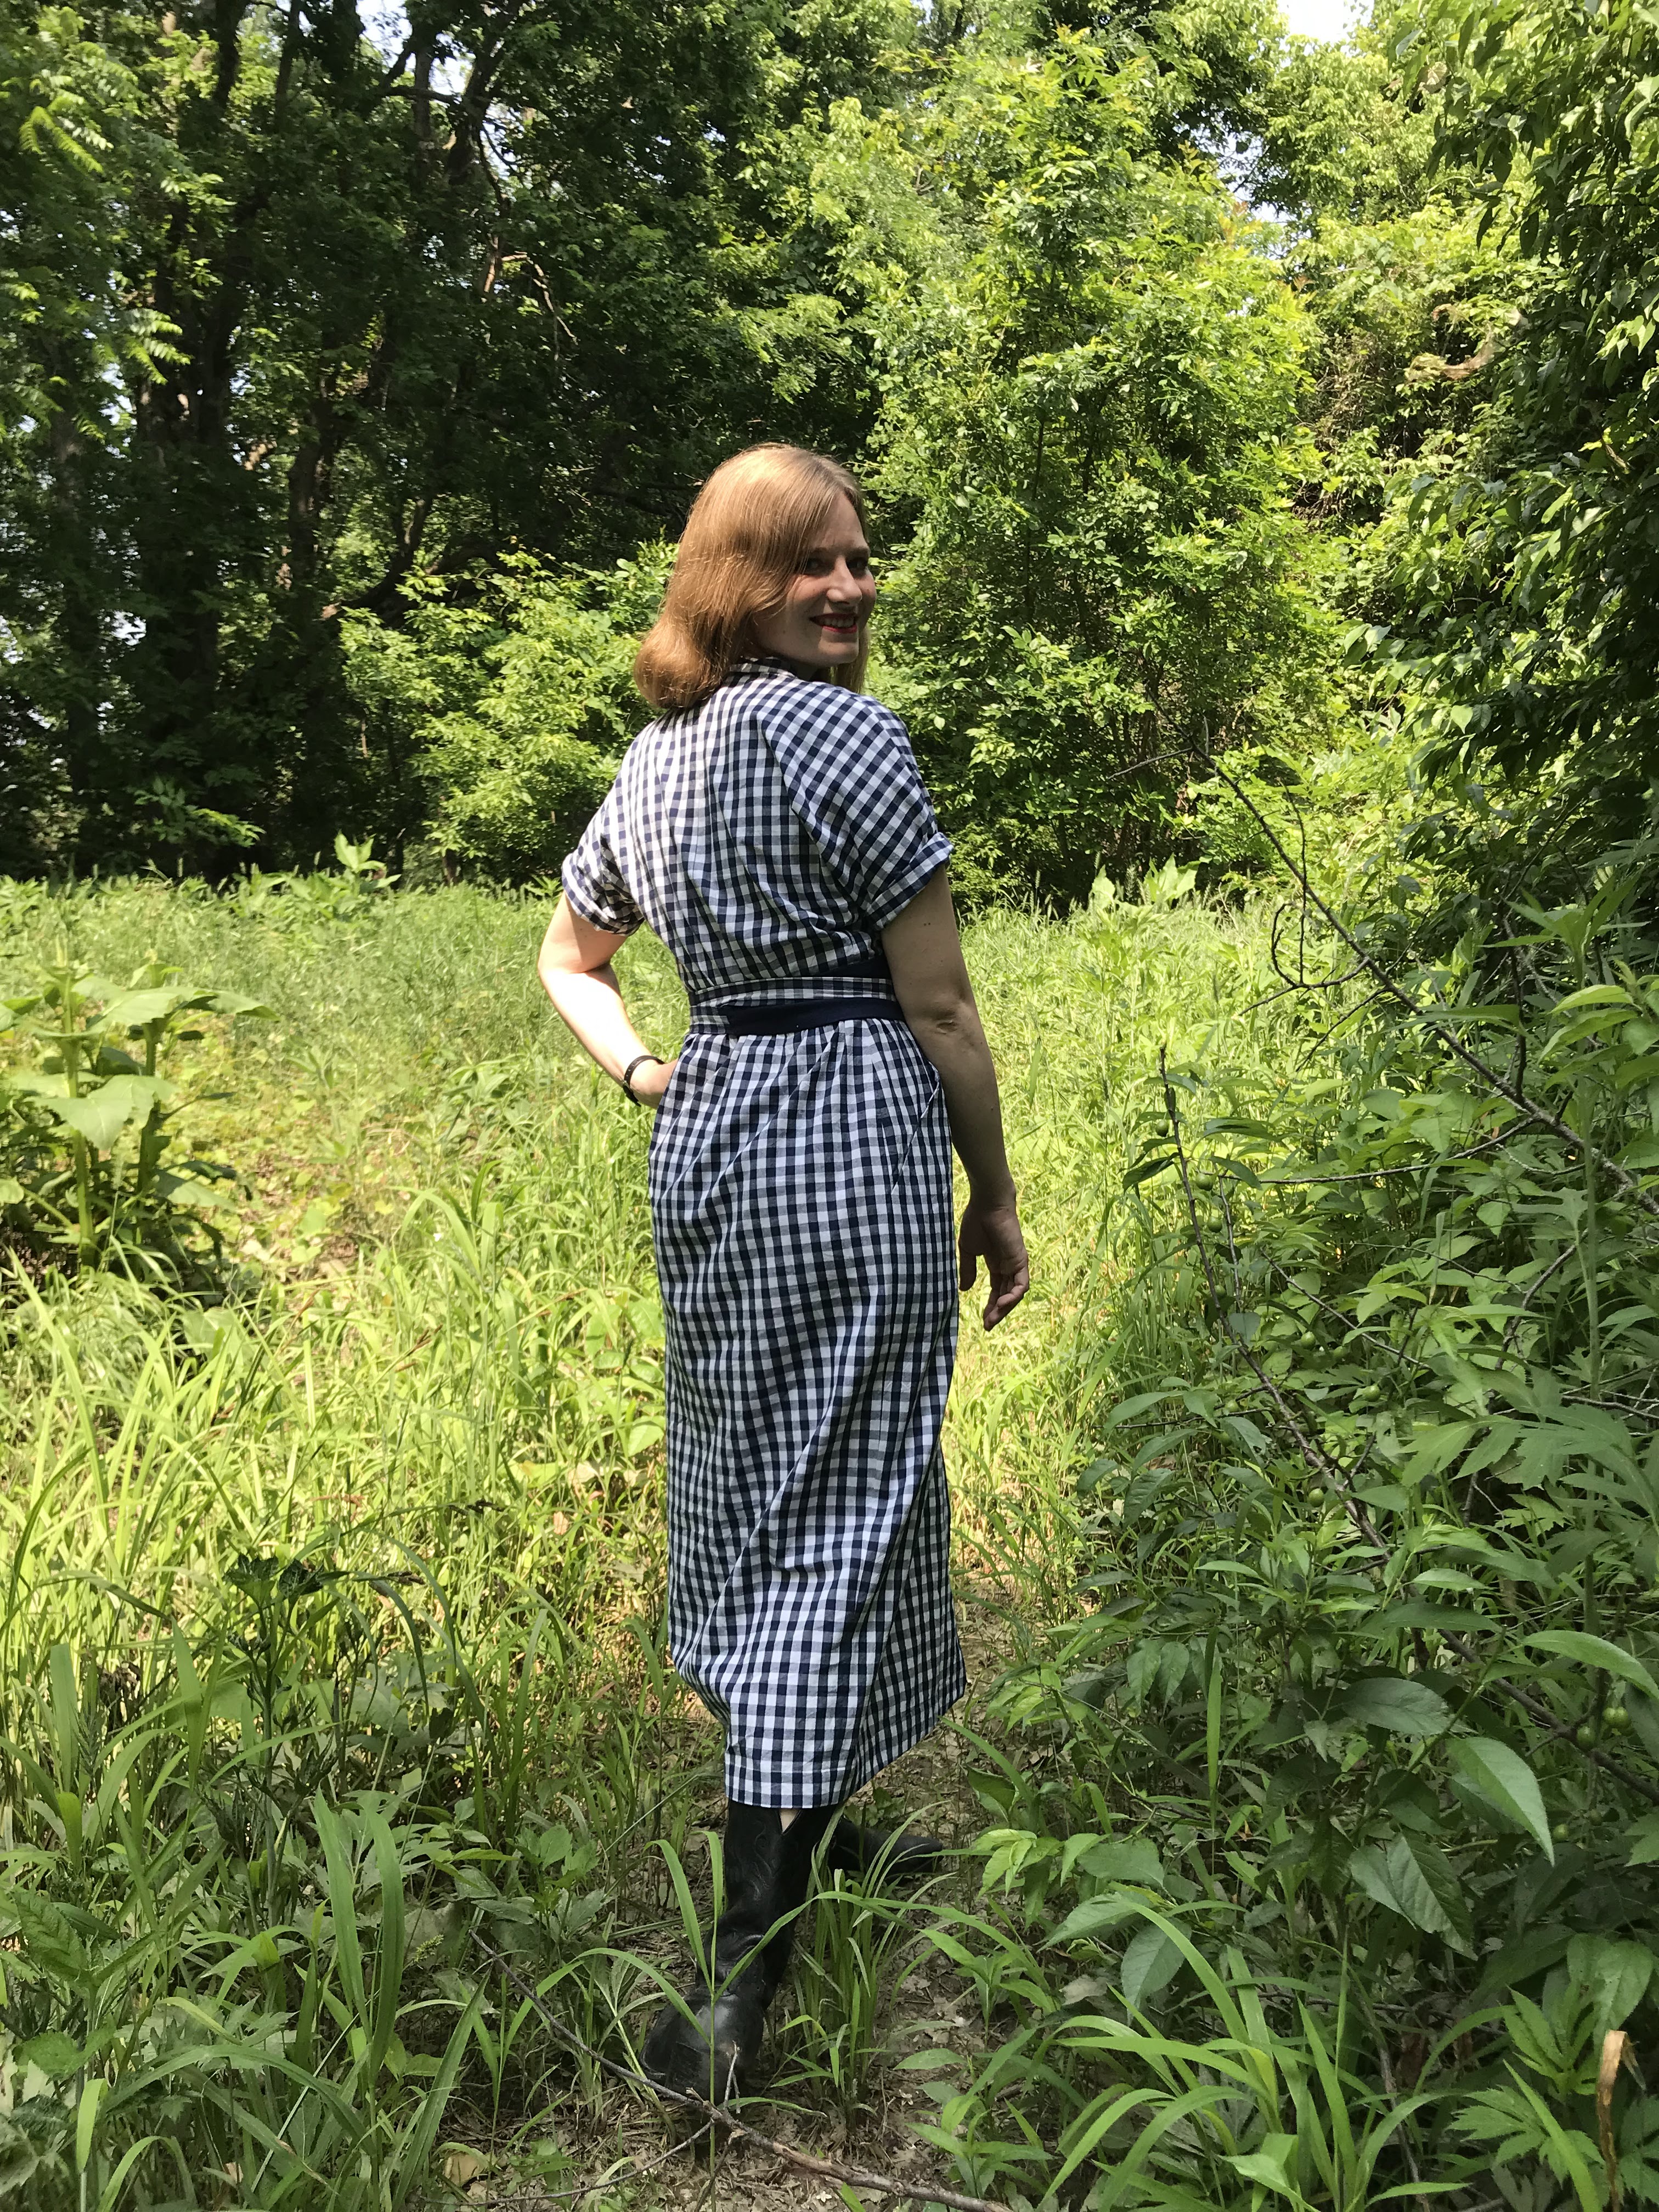
Wildwood Wrap Dress and I just love that name! It conjures up romantic images of time spent wandering through the forest, observing and discovering secrets the forest holds, coming out into a clearing with sunlight filtering through the surrounding trees. A wonderful, blissful, afternoon of the type Anne Shirley and Dianna Berry would enjoy. Never underestimate the power of a good name. If I hadn't already been sold on testing this pattern because; A) Sew House 7 patterns are awesome! and B) I love wrap dresses, the name would have sealed the deal.


This pattern was specifically designed with linen in mind. I was totally going to find a nice linen to make my dress from, but then I fell down a rabbit hole of gingham wrap dresses on Pinterest. I wanted one. Hobby Lobby just happened to have a really nice 100% cotton yarn-dyed navy blue gingham in stock at the time, so I decided it was meant to be. My Wildwood Wrap Dress would be gingham. Maybe  in the future I could make another out of linen.


The bodice features cut-on sleeves and a shawl collar. It's fitted with tucks in the front waistline.


It's rather loose and breezy, but still gives great coverage and doesn't gape easily - a definite plus for a wrap dress.


Now the skirt is considerably straighter and tighter than what I usually go for. Not my usual silhouette at all!


That said, I don't think I'd ever before worn a skirt with this silhouette, so I thought it was worth a try. Did straight skirts truly not suit me, or did I just *think* they didn't suit me?


Well, let me just start by saying I do like this dress, and have worn it quite a bit since I made it a year and a half ago, but no. I'm just not a straight skirt kind of girl. I really appreciate this pattern overall, but if I make it again I intend to pair the bodice with a fuller skirt. That's just personal preference.


A straight skirt, especially a straight wrap skirt just doesn't fit in with my lifestyle of keeping up with, playing with, and caring for kids and livestock. It's hard to get down on the floor to do a puzzle with a 5 year old in this dress, or climb over a fence to check on a goat in the field. However, running errands on a Saturday? Going out with friends? Cooking dinner or sewing at home? This dress was made for that!


It's one of those dresses I'll throw on when I get home from work in the evenings, because it's just so comfortable!


When I first made this dress I had an issue with the skirt falling open, all the way open, every time I sat down. That was inconvenient to say the least.


I fixed the issue by adding three buttons to the top of the skirt to keep it closed from waistline to upper hip.


My buttons are stabilized with a piece of linen tape on the inside of the skirt. You could also stabilize the buttons with some interfacing, but I like how the tape doesn't interfere with the drape of the fabric at all the way fusible interfacing would.


Once I had those buttons on, I felt much more comfortable wearing this dress out and about than I was previously. Since this "skirt falling open" issue was revealed during testing, the pattern was amended prior to release to include instructions for adding a hook and eye to keep the top of the skirt closed. This does the same thing as my buttons - just invisibly!


Now, since I've complained enough about the skirt, let me tell you what I actually love about it.


It has the most large and amazing pockets ever! They are huge, so they can hold just about anything, and they're also well supported so they don't gape or drag down the skirt no matter how much stuff you shove in them!


Yep, these are THE BEST pockets!!!


You know how I said earlier that I plan to use this bodice pattern again and just add it to a different skirt? Well, I'll probably do that with this pocket pattern as well. It's really great!


Sometimes a pattern may be a really great pattern, like this one, but elements of it may not be your style, like this skirt for me - and that's ok! The fun thing with sewing is you can customize almost anything to fit your tastes! You can hack patterns to your heart's content to get a garment that's truly "you" in the end, while still retaining what appealed to you about the pattern in the beginning. I love starting out with a pattern, then taking it my own direction.


This dress fastens at the waist with a button and loop on the overlap and twill tape ties on the underlap. The final piece is an obi-inspired wrap belt.


To break up all the gingham a little bit, I made the main part of my belt out of navy blue linen, left over from this skirt, and made the ties reversible with linen on one side and gingham on the other. The perfect finishing touch!


As the belt, and other elements of this dress design are clearly inspired by traditional Japanese fashion, I decided to wear this dress to the Japanese festival with my friends last year.


I got several compliments on my dress and a few people asked if I'd gotten it at the festival.


Nope, this isn't a dress you can buy, you've gotta make it!

Tuesday, September 22, 2020

A Slytherin Hoodie For My Brother

 Almost as soon as September hit, it started cooling off. Not that it’s particularly chilly out yet, but I don’t think we’ve had a 90 degree day all month! And that’s honestly rather surprising here!


It’s actually been cool enough mornings and evening that hoodies and such have been pulled out and are getting worn regularly.

A couple weeks ago my brother came home from school for the weekend wearing a hoodie I made him a while back, and of course that made me smile! I love seeing things I made get worn.


I made him this hoodie for Christmas 2018, yep nearly 2 years ago now. Last Christmas (2019) I managed to snap some pictures of him wearing it on a family walk. Now it seems like a good idea to get it blogged before Christmas 2020!


As I’ve mentioned before, this brother of mine has been sorted into Slytherin house, and fully embraces his Slytherin identity. He has a set of Slytherin Hogwarts robes and a couple different Slytherin cloaks I’ve made him, which he regularly wears around the house. Thus, a couple of Christmases ago I decided he also needed some Slytherin themed muggle clothing for day to day wear when cloaks are a little more attention grabbing than he’d like.


Enter, the Slytherin Hoodie. I decided to make it pretty much as a muggle version of school robes - black, with green trim and a Slytherin House badge on the chest. The finishing touch is the silver metal zipper down the front.


I used the Otari Hoodie by Scroop Patterns as my pattern for this. Yes, technically this is a woman's pattern, but it has a pretty straight, loose, fit, I already had it in my stash and trusted the sizing, and it had all the elements I was looking for in a classic hoodie for my brother. I particularly love the 3 piece lined hood on this pattern. Three piece hoods just fit nicer than 2 piece hoods do, but some how the majority of the hoodie patterns I own just have 2 piece hoods. Why?!?!? (3 piece hoods can also be squeezed out of smaller scraps of fabric, as an added benefit!)


Prior to beginning this Christmas gift, I'd had my brother try on my Otari hoodie for a completely unrelated reason (One of my instagram friends actually wanted to know how I thought this pattern might fit a male), so I'd been able to judge how this pattern actually fit my brother. I knew from that try-on that he'd found the sleeves and shoulders a little tight. With this in mind, when I cut out my brother's hoodie I did a wide shoulder adjustment and a full bicep adjustment.


These two adjustment resulted in a finished hoodie that fit my brother just about perfectly - at least I've heard no complaints about the fit and he wears the hoodie regularly, so I'll call that a win!


The black fabric I used is a sweatshirt fleece I found lurking in my stash. I have no recollection of obtaining it so who knows where it originated. The green is a cotton/spandex jersey I bought specifically to make Slytherin themed things for my brother out of. It has served that purpose well here. The Slytherin patch on the front was cut out of Slytherin quilting cotton just like the one on my brother's Slytherin school robes.  


The edges of the badge were sealed with Fray Check then I appliqued it onto the front of the hoodie with a tight zig-zag stitch.


My brother tells me that he has received several compliments while wearing this hoodie and and about, but not too much attention so he feels out of place. 


 This is exactly what I was going for with this project! Subtle house pride.


To the untrained eye this is just a black hoodie with green accents.


It's the details that make it special.