Showing posts with label Wool. Show all posts

Saturday, January 20, 2024

The Plaid Wool Fringed Shawl

 In the fall of 2019 I came up with a brilliant idea - I would make a shawl to wear with my new 1840's wool dress! A nice large woolen shawl, it could be worn with all sorts of different dresses from throughout the 19th century - it would be perfect!


I dove into my books to research shawls. If I was going to make this thing I was going to make it right! My family had a re-print of an 1890's Sears catalogue we'd recently picked up and I read all the descriptions of the shawls for sale in the catalogue.


60" by 60", plus fringe, most of the descriptions read. 

I went to my wool stash to see what my fabric options were. After rejecting several fabric cuts because either there wasn't enough yardage, or I had the fabric earmarked for something else, or I didn't like the plaid for this project, or the fabric was too narrow, I finally decided on a gray and red plaid wool I'd picked up from a thrift store for a couple bucks a few years earlier. (I picked it up at the same time I snagged the wool that became this skirt)


The fabric was a full 60" wide, and there was enough of it to cut a full 60" square and still have some fabric left over. So I cut out my square. (And a few months later I used the leftover fabric to make my Hogwarts-inspired bonnet.) Now all I had to do was fringe it!


Now the "proper" way to fringe a shawl is to un-ravel the fabric for a couple inches all around the perimeter. But is that what I did in 2019? Oh no. I was unaware. I made my life much harder than that. Don't get me wrong, I did unravel fabric. . .


A lot of fabric, but. . .


It was not along the edges of my shawl.
I was worried that if I unraveled the edges that would reduce the dimensions too much, I really wanted that 60"x60" + fringe shawl, so I decided at add on fringe instead of unraveling my fabric.


 Along the two edges of my shawl that were not selvedge edges I sewed a very tight zig-zag on my sewing machine to keep the fabric from unraveling. Like I said, there would be absolutely no unraveling the edges of my shawl!


Then, I unraveled my fabric scraps, and cut my unraveled threads to a uniform length.


I sorted the threads by color, then threaded a couple at a time onto a large craft needle.


And I used the needle to thread the threads through the fabric along the edges of my shawl.


Then I knotted the little bunches of fringe in place. 
Making sure, of course, to match the fringe color with the color of the plaid at each location.


This way, when all was said and done, it would look like the fringe had been created by just unraveling the edges of the fabric.


Yep, just by unraveling the fabric, with a few extra steps thrown in.
Honestly, at the beginning it was pretty relaxing and fun, matching up the colors and knotting the fringe onto the shawl.


The completed sections of fringe were just so satisfying to look at!
I started the shawl on a Monday, thinking I'd have it done by that Saturday to wear to a Halloween party. (Thank you date stamps on photos and old blog posts to remind me of the details!)
I did not. In fact, one month later, I only had about 18" of the fringe done. 18" on one of four 60" sides. That's less than one-eighth of the way around the shawl! Barely more that one-sixteenth if my math is correct!


Unravel the fabric.


Cut the threads to the correct length, sort by color.


Knot onto the edge of the shawl and repeat. I definitely lost momentum. This "fringe the shawl" idea became very tedious. I wished I'd just unraveled the edges of my wool like a normal person! But it was too late to do that now. I'd started the shawl this way, I was going to finish it this way! I'm stubborn like that.


For the next 4 winters (2019/2020, 2020/2021, 2021/2022, and 2022/2023) I picked up the shawl between other projects and continued adding fringe. Honestly, knotting the fringe on wasn't too bad. It was the running out of fringe, or running out of one particular color of fringe, and having to unravel more fabric part that got annoying. 


Finally, a couple years in, I figured out a method that worked really well for me. Rather than knotting on the fringe one section at a time - dark gray, white, dark gray, red, dark gray, light gray, dark gray, red, dark gray, white, dark gray, lots of light gray, white, more light gray, and repeat (I bet it was tedious just reading that.) - and having to stop every time I ran out of of one particular color to unravel more, I would just work with one color at a time. I would knot on all of that color I had unraveled.


Then I would pick another color and knot on all of that color that I had unraveled.


Until I has whole sections filled in! (As time went on I also became less obsessive about making all the fringe the exact same length.)


I made some real progress with this method! And finally, last January, over three years after I began this "It should only take me 5 days of knotting on fringe in the evenings while watching TV to finish" project, I actually finished it, by knotting the final bunch of fringe - one strand of each color - onto the final corner of the shawl.


It was done. My big woolen shawl was finally, finally, finished and ready to wear with all the costumes. And what did I do with it?


 I put it away in the closet. After over 3 years I was tired of it. It took too much time!


This winter however? It's finally doing what it was made to do.


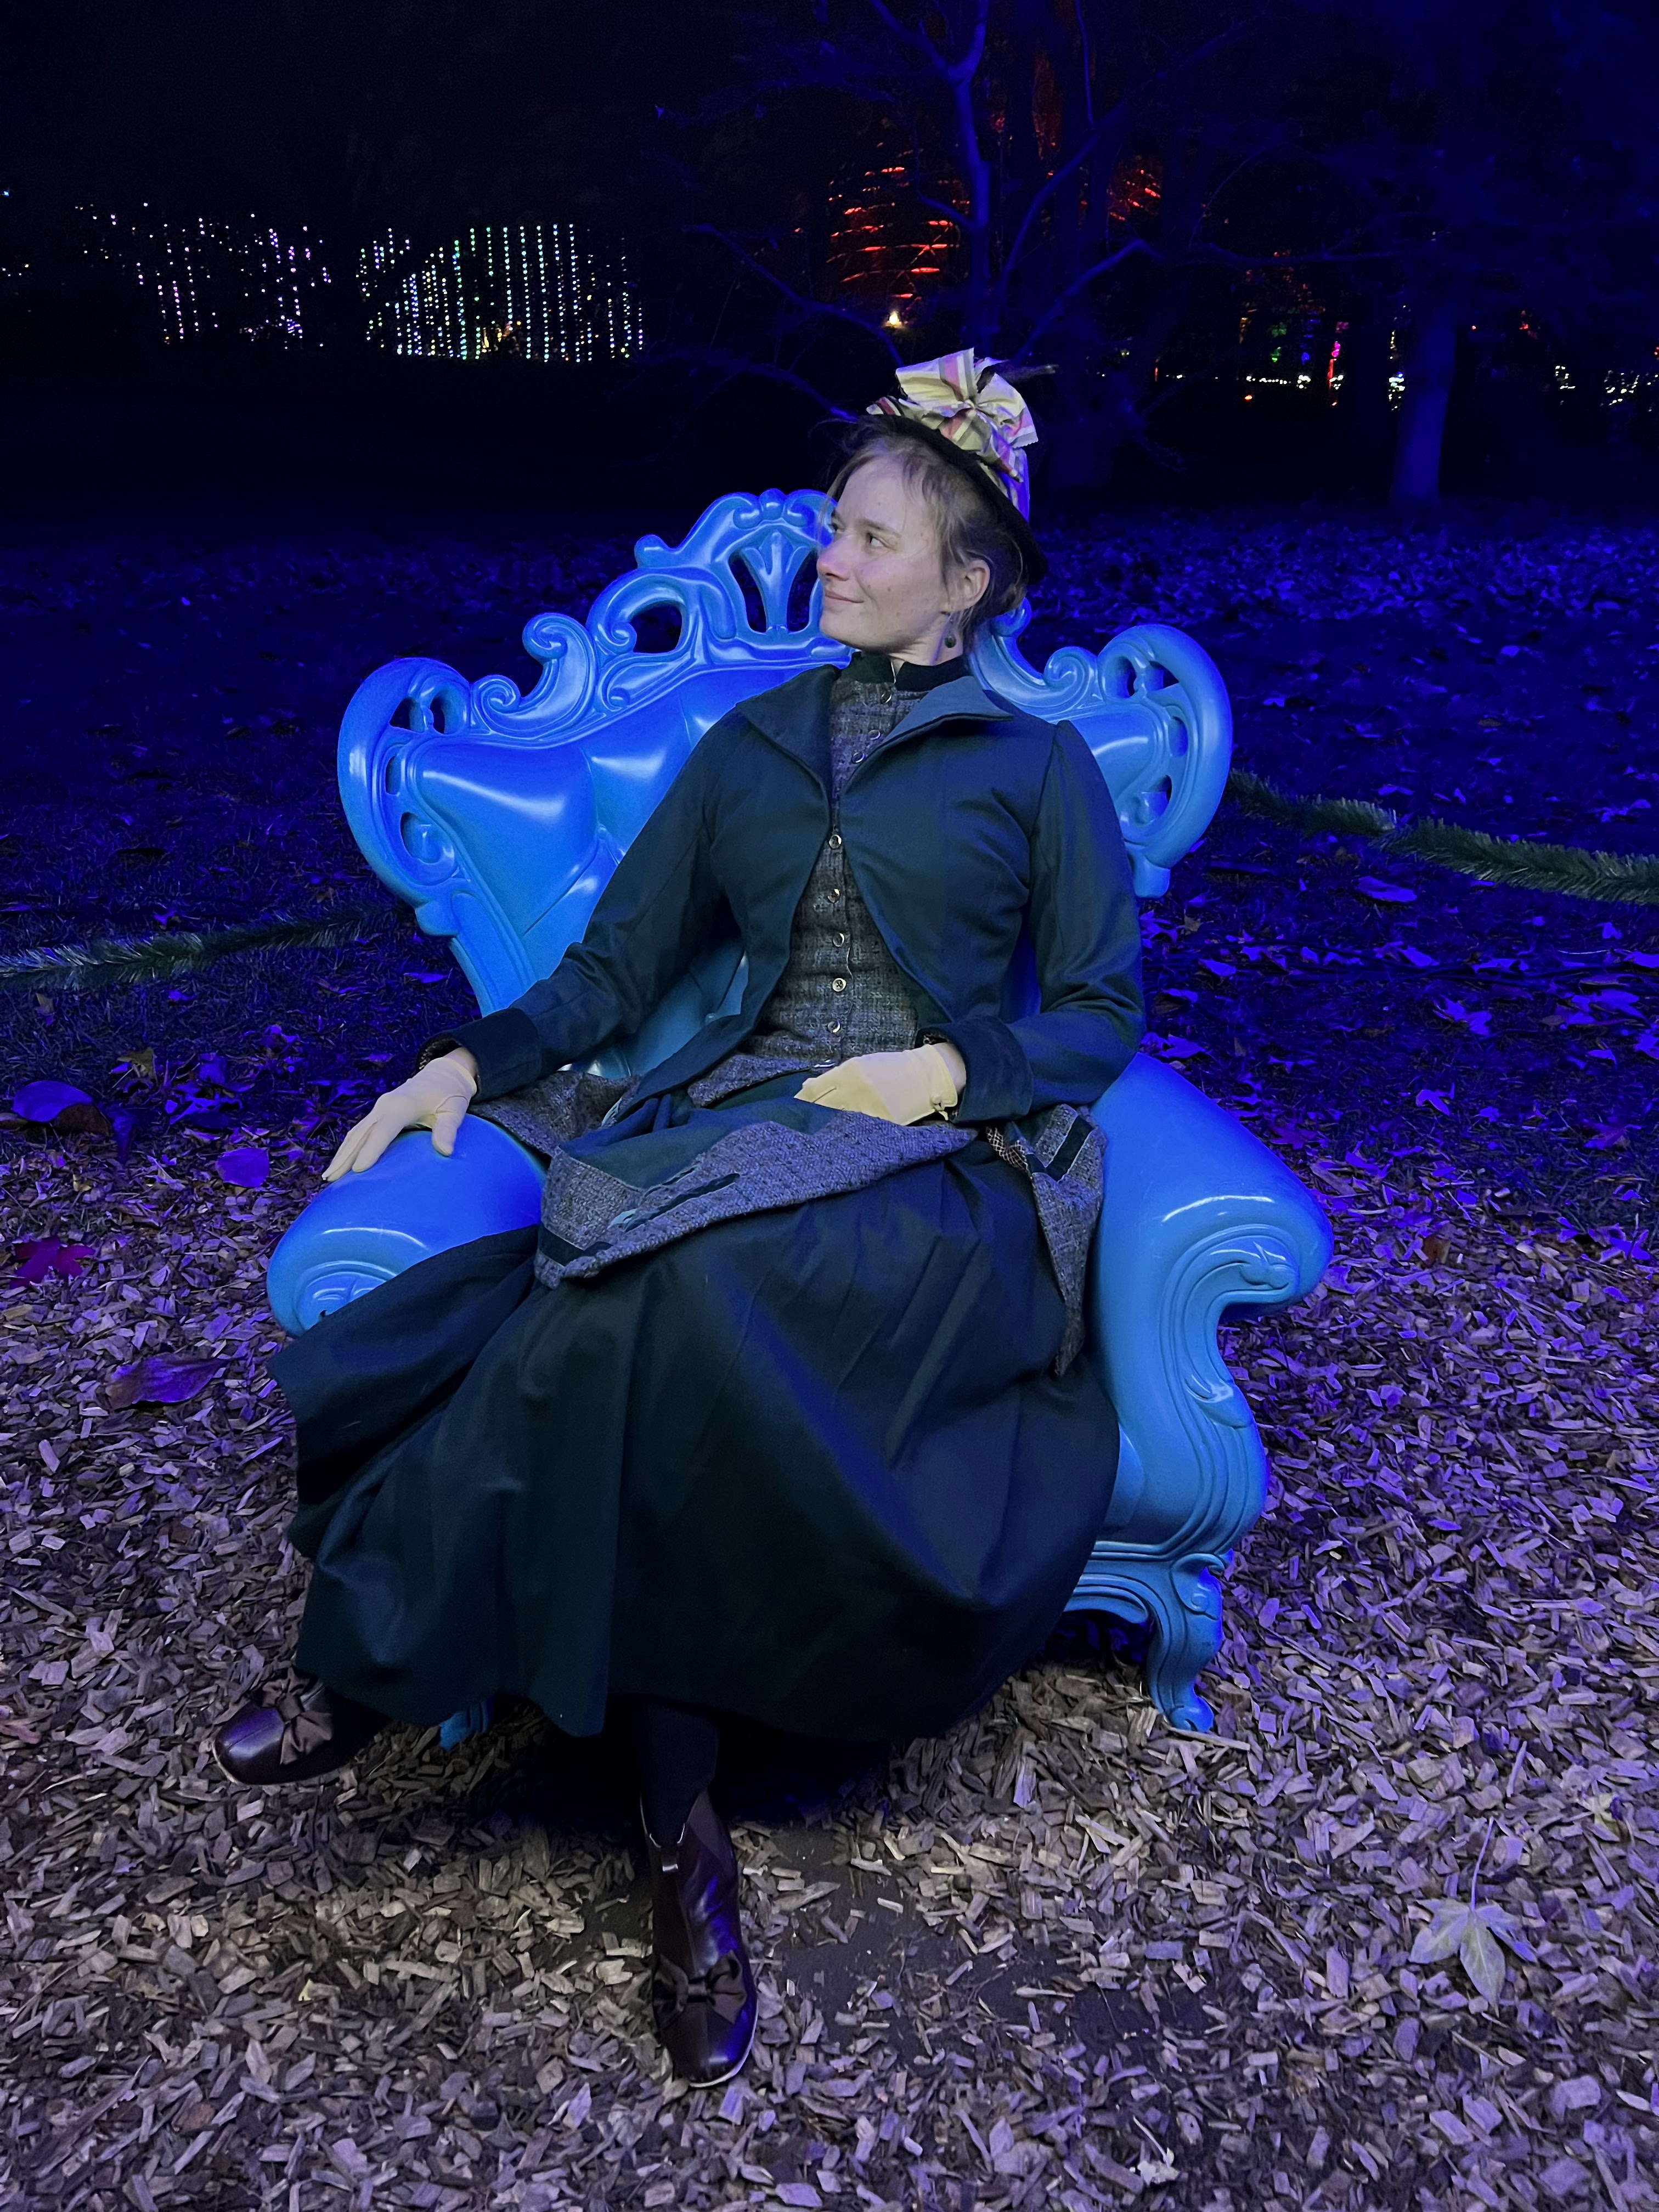
It pairs quite wonderfully with my 1890's wrapper (Which I wear around the house "just because" probably atleast once a week!) It's just the thing to throw on over the wrapper on mild winter days to run outside and do quick animal chores.


And on these very, very, cold winter days we've had recently, I've been wearing it even in the house, while sitting by the fire.


Despite the literal years it took me to make, I've very glad to have this thing - though I will never, never, make a shawl like this again!


Every single year I worked on this thing I picked a Historical Sew Monthly theme it would fit if I could get it done in time. After many themes (it would have been perfect for) came and went, I was left with the 2023 options, and I picked challenge #3:

Focus on the Fabric!

Because really, what else is there to this shawl? It's all just one single piece of fabric, with fringe, made from the fabric, knotted on to match the design woven into the fabric. 

What the item is: A fringed Shawl

The Challenge: Focus on the Fabric

Material: Wool Plaid

Pattern: None, just the dimensions of the shawls in an 1890's Sears catalogue as reference

Year: Pretty much the whole Victorian era

Notions: none, all the fringe came from unraveling scraps of fabric, so it's really all just the fabric.

How historically accurate is it? The fabric and dimensions are accurate. My fringing method? Probably not. I believe it would have been more accurate to unravel the edges of the shawl to make the fringe, rather than unraveling fabric scraps to get the thread then knotting those threads onto the edges of the shawl to make the fringe. When I began this project 4 years ago I valued dimensions over method. Thus a project that took way too long to finish.

Hours to complete: Too many. 4 winters of working on this thing between other projects.

First worn: This winter I guess. I don't have a specific date I can recall.

Total cost: The fabric cost me $4 at a thrift store years ago.


Thursday, January 4, 2024

A Glowing Garden Stroll in Victorian

 For years now my two best friends and I have had a tradition of going to the Botanical Gardens during the Christmas season for the "Garden Glow" - always an enjoyable evening of wondering through and admiring the lights while drinking hot chocolate or apple cider and chatting. The gardens are beautiful, day or night, and seeing them all decorated with Christmas lights is a special kind of thrill!


Last year, as we were preparing to go to the gardens, it crossed my mind that I could dress up for the event. Why not? The gardens were founded in the Victorian era, so why not? I had a couple cozy wool Victorian ensembles in my closet that would be warmer to wear than my standard jeans and jacket - so why not go all-out and dress up for the occasion?


I floated the idea to my two bestfriends, and they were enthusiastic supporters of the idea! So, I did it.


I wore my 1898 winter ensemble to the gardens. With a long sleeve shirt and leggings underneath I was quite warm and cozy - my cheeks and ears were just a touch chilly.


Dressing up certainly added a layer of charm to the evening!


It was totally worth it! So this year, I decided to do it again.


Our group size grew by two, and my costume slightly grew as well - in the back atleast.


I wore my 1884 ice skating dress


And once more, the evening was delightful! 


The entirety of the gardens are, of course, stunning. However, a particular highlight for me was touring the founder's Victorian home - all decorated for Christmas!


It was charming! 


Old homes have a special place in my heart - and getting to tour them in costume is just the best!


I'm thankful to my sister-in-law for photographing me in the house.


Pretty lights, good friends, yummy drinks, the evening has always been very enjoyable. A tradition worth repeating year after year.


Dressing up for the occasion? Now that's just the cherry on top!


As we are still within the 12 days of Christmas, 

(and I insist on observing all of them by doing Christmas-y things and keeping my Christmas decorations up until after Epiphany) 

Merry Christmas and Happy New Year!

Saturday, April 22, 2023

Finishing and Wearing the Plaid Sheer Wool Late Regency (1810’s) Dress

 Two days before the fashion show and this was my to-do list for finishing my sheer wool 1810’s gown, now that  all the trim was done:

~ bind the neckline and sleeve cuffs

~ pleat and attach the skirt

~ drawstrings in the neckline and waistline casings

~ closures of some sort

Oh, and a bonnet. That needed to be finished too. But that’s another story.


The neckline and cuffs were bound in strips of fabric cut on the straight of grain. Bias cut strips are much easier to bind curved edges, such as necklines, with, but bias bindings were rarely, if ever, used in the 18th or early 19th centuries. On-grain bindings are a much more economical use of expensive fabric.


So, in the interest of accuracy, straight grain bindings it was! 


Once the neckline binding was on, I threaded a piece of 1/4” cotton twill tape through it as the drawstring.


~ Bind neckline and cuffs ✔️


Onto the skirt! 


I removed all my basting threads from the skirt trim, and then proceeded to pleat the skirt onto the bodice. 


I used knife pleats all along the back of the skirt, and the front of the skirt is left flat.


Once it was pinned on, I hand sewed the skirt to the bodice using a prick stitch.


The seam allowance was then covered in a piece of 1/2” cotton twill tape.


This formed a casing for the waistline drawstring - made from 1/4” twill tape just like the one in the neckline.


~ Pleat and attach the skirt ✔️

~ Drawstrings in the neckline and waistline ✔️


At this point it was the evening before the fashion show and I had a friend over for dinner. I tried on the dress so my friend could help me figure out how much the back could overlap before I sewed on the hooks and eyes.


Turns out I’d gained a bit of weight since fitting the mockup 6 weeks earlier, and there was no overlap to be had. The edges barely met at all. 


Thus, I sewed the hooks and eyes right at the edges of the back opening. The back would gap, displaying my bodiced petticoat, but atleast it would be fastened.


~ Closures of some sort ✔️


The dress was done! I just needed to trim my bonnet then I could go to bed and be well-rested for the fashion show the next day.


After using my one white Regency dress for anything and everything Regency for the past 6 years it was a thrill to have a new early 1800’s dress to wear!


And such a distinctive style rather than just another “plain white regency dress”.


I was definitely a bit disappointed that I had to resort to the sewing machine for the skirt trim - but when the dress is worn it’s really not obvious.


And the 
 overall look is fabulous!


It’s just so nice to finally have this dress done and wearable after years of planning and dreaming!


What the item is: 1810’s sheer wool dress

The Challenge: Perfect 10 - it’s from the 1810’s and there are 10 rows of gathered trim, 2 around the neck, 2 on each sleeve cuff, and 4 on the skirt.

Material: A sheer wool/nylon blend. It’s about 90% wool, so mostly wool and has a wool texture. The lining is cotton. Silk was used for the piping on the trim.

Pattern: I scaled up the 1813-1816 Morning Dress pattern from “Regency Women’s Dress” by Cassidy Percoco

Year: I based my dress on one from 1811 that I found on Pinterest and used an 1813-1816 pattern. So it would be suitable for most of the 1810’s.

Notions: Cotton cording, thread, hooks and eyes

How historically accurate is it? Sheer wool was often used for dresses of the era, but the nylon in mine brings down the accuracy a bit. A cotton lining is alright, though linen would be better. The pattern is accurate. The bodice was constructed by hand using period techniques, but the skirt and sleeves were machine sewn. It would be recognizable in the era I think. So 60-70%

Hours to complete: I’m not sure, I spent about 6 weeks working on this, and usually did atleast an hour of sewing per day.

First worn: September 3, 2022, for a Regency Era fashion show

Total cost: I believe I spent $5 per yard on this fabric several years ago. I think I got about 6 yards, so that’s $30. The notions were all from stash, the cotton and silk I got really cheap 2nd hand. So $35ish.