Showing posts with label getshirty. Show all posts

Tuesday, September 17, 2019

Turning a Button Down Shirt into a Button Down Skirt

In my first two days home from Uganda, I completed a sewing project, from start to finish, each day. I think I may have missed my sewing machine while I was gone, so now I must make up for it.


On Instagram lately I've noticed an awful lot of gathered, button-fronted, skirts. I think like three different PDF pattern companies have recently released such a skirt pattern. The more I've seen of these skirts, the more the style has grown on me. 


A couple weeks ago I wore this dress I made out of men's button down shirts during The Refashioners series a few years back. A day or two after that I wore this tunic I made from a button down shirt at the same time. These garments got me thinking about how much fun refashioning shirts had been, and how I really ought to do more refashioning. 


Then I remembered a very large men's cambric button down which I had in my fabric stash, obtained from a thrift store by my mother, who thought I might like the fabric, over a year ago. Suddenly, I knew what that shirt was going to become - a gathered button up skirt like all those I'd been seeing on Instagram!

I have no idea what I'm doing with my hand here, but the picture shows off the skirt beautifully!

Thus, after letting the idea stew in the back of my mind for over two weeks, I decided to actually make it happen this past Sunday afternoon.


Out came the 4XL, long sleeve, blue cambric, button down from my refashion bin.


To begin, I carefully seam ripped the back yoke, and only the yoke, off of the rest of the shirt. The remainder of the back of the shirt would be the back of my skirt.


Next, I used the back of the shirt, newly freed from the yoke, as a guide to figure out where I would need to cut the front of the shirt to be the same length as the back of the shirt.


I then cut the front of the shirt straight across from button placket to sleeve seam, on either side, but I was careful not to cut into the sleeve. I seam ripped the sleeve off of the shoulder section I'd just cut off the shirt.


This more or less gave me a large rectangle of fabric with sleeves attached. 


I pushed the sleeves to the inside (wrong side?) of the rectangle-ish thing. They would become my skirt pockets.


I cut the sleeves off at what I considered a respectable pocket depth. (Though in hindsight, I could have made them a few inches longer.)


Then I sewed up the bottom of the newly cut sleeves turned pockets with french seams.


Pockets finished, I gathered up the top edge of the front and back of the skirt. I did not gather the top of the pocket section, as I figured the pockets themselves would add enough volume at the hips. I did not need to add more by gathering it.


Finally, I cut the yoke and yoke lining into the widest possible strips I could, and pieced those together, end to end, to make a strip of cloth long enough for a waistband.


I cut the waistband to the right length, interfaced it, then attached it to the skirt.


I sewed two button holes in the waistband, and used the buttons I'd pulled off the sleeve cuffs to finish it off. 


The skirt was done! And it was everything I'd wanted!


Moderately full and gathered for easy movement.


Tea length so I don't have to worry about any wardrobe malfunctions while chasing after children or animals.


Fabulously large pockets for storing all manner of things! Plus an extra pocket in the form of the original shirt pocket I didn't bother to remove. 


The only issue I found with the skirt upon completion was I'd apparently over estimated the length for the waistband. It was a tad loose. I fixed this by inserting a length of elastic into the back of the waistband only.


The elastic isn't tight enough to really gather up the back of the waistband and make it noticeable when worn, just tight enough to hold the waistband snug against the body, keeping the skirt from slipping down.


Now the skirt fits perfectly! I wore it yesterday, my first day back to work after my trip to Uganda, and the longer I wore it the more I liked it.


This is a super-duper comfortable skirt. 


Since I started with a shirt, the "hard parts" of the construction, the curved hem and button placket, were already done, so this skirt only took about two and a half hours to make. (Future versions could probably be made quicker, since I now know exactly how to make this skirt!)


The denim-like color is extremely versatile and will go with a large variety of the shirts in my closet.


For these pictures that I had my sister snap Sunday evening, I paired it with a scoop-neck t-shirt I made a couple weeks ago using the Winter Wear Designs Banded Tee Pattern


I hacked the pattern to have short, slightly puffed, sleeves, and I think the resulting top is a wonderful addition to my wardrobe. As is this button front, gathered skirt.


I really should play with refashioning more regularly - it often leads to excellent results!

Sunday, August 7, 2016

A Summer-y Red Shirt Refashion

A red shirt. That's what all team members were supposed to wear on the day we traveled to El Salvador. Well, my wardrobe was rather short on red shirts, so I took that as an excuse to make myself a red shirt. Now, I do have this one, but it's not solid red and definitely feels more fall/winter-y than summer-y. I wanted a summer-y red shirt, but as I already had a red shirt that would work if need be, my summer-y shirt needed to be made entirely from stash. That was the plan.

Going through my stash of fabric and items to refashion I found I had no shortage of red things to make my shirt out of. I had a plan or two up my sleeve. Then my friend let me go through her bags of old clothing before she took them to be donated and I found this red linen shirt. No other plan was needed.


I decided getting the shirt to refashion for free was close enough to sewing from stash so this was going to be my red shirt. I started by seam ripping off the pockets and sleeves and cutting the neckline lower.


Then I pleated the neckline to make it fit right, finished it with bias tape, and took in the side seams quite a bit.


I cut new ruffled cap sleeves from the original sleeves.


I had to reduce the size of the sleeves once sewn on the shirt a couple times until they looked right. Sleeves are not my favorite thing to do. Finally, I took in the excess fabric at the back of the shirt with an inverted pleat and some decorative buttons.


My shirt was all ready to travel to El Salvador! (It was even done with a couple days to spare!)


It did it's job of being a summer-y red shirt admirably, and it didn't cost me a thing!


Now, after being back home for a couple months I can definitely say this was a shirt worth making. I've worn it on several occasions this summer!


This shirt is quite possibly my favorite refashion I've done this summer, though now that The Refashioners is upon us, we'll see how long that lasts. I did quite a few refashions for last year's Get Shirty! challenge, and I loved every one! I hope to get done several this year as well. The new theme? Jeanius. Yep, the refashions need to be made from old jeans. There have been some great inspiration posts over at Makery, so check those out if you're interested.


Meanwhile, I would like to point out the jeans I am wearing with this shirt. No, I didn't make them, but they are new. Last week at Orscheln's I found a rack of really nice jeans clearanced at $10 a pair. I picked up 5 pair for less than the cost of one regular priced pair.  This means I can retire several pairs of my old jeans that are getting rather worn or don't fit quite right! I have quite a stash of jeans to refashion now and a head full of ideas of what to make! Now, I just need weeks of uninterrupted sewing time. Ok, so that's not gonna happen, but I'm sure I'll fit in a few jeanius refashions between now and the end of September. If you've ever been even remotely interested in finding something to do with your stash of old jeans, other than throwing them away, join me! I can't wait to see all the refashions! Now, to squeeze in a bit of jeanius sewing before leaving for church this morning, hopefully I'll have something to show you later this week!

Thursday, March 24, 2016

Shirty Shirring

I'm smack dab in the middle of making Easter dresses. I have been all week. The plan? To get all three dresses done by the middle of this week. Yeah, that hasn't happened. They will get done, they're just not done yet. Why? Unsurprisingly I distracted myself. Unintentionally of course. No, really, it started because of the Easter dresses, the original distracting idea completely pertained to the Easter dresses. Well, one Easter dress in particular, mine. 


Anticipating a fitting issue with my dress, that I should have fixed while cutting out the dress, but failed to do, I started brainstorming ways to fix it. An idea popped into my head. I could use elastic thread to shirr the part of the dress with the issue, that ought to the potential problem! I already had elastic thread on hand, I just needed to figure out how to use it.


 A while back I read on a blog a mention of using elastic thread to shirr things and I wanted to try it. I bought some elastic thread, then proceeded to do nothing with it. So, this week, after the idea popped into my head, I proceeded to read a couple of tutorials, then try out this new found skill. Only my Easter dress wasn't (and still isn't) ready to be shirred yet. So, I pulled this men's button down out of my refashion bin instead.


I bought a couple months ago to make my sister another tunic, like this one. I just hadn't gotten around to making said tunic yet. This shirt looked like a pretty good base for my first shirring attempt. I cut a new (huge) neckline, finished it with bias tape, then got down to business.


 I hand-wound my bobbin with elastic thread, then threaded my machine like normal, putting my elastic bobbin in just like a normal bobbin. I lengthened my stitch length to the longest it would go, then started sewing, around and around the new neckline.


It worked! The elastic thread gathered up the fabric just like it was supposed to! I sent regular, 1/4 inch, elastic through the bias tape to stabilize the neckline, did some shirring on the sleeves and at the waist, ran out of elastic thread, then I was done!


Less than two hours, one shirt, one cut, one spool of elastic thread later, my sister had a shirred, puffed sleeved, tunic top!


I can't believe I've never tried shirring anything before! It's so easy and the finished product looks amazing. I love how this tunic turned out, so pretty and famine, yet so easy to make. The puffed sleeves really complete the picture I think.


Now, I might just have to re-design the Easter dresses to showcase some more shirring! Oh, wait, the Easter dresses are already cut out, and mostly sewn together. It might be a little late to do any redesigning. Or is it?


We shall have to see.

Saturday, January 2, 2016

More Shirty Tunics

Remember back in September when I got a little obsessed with re-fashioning men's button down shirts for The Refashioners? I completed 6 shirt refashions during the challenge, yet somehow didn't get burnt out. Once the challenge ended I still had a few more shirt refashion ideas up my sleeve. First off, a tunic for my mom. Remember my sister's tunic?


It was probably the quickest and easiest of the shirt re-fashions. After I finished it my mom requested one like it. So, I went to the thrift store to find a shirt to make my mom a tunic out of. And, of course, I came home with more than just one shirt. I found this shirt to make into a tunic for my mom.


And a white linen men's shirt that I pretty quickly turned into this shirt for my mom.


Once that was done, I made my mom the tunic she had requested. It turned out cute, but a little plain.


While going through my sister's out grown clothes my mom found this cute little skirt. The colors coordinated perfectly with the tunic. My mom requested I use the skirt to embellish the tunic. So I cut a ruffle from the skirt and sewed it to the hem of the tunic. What was left of the skirt my mom turned into a belt.


This tunic is a great base to add embellishment to. 


Once my mom's tunic was done I asked my best friends if they wanted me to re-fashion shirts into anything for them. Well, Tori said she wanted a tunic too. So, I went to the thrift store and found this very soft green striped shirt.


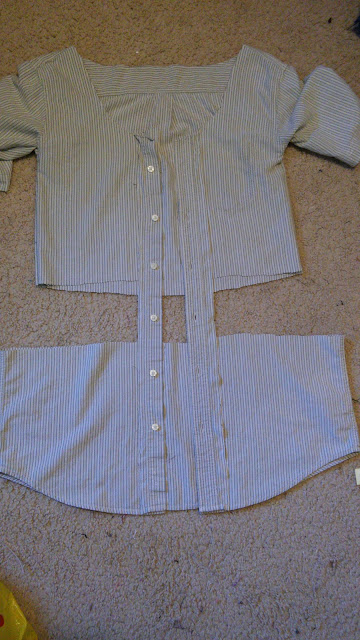
There was only one issue, the shirt was a bit too short to be a tunic. In my stash I found some fabric that coordinated well with the shirt. First thing I did was remove the button placket from the front of the shirt. Then I cut the shirt in half. 


I proceeded to add a strip of the coordinating fabric between the two halves.


Then I sewed the button placket back on and made this tunic just like the other two. (full, step-by-step tutorial-ish thing here)


 As a finishing touch I added a fabric bow to the waist, and the tunic was done! It fit Tori perfectly and she was pretty happy with it!


I just love how this basic tunic can be changed up to reflect different people's individual styles.


Now I want a tunic like this! But first I have a few projects left over from last year to finish, so back to those I go. Check back regularly this month as I have quite a few thing I plan on finishing and blogging. Here's a hint, Tori wasn't the only friend I offered to refashion a shirt for. What did Erentry request?