Sunday, March 28, 2021

A Pink Pinstripe Ngaio Blouse

 Why did I buy a roll of 4 yards of pink pinstripe polyester suiting at Wal-Mart? Well, I had a new skirt pattern I wanted to try out, and I thought a pink skirt would be fun to have. Also, my fiancĂ© said I had enough fabric and tried to steer me away from the fabric section, so of course I had to check out the fabric section, and when I found this pink pinstripe polyester, which would work perfectly for the afore mentioned new skirt pattern, I just had to buy it.


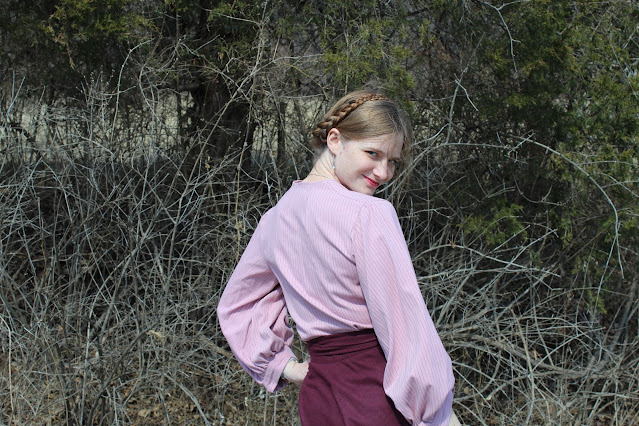
Anyways, I made the skirt, I love it, I have yet to get it photographed and blogged. Once that skirt was made, I still had a good 2 yards of pink pinstripes left. Not wanting to add any more fabric to my already bursting stash, I decided to turn that last 2 yards into a blouse real quick. After a mental trip through my pattern stash, I opted to use the Scroop Patterns Ngaio Blouse pattern for the project. With a couple minor additions. . .


The Ngaio blouse pattern has a couple different options, sleeveless (I made this option about a year ago, never blogged about it specifically, but it can be seen in this blog post.) and short, straight, sleeves. I picked this pattern for this project because I loved the 1930's inspired shape and the multiple cup sizes offered, however, neither of these sleeve options really appealed to me for this project. I wanted something more dramatic! So, I pulled out the 1930's sleeve pattern Simplicity released a few years ago and decided to have some fun!


I picked sleeve, well, the pattern envelope says it's A but the pattern tissue says it's C, basically it's the the puffed 3/4 length sleeve with the angled cuff, for my blouse. Previous experience with this Simplicity pattern has taught me that these sleeves don't generally allow for the best range of motion, so some sleeve cap alterations would be necessary. Also, I would need to make sure the sleeve cap would fit properly into the armscye of the Ngaio Blouse when all was said and done.


I pulled out the straight sleeve piece for the Ngaio blouse and looked at it. Hmmmm. . . I then pulled out the straight sleeve piece for the Scroop patterns Robin Dress and looked at it. The straight sleeve pieces in these two pattern was exactly the same. So, that meant the other sleeve option in the Robin Dress pattern, a flared short sleeve, should fit onto the Ngaio Blouse perfectly. 
 
The short flared sleeve had the same general pattern shape as the puffed sleeve from the Simplicity pattern - a sleeve cap which would fit smoothly into the armscye with extra volume at the bottom of the sleeve - it was just shorter, and better. Why was it better? The Robin Dress Flared sleeve had a lower sleeve cap. A lower sleeve cap generally gives a better range of motion. Thus, I figured I could graft together the lower sleeve of the Simplicity pattern with the upper sleeve of the Robin Dress pattern and get a sleeve that would fit smoothly and easily onto my Ngaio Blouse and have a good range of motion.


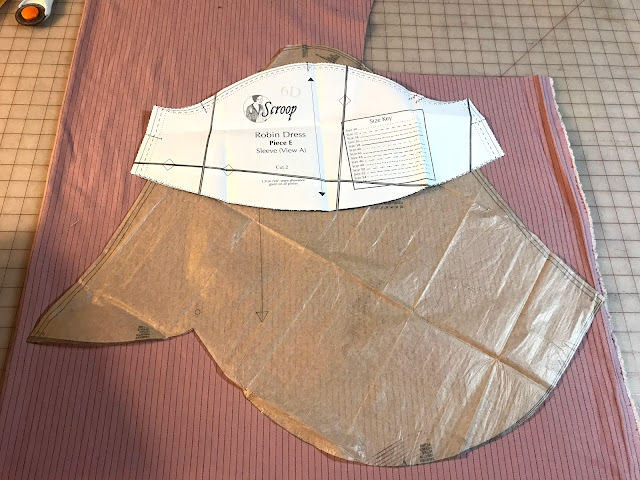
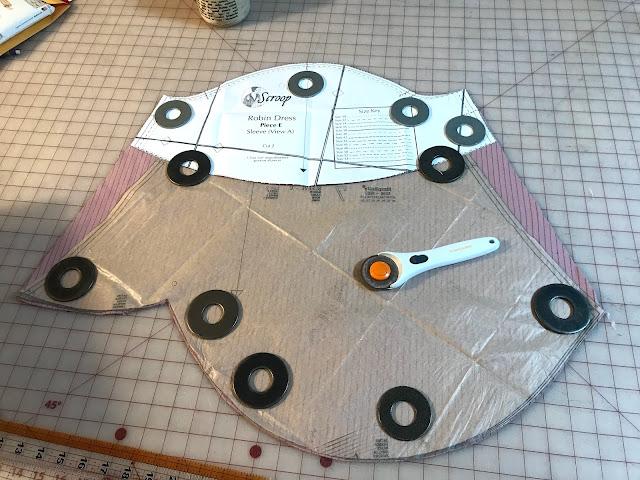
I folded down the too-tall sleeve cap of the Simplicity Pattern to get it out of the way. Then I laid the Robin Dress Sleeve on top of it, making sure to have what would be essentially the mid point of the two sleeve caps (halfway between the top of the sleeve cap and the underarm/bottom of the sleeve cap) at the same level.


Finally, I cut out the sleeves - around the top of the Robin Sleeve, down the side at a smooth angle from the bottom of the Robin sleeve to the bottom of the Simplicity sleeve, and around the bottom of the Simplicity sleeve.


Once that was done the hard part was over! It was smooth sailing, just one evening of sewing, to make the blouse. 


I followed the Simplicity instructions to make the sleeves and get that lovely angled cuff at the bottom.


I followed the Ngaio instructions to put together the body of the blouse, then sewed the sleeves to the body as easy as could be. 


The Robin Dress sleeve cap did indeed fit perfectly into the Ngaio blouse armscye. (I'll have to do some more Robin/Ngaio mash-ups in the future!)


I tried on the finished blouse and loved it! Mostly. . . I felt like it needed a little something else. . . Maybe a bow.


Yes indeed, a bow. I cut a strip of my fabric, sewed it up into a tube, turned it right side out, then slipped it through the little loop of fabric holding the front gathers of the blouse in place and tied it in a bow!


And with that, I had a new blouse I loved! And, all the pink pinstriped polyester suiting was used up! 


Sunday, March 14, 2021

A Little Lavender Witch Hat

 Ever get an idea in your head and decide you're going to do it, even though you don't really have time for it? It can't really take that long, can it? Yeah. . . That's about half my sewing projects. (Go ahead, ask me how wedding sewing is going, I dare you. Actually, it's going fine. I'm pretty much on schedule. But I'm not telling anyone about the random items I've added to my list. . . they won't take that long to make. . .)

Actual footage of me reaching toward the shiny new little project that "won't take too long".

Anyways, back in January, I made this 1790's open robe. I decided to wear it to a somewhat Hogwarts themed dinner with my family. And, since I was wearing it to such a dinner, clearly I needed a witch hat to wear with it. Thus, the night before the dinner, I decided to make that witch hat.


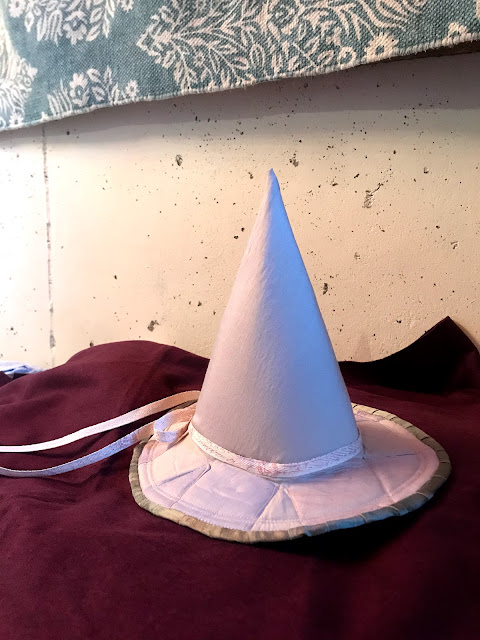
I pulled out some fabric scraps from the open robe and some foam I had left over from the McGonagall hat I made a few years ago.  I cut a partial circle out of each, layered them together and sewed up the back seam to make a cone. I cut out a second partial circle of my fabric and sewed it up as my lining. Next, I needed to figure out a brim.


After messing around with the cone I'd just made, I came up with an idea, rather than making a separate brim and sewing it to the cone, what if I used part of the cone as the brim? After a bit more messing around I made 7 2" cuts into the base of the cone, then set the hat down on a flat surface, letting the cuts spread open until I had a nice flat "brim". I then cut some scrap foam into triangles to fill in the cuts I made. And that was as far as I made it on the hat that night. 


The following day, after a busy morning with the fiancé, I finally got started on the hat again about 2 hours before we needed to leave for the dinner. I could get it done in time! First, I sewed all the foam triangles in place with a wide zig-zag stitch.


Then came the most fiddly part if the project. I cut scraps of fabric to cover the foam triangles, and ironed the edges inward.


I pinned the triangles over the foam and top stitched them into place.


The triangles were all stitched in place about 45 minutes before we needed to leave. Perhaps I should have stopped and gotten dressed for dinner at this point, but I was going to finish this hat!


Next up I needed to finish the edge of the brim somehow. After a quick search through my bias tape collection, nothing caught my eye for the binding. I considered making bias tape from my fabric, but quickly dismissed that idea because I just didn't have time for it. A short look through my box of twill tape revealed something entirely different. Strips of green silk shantung left over from the 1780's caraco. . . 


The silk was cut on the straight of grain, rather than the bias, so it wouldn't curve nicely around the edge of the  brim, but I could get around that by pleating the strip as I sewed it on. And the green would look very nice with the lavender!


I pleated the green silk around the edge of the hat, but it wasn't quite wide enough to turn under nicely on the under side of the brim.


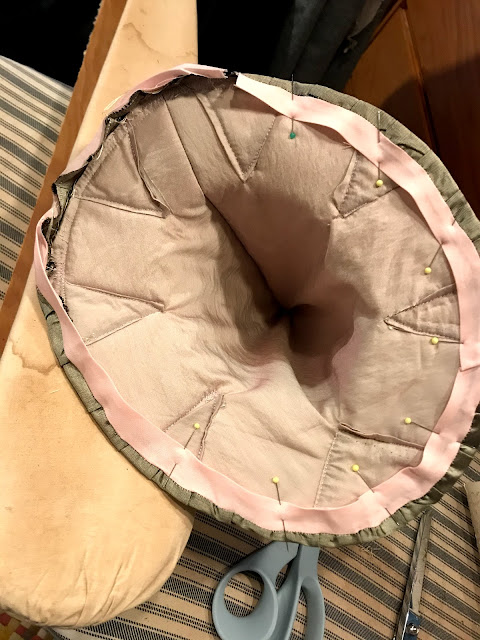
So, I sewed some pale pink bias tape to the edge of the green silk.


Then I folded that to the underside of the brim, pinned, and top stitched it into place.


It was 10 minutes until time to leave, and my hat was technically done, but it really could use some trimming!


I grabbed a piece of decorative twill tape from  my stash, wrapped it around the base of the hat, tied a bow in the back, and pinned the twill tape in place to keep it from moving around.


Finally, I quickly whip stitched a comb into the back of the hat to hold it on my head, and declared the hat to be ready to wear.


And with that, I threw on my open robe ensemble, brushed out my hair, (which had been braided all day in an attempt to have wavy, poofy, hair for the evening) and put on my new hat!


The comb didn't hold the hat in place quite as well as I would have liked, so I added a couple of hat pins to really keep it secure.


One happened to be an owl, which I felt was quite fitting!


And with that, we were off to dinner!


Only a little late - but that was ok! The rest of the family was running late too.


The hat was fun, lightweight, and comfortable to wear - the perfect accessory!


Something I'm sure I'll find an excuse to wear again.


The following week I took the time to fix a couple little things on the hat so it's all ready to wear again when that time comes. There were a coupe places my top stitching didn't catch the back side of the triangles the way it should have, so I added some handsewing to keep things neat.


And I took the time to actually tack the twill tape trim into place and remove the temporary pins.


So, here it is, my last minute little witch hat! A fun little time-crunch project.


Now I have plans to make a proper 1790's bonnet to go with the open robe when witch hat's aren't required. . .


. . . But that will have to wait until after the wedding. . .
. . .maybe.

Monday, March 1, 2021

Preparing to Tie the Knot with the Neck Tie Top

 Am I blogging about this top today primarily as an excuse to look through, admire, and share my engagement pictures?


Maaaaybe. . . 


Did I make this top specifically to wear for engagement pictures?


That would be a no.


I decided to wear it about two hours before we went out to take pictures, when my fiancĂ© showed me what he'd brought along to wear. 


No real pre-planning for this engagement photos thing.


We're pretty laid back like that.


And we have fun together.


Now, would this top have been blog worthy even if I hadn't worn it for our engagement photos?


Oh yes! I've intended to blog about this top ever since I made it in January, but what with kidding season, extreme cold, and getting engaged, I'm a little behind on photographing and blogging my makes.


So, about this shirt. 


This winter it came to my attention that I really, really, needed more sweater-ish/warm tops in my wardrobe. Thus, I did what I do and started thinking through the fabrics in my stash. What did I have that could accommodate this need?


I recalled this dark pink? raspberry? magenta? sweater knit left over from the wrap top I made fall of 2019.


It's such a soft, pretty fabric and the color goes with any number of things in my wardrobe, so I was quite excited about having two tops made from it!


So, fabric picked, what pattern would I use for this top? I had no idea.


At first I considered something with fabulously awesome puffed sleeves.


Buuuut. . . I've made so many puffed sleeve tops in the past few years that I thought maybe I should make something different. 


Perhaps more than just puffed sleeves are required in one's closet.


As I contemplated this, I remembered the ever so slightly puffed stove-pipe sleeve included in the Winter Wear Designs Neck Tie Top pattern. Ohhhhh. . . 


 Then I recalled the V-neck hack Patricia, of Sew Far North, did with this pattern for a recent WWD blog tour.


And suddenly I knew exactly what I was going to turn this fabric into!


And one evening of sewing later, I had my V-neck Neck-Tie Top!


I did accidentally cut the V-neck a bit too low, so I've gotta wear a camisole underneath.


  At first I was annoyed with myself for this, but I've since come around. Now I actually like the look of the cami underneath and the extra warmth it provides is pretty nice too!


This has quickly become one of my very favorite tops to wear!


So, it was a no-brainer when my fiancé showed me the blue sweater he'd brought to wear for photos.


I'd wear my new-ish pink sweater. And my plaid circle skirt, because it's just too fabulous and versatile not to wear. (I really need to make myself a few more wool circle skirts!)


My sister-in-law graciously volunteered to take our engagement pictures, so with the help of her sister and my brother we had a lot of fun getting that done one evening.


Now that's done and it's onto the rest of wedding preparations!


Gulp. We'll do this thing. . . somehow. . .*


*Seriously though, wedding planning is going pretty well and I am beyond grateful for all the friends and family members who have volunteered to help with stuff! This thing is a community effort!