Merry Christmas and Happy New Year! I hope you had a fantastic Christmas celebration with those near and dear to you. Our first Christmas as a married couple was busy, as expected, but we were able to spend a good amount of time with both my family and my husband's family, so I can't complain at all! (Even if I did stress myself out a *bit* in the week leading up to Christmas, thinking I could do more than I actually had time for.)
Back in mid-November an invitation arrived in the mail in a big fancy envelope. It was for my husband's work Christmas party in early December. Ohhhh fun!
Now, I have worked my entire adult life as a nanny, so my experience with company Christmas parties is zero. I've babysat kids while their parents have gone to Christmas parties, but that's as close as I've gotten to these things. Add to that, my father is self-employed, so I didn't even grow up seeing my parents go to work parties. What should I expect? What should I wear?
I asked my friend, whose husband works for the same company as my husband, for wardrobe advice pertaining to this event. She said to wear something a bit fancier than my standard church dresses. Ok! Can do!
I headed to my fabric stash and started brainstorming design ideas.
I quickly uncovered two wonderful options in my fabric stash - a dark green polyester taffeta I've been hoarding for years and a bright red polyester faille I picked up at an estate sale last year. Either one would make a fantastic party dress! How would I pick?
As I contemplated the two options, I happened across an announcement for the Little Red Dress Project 2021, hosted by The Twilight Stitcher and The Island Sewist. That looked fun! My decision was made!
I would use the red faille for my Christmas party dress, and then I'd have my #littlereddressproject2021 entry too! Perfect!
(The reveal date for the challenge was actually last week, and, even though I've had my dress done, and the pictures taken, since the beginning of December, in the craziness of finishing up Christmas preparations, I forgot to share last week. Oh well, better late than never!)
The sewing challenge officially started on Black Friday, so I spent the week or so leading up to that date contemplating my design options. At first I thought I would do a 1950's style cocktail dress, but I couldn't quite fully settle on that idea. So, when we went back to my parents' for Thanksgiving dinner, I looked through my pattern collection to see if anything stood out to me.
Butterick 6016 practically jumped out of the drawer and said "Use me! Use me!"
I picked up this pattern on sale a few years back because the diagonal darts on the bodice intrigued me. Looking at it again, I was also drawn to the center back pleats, reminiscent of 1890's skirts, on the view C skirt, and the additional skirt flair, pleats, and pockets, shown on the front skirt of view A.
The only thing I wasn't sold on with this pattern was the boat neck - but I could change that.
My red dress would be a combination of view A and view C, with a bit of my own style thrown in - because pattern hacking is fun!
On Black Friday, the official start of the challenge, I prepared my pattern.
Scallops! All the scallops! With the help of a spice bottle, I drafted a scallop template for the back neckline of the dress.
Then I folded down the front neckline of the pattern piece into a v-shape and drafted a scallop template for that as well.
Once my bodice pieces were ready, I looked at the skirt pieces. As I mentioned above, I would be using the front skirt from view A and the back skirt from view C. I didn't intend to make any changes to the skirt pattern, however, upon a closer inspection, the pockets of view A, inserted into the front pleats, were simply too small. There was no good way to make them bigger and keep them in the front pleats without distorting the lines of the dress. So, I decided to just scrap those pockets (but keep the front pleats of course!) and add slash pockets to the skirt front instead.
With the pattern alterations complete, I proceeded to cut out my dress.
The faille was in several pieces of varying sizes and some pieces were rather damaged from sitting in someone's damp basement for decades before being unearthed by me at an estate sale. I'd washed the fabric several times upon acquiring it, so the musty smell it came to me with was gone, but the damage remained. It took some careful positioning of pattern pieces to get them all cut out of the undamaged remnants of the material. Good thing I didn't decide to make a 1950's dress - I would not have been able to get a skirt that full cut out of this fabric!
Challenges aside, all the pieces got cut out and assembly began!
I interfaced all the scallops on the neckline to help them hold their shape.
Last minute I decided to add some scallops to the hem as well.
So with the help of a spice bottle and some tailor's chalk. . .
That happened.
To add even more fanciness to the hem (as if scallops weren't enough . . .), I decided to finish the upper edge of the hem with some wide lace hem tape.
Once that was sewn on, the scallops were all turned right side out and pressed.
Then I took the time to sew the hem by hand with a catch stitch.
While I was at it, I installed the zipper in the left side seam by hand as well.
Hand sewn hems and zippers just look nicer in fancy garments.
For the finishing touch I made a matching belt with a center front bow out of my left over fabric.
The belt fastens under the bow with hooks and eyes.
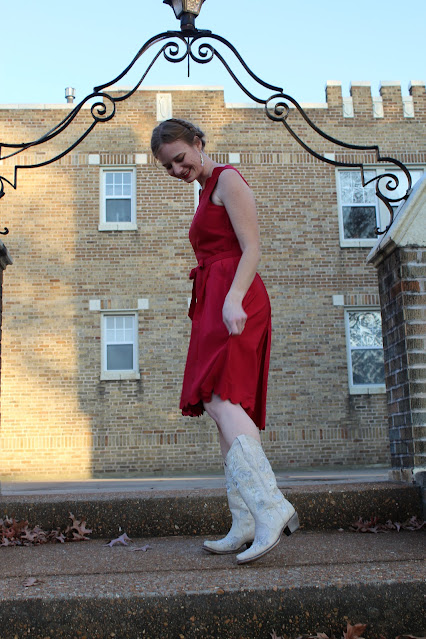
And that is my "little red dress".
It had a bit of a high-low hem because apparently the view A skirt of Butterick 6016 is a bit shorter than the view C skirt.
Which you wouldn't know, until you try to use the front of one with the back of the other.
When I sewed up the side seams on the skirt and discovered the back was longer than the front, I didn't feel like leveling the whole hem, so I just angled the hem from the side seam to the center back and called it good. Apparently I will avoid leveling hems at almost all costs.
The dress was perfect for the Christmas party!
We had a whole lot of fun that evening, though I completely failed to get any pictures of the two of us.
We ate, we drank, we talked to lots of fun people, and we even got to explore the aquarium after hours!
As I mentioned earlier in this post, I don't know much about company Christmas parties, but one that includes a trip to the aquarium is pretty cool in my book!
I got several compliments on my dress, and my sparkly white cowboy boots. These are the boots I bought for my wedding, and I figured I ought to get some more wear out of them!
Thank you Twilight Stitcher and Island Sewist for hosting the Little Red Dress Challenge and helping me narrow down what to actually make for this Christmas party!
I'm incredibly pleased with my new red dress!