Monday, December 24, 2018

A Scroogy, Sparkly, Shiny, Brocade Dressing Gown

A night gown would have been boring.


Scrooge spends the majority of "A Christmas Carol" in his night clothes, viewing his past, present, and future with a Christmas spirit from each era.  Thus, as my brother was cast as Scrooge in a production of "A Christmas Carol", I needed to design him some fabulous, scroogy, sleepwear to swan about in on stage.


Ok, so maybe Scrooge doesn't "swan about" - but I still had the opportunity to make my brother an elaborate costume, and I was going to take it!


As mentioned above, a plain ol' night gown would have been boring - and rather inconvenient to have to put on while on stage in front of an audience. So, I decided to make my Scroogy brother a banyan, or a dressing gown, instead! A coat-like lounging garment, made from elaborate materials, which could easily be put on while on stage without having to be pulled on over the head.


After coming to this conclusion, I began researching what banyans looked like in the 1830's and 40's. (A Christmas Carol was written in 1842).

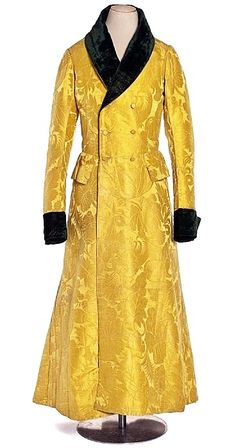
Man’s robe C. 1830. French. Damascus silk and cut velvet. | Les Arts Decoratifs.
I really liked this banyan from the 1830's, and decided to base my brother's Scroogy banyan off of it.

My mom and I went fabric shopping for the project, leaving behind the brother who would actually be wearing the garment. We knew we wanted the banyan to be made from an elaborate luxurious looking fabric - something eye catching and maybe a little shiny. By leaving my brother at home when we went fabric shopping, the risk of him vetoing this plan was eliminated. (He's not really a sparkes kind of guy) *cue mischievous laughter*


We left Joann's with a shiny paisley polyester brocade for the banyan itself, a quilted velvet for the collar and cuffs, and not one, but two patterns which would be used to make this spectacular paisley brocade banyan a reality.


Now, there were no specific "1830's or 40's banyan" patterns to be found in any of the pattern books (and we didn't expect there to be). Butterick, however, did have a lovely men's overcoat pattern in their "making history" line, B6609. With a few tweaks, it would work great for a banyan pattern. There was only one issue - the smallest size included in the pattern would be a bit too big for my brother. We bought the pattern anyway so I could could reference it for pattern shapes, then set about finding a second pattern for a similarly shaped garment in my brother's size.

After considering multiple options for this second pattern we settled on Simplicity 8749, a trench coat pattern by Mimi G.Yes, it's technically a women's pattern, but it's a very straight cut coat pattern with no darts or other shaping so I knew it would work just fine for a male garment - and it came in the right size! If anything I would have to add more shape to the pattern to make the finished garment look properly "1840's".

With both patterns in hand, it was time to begin pattern altering/combining/ mashing/hacking and bring this banyan into reality!


I began by doing a broad back/wide shoulder adjustment to the Simplicity pattern - everyone in my family has wide shoulders and this brother is no exception.


Next I shifted the shoulder seam to the back of the garment so it would be at the right place for 1842. I cut the new shoulder seam at an angle from neckline to middle of the back armhole. 


I taped the piece I cut off of the back shoulder onto the front shoulder and added seam allowance to the new shoulder seams.


Next, I made the center back vent extra long to match the back pleats of the butterick overcoat pattern. Now it would begin at the waist rather than just a few inches above the hem. Then I added curved back side seams starting just below the new angled shoulder seams and going all the way to the hem. Once again, this was so the seam lines of my brother's banyan would match the seam lines of extant 1830's and 40's banyans and dressing gowns.


Once the new seam line was cut, I added seam allowance to both new back pieces and extra fullness at the hem - the original trench coat pattern was cut much straighter all the way down than 1840's banyans were. This alteration finished up the back pattern pieces, so I moved on to the front pattern pieces. 


The front required less alteration than the back, but there was still work to be done. First, I cut the side seams at an angle so there would be more fullness at the hem.


Next I added a shawl collar (more appropriate for a banyan than a coat collar) by tracing the collar from Vogue V8875 (used here for my dress coat) onto the front pattern piece.


Then I changed the front to be double breasted by adding a couple inches to the center front,starting below the collar and going all the way to the hem.


Finally, I adjusted the facing and lining pieces to match the new pattern shapes.


With all the hard work done, it was time to actually make this banyan! Out came the paisley brocade, quilted velvet, and a thrifted cotton sateen sheet for lining.


Over the course of one very long (and I emphasize very long) day, I sewed the banyan - real welt pockets, full lining, velvet cuffs, and all. As I neared the end of the project however, I ran into an issue - we'd forgotten to buy buttons for the darned thing! I needed 8-10 metal buttons, and I did not have any sets of the correct size, shape, number, or elaborate-ness in my stash. And I did not want to run into town to buy some - as that would prevent me from finishing the banyan that day. By a stroke of genius, I decided to rummage through my bin of "garments to refashion" - hoping something in there would have suitable buttons.


And suitable buttons I found - 10 of them - on the front of a sweater dress! The perfect number, the perfect size, the perfect shape, the perfect amount of elaborate-ness. 


There's only one thing about these buttons that's not perfect and that's the fact they're plastic, painted to look like metal, not actual metal. But oh well, they do the job and look the part - and I didn't have to make a special trip into town to buy them - so I'm not complaining at all!


I finished up the banyan just in time for my brother to wear for the Christmas Carol cast photo shoot at a beautiful historic theater in town!


Between the banyan and the nightcap (which I made him months ago, using a santa hat pattern, when he first got cast as Scrooge) he looked the part of Scrooge, dragged out of bed by ghosts to view his past, present, and future.


My brother only had one complaint about the banyan - and it wasn't even the sparkleyness (he was rather resigned to that actually). No, apparently the sleeves were too tight and hard to move in. So, after the photo shoot and before dress rehearsal, I slightly disassembled the banyan in order to let out the sleeves as much as I could and add underarm gussets. After that my brother could actually move in the banyan so he did a lot less complaining!


Performance week came and my brother took the stage as the Scroogy-est Scrooge of them all!

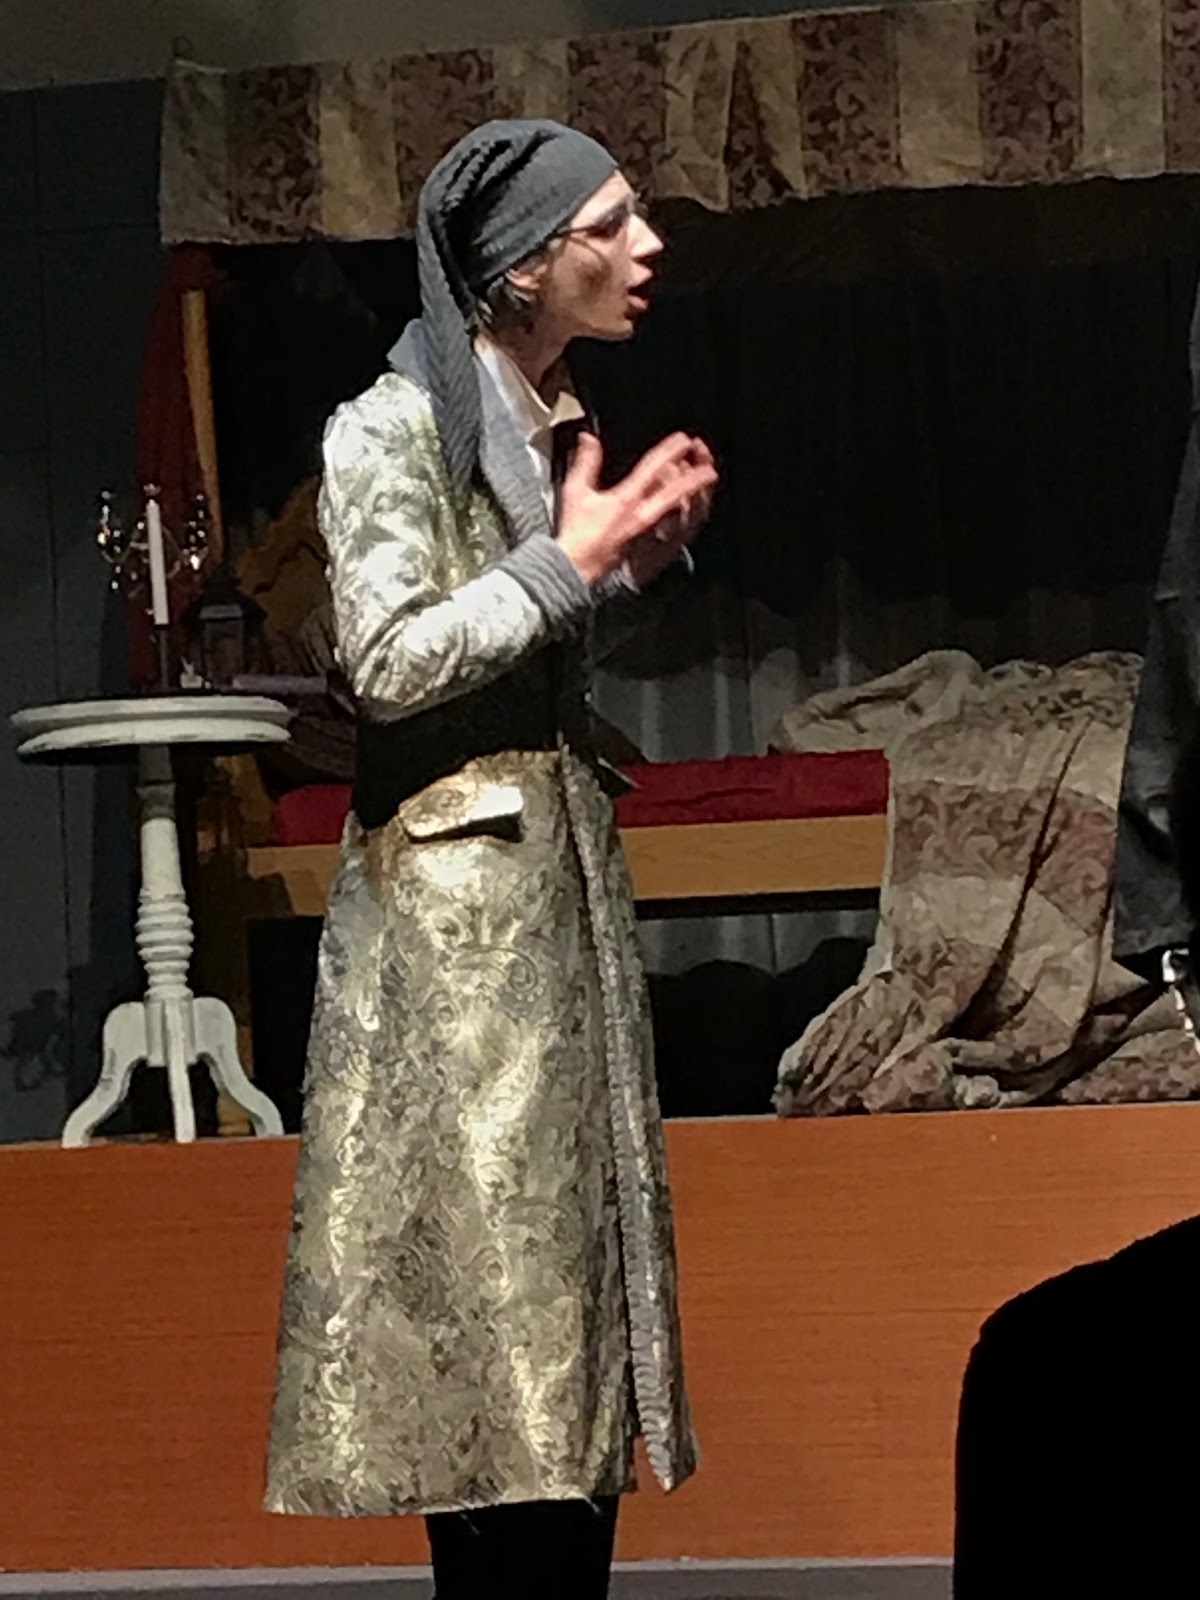
Photo courtesy of Ray Dobert 

He did fabulously, and looked fantastic with his hair and make-up all done!


He was dramatic, and changed his ways to better honor Christmas after seeing the horrors his future would contain if he continued as he was - grumpy, and hating Christmas.


Oh yes, my brother made an excellent, convincing, Scrooge!


And, his banyan was not boring at all! Rather, it was just what I hoped it would be - elaborate and eye catching, with close to the correct seam lines and hem fullness for a men's lounging garment from 1830's or 40's.


Merry Christmas Everyone! I hope you have a wonderful time with friends and family celebrating the birth of Christ!

Thursday, December 13, 2018

The Skirt Born of Curiosity

Please tell me I'm not the only one who orders a piece of fabric just because the description piques my interest, even though the picture of the fabric doesn't necessarily appeal to me. Please? Anyone?


I bought this fabric not because I needed it, not even because I wanted it, but purely because I was curious.


It was called "cotton faille", appeared to resemble corduroy, was described as "canvas-style", and I just had to feel this fabric and figure out what is was actually like. So, as I was ordering from Fashion Fabrics Club anyway, and needed to add something else to my cart in order to qualify for free shipping, I bought the fabric. A few days later it arrived on my front porch so I could actually handle it and figure out what it was.

It was. . . interesting. Heavy-ish wight, decent drape, very soft. A very prominent ribbed texture on both sides thanks to the faille weave (thick threads running one direction, thin the other). Not a fabric I would have bought had I seen it in a store, but that's not really why I bought it. I bought it to satisfy my curiosity. Now the curiosity was satisfied and it was time to figure out what to make from it.

My "I have the fabric, now what?" look
Immediately I had two ideas - either a skirt or a jacket. After a bit of thought, and some input from people on instagram, I decided on a skirt. A skirt like this one I saw on Pinterest:


It looks like the Brijee Patterns' "Casey Skirt" without the large patch pockets and with a hacked high-low hem. As I wear the two Casey Skirts I made over summer quite regularly, this was perfect - just what my fabric needed to become!


I started with the basic pattern, and folded up the 3" seam allowance at the bottom of both the front and the back piece. 


For the back piece, I started at the side seam, cutting from where the pattern piece ended and angling down so the skirt would be longer at the center back.


For the front, I did the same, only in reverse. I started cutting at the side seam, then angled up, so the center front would be shorter than the sides and back.


Due to the angle of the hem, I opted to finish it with a hem facing, rather than a standard turned-up hem.


I bound the raw edge of the facing in lace tape, then hand sewed it in place.


Since I opted to leave the large, eye-catching, patch pockets off this version of the Casey skirt, I added inseam pockets instead. Just as useful, only less obvious. 


To complete the outfit, once the skirt was done, I decided to make a plain black Outer Banks Boat Neck Tee (pattern by Winter Wear Designs) to go with it. 


Ok, so maybe it's not exactly "plain." It had the same scalloped v-neckline as my Christmas shirt.


I actually completed the skirt over a month ago, and I made this shirt at the same time as my Christmas shirt. (I've just been too busy with "Christmas Carol" related things to blog the outfit until now.) While I did the plain, straight, 3/4 length sleeve on the Christmas Shirt, for this once I decided to try out another sleeve option included in the pattern - short bishop sleeves.


I love these sleeves, and I'll have to use them on another shirt in the future! 


I'm a huge fan of how each of these pieces came together and both have been worn regularly, both together and separately, since completion. The cotton faille skirt is easy to wear and it's warm! And how can a plain black shirt not be useful to have? This is my third rendition of each pattern, and certainly not my last! I love how versatile, and hackable, both are!


And, just in case you're considering buying a fabric just because it piques your curiosity, well. . .
I'm not going to be an enabler and say absolutely do it, I'm just gonna say you may find yourself with a new wardrobe staple if you satisfy your curiosity. . . Sometime impromptu fabric purchases turn out well!  

Saturday, December 8, 2018

A Red Wool Dress

Wool is one of my favorite materials to work with. Yet, until a month or so ago, I never really considered making myself any modern, everyday, clothes out of wool. With the exception of the one pair of pants I made at the beginning of this year (and now wear regularly I might add), I tend to save any wool I acquire for one of two things:
  1. Historical clothing
  2. Coats

That changed this fall when the idea for a modern wool dress entered my mind.


As I may have mentioned, a while back my aunt gifted me a box of wool she picked up at an estate sale. A box full of wool - coat weight wools, dress weight wools, and in between weight wools. Larger yardages, and smaller yardages. Plaid wools and solid colored wools. Blue wools, gray wools, green wools, brown wools, and two yards of dress-weight red wool. Beautiful red wool. Really beautiful red wool. Red wool which needed to become a new winter dress for me.


A new winter dress to wear for the opening night of "A Christmas Carol" - the play my younger siblings are performing in, and I costumed.

So, there's the short version of how this dress came to be, now here's the long version:


As mentioned, I have this box full of wool. After admiring and petting all the different wools in the box multiple times, the thought entered my head that I could make myself a nice winter dress out of a piece of wool - why not?

A red wool dress to wear all winter long, it would be fabulous.


That's how the idea began. I wanted a dress out of that red wool, I just had to figure out what it would look like.

Now, I had only two yards of the red wool, which is enough for a dress, but not a crazy elaborate dress. Of course, the only designs I had in mind fell on the elaborate side of the scale, not the "two yards of fabric" side of the scale. Thus, the next time Joann's had a pattern sale, I went in and looked through the pattern book, hoping some fabric conservative dress design would catch my eye.


Inspiration struck when I came across Simplicity 8543. The curved waistband and sleeve flounces appealed to me - as did the fact this was a "perfect fit" pattern, meaning in included different bodice front pattern pieces for B, C, D, and even DD size cups.
What didn't appeal to me was the straight skirt, but I knew that would be an easy problem to fix!


So, I bought the pattern, brought it home, and there it sat, waiting to be used while I continued to work on Christmas Carol costumes. Would my red wool dress be done for me to wear opening night of the play? I didn't know. What I did know was all the costumes needed to be done by opening night, so my red wool dress would have to wait.


And, with Christmas right around the corner, and Christmas gifts to be made, the red wool dress might have waited indefinitely (even after I finished the costumes), had it not been for a post I happened to see on Facebook. A post mentioning the Little Red Dress Challenge - hosted by The Twilight Stitcher and Rosabella Angelica.


The point of this challenge? Make yourself a new red dress for the Christmas season and share it on instagram the week of December 1-9 using the hashtag #thelittlereddressproject. This was just the push I needed to actually make my red dress. The timing was perfect. The challenge ran from the first through the ninth, and opening night of A Christmas Carol happened to be the seventh. I had my fabric. I had my design. I would have my new red wool dress to wear opening night and share as part of the challenge. It was happening.


Once the play costumes themselves were done, I took a break to cut out my dress before beginning Christmas presents. I cut out bodice view B - the option with the flounced sleeves, then I took the rest of the fabric I had and squeezed a 6-panel, 3/4 circle skirt out of it - using the skirt pattern I drafted for this dress (also made from only 2 yards of fabric). Circle skirts are usually great fabric hogs, but this knee-length paneled skirt can actually be squeezed out of a relatively small amount of fabric!


Then I cut the dress lining out of a cotton/poly blend lawn I keep on hand for dress linings- it's lightweight, soft, and slippery. A bit of a pain to work with, but perfect for dress linings and much nicer than the all polyester lining fabric from Joann's.


Once both wool and lining were cut out, I quickly sewed up the bodice lining to check fit prior to sewing my wool. I tried the lining on, discovered a couple minor fitting changes I needed to make, and decided to add underarm gussets for a better range of motion in the sleeves. I implemented these changes and sewed up the dress.


Then I had to decide how I wanted to hem the skirt and the sleeve flounces. Turn up twice and stitch? face with bias tape? I was leaning toward the bias facing option when I remembered I had some silk crepe that exactly matched the color of the wool. I'd ordered it online for another project - and when it came it turned out to not be the right color for that project at all - it was much too bright of a red. However, the way it matched my red dress wool? Amazing! I couldn't have planned a match that great!


So clearly, I had to use the beautifully matching silk for something on my dress. Thus, I decided to bind the hems with bias strips of red silk.


The matching color and mixture of textures is absolutely fabulous!


Finally, to tie the whole look together, I also made a matching red silk belt, using a vintage covered belt kit, acquired at a thrift store several weeks ago.


I carefully followed the instructions on the back of the package for covering the belt and buckle, and was surprised by how easily it came together. And the finished result was just what I'd hoped it would be!


The silk bound hems and covered belt were just the finishing touches this dress needed!


My red wool dress was done in time to wear opening night, so wear it I did!


The play came off beautifully and Mr. Scrooge and Mrs. Fezziwig performed admirably! Two more performances to go, then I'll share a bit about the costume pieces I've made for this show and not yet blogged - such as Mrs. Fezziwig's wrapper and Scrooge's fabulous dressing gown! (and maybe even Marley's chain coat!)


Tonight, I'm going to go enjoy the play again (and hope no costuming emergencies arise!), and since I wore my new red wool dress last night, I'll be wearing my green silk circle skirt outfit tonight. Between this dress, and that outfit, I'd say I'm pretty well covered as far as festive winter clothes go!