Showing posts with label Winter Wear Designs Tour. Show all posts

Saturday, June 3, 2023

The Harry Potter Circle Wrap Skirt

 My sister-in-law called me the day of my sister’s play.

“I have the perfect outfit to wear tonight” she said.

“What is it?” I asked.


But she wouldn’t tell me. A few hours later we met her, my brother, and my niece for dinner before the play, and I may have squealed in delight when I saw what my sister-in-law was wearing!


She was wearing the skirt I’d made her as a birthday gift a few months earlier!! She looked so cute!


This skirt is a full circle skirt made just like my orange linen skirt with ties that wrap around the waist, rather than zippers, buttons, or some other sort of closure, making it incredibly adjustable!

My sister-in-law liked the design and commented on it last summer, so I decided I had to make her a skirt in this style, I just needed to find the perfect fabric!


The “perfect fabric” turned out to be a Harry Potter themed, king size, duvet cover my sister gave me for fabric a couple years ago. My sister-in-law loves Harry Potter, so when I came across this in my stash I knew it was just the thing!


As for the pattern, my orange skirt was made from a dress that I chopped up when I couldn’t get the bodice to play nice, so I didn’t, strictly speaking, have a pattern for this type of skirt. The dress pattern was cut out in the wrong size for my sister-in-law and didn’t have any waistband pieces, so I decided it would be easiest to start with an entirely different pattern, or two. (A combination I actually used to make my Christmas skirt a few years back.)

I used the Winter Wear Designs Bateau Garden dress skirt as my starting point since it was a full circle skirt with pleats just like those on those on my orange skirt. I used the shaped waistband pieces from the Winter Wear Designs Crop Dress pattern and just added ties to the ends. There’s an opening in the waistband at one of the side seams to thread the tie from the opposite side through.


Of course I also put pockets in the side seams.

My sister-in-law seemed quite pleased with the skirt when she unwrapped it, and said she’d have to find the perfect top to go with it!


And, as you can see, she did just that, added a gold headband, and looked fantastic!

It’s such a delight to see people wearing things you’ve made them!


Friday, July 16, 2021

Butterflies and Bows and Purple Jeans

 I originally only intended to make one thing for the Winter Wear Designs Summer Style blog tour. The ruffley Boho Breeze dress I shared yesterday. Then I went through my fabric stash to find a suitable material for said dress and found the striped rayon that just had to be made into the dress I shared on Tuesday. While I was working on those projects, Suzanne asked if any of the bloggers would be interested in sharing a hack for the Y-back Slip and Sleep Set pattern to make this night wear pattern day wear. Ilse immediately volunteered and did a fantastic job with the initial hack! I didn't want to do the same hack she was doing, but seeing her intended hack certainly sparked my imagination and I asked Suzanne if I could have the pattern to play with. She sent it my way. My fabric stash and another WWD pattern came into play. And here is the outfit that resulted.


Now, shall we discuss the top or the jeans first? The jeans have been on my "I'll make that one day" list a loooooooong time, but the top is what prompted the actual making of the jeans.


 So, I suppose I'd better start with the top.


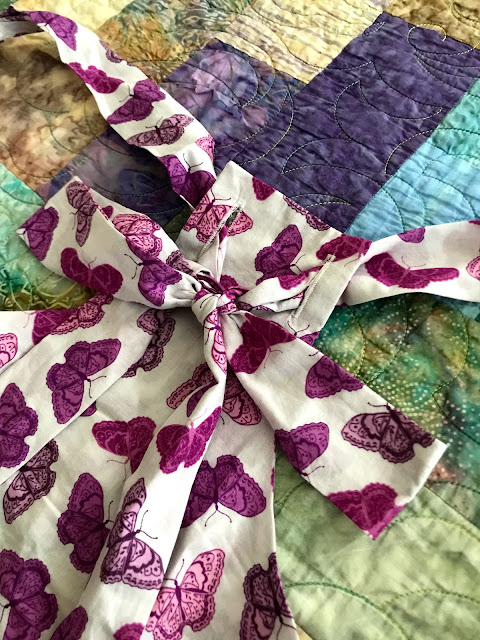
The Y-Back is a PJ or slip pattern with adjustable spaghetti straps. To make it less pajama and more every day casual top I decided to add buttons down the front, widen the straps, and finish it off with a nice big bow in the back


To make this bow and keep the originally intended adjustability of the straps, I cut the "peak" of the back extra wide and made two large button holes in it. I made my widened straps extra long (Possibly too long, but oh well, they're pretty!) to thread through the button holes and tie in a bow!


For the button front, I added a placket width and seam allowance to the center front rather than cutting it on the fold and made a matching facing.


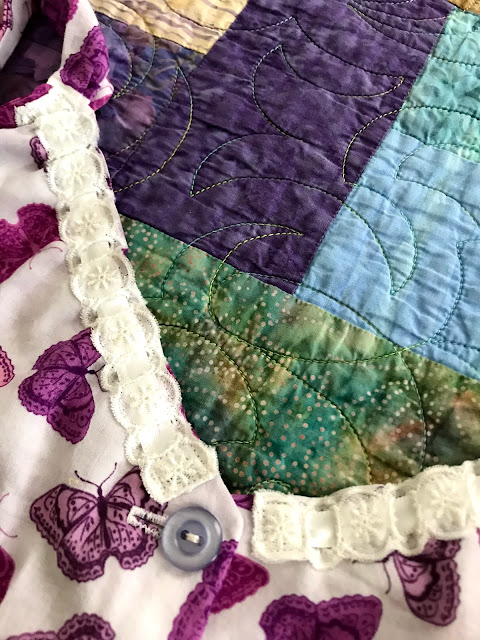
 I really liked the zig-zag lace hem option this pattern features, so I decided to use a wide eyelet from my stash all around the hem.


This thrifted eyelet trim features two scalloped edges, so I simply surged the bottom edge of my fabric and top-stitched the eyelet on to make the most of it. With the zig-zag shape, top stitching the trim in place was definitely the easiest option!


Now I did make one mistake in constructing this top. I failed to stay-stitch the neckline, which is cut on the bias. So it stretched out and gaped horribly when the top was done. 

I fixed this issue by trimming the neckline with some eyelet beading lace and gathering up the stretched out area with a shorter length of ribbon threaded through the beading and sewn in place at either end.

Functional and pretty!


As for the fabric I used, it's cotton voile I found on the clearance rack at Joann's a while back. I bought a yard of it because I really liked the purple butterfly print. I figured a yard would be just enough to make a nice woven tank top out of. 


 As you can see, I was right!


When I got the fabric home I discovered it paired very well with a fabric already in my stash - a bottom weight purple stretch sateen. 


Then and there I decided when I made my butterfly tank top I would have to make a pair of purple skinny jeans from this sateen to go with it!


Good thing WWD had a jeans patterns - The Real Deal Jeans - and good thing I've already made it once so I know it fits me well!


Since my copy of the pattern still has all my fitting adjustments marked on it from last time I used it, these were a pretty quick make as far as jeans go. (They still took most of a weekend, however.)


I added a couple inches to the rise to get a nice high waist (There's a line marked on the pattern showing where to add height if you want to so this is super easy!) and made the pockets a bit deeper. I like big pockets! The skinny jean and wide waistband hacks were done to the pattern last time I used it.


I opted for gray top stitching with the purple, and had great fun stitching a design on the back pockets.


Decorating back pockets is always my favorite part of jeans making!


I just free-hand the design onto one pocket, hope for the best, then copy it onto the other.


This system has worked pretty well for me thus far!


So there we have it! Purple jeans and a butterfly tank top. Pretty easy-wearing summer clothes. I'm happy to have added both of these items to my wardrobe! 


 Don't miss out on any of the stops along the tour!!!

7/12

Patricia of Sew Far North

7/13

Alyssa of The Sewing Goat Herd

Suzanne of WWD

7/14

Rachel Reece of Violets and Jewels

Ilse of Sew Sew Ilse

7/15

Kristen Guest Posting at WWD

Alyssa of The Sewing Goat Herd

7/16

Laurie of The Bear and the Pea Atelier

Patricia of Sew Far North


Thursday, July 15, 2021

A Ruffley Rayon Gauze Boho Breeze

 I don't generally buy Winter Wear Designs patterns. As part of the blogger team I get sent the patterns I want for free in exchange for blogging about them during a tour. With this arrangement, if there's a pattern I want I simply wait for the next blog tour and figure out how I could use that pattern to fit the tour theme and then request it. This system has an added bonus of giving me a deadline so I have to get the pattern sewn in a timely matter rather than adding it to my miles-long "I will sew this one day" list.

All that said, a few years ago I bought the WWD Boho Breeze Romper and Dress pattern when it was on sale.


It was a pretty pattern, I liked the off the shoulder raglan sleeves, and I wanted the maxi-dress version in my closet. Now! So, as I like WWD and am happy to support Suzanne, the designer, I bought the pattern real quick rather than wait for an applicable blog tour. And then proceeded to not get around to sewing it. Until this blog tour. Three years later.


Yeah. I work best with deadlines.


So, here we are, this "Summer Style" blog tour has rolled around and I decided I was absolutely, positively, going to sew up a Boho Breeze dress for it. It was time, past time really, for me to use this pattern!


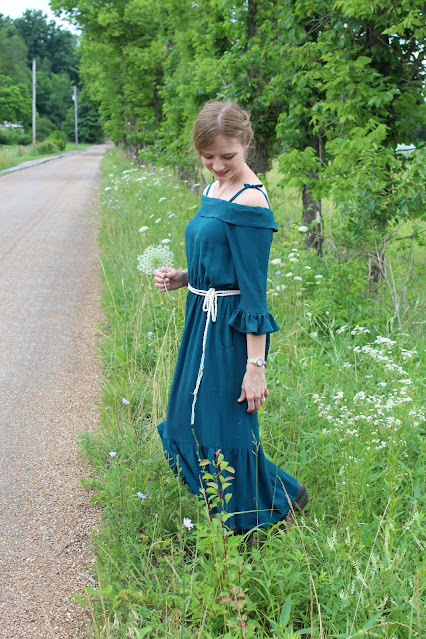
My plan was to sew up the dress, rather than the romper option, and add a few ruffles to personalize it a bit. I do enjoy putting my own spin on WWD patterns! Now what fabric would I use?


In the past few years I discovered I don't particularly like knit dress. They stretch and don't support pockets very well. I stick things in the pockets and they end up at my knees and distort the side seams of the dress. It's not very present. Thus, I prefer woven dresses. However, the Boho Breeze is a knit pattern. Could it, would it, possibly work with a woven fabric?


 This question was actually answered last year on another WWD blog tour when Maglice&So made a Boho Breeze dress out of double gauze. This loosely woven fabric worked and it was beautiful!! This dress inspired me to make my dress out of double gauze, or something similar.


"Something similar" wound up being a vintage crinkle rayon gauze type thing, given to me by my best friend's mom in a lot of stuff from her mom's sewing stash. My stash is short on cotton double gauze. This fabric is a bit heavier than I would have preferred for a summer dress, but it has a nice drape and a bit of stretch to it due to the weave and I knew it would work very well with this pattern.


 I usually blend between sizes S and M in WWD patterns, but since I was doing a knit pattern in a woven fabric this time, I opted to do a straight M. I didn't want the dress to be too tight! 


I cut out the bodice with 3/4 length sleeves and cut the skirt approximately according to the knee length skirt dimensions given in the pattern instruction, but with one notable difference. I cut it with just a center back seam and no side seams. The remainder of the fabric I cut into ruffles.


A nice wide ruffle for the hem.


Full ruffles for the sleeves.


Then I went to cut a ruffle for the neckline and discovered I didn't have enough fabric for a really good ruffle. Oops. Maybe I should have cut the sleeve ruffles a little less full or the hem ruffle a little less wide. Oh well. So my neckline ruffle is really just a wide band with a hint of a flounce to it.


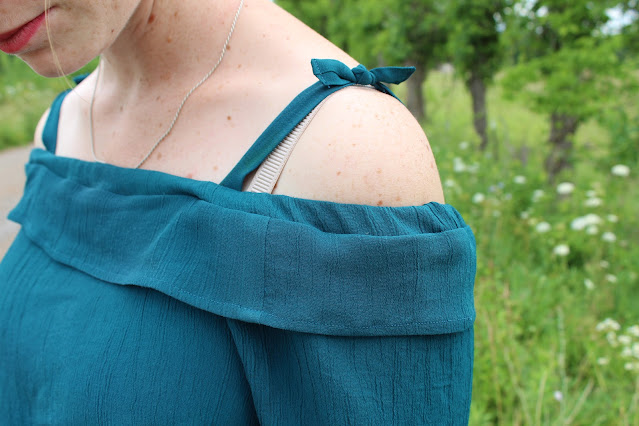
The only way this slight flounce lays nicely is for the dress to be worn off the shoulder, which is really cute, but I'm not a fan of strapless bras so I cut little shoulder ties to cover my bra straps. Emphasis on little, I only had fabric scraps left here. 


Now remember how I said I cut the skirt with only a center back seam and no side seams? Well, when I started sewing the dress together I realized my mistake. I didn't have side seams to put pockets in. As dresses without pockets are a disgrace in my world, I would have to figure something else out.


So I made tear-drop shaped cut out pockets on either side of the skirt. They look cute and fix the pocket issue!


When the dress was on I put it on and was overall very pleased with how it turned out! There's just one thing. This fabric is warm! Not the best choice for a summer dress.


It is very nice in chilly air conditioned settings at least. Such as restaurants. 


I wore this dress when my husband took me out to dinner for my birthday and found it to be very comfortable! 


That said, save for the occasional dinner out, I think this dress will mostly stay in my closet until Fall rolls around! Whatever this fabric is, it's not a summer fabric!


Unseasonable fabric as it is, I'm still very, very, glad I finally made this dress! 

Now if you want to see some WWD makes that actually turned out to be more summer appropriate, check out the rest of the blog tour!

7/12

Patricia of Sew Far North

7/13

Alyssa of The Sewing Goat Herd

Suzanne of WWD

7/14

Rachel Reece of Violets and Jewels

Ilse of Sew Sew Ilse

7/15

Kristen Guest Posting at WWD

Alyssa of The Sewing Goat Herd

7/16

Laurie of The Bear and the Pea Atelier

Patricia of Sew Far North