Wednesday, February 28, 2018

Unders - a Corset Cover and Petticoat

Now that I have an 1890's wool skirt that fits me, I clearly need a shirtwaist to go with it. What is a shirtwaist you ask? Well, today we would call it a blouse. It's a (typically) unlined garment, that covers the top half of the body, and is worn with a skirt. Shirtwaists can be made of cotton, silk, linen, or wool.


Shirtwaists pictured in The Delineatore, 1898.
Picture found on Pinterest, originally from Ruby Lane Vintage 

So, a shirtwaist. That should be an easy enough project. Decide what I want it to look like (Done! The yellow one on the right in the above print), figure out a pattern, (Done! More on that in a later post), and make it. There's just one thing I have to do before I can complete that last step. Make a corset cover. What is a corset cover you ask? Well, today we would call it a camisole. It's a sleeveless garment worn under the shirtwaist, or dress bodice, and over the corset. It smooths out the ridge made by the upper edge of the corset and prevents the corset from potentially showing through the unlined shirtwaist.

On the right you will see illustrations of corset covers, one in the upper right corner and one at the bottom, next to the text, originally pictured in Harper's Bazar in 1892.
So, as I am making myself a shirtwaist, I need a corset cover to go under it. Thankfully, this is an easily accomplished task. First I decided what I wanted my corset cover to look like. After looking through multiple books in my collection, I decided to copy one from 1892 that I found pictured in Victorian Fashions & Costumes from Harper's Bazar, 1867 - 1898, edited by Stella Blum.  


Once I decided what my corset cover would look like, I quickly draped a pattern on my dress form. Then I went digging through my fabric stash for an acceptable white or ivory cotton to make my corset cover from. Well, I have a lot of white and ivory cotton! While searching through this collection of fabric, I happened across a half-finished 1890's petticoat. I must have started it before I went on the World Race (so, well over a year ago). As the petticoat needed to be finished, I decided I might as well go ahead and do so, and make my corset cover to match it!


The petticoat was cut out of an ivory cotton sateen bedsheet. So, I found a similar thrifted sheet in my stash and used that to make my corset cover. (Unfortunately this second sheet was a slightly darker ivory than the first)


I cut the corset cover out (using the original sheet hem to make my center front button placket) and sewed up the side and shoulder seams using french seams. Then I tried it on over my corset and pinned up the back darts and front tucks in place until the entire thing fit properly. The darts and tucks were sewn in place and I completed the corset cover by finishing the neckline and armholes with lace, hemming the bottom, and sewing buttonholes and buttons up the front. The finished product isn't quite perfect, but it will do its job!


Altogether, from pattern draping to button sewing, the corset cover only took about 3 hours to make! Once it was done, I started in on finishing up the petticoat. It was already basically sewn together, just needing be set on a waistband and have the wide eyelet band sewn onto the bottom. That was pretty quick to do. As a bit of extra "umph" I also added some flat lace where the sateen and the eyelet were joined, and a 1" wide tuck right below the lace. That tuck brought the originally too long petticoat up to the right length, and gave it a bit of extra body to poof out my skirts!


With one button sewn onto the waistband, the petticoat was done! I now have a matching corset cover and petticoat set to go under my 1890's clothing! Along with that, February's Historical Sew Monthly challenge was "Under". So despite goats taking up most of my month, I actually completed the HSM challenge! Woo-Hoo!


What the item is: An 1890's corset cover and petticoat
Material: Cotton Sateen, harvested from thrifted sheets, and wide eyelet lace harvested from a thrifted bedskirt.

Pattern: My own - I draped the pattern for the corset cover based on an illustration of a corset cover that appeared in Harper's Bazar in 1892. For the petticoat I used my basic 1890's skirt pattern which I drafted a couple years ago.

Year: 1890's

Notions: China buttons, Polyester lace, All-Purpose thread.

How historically accurate is it? 65% The look is decent, but not perfect. (The corset cover came out a little short and too low-cut, while the eyelet on the petticoat should really be attached as a ruffle, but I didn't have enough for that.) The fabric is good, though I'm not sure cotton sateen was used for corset covers, but I the lace I used on each is synthetic and I wouldn't be surprised if the wide eyelet on the bottom of the petticoat is a poly/cotton blend. Both items will give the correct look under my 1890's outfits however, and that is their purpose :

Hours to complete: Approximately 3 hours on each item, so 6 in total

First worn: Just for the pictures, 2/28/18

Total cost: Less than $2 for the corset cover and less than $5 for the petticoat.


Now, onto the shirtwaist!


Sunday, February 25, 2018

Of Sweaters, Capsule Wardrobes, and Baby Goats

"One more sewing challenge? Why not?"
That was my thought when I saw the Pattern Review capsule wardrobe contest. A set of 6 garments, consisting of one "topper" (jacket/cardigan/ect.), two bottoms, and three tops, that mix and match well. What a great addition to my wardrobe that would be! Yes! I would do it! I was already planning on making myself a new cardigan, so I might as well make five things to go with it. (Never mind that I have a closet full of clothes that work with said cardigan) Thus, I signed up for the contest.

My bottle babies (each the smallest from sets of triplets!), Ruby and Milkyway.

Then baby goats took over my life. Literally. I went from having a pasture full of pregnant goats, and plenty of sewing time, to having a pen full of new mamas and babies, a field full of goats about to kid, a shed full of goats in labor, interrupted nights of sleep, and almost no sewing time. (And I'm not complaining about it because I really do love kidding season and baby goats are just the best, most adorable, little things!) Now, the thing to do in this situation is to acknowledge the fact you don't have time to take on any new sewing projects and put all current projects on the back burner. 


Unfortunately I'm stubborn and I haven't done that. Rather, my mind has kicked into overdrive and my sewing room is more cluttered than ever with patterns and fabric stacked together and waiting to be sewn into all sorts of awesome things - 1890's shirt waists, 1890's tea gowns, 18th century stays, 18th century gowns, 1950's inspired dresses, dresses for my sister, and capsule wardrobe pieces - and I have almost no time to sew any of it! My projects are piling up much faster than I can make them! I'm running out of room in my sewing room to actually do any sewing!


So, sewing this capsule wardrobe for myself. It sounds like a really crazy plan right now, doesn't it? Well actually, it's not. Most of the pieces I have planned are actually pretty simple and can be sewn up in a couple hours, whenever I can catch a bit of time in the sewing room. They are things I can actually get done right now, as opposed to the historical projects I have planned. Amidst all my plans for big sewing projects, I think these smaller projects are keeping me sane. At the end of each week I can look back and see that I've completed something other than feeding goats and cleaning out sheds, and that's pretty darned nice! The things I sew will stay sewn, where as, the goats I've fed, will need to be fed again the next day, and sheds will get dirty again.


My big historical projects? Those need to get boxed up for the next month or so until the goats are less crazy. But this capsule wardrobe? It's happening! 1 cardigan, 1 T-shirt, 1 tank top, 1 blouse, 2 pairs of pants. Those are my plans, and the first three items are already checked off the list! As I mentioned above, when I found out about the contest, I already had plans to sew a cardigan, so that was the first project on the cutting table!


In a lot of ways this cardigan was the definition of an easy sew. Only 5 seams and no hemming required! The only thing that made it slightly complicated was my decision to make it reversible.


I've had the idea to make a reversible, blanket-type, drapey cardigan for over a month now. I saw a friend wearing a sweater that met that description and my first thought was "I like that," quickly followed by "I could make that!" 
From that day on I was keeping my eyes open for just that right fabric. When I spotted a thick sweater knit on the clearance rack at Hobby Lobby, I knew I'd found what I was looking for!


 One side of the fabric is a black and white tribal pattern, while the other is just black and white yarn knitted together to make a solid(ish) gray. Being a neutral color, with both a patterned and a solid side, my reversible sweater will go with just about anything!


Fabric in hand, I found Simplicity 8021 in my pattern stash and was happy to see it had the shape I was going for with this project! All I had to do was alter the neckline to get rid of the collar the pattern had. That was easy enough to do! I also, of course, added large patch pockets to the patterned side of my cardigan.


The body of the sweater only has one seam straight down the center back, (no side seams at all!), and I am thrilled with how my pattern matching on that one seam turned out! The pattern on two halves of the sweater is almost perfectly mirrored!


That one seam, along with the sleeve seams, is flat-felled so that it looks equally good on both the patterned and solid sides of sweater. No seam allowances seen anywhere!


My reversible blanket cardigan turned out just as I hoped it would - even though I made it in the middle of kidding season :)


Wednesday, February 21, 2018

A Hooded Blouse? A Jacket? A Fancy Hoodie?

A hooded blouse. It was not the reason I'd bought the pattern, and I had no plans to sew it originally. Yet, it's a funny thing, as a general rule, kids, including my little sister, like hoods. Thus, as I was cutting out Simplicity 8447, to make my sister a pair of overalls, I decided "why not?" Why not make a hooded blouse to go with the overalls? Surely I had some fabric in my stash that was up for the task.


I didn't have to look very far to find the perfect fabric for making this hooded blouse. Sitting in my fabric cabinet was the denim for the overalls, and at least half a dozen other fabrics bought at the same time. One of which was this pink cotton textured knit. For a knit, it didn't have much stretch to it, but that was just fine, as the pattern was technically written to be sewn from woven fabric not knit. So, in keeping with my original decision to make the hooded blouse, I decided, "why not?" Why not make a "woven blouse" of of a knit fabric? It ought to be soft and cuddly!


So, I cut out the blouse the same morning I cut out the overalls. Then it sat on my sewing table, waiting to be made, for a couple weeks. This "why not" project was not top of my to-do list, until week 6 of the 52-week sewing challenge. The theme for that week was "Sew something pink." So why not make that pink hooded blouse that I had all cut out and ready to go?


Just from looking at the pattern envelope I didn't really notice anything exciting about this blouse, other than the hood. Well, clearly I didn't pay much attention to the blouse pictures (I was too focused on the overalls), because once I started sewing the blouse I fell in love with the details of it! The blouse is fitted with inverted pleats at the waistline, the hemline is curved beautifully, and the narrow cuffs with the gathered sleeves are just so sweet!


And the hood, of course the hood. It's fun, and big, and pointed, and my sister's favorite part of the blouse, just as I expected it to be!


She loves that the hood is big enough to pull down over her face in case of cold wind!


So, I thought I was making this as a blouse, to go with the overalls from the same pattern, but once I finished sewing on the last flowery button and presented it to my sister, I discovered that was not the case.


As you can see here, my sister is wearing this "blouse" over her overall dress. Yep, she decided it made a much better jacket than shirt, and I'm not complaining about that.


The blouse will get way more wear this way, than it would as a shirt, and it looks fabulous worn over other clothing items. So why not? Why not call it a jacket?


Friday, February 16, 2018

Fun Shirts in Twos

I love wearing the clothes I make. There's just something really awesome about going through the day in a garment that I made. It gives me an extra boost of confidence and makes me feel all put together and ready to tackle the day!

Please note the ice-coated field in the background.
On the morning we took these pictures, everything was covered in 1/4 inch of ice!

Now, my favorite thing to sew, and really, wear, are dresses. Unfortunately, dresses are just not the most practical thing for my everyday life - especially when it's freezing cold outside! (Which perfectly describes the last couple months. . .)


My second favorite thing to wear is jeans - comfortable, perfectly suited to my life, appropriate for winter temps, and something I don't plan on sewing for myself! Ahh yes, most of my wardrobe revolves around jeans - so this leaves me one thing to sew for myself for everyday wear. Shirts. Preferably knit shirts as they are comfortable and quick to sew.


Plain, boring T-shirts? Those are no fun to make! (Or wear for that matter) Thus, I'm always on the look-out for fun shirt designs. I was quite thrilled a couple weeks ago when a "Not boring" knit shirt pattern came across my Facebook feed.


It was the testing call for the "Lace Me Up Top" from More 2 Hug patterns. A shirt with a lace-up back (or front!) yes please! I immediately applied to be a tester, and was quite excited to get accepted. I needed this shirt in my closet!


I then proceeded to make this shirt twice during the testing phase. The shirt came together quickly and easily and looked fabulous when it was done. So, since I had the fabric already in my stash, how could I not make it twice??


The first shirt (pictured at the beginning of the post) is made out of the navy stretch velvet left over from our Christmas dresses. The second (Which makes a great backdrop for an adorable little goat, doesn't it?) is made out of a drapey rayon jersey, left over from a shirt I made my mom, and a nearly see-through white mystery knit I brought home from Wal-Mart a couple months ago. 


The drapey rayon worked a bit better for this design, but I love the look of the velvet shirt too! 
The "Lace Me Up Top" pattern is available for 25% with the coupon code "BEMYVALENTINE" until Sunday (Feb. 18). So if this shirt pattern interests you, get it!


Now, as exciting as one fun top pattern is, that's not enough to fill my closet with everyday shirts I'm excited to wear. A few more designs are necessary for that endeavor. 


With the "Lace Me Up Top", the pattern was picked first, and then I found fabric to match. This shirt was the opposite. I found this lovely patterned jersey knit at a fabric store in Romania last summer. (Yes, I tried to go fabric shopping in every country I visited on the World Race.) It was soft, and beautiful, and begged me to take it home. So, I bought all of it that the shop had left - 1 meter. Yep, just over a yard. That's not a whole lot of fabric - but thankfully, at 60" wide, it's just enough to make a T-shirt! 

The main pattern pieces laid out - with just enough fabric left over for the sleeves!
So, I bought the fabric knowing that in approximately 4 months, when I was home and reunited with my sewing machine, it would become a shirt. What the shirt would look like? That I didn't know, until I got home and happened across a Kwik Sew pattern sale at Joann's.


Kwik Sew 4189 leapt out at me from the pattern book as "the shirt" to make out of my Romania fabric. The handkerchief hem and diagonal waist seam elevated this shirt design from "standard T-shirt" to "fun to make and wear shirt"


As you can see, the pattern/fabric combo worked out splendidly! However, right before I cut into my fabric I got nervous. What if it didn't work out well? I'd brought this fabric back all the way from Romania, and I had a limited amount of it. What if I made the shirt and didn't like it? With these thoughts running through my head, I decided to make a test shirt before cutting into my precious fabric.


From my stash I pulled a remnant of purple cotton/poly interlock for the bodice of the shirt and my nearly see-through pretty mystery knit. The test shirt came together quickly and I was mostly pleased with the result. 


My only issue with the test shirt was it came out a tad looser than I prefered. This wasn't something that would keep me from wearing the shirt (Indeed, it has been worn plenty since it's completion!), but it was something I wanted to change for the final version.


So, I cut the pattern down one size for the final shirt and the result is perfect! My test shirt paid off in two ways - my Romania fabric became a shirt I absolutely love, and I wound up with two shirts from this fun pattern!


Fun everyday shirts are definitely better in twos!

Wednesday, February 14, 2018

The Dress with the Heart Pockets

One of the very first things I sewed for my little sister (that wasn't doll clothes or a costume) was a Valentine's Day dress. She was with my mom and me at the fabric store where she found a package of heart-shaped buttons and insisted that she wanted one of us to make her a Valentine's day dress with them. Well, that girl has always had me wrapped around her finger, so I agreed, and made the dress with the heart-shaped buttons. That dress started a landslide. After it was finished I made her another dress, and another, and another, until eventually I was sewing most of her wardrobe.


Now, since that first dress, I can't say I've made a habit of making my little sister new dresses for Valentine's day. In fact, I can't remember making her a single other Valentine's dress in the past 5 years. It certainly wasn't on my radar to make her one this year, and she didn't ask for one either. But then. . . .


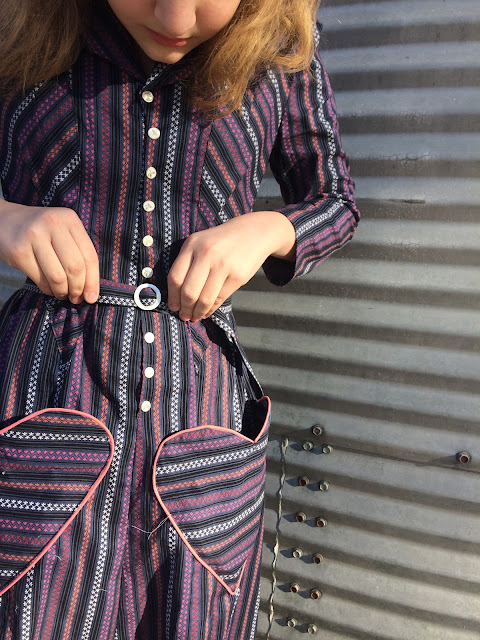
I saw an adorable dress, with adorable heart-shaped patch pockets, on instagram. Heart-shaped patch pockets with piped edges?!? Yes, please! I needed to make a set of those! And, of course, a dress to put them on. 


So that, my friends, is how my little sister wound up with a new dress for Valentine's Day this year. I just couldn't resist the heart pockets. Once I'd decided I just had to make a dress with those pockets, it was pretty easy to figure out the rest. 


Simplicity 8050 is a pattern that my sister picked out for herself. It's a 1940's reprint pattern, that has patiently been sitting in my stash since Black Friday, waiting for me to decide to make it.


Well, its day had come! I decided it would be a perfect canvas for the heart pockets.


And it was! The fabric for this dress came from a little Mennonite Fabric store my mom, sister, and I visited a couple weeks ago. As soon as the fabric made its way home with me, it was earmarked for this pattern. I just knew that by playing with the direction of the stripes I'd be able to highlight the fun design features of this dress.


The snaps down the front of the dress also came from the Mennonite store, and my sister specifically picked them out for herself, as they feature one of her favorite animals - horses! To finish off the dress I made a self-fabric belt using a circular mother of pearl buckle from my stash. I loved how the buckle perfectly matched the shape and color of the snaps!


My little sister was completely surprised and absolutely thrilled when I presented her with the finished dress! It was just the thing for her to wear to her homeschool co-op valentine's party!


A new dress and a shoe box ready to be filled with cards and candy? I do believe this girl is ready to celebrate the day! Happy Valentine's day everyone!