Friday, May 29, 2020

A Mooi Sundress with Criss-Crossed Straps

Sundresses. Fun fabrics. Interesting design details making each new dress just a little special and different from the last. Cool and comfortable.
I might just have a weakness for sundresses. I do believe they are my favorite thing to sew. And I know they're my favorite thing to wear in the summer.


I certainly have a weakness for dress designs from The Eli Monster. Her dress designs are fun and whimsical, with a touch of vintage-inspired thrown in. When my sister was still in children's sizes, I was always eager to test The Eli Monster's girls' dress patterns. Now that my sister has grown up, I'm excited that The Eli Monster has started coming out with a handful of women's dress patterns so I can still make these fun designs, despite my lack of a child to sew for. It's fun to make these dresses for myself!


Thus, it should be no surprise that when, a few weeks ago, The Eli Monster put out a tester call for an adult sundress pattern, matching one of their recent children's sundress patterns, I quickly volunteered. 


The new sundress pattern featured a full skirt with pockets - two things I consider mandatory for just about every sundress I ever make. Along with these oh-so-important features, the pattern also boasted an open back with criss-crossed straps that tied at the shoulders. I had no idea how one was to wear a bra with such a design, but I decided I'd cross that bridge when I came to it, and set to picking out my fabric.


I chose a red and blue and teal cotton batik out of my aunt's friend's mother's fabric stash, which I was gifted last year. I didn't have a ton of this fabric, and it came to me in several oddly shaped pieces, but I figured I could just eek this backless sundress out of the yardage I had.


 To conserve my main fabric, I decided to line the bodice in a solid dark red cotton. This fabric shows at the shoulders where the straps are tied, but I think it matches one of the colors in the batik print well enough to look good.


With the contrast bodice lining, I did indeed have enough of the batik to make the dress! I cut it out and sewed it up with no issues.


The back waistband of this dress is fitted with elastic and there are no buttons, or zippers, or other closures beyond the shoulder ties. This made it a pretty quick sew - which was good because the time I saved not sewing zippers or buttons was used instead to figure out the bra issue.


As you can see, with the open back there was no way to wear a normal bra with this dress. the band would show. 


As I wasn't a fan of the bra-less option I needed to figure out a way to remove the band from a bra and still have it be supportive. After a bit of brain storming, I came up with an idea. I didn't remove the band, I removed the straps.


I started with a cheap bra I picked up in Europe while I was on the World Race. (Once I got to Europe, all the bras I'd brought with me were plain wore out. So I picked up a handful of these cheap lace bras just to get me through until I returned home 5 months later. I may have picked up too many of these bras, as I still have several in decent shape left. Thus, this bra was a very good candidate for re-fashioning!) The straps on this bra just hooked in place, rather than being sewn on, so those were easy to get rid of. Once the straps were out of the way, I found a second old bra. This second bra donated the hook-and-eye part of its band to the cause.


The band portions which had been cut off the second bra, were then sewn onto to the top of the cups of the first bra, forming new straps.


These new straps could then be hooked diagonally across the back to the original bra band. The left strap hooked to the end of the right band and vice-versa. 


This eliminated the bra band straight across the middle of the back, while still providing the support the bra was designed for. The newly rigged up strap/band combination can now be completely covered by the fun criss-crossed shoulder straps of this sundress!


And so that is the story of the newest sundress in my closet. A pattern test and a bra re-fashion. The resulting dress is just too much fun not to be worn all summer long!


If you're interested, this pattern, the Mooi Dress, is on sale for the next week over the The Eli Monster website! It's only $7 right now! 

I was given this pattern for free in exchange for testing it and giving my feedback. All thoughts and opinions given here are my own. I was not required to write this blog post or otherwise share about this pattern.


Sunday, May 24, 2020

The Ruffled Edwardian Princess Slip

With my pink silk, fur-trimmed, Edwardian skirt done, I was ready to start on the bodice, right? Wrong. There was one more undergarment I needed to make first - a corset cover.


A corset cover is a camisole-like garment which, surprise, surprise, gets worn over the corset. It prevents the outline of the corset from showing through the bodice. A couple years ago, I made myself an 1890's corset cover; but early 1900's corset covers are shaped a bit differently than 1890's corset covers, so I needed to make a new one. Edwardian corset covers were cut rather full in the front to help achieve the "Pigeon Breast" silhouette of the era. Some were even ruffled to really help fill out the front of the bodice. Corset covers of the 1890's on the other hand were rather fitted, just meant to smooth out corset ridges, not add any extra volume.  


Thus, I needed to make an Edwardian corset cover. I wanted to make a ruffled corset cover like this one from 1905. And yet, I was completely unmotivated to actually make said corset cover. For no specific reason, I just didn't want to make a corset cover.


As I tried to talk myself past this hurdle of simply not wanting to make a corset cover, I hit upon a solution. I could make a princess slip instead. A princess slip is basically a combination of a corset cover and a petticoat. They became popular right around 1900. A corset cover with a skirt attached. Approximately twice as much work as just a corset cover would have been, but a project I could get way more excited about. No logical reason why, but at this moment I wanted to make a princess slip just as much as I didn't want to make a corset cover. Thus, a princess slip I would make! (No clue where my aversion to making a corset cover came from.)

Slip, 1900-1908. The MET. 2009.300.3255
I decided to base my princess slip off this one from the first decade of the 20th century, held by the MET museum. I would add ruffles to the bodice to match the corset cover I referenced earlier, and I would be set. The perfect, pretty, and fun Edwardian undergarment.


For the top half of my princess slip, I used the bodice pattern from the Wearing History 1910 combination pattern. This bodice has just the perfect pigeon-breasted silhouette for the Edwardian era, and I already had the pattern in my stash thanks to a sale Wearing History had last fall.


This pattern is a digitized version of an actual 1910 pattern, and as such is only available in one size - a 36" bust. As I have a 37" bust, this was almost perfect for me so I made no adjustments. However, I don't think the pattern would be too hard to resize using the slash and spread method to add or subtract a few inches from the bust.


Since this is a relatively loose fitting garment, and the pattern was about my size, I didn't bother making a mock-up. Not recommended practice, but in this instance it worked out, the bodice fit perfectly, and I have no regrets. Had this been a more fitted garment, and something other than underwear, I definitely would have mocked it up first.


I made the bodice (and later the skirt too) from plain cotton muslin. The ruffles were then made from cotton organdy trimmed in vintage cotton lace.


I had a hard time figuring out exactly how to neatly attach the organdy ruffles to my bodice. Eventually, I decided to use this method of gathering with cotton cording.


The upper edge of each ruffle got folded over a length of cotton cord, and sewn as if I were making piping.


The ruffles then got gathered up with the cord and I used a zigzag stitch to anchor them to the bodice.


The neckline and armscyes were bound in plain old bias tape, and then the bodice was done.


Ruffled to perfection, and ready to be attached to the skirt!


For the petticoat portion of my slip, I drafted up a simple 7-gore skirt pattern from the Dover book 59 Authentic Turn-of-the-Century Fashion Patterns. I used the pattern on page 128.


I've found the patterns in this book to be very easy to use, and this skirt pattern was no exception! 


Once again, it would have been advisable to make a mock-up once I was done drafting this pattern. However, as I was just using it for a petticoat and it already appeared to be about the right size, I didn't bother with a mock-up. Just like with the bodice, no regrets here, it turned out just fine.


I knew how long I wanted my petticoat to be, and I knew I wanted a 12" wide lace trimmed ruffle at the bottom, so I used this information to cut my pattern pieces to the correct length before cutting into my fabric (cotton muslin, just like the bodice).


The 7 gores of the skirt were all sewn together with french seams, and I left the top several inches of the center front seam open for the button placket.


I then took a wide strip of muslin, sewed in 4 wide tucks for decoration, and finished the hem with some pretty paisley 100% cotton eyelet I found at Hobby Lobby. (I was super excited to find 100% cotton eyelet, as most eyelet I find is a poly cotton blend!)


The tucked and eyelet trimmed ruffle was then gathered up and sewn to the bottom of the skirt.
The skirt and bodice of my princess slip were now ready to be sewn together!


The center back of the skirt was gathered up to fit the back of the bodice.


And the front of the bodice was gathered to fit the front of the skirt.


The two were sewn together with a french seam. 


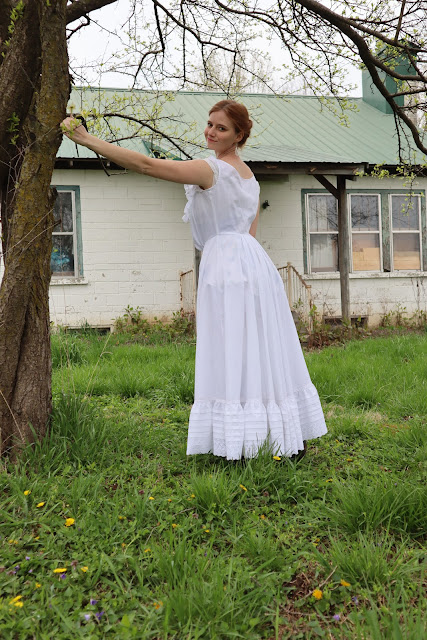
Finally, my princess slip was finished with buttons down the center front.


And with that, my princess slip was done!


I love it!!


Yes, it was more work than just a corset cover would have been, but it was absolutely worth it!


I enjoy wearing this slip and look forward to making all sorts of Edwardian ensembles to wear it under!


Historical Sew Monthly 2020, Challenge #5 - Basic

What the item is: Edwardian Princess Slip
How it fits the challenge: It's a base layer to be worn under multiple different ensembles from the first decade of the 20th century.
Material: Cotton Muslin, Cotton Organdy
Pattern: Wearing History 1910 combination bodice, combined with a skirt pattern from 59 Authentic Turn-of-the-Century Fashion Patterns.
Year: 1900-1910
Notions: Thread, buttons, cotton lace, cotton eyelet
How historically accurate is it? The patterns are accurate. My material choices aren't bad, just perhaps a touch heavier than they would have been in the era. The construction methods are just what made sense to me, rather than researched historical methods. This would have been recognized in the era, though I've not seen any historical examples of princess slips with ruffled bodices like I did here. So, let's say 75% accurate
Hours to complete: I have no idea. I finished it in about a week, working on it a few hours every evening. Probably 8-10 hours total, including patterning.
First worn: Just for pictures 4/5/20, as the event I was supposed to wear it to that day was canceled.
Total cost: The muslin was gifted to me by someone de-stashing. Same with the lace. The buttons were bought in bulk years ago. The organdy was left over scraps from another project. I spent about $5 on the paisley eyelet. So, $5?


Wednesday, May 20, 2020

A Leather Shop Apron for my Dad

Last fall, a friend of a friend offered me a big box of deer hide they had in their basement. They'd acquired this deer hide at least 30 years ago, and had always intended to do something with it, but never got around to it. As they were clearing out their basement last year, knowing I sewed and did historical costuming, they asked if I would like this box of leather. I eagerly accepted! I've not really done much leather work thus far, but I was sure I'd find projects for this stuff.

When my dad saw the box of leather, he casually mentioned he's always wanted/needed a leather shop apron to protect his clothes while using a grinder to sharpen lawn mower blades and other such things. Alright. Request heard. Birthday gift planned.


The evening before my dad's birthday, I went through all the hides in the box to pick one to make my dad an apron from. The box was primarily full of deer hides, but at the bottom of the box there was one cowhide. Or, more accurately, two halves of a cowhide. Deer hide is pretty thin and stretchy, so I wasn't sure how well it would hold up to my dad's work. Cowhide however? Very durable. I was confident an apron made of cow hide would last my dad a very long time. Thus, I pulled one half of the cowhide out of the box and set to work.


I decided to use the basic apron pattern I drafted 5 years ago to make aprons for my mission trip to Guatemala. After some experimentation as to how best to cut the leather, I discovered my little Fiskers spring-assisted snippers worked best. I used an older pair of these snippers so I wouldn't dull the newer ones I currently use on most of my sewing projects.


After the leather was cut out in an apron shape, I bound the curved edges in black bias tape. This adds a little bit of stability and will hopefully keep the edges from stretching out too badly over time.


For the neck strap I used thick cotton webbing, as I figured that would be more comfortable against the neck than regular nylon webbing. 


I harvested hardware off an old purse and used it to make the neck strap adjustable.


The waist strap is made from regular 1" wide nylon webbing, fastens with a plastic quick release buckle, and is also adjustable.


My sewing machine handled sewing the straps to the thick leather like a champ! I used a large universal needle, took it slow, and ran into no issues. That was a relief since this is definitely the heaviest leather I've ever asked my machine to sew for me! 

The apron went together in a couple of hours one evening - which was really good since I only had one evening to make this thing before giving it to my dad for his birthday!


My dad was super surprised when he unwrapped his gift! He'd apparently not expected me to actually take his request seriously, and loved it! He assured me the apron would be very useful and he'd wear it often!


And this has certainly been true! I've found him wearing the apron while working on multiple occasions!


It makes me so happy seeing my dad wearing his apron. It's not often that I'm able to figure out something truly useful to make my dad, but this apron is certainly something he's needed and wanted for a while! I'm glad I was able to make it for him! 
Now that they're no longer getting hit with sparks and metal shavings on a daily basis, my dad's work clothes should last him longer! The apron is doing its job! 
(And just a disclaimer, even though they're not pictured in these photos, yes, my dad always wears safety glasses when using a grinder and other such equipment. He just turned off the equipment and took off the glasses when I appeared to take a couple pictures of him wearing the apron.)