Saturday, July 30, 2016

She's Home!

After a very fun filled week at camp involving a hot air balloon ride and a zipline, my little sister is home! It was a rather quiet week around here without her, it's good to have her back!


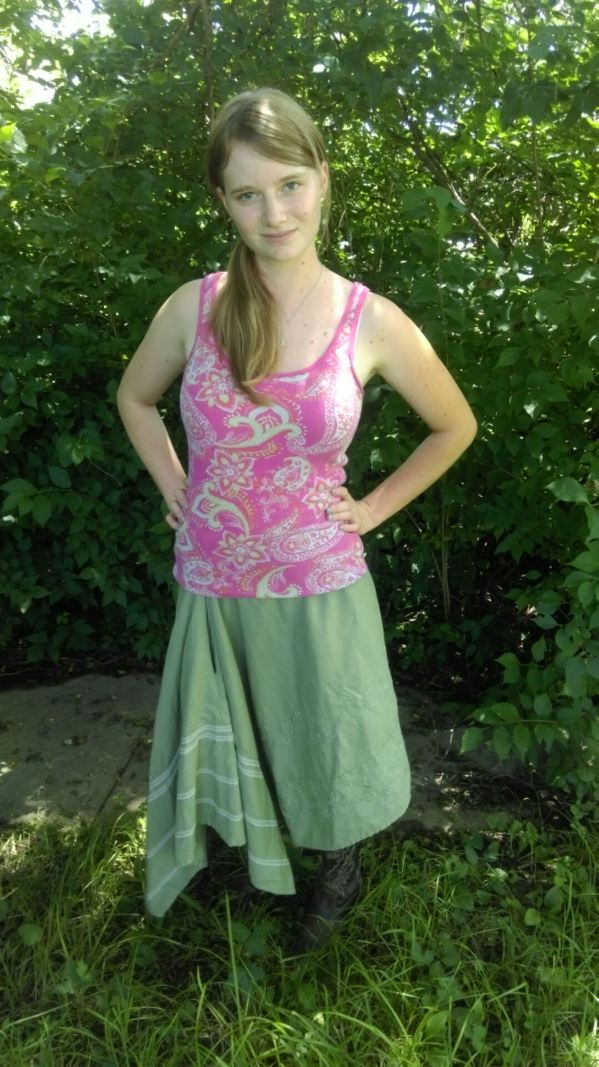
Quiet at home however does not mean it was a slow week, not at all. As I've done previous years, I had great plans to sew my sister a couple dresses while she was away. The week sped by however, filled by work and other such things, and by yesterday evening I still hadn't made her a dress. Oh well, I thought, she really doesn't need anymore dresses, but. . . she has outgrown a few sundresses and I really wanted to make her a new dress. Thus, I pulled out a pattern I bought over a year ago and some plaid cotton gauze that I've had in my stash for a year or two now and cut that dress out.


So, the dress got cut out last night and this morning I set to sewing it together. It was a very simple pattern so I figured I might just be able to get the dress done before we left to pick my sister up from camp. Well, the dress was almost done when we left, but not quite. I'd decided to add a flounce to the bottom of the dress as it looked a little short in the picture and I thought a flounce would really add to the overall design. I still needed to sew said flounce on. Also, the back of the dress still needed to be shirred. (Well, the pattern said to sew elastic to the back of the dress, but shirring with elastic thread is so much easier and the finished product so much nicer). Thus, the dress got finished after my sister got home, but she was still thrilled with it!


While simple this dress is, plain it is not. I love the tucks and decorative button placket on the front. I used mismatched pink and purple buttons from my stash and outlined the placket in yellow rickrack. The pleated shoulder straps though might just be my favorite detail.


Thanks to the loose cut and the elasticized back this dress required no functioning buttons or zipper, score!


My sister loves how light the fabric is, making this dress cool and comfortable. She's been admiring this fabric in my stash for a while now so she was super excited when she discovered I'd turned it into a dress for her!


It's good to have her home again! When we went to pick her up she and her friend were wearing their Thing 1 and 2 dresses, just for fun. I was happy to see Thing 1's dress fit and that both girls enjoyed the week at camp!

Friday, July 29, 2016

Printed Out Patterns: Shorts and a Shirt

I did something I've never done before. I bought a downloadable, printable pattern online. I downloaded it and printed it out. I taped it together and hoped for the best. Did I size it right when I printed it? Did I get the pattern pieces taped together exact enough? My only experience with downloadable patterns was the Anya bag, and that was a bag (so if a few things were off in my taping together the pattern it would be ok in the end). Plus,since I was testing out the Anya bag pattern for the designer before it was released I got that pattern for free, thus, the pressure was a little less somehow with that than it was with this pattern that I'd actually paid for. Well, this shorts pattern I bought online, printed out, and taped together? it worked!


While searching online for a button front shorts pattern, I found Kwik Sew 3854, which I used to make my green shorts, and then this one, Dixie DIY's Movies in the Park shorts pattern. I read Dixie's blog, so when I found this unique button up shorts pattern made by her, I thought it would be a fun one to try. Thus, after a bit of debating I decided to buy it, download it, and try it out.


I sewed the shorts out of a linen blend skirt I picked up at a thrift store. It took some creative cutting and folding, but there was just barely enough fabric in the skirt to squeeze out these shorts. Cutting them out was probably the hardest part of making these shorts, they went together pretty easily. I made my own bias tape from some soft cambrey in my stash to bind the edges with. I used that same cambrey to line the waistband.


In my stash I had just enough blue buttons to finish up my shorts, 7 buttons on each side. The bottom 3 on each side are just for decoration. The top four are functional for getting the shorts on and off. No elastic or zippers in this pattern! Now, there is only supposed to be one button on either side of the waistband, so 6 buttons total on each side of the shorts, but, as you can see in the picture, I have two at the waistband on either side. While the shorts themselves fit great, the waistband wound up a bit big so I had to add extra buttons. Next time I make this pattern, and there will be a next time, I'll make the waistband a size or two smaller. 


Other than the waistband issue, I really like these shorts! They're comfortable, cute, and have decent sized pockets, thus they meet my shorts criteria! Once the shorts were done however, I ran into another issue. I needed a shirt to go with them. Somehow I had no blue summer shirt in my wardrobe (other than a plain tank, but that was rather boring). A chambray shirt would be cute, but that wasn't what I wanted. I looked through my light blue fabrics (I have a few, several, uh. . . many pieces). I started sketching out design ideas. I had a general plan of what I wanted to make. Then, I didn't need it anymore.


I happened across this downloadable shirt pattern on Pinterest, and it was free! After success with my downloaded shorts pattern, I was ready to give this one a go. I downloaded it, printed it, taped it together, pulled a 2 yard piece of blue plaid shirting out of my stash and got started.


The pattern went together with no major issues. I had to lower the neckline a couple inches as it was really high, and the bias binding at the neck was a little fiddly, but other than that the shirt came together easily. Though, I really should have added a couple inches at the hem as it's a little shorter than I prefer (I'm rather long waisted). Even with that, It's a very comfortable shirt and looks great with my shorts!


I love the gathers at the shoulders and the cut on sleeves! I typically avoid sleeves in the summer as I try to stay cool, but I really, really, like this shirt, sleeves and all. It's very lightweight and loose, while still having structure and not looking baggy. I think I need to make this shirt again!


An entire summer outfit with no trip to the fabric store, just a lot of printing and cutting. I rather like being able to get my patterns without having to drive anywhere. Although, 24/7 access to new patterns, this might not be a good thing for my wallet or the ink in the printer. I think I might just need to learn how to draft my own patterns instead.
  

Monday, July 25, 2016

Thing 2 goes to camp!

She's off to camp! A whole week of fun with her friends! I'll miss my sister, of course, but it's so much fun to see her so excited!


Every year her camp has a theme. To go along with that theme one evening there's a costume contest and dance. Well, this year's theme was Dr. Seuss and my sister needed the perfect costume. She and a friend decided to dress up together as Thing 1 and Thing 2. Of course, as my sister's personal seamstress, this meant I needed to sew two cute red dresses. Thankfully, I had a torn red sateen sheet in my stash with just enough usable fabric for two identical size 12 dresses. 

I used an 80's pattern from my stash, McCall's 5122. I thought the dropped waist and double ruffled skirt just fit the bounciness of both the characters and the girls perfectly!


Now, unsurprisingly, more than just red clothing was required to make these costumes work. Thing 1 and Thing 2 needed big, round, white nametags on their fronts. Those were easy enough to make. A couple circles of white twill and a black fabric marker, no problem! The name tags are just pinned to the front of the dresses so that they can be easily removed and the dresses worn again for other things. 

Next, shoes. Things 1 and 2 have red feet so red shoes were a must. Thankfully Walmart had the perfect red shoes in stock.

 Finally, the hair. That was the challenge. Things 1 and 2 have blue hair. Unfortunately, it's July, not October. Spray on hair color or colored wigs are not easy to find this time of year. We had to improvise. My mom and sister picked up a couple pair of blue spandex leggings, cut each leg into three strips, and braided it. The waistband holds the braids on the girls' heads. I found this idea in an American Girl backyard theater book that I had when I was my sister's age. It may not look exactly like hair, but it gives the right effect to finish off the Thing 1 and Thing 2 costumes. 


We finished the costumes the night before my sister left. Into a backpack they went to await inspection from Thing 1 at camp the next day. Thankfully, Thing 1 was just as excited as my sister about the costumes. Hopefully the girls have lots of fun this week! (and I really hope someone at camp takes lots of pictures so that I can see these costumes in action and all the fun that my sister gets to have!) 


Wednesday, July 20, 2016

The Blue 1890's Dress Plans

It's almost that time of year again. Costuming madness. Sewing Craziness. Every year for the past 6 years my two best friends and I have gone to the Japanese Festival. Every year for the past 5 years we have dressed up for it. My best friends love Anime and Japanese culture. Me, not so much, but I do love to dress up and the Japanese Festival is great fun! The month or so leading up to the festival (and especially the last week before the festival) are a little crazy as we make our costumes. Last year we dressed up from Legend of Zelda. Our costumes were awesome! Now, how do we beat that this year? I'm not sure if we can, but we're gonna try! The festival is a little over a month away so it's time to get started.

This year the chosen cosplay is Studio Ghibli movie characters. Any Studio Ghibli movie, any character. I picked Sophie from Howl's Moving Castle for my cosplay. I picked her for a couple reasons. She has light colored hair in a single braid down her back, so no fancy hair stuff required for me.  In the movie she starts out as a hat maker, which is about as close as I can get to a seamstress character. And finally, her dress!


Ok, so it's not a particularly exciting dress, but I've been wanting to make a basic 1890's dress (think Anne of Green Gables) for some time now  and this dress definitely has the right elements for that. For example, look at this late 1890's work dress from the Smithsonian. 

image source
Imagine this in blue. Look at the shapes in the bodice. See the similarities? 

So, yes, I'm using the Japanese Festival as an excuse to sew a historically accurate 1890's dress like the one above. I'll make the dress in a blue cotton print, so it will be usable for both this cosplay and any historical events I come across requiring an 1890's dress. It's a very basic dress of the period, but I think that it's a great way to start to familiarize myself with late 1800's clothing. Up until now I've stuck with early to mid 19th century, so this is a totally new era for me! I'm excited! Along with the dress I'll also need a straw hat like this one to complete the cosplay.


The dress is a rather large undertaking, but at least the hat will be easy! A small straw hat with a red ribbon tied around it. I think I already have a hat I can use. 

Now, I mentioned I planned to use a blue cotton print for making this dress, not a solid blue fabric. Why? Well there are two reasons for that. First, solid colored cottons were rather unusual in the 1800's and I'm trying to make this as historically accurate as possible. Second, the theme for Historical Sew Monthly's August challenge is patterns. Not sewing patterns but patterned fabric or a specific feature of the garment. I've not kept up with HSM like I've planned to this year, but since I'm making a historical garment in August, by golly, I'm going to make it fit into the challenge!

I really like the fabric of this 1890's cotton dress and I'm hoping to find something similar in blue. 

image source
Now, I just need to go fabric shopping and I can get started!


Saturday, July 16, 2016

Button Front Shorts

Was there anyway that I was going to stop sewing shorts after two pair? No, not really. Once I started making shorts all the design possibilities became apparent to me and I just had to sew more. Lace, frills, scallops, buttons; there are so many fun things to add to shorts! One particular style that appealed to me after my attempt at elastic waist shorts being met with success? Sailor style, button front shorts.


Once I decided to make a pair of sailor style shorts I started by tracking down a pattern. I wanted one with functional buttons and no zipper, rather than decorative buttons and an invisible zipper. Lots of google searches commenced. I stumbled upon Kwik Sew K3854, it had the exact shorts I was looking for! Even better, Joann's happened to have Kwik Sew patterns on sale that week, so I swung by after work to pick up my pattern. I was met with disappointment. They didn't have the correct pattern in stock, if I wanted the pattern I would have to order it online. Thankfully, the McCall's website itself had the Kwik Sew patterns on sale. So for just $2 more than I would have had to pay at Joann's I was able to get this pattern, including shipping. Two days later the pattern came in the mail and I could get started!


I decided to use some green light weight upholstery fabric from my stash; the same fabric I used for the waistband of this skirt and to trim my purse with. There was just enough left to squeeze these shorts out of. I picked this fabric up at a thrift store and have now used every last scrap! I cut the pocket facing and waistband lining out of a pair of no longer worn pretty flowered cotton PJ pants. 

Since I had to go through the trouble of ordering this pattern I did something I don't generally take time to do with my patterns, I traced my pattern in the correct size rather than cutting it. (with the patterns I pick up for $1 at pattern sales I don't feel like it's worth the time to do this.) My decision to trace the pattern was also partially due to me not knowing what size I needed. Most of the reviews I read said that these shorts came out on the large side, so I decided to trace a size smaller than my measurments said I needed. If the shorts came out too small I could always trace a size up for my next pair. That didn't happen though, the shorts came out with the perfect fit!


I did add a little depth to the pockets to allow enough space for a pocket knife and cell phone, as a few reviews had mentioned the pockets were a little on the small side. My stuff now fits in these pockets no problem!


A third pair of cute, comfortable shorts with decent sized pockets and shorts making is too fun to stop now! I plan on making a second pair from this pattern, then I have another pattern to try out. Another elastic waist pair wouldn't be too bad either. Hmm, exactly how many pairs of shorts do I need again?


Maybe one for every day of the week.


Friday, July 15, 2016

Happy 4th (err. . .15th) of July!

Independence Day, the celebration of the founding of our country. The celebration of our freedom. Family, Friends, Food, and Fireworks, what more could one ask for in a celebration? Nothing really, but red, white, and blue clothing is fun to wear for the occasion, and very fun to make!


The week before the 4th I came across a bandana shirt on Pinterest, and decided I had to attempt to make one. Well, one turned into two after I showed the pin to my mom and she liked it too. Then two turned into three once I got to thinking and figured that red, white, and blue bandana shirts would be perfect for the Fourth, so my little sister needed one too.


Thus, after a busy weekend, I went to the sewing machine on the evening of the 3rd and set to work. These shirts went together ridiculously easy. For mine and my mom's I used a raglan shirt pattern and just lined the pattern pieces up as best I could on the bandanas.


I sewed the shirts together and finished the necklines with fold-over elastic. Less than an hour per shirt, I call that easy!

My sister's shirt was even easier. Two bandanas laid back to back, neck hole cut, shoulder seams sewn, side seams marked, based on a pattern the correct size, then sewn up (leaving armholes open of course!), fold-over elastic around the neck and the shirt was done! 15 minutes, that was it. I may have to make her a few more shirts like this!

The evening of the 4th friends came over for hamburgers, hotdogs, and fireworks, along with my personal favorite Independence Day dessert to make, American flag fruit pizza!

It's always fun having friends over who like to take pictures. Look at these fabulous sparkler pictures my friend Erentry's parents took!

 My dad brought out the blowtorch (best way to light sparklers), those of us who wanted to grabbed sparklers, and the audience on the deck gave instructions so that these pictures could happen!

Good friends and freedom, it was a fun night! Happy belated Independence Day!


Tuesday, July 12, 2016

The Asymmetrical Curtain Skirt

As I may have mentioned a time or two, my sewing time in the month leading up to my trip tp El Salvador was consumed by sewing skirts for myself. Prior to this I had never really considered how many design possibilities skirts had. I mean I'd seen and sewn a few cute or fun skirts, but once I started looking for cool skirt ideas I was amazed! There were so many skirts I wanted to sew! In reality though, I only needed a few skirts, not dozens, so I needed to narrow down my list (and expectations of the amount of sewing time I actually had) a bit.
Like for any sewing project, Pinterest was a great source of inspiration. One of my favorite skirts I came across was a really neat asymmetrical design. As you may have noticed, I kind of love the asymmetrical look. This one had to be reproduced, preferably in green linen.

Well, finding that green linen proved to be the first challenge. Joann's didn't have the exact color I had in mind. Then I stumbled upon this set of valences at a thrift store.


A linen/cotton blend and the exact color I'd had in mind these curtains were! I loved the embroidered edge and figured that between the two of them I'd have just enough fabric for my skirt.


I cut apart the curtains and sewed them back together in a rectangle. I positioned the embroidery around the bottom of the skirt and decorated the unembroidered end with ivory lace. I folded the rectangle in half and cut where the waistband would be. Then I ran out of fabric before I  got to the waistband. Thus, the waistband is cut from a slightly darker green fabric from my stash. I sewed up the one side seam, added a pocket and inserted a zipper.


Ok, confession time - I actually wear this skirt backward of how I meant to wear it. The trouble started with the zipper. It was my first time attempting to sew a lapped zipper and I accidentally made the fabric 'lap' the wrong way, back to front instead of front to back. Thus the zipper couldn't be seen from the back of the skirt, but it was completely visible from the front, and I was too lazy to fix it. Then there is the side without the side seam. I put a small pleat there to help the fabric lay right. Well, I should have just cut that side with a slight A-line, and added a pocket, rather than just folding the fabric in half. The pleat looked distinctly better from the back than the front. I decided to just wear the skirt backward, after all both sides look the same, the only difference is a slight curve to the waistband. The pleat and zipper now look good. This does make the pocket hang sort of strange though. . . hmm, maybe eventually I'll just fix the skirt, but meanwhile. . .


I actually really love wearing this skirt! It's comfortable and just kinda fun. I wore it a couple times before the trip, then on the trip, and a few times since. Of the skirts I made for the trip this one may have gotten the most wear so far, even with its issues.


It's interesting to me how much I wear something after a sew it. Surprisingly, the amount I wear a garment has almost no correlation to how much I loved or hated the garment upon completion. Some garments I loved as soon as I finished them haven't received much wear, while others I felt so-so about have been worn constantly and I've grown to love them. I'm not sure why this is. Maybe because I don't want to risk messing up the clothes I really love? Or maybe because I want to give the clothes I don't love as much a chance? I'm not sure, but I'm always happy when I actually wear the clothes I make, and this skirt has become a wardrobe staple!


Saturday, July 9, 2016

The "Issues Tied Off" Dress

It's always nice to get something else checked off a to-do list. Especially when that list is a list of patterns I really want to sew, so getting an item checked off means I have a new article of clothing that I either needed (or in this case. . .umm most cases) or just wanted. 


I couple weeks ago I shared a picture of the four 50's re-print or 50's inspired patterns I really wanted to get sewn this summer. I have found that dresses with full, just bellow knee-length skirts are just as comfortable and practical to wear as shorts during the summer. Unfortunately, of all the dresses I have in my closet very few have skirts that are both full enough and long enough for me to move easily and do a verity of activities (such as climbing fences and going up and down creek banks trying to catch frogs, why yes I do have the best job ever) without flashing anyone. 50's dresses though? Those have the perfect skirts. I finished Simplicity 8085, next up was Butterick B5708.


I actually made this pattern about a year ago with a friend who was learning to sew. Once her dress was done, I decided I needed one from this pattern too. So, the next time Butterick patterns were on sale I picked it up, brought it home, and put it away. Then when I was hit with the renewed desire to actually sew these pretty patterns I've been collecting I pulled it out and picked out fabrics from my stash. 


There has only been one issue with sewing these dresses entirely from my fabric stash, I have very few lengths of fabric of more than 3 yards, and at least 4 are required for most of these dresses. This one was no exception. I picked out a pretty 3 yard piece of light teal paisley quilting cotton (given to me by my awesome grandma) for the skirt, and that was a little short. I had to take a bit of the fullness out of the skirt in order to get it cut out, but as full as this skirt was, and still is, that wasn't a big deal.


After cutting out my slightly reduced in size shirt I still had enough fabric left to make the lower bodice and side seam pockets. For the upper bodice I picked a one and a half yard piece of a lovely blue and green batik, also given to me by my grandma. The upper bodice pieces are cut on the bias and rather large, plus the lining needed to be cut from the same fabric since it shows at the shoulder ties, so that was just barley enough fabric.


I finished this dress in one afternoon of sewing then wore it the next day. I loved how it looked and it was comfortable, there was just one issue. With all the different ways to tie the shoulder straps it was nearly impossible to keep my bra straps covered, which I really do prefer to do. I am not a fan of wearing a strapless bra (who is?) so I came up with another solution. I cut up an old bra and sewed it in the bodice, just like I did with my red 40's halter dress last year. Issue fixed!


A pretty, comfortable, wearable anywhere dress. That was the goal, and this dress met it.


Work, church, goat pen, I can wear this dress with no issues if I want to. Speaking of goat pen, who is that little brown goat? You haven't seen her before.


Meet Floricita. She is my beloved Sombrita's granddaughter, courtesy of her son Domino. After I lost Brita my friend told me she had a doe she *thought* Domino may have bred when she was keeping him for me last winter. Well, Domino did his job so the day before I left for El Salvador this little lady was born.


My friend called me to say the goat bred by Domino had kidded and I needed to come see the baby. So, over I went to find a little doeling my friend said I could have! The day after I got back from El Salvador I brought her home and I've been bottle feeding her ever since. She's very sweet and friendly and I'm thrilled to have more offspring of Sombrita! Here's hoping she lives up to her Grandmother's legacy. A tall order, I know.


Goats, work and sewing, life's busy, but I can't complain. A Sombrita granddaughter, a fun job, and two of the four patterns on my list sewn up now with good, no great, results. Yep, I can't complain at all!