Wednesday, January 31, 2018

The Flannel and Corduroy Belated Christmas Shirt

"Wouldn't it be fun to make my little brother a shirt to match our Christmas dresses?"


That was my thought when I saw Burda 7525 in the pattern catalogue during a pattern sale back in December. "Wouldn't this shirt look nice made up in our gray and navy plaid flannel with some navy accents?"


Since I had these thoughts running through my mind, the pattern came home with me. A Christmas shirt for my little brother was going to happen! Only, it didn't. I ran out of time. And fabric. And motivation.


Once all three Christmas dresses were done I had no time to complete another project by Christmas Eve, and I had less than one yard of flannel left. Not enough to make a shirt. I checked 3 different Joann's stores in the area to see if I could get more of the same fabric. Nope, none of them had any left in stock. It appeared that this Christmas shirt was just not gonna happen.


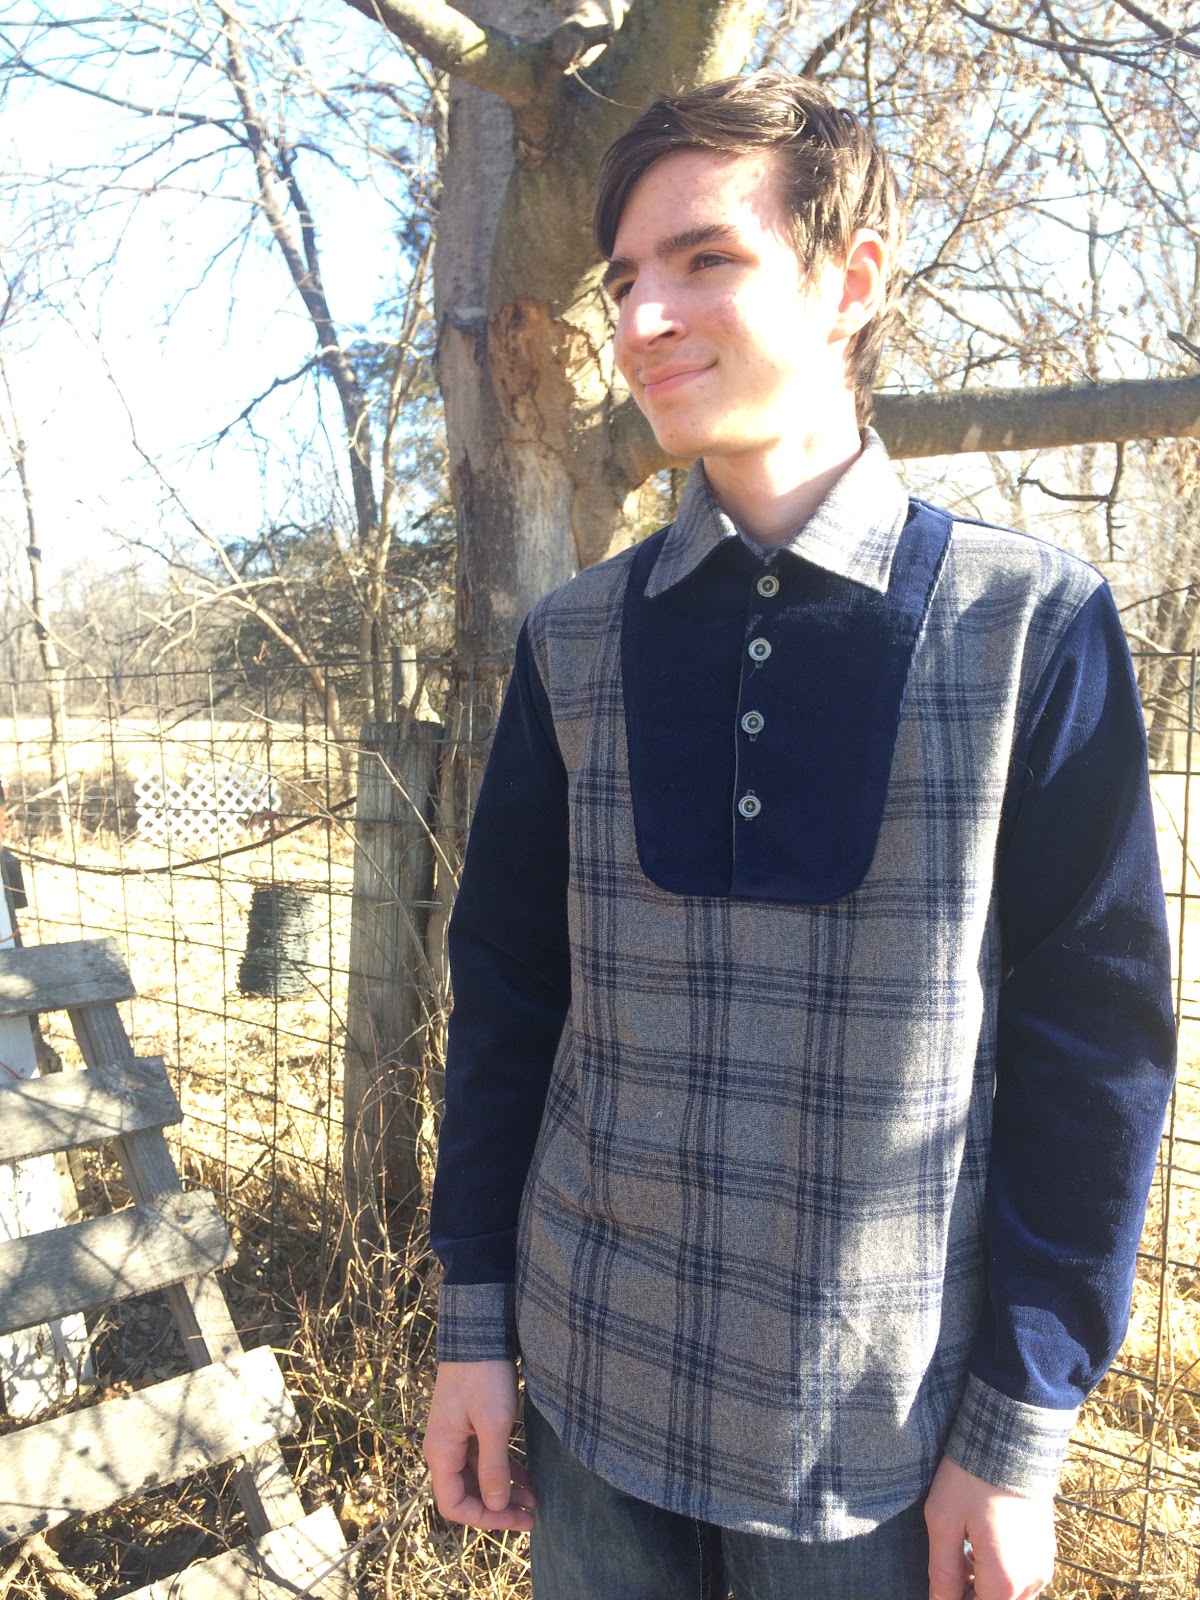
Then inspiration struck when I found this navy needle corduroy on sale for 60% off. Wouldn't it look handsome paired with the flannel? I bought a yard of it, brought it home, and the Christmas shirt plan was back on! Other than the fact that I still didn't actually have time to make such a shirt. 


Christmas came and went and the fabrics and pattern sat in my sewing room, waiting to be made into a shirt. I just had no motivation to make the shirt now that Christmas was past. Until last week. 

At the beginning of this year I joined a "52 Week Sewing Challenge" group on Facebook. My hope is that by participating in this group I'll manage to complete most of the planned sewing projects I never seem to get around to. Every week a challenge theme is given, and the goal is to complete something that week which fits into the theme. Well, I have a lot of planned projects that I already have the supplies for, so it is no problem for me to find a project in my stash that fits the theme every week!

Well, last week was week 4, and the theme was "Sew something for a boy." This was just the motivation I needed to make my brother's shirt! The fabrics and pattern came out and shirt construction began!


As I've never actually made a guy's shirt before, I did something incredibly unusual for me and actually read the pattern instructions and followed them to the letter - mostly. I did make a change or two to the design of the shirt and the construction order, but how could I not? (And these changes were actually made due to fabric shortage, not 'just because'.)


The biggest change I made to the shirt was this - I added a back yoke. No, I didn't do this just as a cool design feature (though I love how it turned out!). I cut out the shirt with a back yoke because I didn't have enough flannel to cut out the back of the shirt all in one piece the way the pattern was written. So, I improvised, and it turned out pretty darned well! 


While I love the back yoke, it's not my favorite detail on this shirt. No, my favorite details are the sleeve cuffs and plackets. I made them exactly as the pattern instructions said, and I love the finished result!


Flannel, corduroy, and fun details - a month after Christmas and my little brother finally got his Christmas shirt! I'd say it looks quite handsome on him, but I might be a little biased :)  

Monday, January 29, 2018

An 1890's Re-made Plaid Wool Skirt

"Mend, Reshape, Refashion." That's the first Historical Sew Monthly theme for 2018. Mend or re-shape one of your previously made historical clothing items, or refashion a new one out of something not originally intended as sewing fabric. There couldn't be a more perfect theme to get me back into historical sewing after my year long absence!


I made this plaid wool skirt a little over a year ago as a costume for a Christmas play my mom and sister were part of. 

The skirt in it's original form in the Christmas play

Not only did I make my mom's and sister's costumes for the play, I costumed the entire cast. Mostly the costumes consisted of  pieces from thrift stores and my own personal costume stash, but I did make a few new pieces as well, such as this skirt. 


I found this wool at a thrift store for just a couple dollars. There was a tag on it marked "4 yards." 4 yards of wool plaid for under $5!! Yes please! The wool came home with me, I did a quick burn test to make sure it was indeed all wool, not synthetic, (it's all wool!), then stashed it on my fabric shelves for the perfect project. So, there it sat, on my fabric shelves, for over a year, until I needed it to make this skirt. That's when I ran into issues.

It turns out, there were not 4 yards of fabric. Oh, no. There were only two. Would it be possible to squeeze an 1890's gored skirt out of only 2 yards of 60" wool? Well, I was gonna find out.


Turns out, it's possible to make an 1890's skirt out of only 2 yards of fabric, if you throw plaid matching out the window. So that is what I did. Good-bye plaid matching, hello new skirt.

I found a cotton sateen sheet in my fabric stash that would work perfectly to underline the wool with, so I cut that out too. Then the skirt got thrown together one evening so that it would be ready for dress rehearsal the next day. It had a machine sewn hem and unfinished seams and it looked excellent on stage. It served its purpose well in the Christmas play! Once the play was over it came home and sat in my sewing room waiting for me to return home from the World Race and do something with it. 


The original wearer of the skirt was a bit larger than I am, so when I made the skirt I made it with the intent of re-setting it on a waistband to fit me after the play was over. January's Historical Sew monthly challenge was just the push I needed to do just that. So a couple weeks ago I pulled the skirt out of the costume pile in my sewing room (please tell me I'm not the only one with "organized piles" in their sewing room) and detached it from the waistband. 


While doing so, I took a good look at the insides of the skirt and decided they need a bit of work. That machine stitched hem, faced with twill tape? it had to go. Those raw seams? They needed finishing. The lack of pockets? That needed addressing. I pulled out my seam ripper and got started.


Over the past two weeks, whenever I could snatch a few moments in between other projects, this skirt got put to rights. All the seams were overcast by hand to prevent unraveling in the future. Then machine sewed twill tape was removed and replaced with a cotton canvas hem facing, which was hand-sewed in place. Pockets were added to the side seams. Finally the waistband was cut down to fit my corseted waist, and the skirt was pleated onto the smaller waistband. 


Now I've got an 1890's winter skirt that I can't wait to wear! After I complete the outfit with a shirtwaist and jacket, of course! I have the fabrics for both of these pieces in my stash, so all that's left is to actually make them. (In these pictures I'm wearing my 1860's Garibaldi Blouse, since I don't yet have and 1890's 'waist') Now that I've gotten a taste of historical sewing again, I can't wait to forge ahead with other projects!

The pockets work well!


Historical Sew Monthly Facts:

The Challenge: #1 Mend, Reshape, Refashion. I remade an 1890's skirt to suit my needs and be more historically accurate.

Material: Mid-weight plaid wool for skirt, cotton sateen sheet for flatlining, scrap of cotton poplin for pockets, printed cotton canvas for hem facing.

Pattern: My own

Year: 1890's

Notions: Thread, hooks and bars for closures

How historically accurate is it? Probably about 90% The main materials are correct, the construction is correct, and the look is correct.

Hours to complete: Probably about 10, done in short bits between other projects or on long car rides.

First worn: 1/28/18, for pictures.

Total cost: The original wool fabric cost about $4 at a thrift store several years ago, and everything else was in my stash either gifted to me or left over from other projects. 

Wednesday, January 24, 2018

Poofy-Puffy Sleeves

Puffed sleeves, ruffle-y sleeves, any sort of fun sleeves - these are a few of my favorite things.


Now, apparently 2017 was "the year of the sleeve", but 2017 was also the year of "I'm separated from my sewing machine". Thus, I did not have a chance to make anything with fun and trendy sleeves. So, now it's 2018, I'm reunited with my sewing machine, and I'm gonna sew myself some clothes with fun sleeves, just because I can, regardless of whether or not fancy sleeves are in style! (But if they would stay in style, that might be nice)


The dolman T-shirt pattern I made last winter seemed to be the perfect base for some fun sleeves, so I pulled a purple ribbed knit out of my fabric stash and got started.


I found about 2 yards of this eggplant purple knit at a thrift store, and, no surprise it came home with me. Then sat in my stash for about 6 weeks while I tried to figure out what I could make out of it.


2 yards was just enough fabric to cut out the front and back of the shirt from, along with two large-ish rectangles for the sleeve puffs. Once those things were cut out, I had enough scraps to cut the sleeve cuffs and neckband from, but I decided against doing that and pulled a scrap of gray knit from my stash instead to make contrasting sleeve and neck bands from.


Once the shirt was cut out it was quick and easy to sew, until I ran into an issue. The shoulder seams didn't want to behave. They began to stretch out and wanted to just keep stretching! That wasn't going to work, so I pulled out some gray hem lace to stabilize them with. For an extra fun detail I added the shoulder seam stabilizing lace tape on the outside of the shirt as it perfectly matched the gray neckband and cuffs.


After the shoulder issue was fixed, I sewed on the sleeve puffs and cuffs and shirt was done! (Yep, I didn't hem this shirt. The way this ribbed knit behaves, hemming the shirt could have ended in disaster. So, I decided to avoid that.)


 I put on the shirt immediately upon finishing it, and then freaked out and thought maybe I'd made the sleeve puffs too big. After wearing the shirt around for a few hours however, I decided that was not the case. The sleeve puffs are perfect, just what I wanted them to be!

Monday, January 22, 2018

The Admiraal Dress

While scrolling through Instagram one day, I saw it - the dress I just had to make for my little sister. Full skirted, cross-over button up bodice, and a shawl collar. The quintessential 50's style dress - in child's size. Therein lie the problem. My little sister is growing up and left children's sizes in the dust over a year ago. But this dress, I had to make it! So, I was going to figure out a pattern and make it. Then, I didn't have to. The pattern came to me!


The dress I fell in love with was made by Steph, of the Eli Monster, for her daughter. Shortly after she shared the dress on Instagram, she announced she would be releasing a pattern for it! And - here's the best part - the dress pattern would be going all the way up to a girl's size 16! That meant it would fit my sister!!


So, I kept an eye out, and as soon as Steph put out a call for pattern testers I applied and got accepted. It was time to rummage through my stash for the perfect fabric to make this dress out of. 


The dress is designed for light to medium weight woven fabric, and quick search through my stash provided just the right material. Last month I picked up nearly 4 yards of this woven stripe cotton for less than 50 cents a yard at a local Amish fabric shop. The stripes were pretty, but not too busy, so they would allow the design details of this dress to shine.


Main fabric picked out, I decided I needed a second fabric in a solid color to make the collar and cuffs really pop. A second search through my fabric stash revealed a scrap of olive green silk dupioni just the right size for these details. And I even had green buttons in almost the exact same shade in my button container! With the details decided on the dress was as good as made.


Well, almost. I still had to actually make the dress. So I printed out the pattern, taped it together, cut out the dress, and then spent a morning sitting at my sewing machine making the dress. The instructions for this dress are very clear and give you an excellent finished product. The lining in particular was easy to make and applied in such a way that all the bodice seams are completely hidden inside with no hand sewing required!


As soon as the dress was done, I had my sister try it on and I was thrilled to discover the fit was absolutely perfect! Lately, almost no patterns have fit her perfectly without some adjusting as she's at that awkward stage where she no longer fits in kids' patterns, but she doesn't quite fill out ladies patterns. Steph knows how to draft patterns for tweens and young teens!


My sister was just as thrilled with the dress as I was! She was so happy with the dress that it was actually quite easy to convince her to go outside and stand in the snow for pictures! Especially once I gave her the petticoat (made out of a circular, ruffley, thrift store tablecloth) I'd made to go with the dress.


The petticoat adds just the right amount of "umph" to the design, and takes this dress from pretty to fabulous!


My sister has already requested a second dress out of this pattern, and one of these days I'll get around to obliging her. Meanwhile, if you would like to make a dress like this yourself, the pattern was just released today in girls' sizes 2-16, and for the next week it's on sale for only $7! So head on over to The Eli Monster and check out the Admiraal dress!


This is definitely a dress worth making!

Thursday, January 18, 2018

Yet Another Sweatshirt

I promise that one day, eventually, I'll make and blog about something other than jackets, coats, and sweatshirts. Today is just not that day. As I mentioned last week, I find sewing outerwear to be very satisfying.  So, as I had the pattern and I had the fabric, I made another sweatshirt. My little brother was the appreciative recipient of this most recent outerwear project.


I've decided this year I want to actually sew some everyday wardrobe items for my youngest brother. Over the years I've made him a couple of jackets, a few costume pieces, and countless pairs of PJ pants, but no regular everyday clothes, and this year I want to change that. Guys' clothing is a new challenge that I'd like to conquer, and my little brother has no complaints about being my test subject for this particular endeavor. 


Well, actually, he does have one complaint. It turns out that going outside to have his pictures taken in the snow is not my brother's idea of a relaxing Sunday afternoon. After a bit of coaxing though, he complied.


The sweatshirt is made out of the left over lining fabric from the camo jacket I made my brother a couple weeks ago. This fabric is soft and warm and my brother loves it! So, when a couple yards were leftover after making his jacket, I decided to make him a sweatshirt out of it.


Thankfully, I had a pattern already on hand for the project, Burda 7734. Yes, it's the same pattern I used to make both my brother's camo jacket and my hoodie. I made the jacket and hoodie using view A. For this sweatshirt I used view C. This pattern is very straightforward and easy to put together, and it produces decent results. However, something about the proportions of both the jacket and this sweatshirt look off to me. So, if I use it again, I think I'll make a few adjustments to the length for a more balenced looking final garment. 


Despite my opinions of the proportions of the pattern,  I'm calling this project a success. My brother put it on as soon as it was finished, and tells me it is plenty warm! Warm enough to make standing out in the snow for pictures a bearable, if not favorite, experience.


Now, what shall I sew next for this brother of mine?


Thursday, January 11, 2018

The Very Soft Gray Hoodie

Outerwear might just be my favorite everyday garment to sew. It presents challenges and learning opportunities, and one jacket or coat will get worn more often than a single dress or shirt would. Thus, I find outerwear very worthwhile to make - especially when you happen upon the perfect fabric as I did with this hoodie.


The fabric is a heathered gray french terry that I found in the bargain fabrics at Wal-Mart. It is literally the softest french terry I have ever felt! Originally I bought two yards of this fabric and about a yard of that became a shirt for my sister. Then I decided this fabric also needed to be turned into something for me. It was just so soft and wonderful to work with!  So, back to Wal-Mart I went, and another yard of fabric came home with me.


I needed a new hoodie, as my old favorite hoodie died this year on the World Race, so a hoodie is what I knew this fabric needed to become. 


However, just a plain gray hoodie was not very appealing to me, so I decided to make it a little more colorful by using scraps of a teal and gray striped knit (left over from this shirt) for some fun contrasting details.


The hem band, sleeve cuffs, hood facing, pocket bindings, and shoulders are all made out of the teal and gray knit and I couldn't be happier with the result!


I made this hoodie out of the same pattern I used to make my brother's new camo jacket, just with a few adjusts for fit and my personal preferences. I added around three inches of length to the body of the jacket, raised the armscye slightly and lowered the sleeve cap, widened the shoulders by about an inch (which I probably didn't need to do), drafted a new pocket pattern, and cut the shoulders of the hoodie separate from the torso to accommodate my contrasting fabric. The resulting garment fit perfectly and was just what I wanted it to be!


Soft, pretty, and warm enough for some of the mild winter days we've had this week. This hoodie has already been worn plenty and I think it will last me for several years to come!

Thursday, January 4, 2018

A Camo Jacket Replacement

It could be argued that the most treasured thing I've ever made was a camo jacket for my younger brother. He would wear it all winter long, and it would rarely be put away in the summer. Then He outgrew it while I was gone this year. He eventually realized that he just couldn't wear the jacket anymore, so he hung it up in his closet. And it became common knowledge that I would be making him a new camo jacket once I returned home.


Now, the first order of business with this new jacket was to find the proper lining fabric. Joann's still carries the digital camo twill I used to make the original camo jacket, so picking up more of that was no problem The lining was harder to come by. 


The lining (and cuffs and hem band) of the original jaket was a remnant of some ridiculously soft and warm fleece backed sweater knit. I've seen other fleece backed sweater knits, but none that measured up to this one. That lining was one of my brother's very favorite things about his old jacket, and he specifically wanted the exact same lining in his new jacket. That was a problem.  The old lining came into my stash by way of a trash bag full of fabric a friend gave to me when they were cleaning out their sewing room. Thus I had no clue where I could find more of that lining fabric! 


Online fabric shopping (something I rarely do) commenced as I pondered the issue of the lining. I looked at fleece backed sweater knit after fleece backed sweater knit online until I happened upon this one on Fashion Fabrics Club. It was a wool blend sweater knit bonded to a fleece backing. I knew it wouldn't be exactly the same as the old lining, but I thought it just might fit the bill as it would be soft and warm. Well, it arrived in the mail, my brother felt it and approved! We had found a suitable lining, the jacket could now be made!


I used Burda 7734 for the jacket because it looked like exactly what I wanted for this jacket. It was a great base pattern, but I should have made a couple changes to it. First, I should have gone up a size larger than my brother's measurements to accommodate the lining (the pattern is for an unlined jacket). Second, I should have lengthened the body of the jacket by a couple inches as it's almost too short for my little brother! The jacket fits my brother ok as is, but I don't foresee it lasting him more than one winter with as fast as he's growing. So when I sew him a replacement in about a year, I'll apply those changes.


Now there was one pattern alteration I made while sewing this jacket, and it worked fabulously! Wide shoulders tend to run in my family, so to accommodate that trait in this growing teenage boy I added pleats to the back shoulders. These allowed the jacket to "stretch" in the shoulders, giving my brother a good range of motion and making the jacket comfortable to work in. 


My brother is thrilled with this jacket and tells me it's even better than the last one! That is just what this seamstress big sister likes to hear!


 And I'd say he looks pretty good in it too :)