Monday, November 28, 2016

Recreating the 1890's Aesthetic Dress

I make myself historical dresses, and I love getting to wear them. I make my sister historical dresses, and she adores them. My mom would love to have a historical dress, I just haven't made her one. It's time to change that. She needs an 1890's dress for the church Christmas play. Now. she could have just worn my 1890's dress, but I decided to use this play as an excuse to make her her own dress. Thus, we sat down to browse Pinterest one evening. We needed to find an 1890's dress that my mom loved, that was suitable for her character in the play, and that I could recreate in a somewhat limited time frame. After quite a bit of consideration, we settled on this one.

c. 1895 Liberty & co. dress. V&A Museum
This blue silk dress was made in the mid 1890's for Liberty & Co, a London fashion house that still produces some excellent fabrics today. You may notice that it looks a little different than your standard tailored, puffed sleeved, 1890's dress. That's because it's part of the aesthetic dress movement.

In the last quarter of the 19th century a trend of less structured dresses began. There were two dress movements that did this, the reform dress movement and the aesthetic dress movement. The loose dresses of the reform dress movement were thought to be healthier for women to wear than the standard corset supported designs. The aesthetic dress movement focused on flowing, feminine designs reminiscent of  country life, the Renaissance era, and ancient Greek clothing. These things, a simpler life and time, were considered ideal to many city living people of the 1890's. Sound familiar to the way many people look at things today?

Starting in 1884, Liberty sought to produce something different from the parisian fashion houses by designing aesthetic dresses that showcased their gorgeous fabrics, smocking, and embroidery. This blue silk dress does just that.


That said, my mom fell in love with this dress. I assured her I could re-create it. Now, the only question was how? Where did I start? How did the construction of a dress like this differ from the construction of a standard dress from this era? Thankfully the Victoria and Albert Museum website provided some answers.

"Dress of blue pongee silk trimmed with smocking and machine-made lace. Full length with train, medium height round neck, double-puff elbow length sleeves, trimmed with smocking and frilled edge. Fastens at the back with brass hooks and silk eyes. The bodice is lined with silk twill and well boned. Corded silk waist-band fastening with a double pronged buckle. Skirt is lined with cotton. The dress is cut to fall in soft folds from the neck to the hem and is held at the waist with a diamond-shaped band of smocking. Hem is trimmed with three rows of pale blue silk embroidery and has a frilled border. At the waist there are small silk covered and embroidered buttons with worked silk loops." ~ V&A site

Ok, so I needed to start by making a fitted, boned, bodice lining. I could see that this dress has raglan sleeves so I used a pattern from my stash, out of print Simplicity 9025, as my bodice lining starting point.


A few minor adjustments to the pattern and the bodice lining was perfectly fitted to my mom. Next step, building the rest of the dress on top of it. We just needed to pick out some fabric first.

The original dress was silk. My mom's character in the play is an american country woman. Not someone who would regularly wear silk dresses, or be able to buy an actual Liberty dress. It is plausible however that this woman could have seen the dress in a fashion magazine, fallen in love with it, and decided to recreate it at home in a different fabric, just like my mom and I are doing. With this backstory in place, my mom and I just needed to find a fabric with the right drape. A trip to JoAnn's yielded a red linen/rayon blend to be transformed into the dress.


I draped my pattern making material over the lining on the dress form, and cut it to the right shapes for the dress front, dress back, and sleeves. I then cut apart my new pattern vertically and pinned it onto my fabric all spread out to add extra volume for the smocking. Then I cut out the dress pieces.


Now I'm ready for the fun part, sewing the actual dress! My mom is really looking forward to seeing the final result! 


Friday, November 18, 2016

Watching Her Grow Up And Using Up Fabric Scraps

This Girl. She's growing up. Leaving behind the little girl.


I brought the two year old I care for to my house for the morning. My little sister spent most of the time we were there playing with him and helping him with things. He loves her. Everything she did, he wanted to do too. She was swinging on top of the tire swing, he climbed into the bottom.


When she was swinging in the bottom of the tire swing, he climbed into her lap to swing too.


She didn't get annoyed with him at all, rather she helped him do whatever he wanted to do. She was incredibly patient with him. She's the youngest in our family, and it was so much fun to see her step into the big sister role with this little guy.


She's growing up. While part of me wants to hold onto the little girl she was incredibly tightly and never let her grow up, the other part of me watches in amazement as I see her becoming a young lady. Letting go of the little girl is bittersweet. However, watching her and the two year old that morning, seeing the contrast of the little one and the girl she is now, helping that little one, was incredibly sweet.


I am very thankful though that she's not growing up all at once! She still loves to swing, and she still loves wearing the cute clothes I love to make her.


After I made her the Susse Skirt, as a pattern tester, she declared she wanted another. That could be done, no problem!


Well, that's true other than the fact that I didn't have quite enough of the fabric I wanted to use for this skirt. I picked up a remnant of the red fabric this spring (at the same time I also bought this fabric) when my sister requested a red dress. Thus, the fabric had been earmarked to be made into something for my little sister. Unfortunately, I only had about 3/4 of a yard, half the amount required for a size 12 Susse Skirt. 


Luckily, I have a very extensive fabric stash! A quick look through revealed some rather large scraps this gold quilting cotton printed with dogwood flowers. It paired perfectly with the red calico! Thus, this color blocked Susse Skirt came to be!


I added a band of red lace to the gold section just for fun, then totally surprised my sister with the final result! She'd been admiring both of the fabrics in my stash for some time now. Also, back when I tested the Susse Skirt pattern she'd suggested color blocking it (with different fabrics), so she was pretty happy to see I'd taken her suggestion.


She's growing up, and coming up with some pretty excellent ideas for things. I couldn't stop with just one color blocked Susse Skirt, so I also made this one.


It's for my sister's friend. I let the recipient pick the fabrics out from my stash, and now I can't wait to give it to her at church on Sunday. Hopefully she likes it!

Thursday, November 17, 2016

Always Wear Clothes You Can Paint In

What does one do when she shows up where her dad is working at a rental property with ice cream for him, in her nice church clothes, and he asks her to help him paint? Wanting to help her father, this nice daughter (who comes bearing ice cream, after all) figures out a way to protect her pretty clothes. She searches behind the seat of her truck and finds a sweatshirt to protect her newly made blouse. Then she constructs an apron out of some shop rags found in her dad's truck toolbox. Once the apron is held together by a couple knots and half a dozen straight pins found in the depths of her purse, she is ready to paint!!


And paint I did! My apron and sweatshirt worked admirably, not a speck of paint made its way onto my skirt and blouse. What skirt and blouse, you ask? These:

Look at that pretty, newly painted outside wall behind me! It looks great with the green tin roof!
Over a year ago, my grandma gave me two yards of this light blue floral striped quilting cotton I'd been admiring in her sewing room.


I've been hoarding the fabric ever since, trying to figure out the perfect shirt design for it. I've come up with a few ideas, but nothing that could actually induce me to cut into this fabric. I really wanted to make sure I didn't waste my pretty fabric!


Finally, I came to the conclusion that perfect doesn't really exist and I'd get a whole lot more enjoyment out of actually wearing the fabric rather than just seeing it sitting in my stash, so I picked a pattern and went with it. 
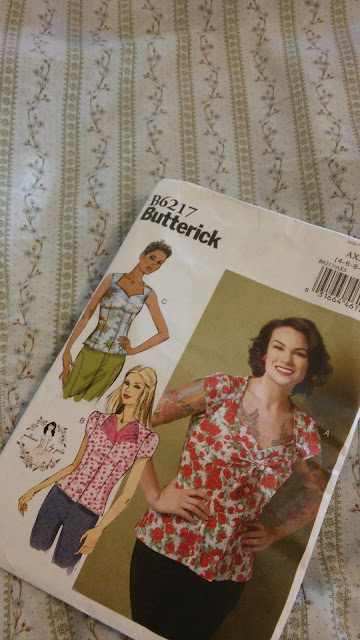
I decided to use Butterick B6217. When I first saw this pattern I wasn't too impressed by it. Then I saw a couple versions other people had made and it grew on me. So I bought it, then it sat waiting to be used. I wondered if I would actually like the finished blouse. Finally, I decided to just go with it and hoped for the best.


Now, the pattern called for 2 yards of fabric and it used every bit of that due to those large pattern pieces for the bias-cut bust ties. It has been my experience that patterns don't usually actually require the full yardage listed, but that was not so with this one. Good thing I had the full 2 yards rather than just a yard and a half. Even with the right amount of fabric, I made a minor cutting mistake and I didn't have enough fabric left to fix it.
I accidentally cut both of the front facing pieces the same rather than opposite each other. So, in the finished shirt one facing piece is wrong side out. Oops! At least it can't be seen when the shirt is worn!


I got the shirt sewn together in one afternoon and I love the finished product for several reasons.
First, I often have to adjust arm holes or they gape due to my bust size. No adjustments were required for me on these armscyes (aka armholes)! Now, the armscye is rather small so I read in several reviews that people had to make them bigger for the shirt to be comfortable. For me though the smaller armscye was a good thing, no gaping and an excellent range of motion!
Second, I have wide shoulders and typically forget to adjust patterns to accommodate that. This time I remembered to add an extra inch of width to the shoulders. The fit is wonderful and makes the shirt so much more comfortable that it otherwise would have been! 
Third, the shape. The shirt is fitted with 8 darts total. It's easy to slightly adjust those darts to make the shirt fit different individuals perfectly. For example, I just had to take the front darts in an extra 1/4 inch each to prevent the shirt from being baggy.
And finally, this shirt is just plain pretty The shape, combined with details like the neckline shape, petal sleeves, and the bust ties, combined with the materials I chose to use, results in one very pretty shirt.  I decided to use pearl snaps down the front of the shirt rather than buttons because I loved how they paired with my fabric. 


I do have one complaint though, I accidentally overlapped the petal sleeves to the back rather than the front. Uhgg, I need to take time to fix that one of these days.  


Before I even got around to making the blouse I knew exactly which shirt in my closet I would pair it with; the navy linen maxi skirt I made back in June, right before I went to El Salvador.
In May I came across this skirt on Pinterest and decided to replicate it, with a few adjustments.


My best friend's mom had recently found several yards of navy blue linen at a garage sale. So, she bought it and gave it to me. As soon as I found this skirt I knew what that navy linen would become.


I decided to use McCall's M6993, a reprint of a 1933 pattern, because I liked the overall shape of the skirt, especially the high waist. I used the yoke of view A and the non-pleated shape of view B. I cut the hem into a point at the front and back, then drafted my pattern pieces for the lace band and the bottom ruffle.


A friend had recently given me a lace sundress she didn't wear anymore, so I cut the lace band out of the skirt. I cut matching bands out of my linen to go under the lace.


If course, I added pockets (though they don't lay quite as well as I would like). The skirt closes with a lapped zipper in the center back.


The finished skirt is more tailored, ruffly, and just more "me" than the inspiration skirt. I fully intend to bring this and my new blouse on the World Race next year.


I love the completed outfit. It looks great and rather tailored, but it doesn't restrict movement or get in the way of doing various activities. As it is, it can be worn to church, and to climb trees. Also, with an apron (made out of shop rages) and a sweatshirt, it can even be worn for painting!


Yep, it's a pretty versatile outfit, perfectly suited to my life! (As it should be since, after all, I did make it for myself.)


Oh, and just in case you were wondering, between my dad, brothers, and me, we got that house completely painted that Sunday afternoon. You can't beat family working together!


What am I going to do without these guys next year?


Thursday, November 10, 2016

Black, Brown, Lace, and Frost

There has been frost on the ground the past 2 mornings! The weather is finally changing!


Now, don't get me wrong, I really do like warm weather, but I love having four seasons. Currently the grass is still green, some trees still have their leaves, and some flowers are blooming like it's spring. That's not what late fall is supposed to look and feel like. Next year I'm going to be in warm climates all year long, so right now cool weather makes me very happy. Along with the fact that I love fall, I've made some chilly weather garments (such as my jean jacket, my capelet, and this sweater) which I'd really like to get some more wear out of before I leave. This skirt is one such garment.


Last winter my grandma gave me a yard and a half of this brown, satin backed fabric with a faux suede texture. She said she thought I could make a skirt out of it. So, I started brainstorming ideas for said skirt. One evening I came up with an idea, so I pulled out the fabric and my trusty skirt pattern, Simplicity 1500.


I would be making the skirt with the handkerchief hem, view E, with some alterations. 


I cut out the back of the skirt just as the pattern dictated, then came the fun part, the front.

  
I cut the front piece on the fold, then cut it into two sections, one about 1/3rd the total width, and the other about 2/3rds the total width. Between those two sections I added an extra panel of fabric, some brown poly crepe with an overlay of black lace (left over from this refashion).
At this point I'd run out of my satin backed suede fabric so I made the waistband out of a scrap of the brown crepe. The back waistband I made as usual, the front waistband I made extra long to fit onto the extra wide skirt front, then I added buttons.


Eight mismatched black buttons, four sets of two. The skirt waistband fastens in one of my favorite methods (used on this skirt, and these skirts), it folds over itself and buttons closed. This makes 4 pleats in the lace panel.


Of course, I added pockets to this skirt, just as with everything else I make. Where would I be without pockets? I finished the hem by pinking it, then added a ruffle of 4"wide black lace. (I had decided an actual hem would be too bulky, and this fabric doesn't really fray.)


I fell in love with the finished product. I don't usually wear black and brown together, but with this skirt, it just worked. The combination of the two colors means it can be worn with quite a few of my shirts.


All in all, though, this is very much a winter skirt. The fabric is too warm (being a rather heavy polyester) to be comfortable during the warm seasons. (I learned this the hard way when I wore the skirt one day in El Salvador over the summer)


So, I finished this skirt last winter and wore it plenty! I just never got around to getting pictures of it. Then, at the beginning of this week, I needed a dark skirt to wear and I decided to was a cool enough evening that I could wear this one. 


Thus, as soon as I got dressed for the evening I dragged my youngest brother outside to get these pictures. Photographically documenting both this skirt and my red hair for the first time ever.


I rather like both. Thank you, Gram, for the fabric and the suggestion of what to make with it!


Monday, November 7, 2016

"What Did I Just Do?!?!?"

Over the weekend I did two rather strange things. First off, I bought a dress.


Yep, I went into a store, that wasn't a fabric store or a thrift store, found a dress on the rack, tried it on, and bought it. This was strange because I don't buy dresses (unless I'm going to refashion them), I make dresses. This dress though, it was cute (those sleeves, that lace yoke. . .), it fit well, it was clearanced at a great price, and I kind of needed a little black dress to add to my wardrobe. So, yes, I bought a dress.


So, that dress came home with me and then the second strange thing happened, you may have already noticed it. That's right, I dyed my hair! 


I've kind of wanted red hair for a few years now. I've been halfway considering dying my hair red for a couple months. Finally last week I decided "why not?" So, not wanting to chemically dye (and damage) my hair, I bought some henna and used it to dye my hair Saturday night.


The results are taking some getting used to, but the overall verdict is I like it! I look in the mirror, and after a quick double take (it's only been about 2 days after all), I get excited again! I'm a redhead now! Just like my mom, my grandma, and one of my favorite book heroines, Anne of Green Gables. 


My red hair makes quite the contrast with that store-bought black dress. Of course, after I bought the dress I needed to add a couple of things to make it mine. First it needed a belt or sash, the dress was a little shapeless without one, and I don't like shapeless.


I brought the dress home and started considering my options for making this belt. I knew I wanted it to be a color (no white, black, ivory, grey, tan, etc.), and I knew I wanted lace on it. Then I took into account my new red hair, and what color nearly always looks good on redheads? Green. Thus, green my belt will be.


From my stash I pulled a scrap of green taffeta and some pastel green lace. I cut the taffeta into 3 bias strips, each 5 inches wide.


I then sewed the 3 strips together with tiny french seams to make one long strip. Down the middle of the strip I sewed two rows of lace, leaving long tails of lace at either end, with 5 rows of stitching. A zigzag stitch between the two rows, a straight stitch down the middle of each row, and a straight stitch on the outer edge of each row.


Next I carefully cut only the taffeta, not the lace, right between those outer two rows of stitching.


Then I folded over the taffeta and stitched it down so that it was no longer visible through the lace in those two places. I also hemmed the outer edges of the taffeta so that they would be finished.


Finally I folded the very long lace and taffeta strip in half and sewed it straight down the middle again, starting about 2 inches from the folded end and ending about 5 inches from the other end with the tails of lace. This effectively hid the not as pretty wrong side of the belt, and it served a practical purpose as well.


Now the belt can be tied by threading the end with the tails through the loop the folded end made.


Belt finished, shape and color added to the dress, it was time to address the other issue this dress had. For some strange, infuriating, reason, clothing companies can't seem to grasp the fact that pockets are required in all -ALL- skirts, dresses, and pants. What am I supposed to do with my pocket knife, cell phone, keys, and spare change if I have no pockets?!?!? Yep, this dress had no pockets. I refuse to wear a dress with no pockets. So, I fixed that problem. (I really wish I hadn't needed to. Darned clothing companies.)


I cut two pockets from a scrap of black knit left over from a previous refashion.

Black and black does not make for an easily decipherable picture, sorry!
Next, I sewed the pockets in. The main fabric of the dress is chiffon, not very sturdy, thus not ideal to hang pockets from. So, I attached the pockets as patch pockets at the side seams of the sturdier lining.

White fabric added for a clearer picture, it's not actually part of the dress.
Finally I opened up the side seams about 6 inches so that my pockets would be accessible.


Pockets finished, belt added, and my store bought dress was officially wearable!  I'm pretty pleased with both it and my newly colored red hair!