Sunday, April 28, 2019

Actually Finishing and Wearing an 18th Century Gown

Well, I did it! I sewed until 3 a.m. Friday night/Saturday morning, and I actually finished my very first 18th century outfit in time to wear it to the Rococo Picnic I'd signed up to attend!

Photo Credit: Juanita

Last summer, while perusing Facebook, I discovered the "Saint Louis Georgian Sewing Society", a historical costuming group, primarily focused on 18th century, who gets together to sew and hold events within a few hours of me! It was very excited to find I was not the only person with this crazy hobby in my part of the country! Since discovering the group however, I've held back from actually attending the majority of the costume events because I haven't had anything from the correct century to wear.

Photo Credit: Ensambles of the Past


At the beginning of the year, this picnic was scheduled for April, and I decided I would absolutely be going.  There was enough time for me to make a gown (and the appropriate underpinnings) before the scheduled date, and an outdoor, costume-laden picnic on a pretty spring day sounded fabulous. 

Photo Credit: Jean

Of course, I'd intended to get started on my ensemble right away, but I procrastinated, as usual. I finally began my stays (the 18th century version of a corset, which has a completely different shape than a victorian corset) a month ago. I got those into a wearable state (wearable, but not completely finished, I'll blog about the stays themselves sometime.) and less than two weeks ago, I began my gown.

Photo Credit: Ensambles of the Past

The gown, all the way down to the hem, is pretty much entirely machine sewn. This was not my original plan (After all, I took forever to completely hand sew my shift which is hidden under the gown), but this is what I had time for - and I'm very pleased with the results despite the historically inaccurate construction method!


So, as aforementioned, I finished my gown, matching stomacher, petticoat, and all the trimmings at 3 a.m. Friday night/Saturday morning. I woke up the next morning, put everything on, was relieved it all fit and worked together well, then wedged myself in the truck to drive to St. Louis.


Let me take a moment to wax lyrical about my truck. I have driven quite a few vehicles in costume, wearing all manor of corsets, hoop skirts, and petticoats. My old Chevy pick-up is absolutely the most comfortable vehicle to drive while in costume (or even just ride in) that I have encountered. The seat back is at such an angle that you can comfortable sit all the way back in a corset. In most vehicles the seat leans too far back for that to be comfortable in the slightest. The truck is old enough, there are no headrests so that I can easily wear a hat or bonnet (yes, I realize this is a safety issue, and eventually I may replace my truck seat with a seat that has headrests for that reason). The seat is also a bench seat, so there's plenty of room to spread out skirts. (Driving or riding in a vehicle with a center console while wearing a hoop skirt is very inconvenient) And, to finish it all off, the truck seat sits higher off the floor board than a seat in a smaller car does, so your feet do not get tangled up in your petticoats while you work the pedals - a nice safety feature. So, all that to say, I made it to St. Louis just fine and comfortable.

Photo Credit: Anna

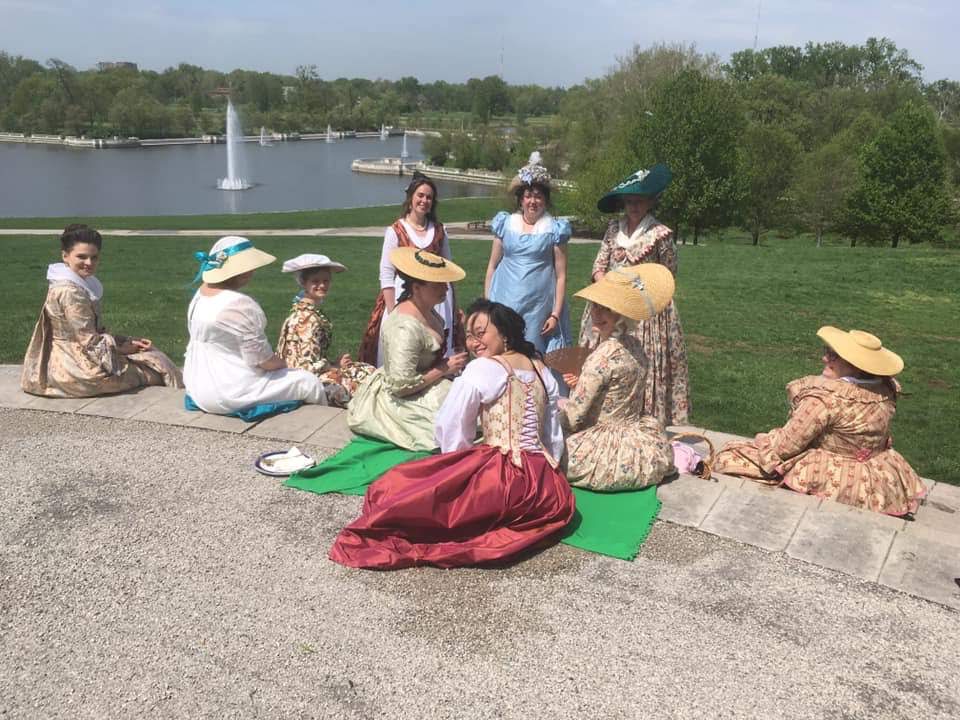
Unfortunately however, it was raining. So, rather than meet in the park as we'd intended to, we met at the art museum, and spent the next hour, until it was done raining, wandering around the museum, admiring the art work and one another's dresses. Thankfully, it stopped raining in the early afternoon so we ventured outside and enjoyed our picnic on the museum grounds.


We ate, we talked, we walked along the paths and took pictures. 


It really is wonderful to discover people in real life who have the same hobby as you!


I enjoyed it immensely, and loved swanning about in my gown!


I used Simplicity 8578 to make my 1760's sack-back gown, or Robe a la Francaise, from an 18th century inspired cotton I found at Hobby Lobby last fall.


Oh my word, this gown is ridiculously fun to wear! The way the pleats sail out behind you as you walk. . .

Photo Credit: Ensambles of the Past

I wore the gown over my shift, under petticoat, a pair of pocket hoops (constructed in an afternoon a week and a half ago. I'll do a blog post on them eventually, but they are awesome!), and a matching petticoat and stomacher. 

Photo Credit: Ensambles of the Past

On my head I wore a linen cap (finished a month ago) and the hat I made for my sister several years ago to go with her "Molly Pitcher" outfit.

Photo Credit: The Modern Marie Antoinette

The hat really finished off the whole look nicely, even though it wasn't made specifically for this outfit (and probably not what I would have chosen had I had time to make a new hat). It really is wonderful to have a substantial costume closet to pull things from! 


The whole outfit was finished off with my green American Duchess buckle shoes - I really am happy I bought them!


It was fun to see everyone else's shoes too - and to find I'm not the only one who appreciates green shoes!


It was most certainly worth it to hurry up and assemble a complete 18th century ensemble in under a month!


I greatly enjoyed meeting more people with the same crazy hobby as myself. And, I almost felt like I was in a dream, wearing this gown.


A Huge Thank You to those who allowed me to use photos they took in this post!!


Thursday, April 25, 2019

All Dressed up in Fluttery Easter Outfits

Our Easter outfits for this spring started over a year ago, when I brought home just over two yards of teal on teal butterfly fabric, with the full intention of turning it into a drop-waist dress for my sister.


Of course, when I bought the fabric, I'd planned on making the dress right away - within a week or two, or at least within a month or two! As is often the case with fabric purchases however, I did not get around to the intended project as soon as I'd anticipated. A year later, the drop-waisted butterfly dress had not been made, and the fabric was still sitting on my shelves, in a bin with other fabrics, waiting. 


Who knows how long this fabric would have remained in that bin, hidden amongst the other fabrics in my stash, had it not been for this month's Winter Wear Designs blog tour "All Dressed Up". When the blog tour theme was announced, I suddenly remembered this fabric, and the plan I'd had for it. With the addition of a simple gathered skirt, the Classic Shell pattern by Winter Wear Designs would work beautifully to make my sister a sweet and pretty drop-waist dress.


So, that's exactly what happened, Suzanne (the designer behind Winter Wear Designs) sent me the Classic Shell pattern, and I turned it into a dress. I cut out the pattern in my sister's size, making no changes, except to cut the back bodice piece with a center back seam, rather than on the fold, to conserve fabric. Then I cut two 14"(ish, I didn't actually measure, just eyeballed) strips of material the full width of the fabric.


These two strips of fabric were gathered up and sewn to the bottom of the Classic Shell shirt to make a skirt. This was ridiculously easy to do, and produced a beautiful result.


When called to the sewing room to try on the finished product, my sister was quite pleased with her new dress. It fit her wonderfully, and was perfectly lovely, fluttery, and springy. Just the thing to wear on Easter Sunday!


Personally, my favorite part of the dress is the sleeves. I love tulip sleeves, so when I saw the Classic Shell offered them as an option, there was no doubt in my mind what type of sleeves this dress would have.


As for my sister, I believe her favorite feature of the dress is the button at the back keyhole opening. You can't see it in the picture (because I couldn't get the camera to focus on it at all) but the black shank button has a little hummingbird etched on it. My sister found this lone button in a large lot of vintage buttons I was gifted. We decided the little fluttering hummingbird was the perfect finishing touch for a dress already featuring fluttering butterflies and tulip sleeves


Now I couldn't let my sister have all the fluttery dress fun, could I? Originally, I had no intention of making myself something for this blog tour, nor did I have specific plans to make myself an Easter Outfit. Then Winter Wear Designs released a new skirt pattern, the Boulevard Skirt, and I just had to make it for myself. So, I asked Suzanne if I could have that pattern too for this blog tour, and she agreed, very quickly, and sent it to me. 


The Boulevard skirt is a button-front skirt, with multiple different length options, plus two high-low length options. It was the maxi length high-low option that caught my eye when the pattern was released. It was fabulously swooshy.


Thus, it took no time at all for me to decide which version of the Boulevard skirt to make myself. All I had to do was decide what fabric to make it out of. I loved the butterflies on my sister's dress fabric, and wanted my skirt to also have a butterfly theme. The only problem was I had no other butterfly fabrics in my stash.


Intending to only use fabrics from my stash to make my outfit, I considered making the skirt from a solid colored fabric and appliqueing butterflies on. I'd gotten as far as finding a couple different suitable plain fabric options for this plan, when I wound up at Hobby Lobby with my brother's girlfriend.


At Hobby Lobby I found the prettiest green quilting cotton, covered in little green dragonflies. The dragonflies were accented with teal, so they would match the butterflies on my sister's dress fabric wonderfully. I admired the fabric for a couple moments, wondering if I should actually buy it, when my brother's girlfriend wandered over, took one look at the fabric, and said "That fabric screams Alyssa, you have to get it."


She convinced me (not that I really took that much convincing), so I bought it, along with a yard of teal rayon/spandex to make a matching Outer Banks Boat Neck (arguably my favorite WWD pattern, seeing as I've made it 10 times now!) to go with the skirt.


I used my scalloped neckline hack for the shirt and chose to make the sleeves short and fluttery by cutting out the short bishop sleeves, included in the pattern, and just leaving off the bottom band/cuff. I chose not to hem the sleeves as I didn't want to mess up the drape of the sleeves with the weight of a hem. Knit fabric doesn't really fray, so this works just fine.


To tie the whole look together I finished off my skirt with teal vintage buttons, found at a local antique mall last fall.


I had two different sizes of these buttons and there card of smaller buttons contained the perfect number for my skirt. I'll save the larger buttons for a future project - buttons of this pretty color are sure to be needed again!


Teal and green are some of my favorite colors, butterflies and dragonflies just make me happy, so combine the two, and I really love how my sister's and my Easter Outfits turned out this year!


They're different in style, but similar in theme and wonderfully fluttery! Just the thing for getting all dressed up on Easter Sunday and throughout the rest of the spring!


A Huge thank-you to my cousin Kate for taking pictures of my sister and I Easter Afternoon!

*I received the patterns used in this post for free in exchange for this blog post, but all thoughts and opinions expressed are my own.


Don't miss out on any of the stops on the All Dressed Up Blog Tour:

Monday 4/22
Suzanne of Winter Wear Designs

Tuesday 4/23

Wednesday 4/24
Patricia of Sew Far North

Thursday 4/25
Rachel of  Violets and Jewels

Friday 4/26
Aurelie of Maglice and So

Monday, April 22, 2019

My Mom's Easter Outfit - Rose Covered Jeans and a Miramar Top

All day Saturday, I worked on Easter Outfits. And on Easter morning, my mom, sister, and I each had a brand new outfit to wear to church.


I'll share about the clothing worn by my sister and I later this week as part of the latest Winter Wear Designs blog tour. Today, however, I'm going to share all about my mom's outfit.


This outfit began when I found a rose printed stretch denim at a small Mennonite fabric store. The fabric immediately caught my eye and I stood there, handling and admiring it, and wondering if I ought to buy it. I had no idea what I would make with rose-printed stretch denim, but it was pretty. Then my mom walked by and solved the dilemma for me.
"Get it" she said.
"But I don't know what I would use it for" I replied
"I'd wear a pair of jeans from it" my mom said.
Thus, I bought the rose covered stretch denim, sometime in March, with every intention of turning it into a pair of jeans for my mom. Sometimes you don't *need* to turn the pretty fabric into something for yourself, you just need a chance to work with it, handle it, turn it into something pretty and wearable for someone. Such was the case with this denim.


A couple weeks ago, I finally cut into the denim, using the Simple Skinny Jeans pattern from Sew Liberated. (The same pattern I used to make these jeans for my mom). With a knit waistband and no fly, this is a super quick and easy "jeans" pattern to make. It goes together in under 4 hours and, judging by how often my mom wears the pair I made her for Christmas, appears to be very comfortable.


Anyway, back to the making of the jeans. The cut out jeans have been sitting in a basket next to my sewing machine, just waiting to be assembled, for a while now. Saturday afternoon, upon finishing the Easter outfits for my sister and I, I decided I really wanted to make something new for my mom too. So, out came the jeans. The floral pattern seemed quite Easter appropriate. 


The first thing I do every time I make jeans, is decorate the back pockets with a bit of top stitching. Coming up with a decorative top stitching idea and executing it, is my favorite part of the whole jeans- making process. For this pair of rosy pants, I decided to use gray top stitching thread, as that's what I had on hand that coordinated nicely with the fabric.


The top stitching just about disappears in the rose pattern of the denim - but I know it's there and it makes me happy. More visible top stitching might be a bit of a sensory overload with this already busy fabric.


The fly on this jeans pattern is completely faux - just some top stitching on the left (when you're wearing the jeans) front panel. So, just top stitch and go, that's what I've done the past two times I've made this pattern. This time however, I decided to add something extra. No, I didn't make it a functional fly in any way, shape, or form.What I did is add a fly facing of sorts to make the fake fly a little more substantial and prevent the top stitching from stretching out the fabric of anything. 


It may not look like much, but it does give the fake fly a more "real" appearance.


I finished the jeans early saturday evening, and presented them to my mom. She was surprised and appeared to be quite pleased with them, though she did comment that she wasn't sure what shirt she had to go with them. She needn't have worried, I'd already thought of that.


When I was cutting out the jeans, I was admiring the different shades of pink and green in the print, and considering what fabrics I might have in my stash that would coordinate. I recalled a pale green (pale teal?), very stretchy, rib knit I bought at Wal a year ago. It would match wonderfully, and be quite suitable for the Miramar top from Scroop Patterns. (I recently blogged the Miramar tops I made myself here)


I cut the Miramar for my mom tunic length, as she prefers longer tops with her skinny jeans. As this top only requires two pattern pieces, it was cut out and ready to sew very quickly.


This pattern really is a quick sew, generally, and in the beginning this particular top went together very smoothly. I sewed the shoulder/upper sleeve/collar seam and side seams with my serger easily enough. Then it came time to sew up the center front seam with my sewing machine and all the troubles started. My machine hated this fabric.


As best as I can tell (the bolt wasn't labeled), this fabric is a rayon rib knit with a very high spandex content and incredible stretch and recovery. I set my sewing machine to my standard settings for sewing knit fabric, popped in a ball point needle, and began sewing the center front seam. The thread broke. And my machine kept skipping stitches. So, I figured there was something wrong with my thread and my needle must be dull. I pulled out another spool of thread and a brand new ballpoint needle. Stitches were still getting skipped. The thread broke again.


These are the issues I had when I first started sewing with knits several years ago. Yet, ever since I learned to use a ballpoint needle and a shallow zig-zag stitch, I've been fine - sewing knits with no problems! However, I believe due to the insanely high stretch capacity and spandex content of this fabric, my normal knit settings were not working with this fabric. Finally, I discovered the lightning bolt stitch (which is technically the knit stitch) worked decently well (better than the zig-zag at least), and I managed to sew up that center front seam.

As my mom prefers her necklines to be not low cut, I raised the neckline about an inch higher than the necklines on my Miramar tops are. 


Once that center front seam was done, I decided the less hemming the better with this shirt. So I finished off the sleeves with knit bands/cuffs. Then came the actual hem. I was only going to do that once with this devilish fabric, so I had my mom try on the shirt to make sure the length was just right before sewing anything. 


She tried on the shirt, we decided to shorten it 2", and then I began the hemming. Through trial and error I discovered the closest thing to a decent hem I could get required me to first serge the bottom edge of the fabric, then turn that up and hem by stitching through the serging with a rather wide zig-zag stitch.


This is still far from a "pretty" hem, but at least it's hemmed! Looking back, what I really needed was a different needle. Either a "stretch" or a "microtex" needle may have worked better with this fabric and its insane spandex content than the ballpoint did. However, I had neither of those needles on hand, and I had too much to get done Saturday night to run into town to buy one. Thus, please, don't look too closely (or at all) at this hem.


The hem got sewn, the shirt was finished, and my mom, my wonderful mother, wore her new outfit to Church yesterday morning to celebrate the Resurrection of Jesus.


And it's a darned good thing that Easter is about Jesus, his perfect life, death, and resurrection, not perfect hems.


(Also, aren't my parents cute? These pictures were taken yesterday evening, after my dad had changed out of his church clothes. We saw that the teal stripes in his work shirt perfectly matched my mom's new shirt, so we had to take a couple pictures of the two of them!)