Monday, February 29, 2016

Not a Regency Open Robe, But Something

I had grand plans for Historical Sew Monthly this year. In January, for the procrastination challenge, I was going to make my regency stays (I got those done at least!). Following the completion of those I was going to make this drop-front regency dress, and hopefully get it done by the end of the month.


 Well that didn't happen. Then for February's tucks and pleats challenge I would make this lovely early regency open robe to go over my new dress and stays.


The robe is shaped with pleats, and I had already bought the fabric several months ago, so what could be better for the tucks and pleats challenge? Nothing, well except for the hood I decided to make instead of working on my regency dress apparently. (I am very happy I made the hood though!)

Once my hood was done I started working on my regency dress again. Then I remembered, I needed a regency petticoat. A bodiced petticoat like this one at the MET Museum.


 So, I picked up a cotton sheet from a thrift store and made myself a bodiced petticoat one night.


I adapted Simplicity 4055 for the bodice, then just cut rectangles of the correct portions for the straps, waistband, and skirt. I sewed the straps to the bodice, gathered the skirt into the waistband (keeping the gathers at the back and sides of the petticoat only), then sewed the two together.


I added some eyelet from another sheet onto the bottom of the petticoat for decoration, then regulated the length by adding 3 one inch tucks. 

The entire petticoat came together really quickly, then I was back to sewing my regency dress. To keep with the tucks and pleats theme of the month I decided to add some tucks to the sleeves for decoration.


So, I got the bodice and sleeves done and all I had to do was set the sleeves. Then somehow, I'd actually really like to know how, I managed to loose a sleeve. Uggg, I searched everywhere for it, then set the entire project aside in frustration. I didn't work on it for a couple weeks due to frustration and kidding season busy-ness. Finally, last week I gave in and just made a new sleeve. As of now the sleeves are on and bodice is done! (minus the drop front that will be attached to the skirt)


So here it is, the 29th of February, and my regency dress still isn't done. At least it's closer than it was a month ago! Hopefully, maybe, by the end of next month I will have a regency dress. Meanwhile, I can be thankful I now have the proper regency undergarments. Also, my bodiced petticoat does have three tucks in it, so I can use it as an entry for the HSM tucks and pleats challenge. 

What the item is: A regency bodiced petticoat

The Challenge: #2, tucks and pleats

Fabric/Materials: 100% cotton sheet

Pattern: None for skirt, waistband, and straps, Simplicity 4055, heavily adapted for the bodice

Year: 1800 - 1820, approximately

Notions: thread, cotton cord for drawstring, cotton blend eyelet, coconut shell buttons

How historically accurate is it? Well, the fabric choice and look are correct, but it's all machine sewn with poly thread and poly/cotton blend eyelet. So maybe, if I'm being generous, 60%

Hours to complete: 3

First worn: just for fitting and pictures, the dress to go over it isn't done yet

Total cost: $1 for the sheet, everything else was stash, left over from other projects.


This month may not have been extremely productive on the sewing front thanks to missing sleeves and baby goats, but at least I got something done for my regency ensemble!

Sunday, February 28, 2016

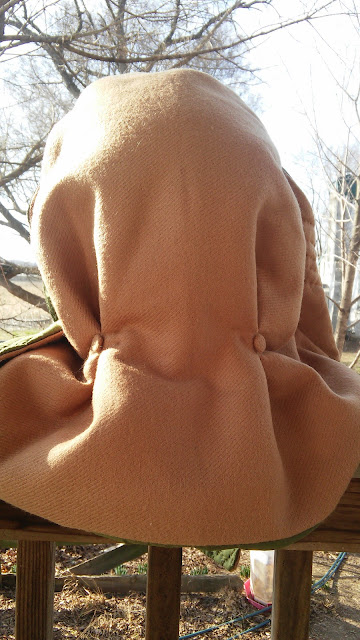
A Pleated Warm Winter Hood

Back in December, or maybe it was the beginning of January I really can't remember exactly, a member of the Historical Sew Monthly Facebook group posted a picture of a mid-19th century winter hood she had made. Ohh, I thought, I wanna make one of those, but what HSM challenge could I do that for? Not January's challenge, procrastination, as I'd just decided to make it, so it didn't fit the theme at all. Maybe February's challenge, Pleats and Tucks, if only I could think of a way to make pleats and/or tucks a focal point of the hood. So, I started researching, trying to think of a way to make a winter hood fit the theme of February's HSM challenge. I looked at picture, after picture, after picture, of early to mid Victorian winter hoods and read several blog posts by people who had made hoods themselves.

I was really inspired by this hood, where the crown of the hood, and the curtain covering the neck, all appeared to be one piece of fabric.


I could do that, and make inverted pleats at the neck to add shaping, perfect!

 I made my pattern, a long strip for the brim and an all-in-one piece for the crown and certain, then got started.

The outside of the hood is made out of left over scraps of wool from my cloak I made a year ago. It is lined in green silk dupioni, with a layer of wool batting in between. I sewed the hood together, then fitted it at the neck with two pleats and covered buttons for decoration. 


Rather than use a covered button kit to make my buttons, (I've had issues with those buttons falling apart) I used my scraps of wool to cover some coconut shell buttons I had. 


Once I'd wrapped the wool around the button, I gathered the excess fabric at the bottom, then wrapped my thread around what would be the shank of the button to secure it. I trimmed off the excess fabric then sewed the button to the hood. I'm not sure how well this method would work for functioning buttons, but for decorative buttons I really like it!


The brim gets folded back to reveal the silk lining, and display my first ever attempt at hand quilting. The quilting turned out ok. It's far from perfect. My stitches are rather uneven and the lines of stitching aren't perfectly spaced. However, I really like the overall effect the quilting gives the hood, and, unless you're closely inspecting the brim, the imperfections aren't *too* noticeable.


All in all, I'm pretty happy with how this hood turned out, so it was definitely worth making, despite the face I still haven't finished my originally planned Tucks and Pleats item, but more on that tomorrow.


What the item is: A winter hood

The Challenge: #2, tucks and pleats

Fabric/Materials: Light weight coat wool, wool batting, silk dupioni

Pattern: My own

Year: 1840-1865

Notions: Cotton thread

How historically accurate is it? The materials are all correct, (with the exception of the dupioni, but it has very few slubs so it's not too bad, almost taffeta like), Mostly machine sewn, but all visible stitching is hand sewn. The pattern is based off actual hoods from the era. So probably 80-85%

Hours to complete: forgot to keep track, I finished it a month ago and really have no idea. Maybe 8 total?

First worn: Just to test fit and for pictures.

Total cost: $8 for the batting, $10 for the silk, (thank you 60% coupons!) the thread and wool were left over from other projects. 


Wednesday, February 24, 2016

Kidding 2016, Week One

Baby goats galore, that's pretty much the story of my life right now. The amount of time it takes to do chores has quadrupled, at least. Goodness gracious though, is there anything cuter than baby goats?


Genesis kicked off kidding season on Valentines day with a buck, named Exodus, and a doe, named Truffle.


Both are staying with mama, though Truffle comes in the house some nights to keep my bottle baby company, and to learn to like humans (you know, those scary things that feed your mama every day and always want to pet you.).
Next up was Airalena. She was HUGE! Well Tuseday morning out popped a little doeling before I even got out there with towels to dry the coming babies off.
Airalena is my brother's goat and he was very happy to get a doeling out of her! He named the doeling Rosalena.


Then the waiting game began. This baby was so little, and Airalena so huge we knew she had to have at least one more baby. But, Airalena just took care of her new baby and did nothing else. Finally, after an hour she had baby number two, a little buck my brother named Pepper.


That little buck was quickly followed by a third baby, another doe! My brother named her Skylena. (Notice a theme here with the names?)


Airalena is an experienced mother at 7 years old and an excellent milk producer so she is happily raising all three babies. (And we still have to milk her once a day!)


Thursday, after a few false labors, Candy Cane was finally in labor. I was excited, Candy Cane is a Sombrita daughter, who didn't kid last year, so I'd really been looking forward to her babies.


She was clearly in labor for over 13 hours, finally, just before midnight she began to push.
It was soon evident that something wasn't right. The first baby was in the wrong position and dead. I had to re-position and pull him out. Poor Candy Cane! I knew she would have a second baby but at this point I had little hope it would be born alive. Well I was extremely surprised and happy when 15 minutes later a living, breathing, moving doeling was born! Thank God!! I got the doeling dried off then Candy Cane began to push again. Another still born buck in the wrong position who had to be re-positioned and pulled. This was the worst kidding I've had in several years. The umbilical cords were incomplete, which is what caused the two bucklings to die. It's truly amazing the doeling survived! Due to the traumatic kidding and a way to short umbilical cord (that could easily get infected) the doeling came into the house to be bottle fed. 


Now, 5 days later, Miss Peppermint Star is still doing well as a bottle baby and Candy Cane is healing from her ordeal and producing enough milk for me to feed her baby. If I never have another kidding like that one it will be too soon!


Saturday promised to be eventful, I went out to do chores and discovered three of my goats in labor! All three were first freshening 2 year olds, who came up to the trough to eat grain then immediately went back to the sheds to labor while the rest of the herd went out to the pasture to graze. Along with that, the 5 babies born at the beginning of the week were scheduled to be dis-budded.
About an hour after feeding, when I was out in the pen to get the babies for dis-budding, Sweetie, my Saanan-Alpine cross had a big buckling!


I helped her get him dried up then went to see how the dis-budding was going. About 10 minutes later, when I was returning the newly de-horned babies to their mamas, I found Sweetie about to have a second baby.


A little doeling, born much faster than her brother! Meet Sugar Plum, solid white just like her mother.


Mama and both babies were doing well so I moved them all to the pen I had set up for new babies and Mamas.


About 2 hours later, Iridessa was ready to have her babies. First out was a little buck, shortly followed by another little buck.


Once we'd helped Iridessa get her babies dried off, we moved them to the pen where Sweetie and her babies were, then went to check on the next goat in labor, Athena.


Athenalena, Airalena's 2 year old daughter. She pushed for  an hour before she finally had baby number one, a big buck my brother named Blitz. Once baby number one was out baby number two quickly followed. An hour for the first baby, less than five minutes for the second baby! That's a first freshener for you!


Another, beautiful, colorful, buck. My brother named the second one Storm, and lamented the fact he didn't get a doe out of his favorite goat. Why are the pretty babies, out of the best does, so often bucks? 

That night it was clear that Bonnie, my little sister's goat was in labor, so I stuck her in a kidding shed, went to bed, and woke up every three hours to check on her. She didn't kid. When I checked on her come morning, still no babies. She made it very clear she wanted to got out to the pasture, so I put her out there, and continued to check on her every 30 minutes. One check, she wasn't pushing or anything, 30 minutes later I went out to check again, and there was a baby!


Darned goat, apparently she wanted to have her babies in the pasture and didn't want me interfering! I lost a good nights sleep only to miss the big event come morning! Well, ok, only half the big event. She waited to have the second baby until I got out there.


Twin Does! After five bucks and only one doe the day before this was exciting! My sister named the first baby Iris and the second Orchid.

Whew, busy weekend! Needless to say, we didn't make it to church. Now after 7 goats kidding and 14 live babies, (a very even 7 bucks and 7 does) I only have three goats left to kid, and they appear to be taking their own sweet time. On one hand, this is a little frustrating, I was up every three hours last night to check on a still pregnant goat! On the other hand, the break is rather nice, until the current babies get a bit bigger, I'm out of kidding sheds! I foresee another busy weekend coming up, this time with cleaning out and moving around sheds to accommodate my growing herd!


Sunday, February 21, 2016

Rag Rugs, Potholder Style

This winter my family got really into making potholders. You know, the ones you weave from cotton loops on little metal looms? We made a lot of them! Most of the extended family got a set for Christmas.


Once we ran out of cotton loops I got a little creative and cut up some holey knee socks to make more potholders. That worked surprisingly well!


At some point during this whole potholder making frenzy I began to think, "Hey, wouldn't it be cool to make a ragrug this way?" I would just need a really big loom and really big loops. For the loops I went to the thrift store and picked up approximately twenty 50 cent T-shirts.


Using my rotary cutter and mat I cut the t-shirts into 4 inch wide loops.

I sorted them according to color.

Then, they all had to be stretched out, in order to fit on my yet-to-be-built loom.

My siblings were very helpful with this. After an evening of cutting and stretching loops, I was all ready to weave my rug.

So, one night I volunteered to cook supper and my dad built a loom for me. 


Weaving the rug actually took much less time then expected! In one evening I had a rug done!

This was fun! So the next week, armed with more T-shirts, I made a second one. This time with a pretty plaid design.

Excited about how this was going I decided to make a third rug, only this time with a twist. I would weave this rug diagonally.


Unfortunantly my loom wasn't built to be used like this and the top bored split. EEK! Daddy to the rescue!


My dad reinforced the loom for me! Now, if only my goats will take a break from going into labor for several hours I can get this rug done! (then ask my dad to build me another, stronger, loom) 


Now, how many other ways can I weave a rag rug? Anyone have a bunch of old T-shirts to give me? Alright, back outside now to check on all my pregnant goats and new babies. Check back later this week for a full report on kidding season thus far!


Wednesday, February 17, 2016

Valentines Day: Shirts and Baby Goats

So many of my projects start with me finding a fabric I just can't leave behind, then designing a garment to turn the fabric into, in order to justify the fabric I just bought. This shirt was no exception.


The fabric I had been admiring for a while, then during one trip to Joann's I saw that it had been clearanced. So I immediately got what was left on the bolt, about two yards.


A soft grey knit with metallic gold stripes on one side and gold dots on the other. I really wanted to showcase both sides of the fabric in what ever I made and I thought a circle shirt, like this, would be a great way to do that. I decided some gold lace would be just perfect to set off the stripes and dots. Not wanting to spend too much more money on the supplies for this project, I stopped by a thrift store on my way home from Joann's that day to see if there was a garment with gold lace I could use. Well, there wasn't one.


There was, however, this shirt. While not something I would typically wear, the paisley pattern of blue, green, grey, and metallic gold intrigued me. I could find a way to combine this shirt with my new fabric in place of lace!

This all took place several weeks ago. The shirt and fabric got stuck in my re-fashion bin and there they stayed. Finally, I had a few spare hours this past weekend, while waiting for my very pregnant goats to kid. Out my fabric came!


I used one of my favorite tank tops as the pattern for the body of the shirt. I cut two large half-circles for sleeves. Then, I chopped up the thrifted shirt.


I cut off the sleeves, then chopped off the top of the shirt. This would be the yoke for my circle shirt. I flipped it around so that the front of the shirt was the back yoke, and the back was the front yoke. Then I started sewing my circle shirt.

Well, it was supposed to be a circle shirt at least. I sewed the top of the thrifted shirt onto the body of my new shirt. Then I planned to sew the half-circles to the sides of the shirt body to make a large circle/oval shape, but halfway into sewing the half circles on I decided to go a slightly different direction.


I sewed the half-circles around what would be the arm hole, then, rather that sewing the rest of the sleeves into the side seams, as I'd planned to do, I decided to sew up the side seams and the under arm seams separately, giving this shirt very distinct sleeves, rather than a poncho look.

Once I had the sleeves figured out, my shirt was about done, only two little issues that needed to be solved, first, it was a little tight and short through the torso. 


I cut the bottom couple inches off the original shirt, along with wedges out of the sides of the shirt. I then seam ripped a few inches up each side seam of the shirt I had just made. I sewed the wedges I had just cut into the side seams and sewed the hem of the original shirt onto the bottom of my new shirt. That fixed the problem!


The second issue was the back of the shirt, it was just a bit too open for my tastes. So I made two straps out of the fabric scraps I had, then cris-crossed them across the open back.


There, much more comfortable! This shirt took about an hour and a half to make, then it was time to check on the pregnant goats again. So I threw a coat on over my pretty new shirt and outside I went, to discover Genesis very close to having babies!


Genesis is a two year old, first time mama and she did great! First out was a little buck who looked exactly like his mama. My sister named him Exodus. He was soon followed by a doeling, named Truffle (to honor her Valentines day birth).


We quickly moved all three into a nice warm shed, and the babies didn't take long to figure out how to nurse.


Now, hopefully all my kiddings this year go just as well as Genesis's did, and all my sewing projects come together as quickly and nicely as my shirt did!


Well, ok, that second one might be pretty near impossible, but I'm still hoping for a smooth kidding season!