Thursday, September 29, 2016

The Jeanius 5-Pocket 7 1/2-Pair Jean Jacket

I wanted a long full skirted jean jacket. I've wanted one for a while now and my ample supply of old jeans seemed just the thing to become said jacket.


This has been my plan since before The Refashioners began. Once I heard what this year's theme was I knew I would be making this jacket. But, dang, I am a procrastinator.
"The jacket will happen." I kept thinking.
"It's too hot to make a jacket now." I told myself.
So here we are, at the end of September, the day before The Refashioners contest ends. It's finally begun to cool off, and my jacket is finally done!


I began it last week. I picked McCall's M6800 as my base pattern. I gathered up my materials. The the cutting began. I seam ripped open the inner leg seam on pair after pair of jeans. 6 pair for the body of the jacket.


Once the seam ripping was done I laid the jeans out flat and cut out the skirt sections of the jacket. Then I squeezed the bodice section of each piece out of what remained once the skirt section was cut out.


Then I was ready to cut out the sleeves, and I was running out of decent jeans. The few pairs that remained were very stained and torn. So, I picked out the best of the worst for the main sleeve pieces, trying my best to avoid the biggest stains. For the smaller sleeve piece I used a pair of jean legs left over from making cut offs once upon a time.


Finally everything was cut out and construction could begin. Construction wasn't hard at all, just time consuming. Lots of long seams to sew, serge, and top stitch with white thread for a finished look. Then came my favorite part, the details.

 While planning this jacket I decided I wanted to attempt to use a jeans waistband to make the neckline. So I choose a waistband out of my stash of old jeans and sewed it onto the jacket neckline. Then I pleated the upper edge of the waistband neckline until it lay flat.


I stitched each pleat down flat.


The result turned out just as I'd hoped!


One of the only the only things on this jacket not reused from jeans are the three metal buttons down the front. They came from my best friend's mom. I've had them in my stash for months, just waiting for the perfect project. This was it.

For the cuffs I used two more jeans waistbands. For the hanging loop, a belt loop.


In keeping with the reusing of the original jeans pieces, I added three back jean pockets to the front of the jacket. Two on the skirt, and one as the breast pocket.


In addition to those, just because I love pockets, there are two large inseam pockets in the skirt, made from the scraps of a shirt refashion from last year. With 5 pockets total I should have plenty of places to stash stuff!


Whew, all that planning, all that work. I wasn't sure if I was going to get it done in time. Finally, this evening, with less than 24 hours before the end of The Refashioners 2016, and about 45 minutes till dark, my jacket was done! All I needed now was a willing photographer. I threw on my crinoline, my fabulous green wrap dress, and my newly completed jacket. Outside I went to track down a family member.


My dad and brothers are building lean-to addition onto the barn, and they graciously paused their work to snap a few pictures for me!


All done! A long full denim jacket made from my old jeans.


Complete with paint stains from painting my friend's room, a grease stain from fixing my truck, ink stains from tattooing goats, and glitter glue from who knows what.


With all that I don't need to worry about messing it up, so now all that's left to do is wear my new jacket as much as possible!


A HUGE, HUGE Thank You to Portia from Makery for organising The Refashioners 2016. My old jeans stash is much diminished! I feel like I need to shrink my fabric stash before I leave on the World Race in January and the Jeanius theme has definitely helped me with that!


Now, has this contest greatly inspired me so that I have more jeanius ideas than jeans left to refashion? Of course! Just like with the men's shirt refashions of last year, this is not the end of my jeans refashioning. There will be more!


Monday, September 26, 2016

The Second Swingy Jeanius Dress

One Swingy Jeanius Dress was not enough in my sister's opinion. She wanted a second. Being the indulgent big sister that I am, and really wanting a chance to get the neckline right this time, I complied.


Two pairs of Jeans, one darker, one slightly lighter, and a very light old jean leg left over from cut off shorts long ago, got cut up one evening.


Then another evening these old jeans got sewn together. Buttons were added at the shoulders. The result was tried on by my sister. There was no gaping at the neckline this time!


Using the satin stitch on my sewing machine I embroidered two butterflies on one side panel. This is a favorite detail of my sister's.


The opposite side panel displays a pocket from the lighter pair of jeans, also a very important detail.


I do believe this second swingy jeanius dress will be just as loved as the first. This will have to be her last such dress however as I see no reason why any girl needs three nearly identical dresses!

Refashioning jeans for The Refashioners 2016 has been great fun and my old jean stash is quite diminished, thankfully!


I am so grateful to Portia from Makery for hosting the challenge again this year so that I had a reason for tackling my out of control stash of discarded denim. Thank you, Thank you, Thank you Portia for all the work you put into this!


My sister and I are pretty pleased with our new "jeans." Am I done refashioning jeans for now? 


No, Not yet. I still have a couple more plans up my sleeve. Here's hoping I get them done this week!


The end goal? Old Jeans-0 Wearable new garments- umm I'm up to 4 now so how does 6 sound? Check out my previous Jeanius posts to see all the fun I've already had! Now, on to the next project!  


Saturday, September 24, 2016

The Burgundy Corset

3 weeks ago, underneath my blue paisley 1890's dress,  I wore my gold corset to the Japanese Festival. It was fine, for the first 2 hours, before the car ride. Then, after the 2 hour car ride, the corset pinched, gave me a sore back, and was too tight through the ribs. I loosened it some midway through the day and that gave a bit of relief, but by the end of the day I was done. Pretty as it might be, that corset was retired. I needed a new one before the Heritage Festival. That meant I had less than two weeks to get a corset made. Yikes, was that doable?

  At the beginning of that first week I picked up my pattern, Simplicity 1139, at a pattern sale at Joann's. I went through my stash and picked my fabrics. I found a yard of this burgundy striped cotton sateen, picked up at a thrift store once upon a time, in my stash and decided it would make a lovely corset. While not too heavy or stiff it was very strong with no give what so ever. After handling the fabric some I decided there was no need for a heavy canvas or twill interlining, the sateen would do its job. All I needed to line the corset with was an incredibly soft blue and white cotton sheet, the same one I lined the bodice of my 1890's dress with.

That decided, I realized I needed a new busk for this corset as well as a couple pieces of spring steel boning for the back of the corset and some grommets. So, at the end of that first week I ordered those and hoped they would come in with enough time left for me to assemble the corset before the Heritage Festival.

The first mock-up, too large

Over the weekend I made a couple of quick mock-ups. I discovered a straight up size 6 with no alterations fit me perfectly. By the beginning of the second week I was able to cut out the corset from my sateen and sheet and cut and tip my spiral steel boning.


Now, you will remember I said I had to order spring steel boning for the back of the corset. What's the difference? Well, spiral steel boning, which I keep a roll of on hand, bends 4 ways, front to back and side to side. Spring steel boning does not bend side to side, only front to back, so it adds a bit more stability to the corset. In my gold corset I discovered that while spiral steel is great for most of the corset, it's not stable enough for the center back, next to the grommets. Spring steel is really needed for that, so I ordered some for this corset.

Thursday of that second week, less than two days before I needed to wear my new corset, the boning, busk, and grommets came it the mail. Assembly could begin! 

Thursday afternoon I got the corset mostly assembled. Friday morning I bound the edges and put in the grommets. I tried the corset on.


It fit! I had my new corset done with nearly 24 hours to spare!


When I'm all laced up the gap is just over an inch. Still not the perfect 2" gap, but better than either of my previous corsets. 


And my waist measurement? 1/2 inch to an inch smaller than it was in the gold corset!


I wore this corset two days in a row and have no complaints about it. It's comfortable! No need for loosening in the middle of the day. I may have finally succeeded in making a perfectly fitted corset, in less time than I've made a corset before. Apparently I work well under pressure.


Wednesday, September 21, 2016

A Hat to Complete the 1890's Outfit

I was thrilled to be invited to help out in the Maplewood house at the Heritage Festival again this year. A chance to see items, including some clothing, up close from the late 19th century and to learn more about local history while educating others? Sign me up! This home of the Lenore and Nifong Families was built in 1877, added onto in 1891, and lived in until 1959. Thus, my blue paisley 1890's dress (after some minor bodice alterations)  was the natural choice of attire for this volunteer assignment last weekend.


However, my 1890's wardrobe was missing one vital piece, a proper hat. The Sophie hat I made using hot glue and model magic to wear with my dress to the Japanese Festival was far from historically accurate. Something new was needed for the Heritage Festival. 

Young Ladies' Hat October 1896

This month's Historical Sew Monthly challenge is Historicism: make a historical garment inspired by a previous era. After some research I decided an 1890's straw hat inspired by the 18th century bergere hats was just what I needed. So, after saving a bunch of inspiration images to my 1890's Pinterest board I set to hat making.


I started with this straw hat I picked up a Goodwill a while back. I yanked off all the embellishments, soaked it in water so I could reshape it, and trimmed down the brim a couple inches. Then I decided I wanted to dye it a dark brown. I used Rit dye for synthetics (even though straw is natural, I wasn't sure how it would take dye), and hoped for the best


So into a tub of dye sitting in the bathtub the hat went for a night. I weighed it down with rocks so it would stay fully submerged.


The next morning I pulled the hat out, rinsed it off, and this is what I had.


Not quite as dark as I wanted, but it would do. Time for the trimming to begin! I picked up some feathers at Hobby Lobby and used some fake flowers and a strip of polyester tissue taffeta from my stash.


I played around with my trims until I got the look I was going for then stitched everything in place by hand. No hot glue this time!

 The finished product worked splendidly to complete my outfit! 


I showed visitors the guest bedroom. I explained about the changes the room had undergone over time and a little about the family who had lived in the house. I also told people about some notable items in the room. The green butterfly quilt on the bed in this picture actually went to the St. Louis World's Fair in 1904, and it won!


I love this pattern! Now, if only I quilted. . .


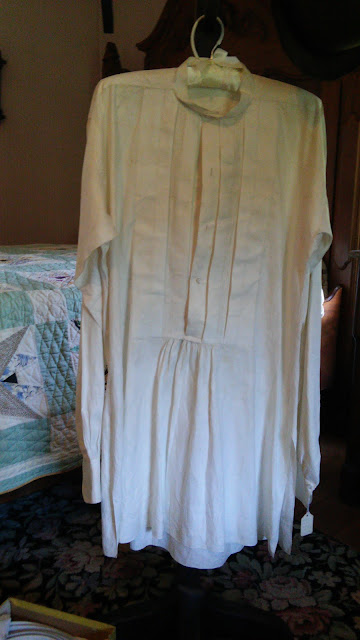
This shirt was Mr. Lenore's wedding shirt in 1864. Between visitors I examined it as much as possible without touching.


All handsewn with the tiniest stitches and hems imaginable. Amazing attention to detail. I would love to have this kind of sewing ability. Something to aspire to.

The hem of the drawers
 There was also a wardrobe in the room that held a chemise and drawers from the last quarter of the 19th century. They were sewn with a mix of hand and machine sewing and absolutely amazing. These undergarments of yesteryear were better made than any clothing today. It was a treat to get to volunteer in the house and see these items.


I received many compliments on my dress but after seeing the workmanship of the actual historical clothing, I felt a little inadequate. Good thing sewing is something I can continue to improve at! Though I'm not sure it is an art I can ever completely master, but atleast I can try.

Now for the less impressive details of my new hat.

What the item is: An 1890's Bergere hat, inspired by the Bergere hats from the previous century

The Challenge: #9, Historicism

Fabric/Materials: Straw Hat, Feathers, Fake Flowers, Polyester Taffeta

Pattern: None

Year: 1896-1899

Notions: Thread

How historically accurate is it? The look is right, but that's about it. The materials for the most part aren't.(with the exception of the straw and feathers.) So, maybe 40%

Hours to complete: About 3 hours, unless you count the amount of time the hat was in the dye. Then it would be 16.

First worn: 9/17/16

Total cost: The hat was $4. The feathers were $5. The dye was $5. The fabric and flowers were leftover from another project, basicly free. Thus, about $14.


It was a privilege to volunteer in the house again this year, and it was so much fun to have a dress from the correct era this time! Now, I just need to find a few more excuses to wear my historical dresses before I leave on the World Race in January! This time of year that shouldn't be too hard.