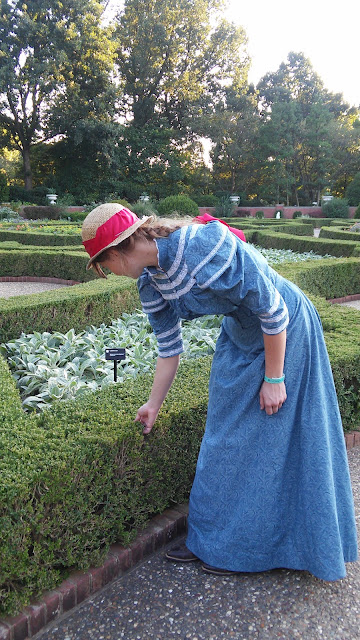
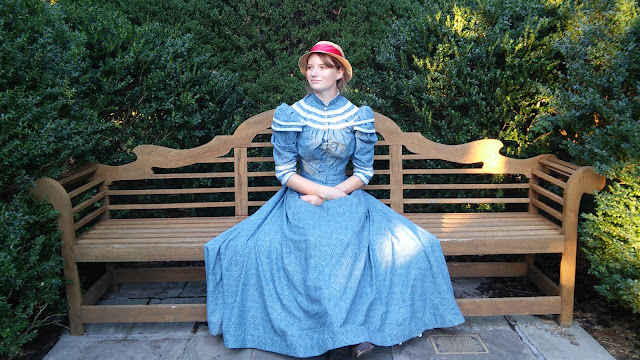
One month. That's how much time I had to sew this 1890's dress once I decided I was going to make it. That's the least about of time I've ever had from the idea conception to the completion of a historical dress.
This first challenge of this dress was finding the fabric. It needed to be blue and I wanted it to be patterned. Shouldn't be too hard finding a historically accurate blue patterned fabric, right? Wrong. Finally I settled on a 90 inch wide blue paisley lightweight quilting cotton. I decided it would work well to replicate this 1890's cotton summer dress.
 |
| image source |
Now, the fabric probably ought to be a bit lighter weight and more sheer, but I think it works pretty well. Unfortunately, Joann's had less than two yards in stock. Thanks to the extra wide width this was just enough to make my skirt.
Thus, the second week after I decided to make the dress I had the skirt done, using the pattern I made based on one in Janet Arnold's Patterns of Fashion II.
I put two pockets in the skirt, in the seams on either side of the center front panel. The plan was to put both pockets at the top of the skirt, just below the waistband. Well, that worked great with one pocket, but the second pocket just wouldn't lie smooth there, so it got moved down to about knee level, supported by a cord attached to the waistband. Thus, I got my two pockets in the skirt.
The hem of the skirt is faced in 3 inch wide strips of bias cut cotton buckram.
In the 1890's skirt hems had horsehair braid for extra body. Today you can get nylon "horsehair braid", but I didn't have any in my stash and didn't want to spend more money than I had to. So, after a little research, I pulled out some buckram leftover from making a bonnet and used that. I had just enough to face the entire hem.
This is a very full skirt.
The skirt went together easily enough, then it was time for the bodice. I still needed fabric and a pattern. The fabric was easy enough. I had a friend going to a nearby town with a Joann's, so she very kindly picked up another yard of the fabric for me. Then came the pattern. That took a bit more work. I adapted two different 1980's patterns from my stash for this. I found the puffiest sleeve pattern I could, then cut and spread to add even more puff.
Then for the main bodice I found a shirt pattern with a yoke that buttoned up the front.
I angled the shoulder seams to the back, changed the darts (To get these just right I made a dartless mock-up, tried it on over my corset, then pinned the darts in place.), and made a couple small adjustments to the yoke. After 2 mockups I had my lining pattern.
For the outer gathered bodice I used my lining pattern and added some extra width to be gathered into the yoke and waistband. Unfortunately, I didn't think to make the bodice mock-up with the waistband. So, the finished bodice wound up a little too long. This caused some unattractive folding in the bust area. I'll be fixing that before I wear this dress again.
The bodice is flat lined and boned for extra structure. I should have also flat lined the sleeves for extra body, but I didn't, so I may go back and re-do those later.
Trimming the bodice was the fun part. Typically historically accurate lace is an expensive nightmare to find, but not this time! My friend's mom picked up this fabulous cotton lace at a yard sale and gave it to me.
There was just barely enough of the narrow lace for the sleeve cap ruffles, but I have lots more of the wider stuff on the yoke, so that will make appearances on future projects.
The bodice fastens with hooks and eyes, but I added three vintage porcelain buttons at the yoke for decoration.
I wore the dress over the 1890's petticoat I made to go with it, my gold corset from last year and a combination (chamise and drawers in one) I made the night before the event. I'll have to do a blog post on the combination later. It was perfect for going under my corset and not adding extra bulk!
I felt so elegant in this dress, with all the lace and the slight train, and I got lots of compliments on it, even from people who had no idea who I was dressed as!
I'm hoping to find a few more excuses this fall to wear this dress. It's nice to have a historical dress that's easy to get into that doesn't require a massive amount of petticoats (though I really should have at least one more petticoat to wear with it, I just ran out of time to get a second sewn).
Even though it was finished a couple days after the deadline, I'm using this as an entry for the 8th HSM challenge of the year, Pattern.
What the item is: A summer dress
The Challenge: #8, Pattern
Fabric/Materials: Quilting cotton, duck canvas for interfacing, a cotton sheet for flat lining.
Pattern: A few cobbled together and hacked, so mostly my own.
Year: Late 1890's
Notions: Thread, cotton lace, porcelain buttons, hooks and eyes
How historically accurate is it? It's all machine sewn with hand finishing, which is appropriate for the era. The fiber content of the materials is good, other than the thread, though I'm not sure the paisley pattern is perfect. The pattern is good to the best of my knowledge, but probably not perfect. (lots of work there to make it as historically accurate as possible). So I'm going to give it an 80%.
Hours to complete: I didn't keep track.
First worn: 9/4/16
Total cost: Less than $30


You made a wonderful Sophie!
ReplyDeletebeautiful!
ReplyDeleteYour dress turned out beautiful!! Waaaay better than mine. I'm gonna remake it though!
ReplyDeleteThanks! I'm pretty happy with mine, though I do want to make the bodice fit more smoothly down the front. I'm sure yours was fine. I'd love to see pics of your completed cosplay!
DeleteAmazing dress!
ReplyDeleteThanks!
Delete