It was a beautiful green plaid - I fell in love with it as soon as I saw it at the City Sewing Room - and there was a lot of it! My first thought was it would make a wonderful 1880's ensemble, but. . . it was stretchy. This woven plaid certainly had a high spandex content, which is not ideal for historical clothing. I almost left the plaid behind for that reason, but it was just too pretty! I decided to take about 4 yards home with me that day. It wasn't suitable for historical clothing, but surly I could figure out something more modern to make with it!
The green plaid reminded me of Professor McGonagall, so I decided I wanted to use the fabric for something inspired by McGonagall - inspired by her, but not costume-y. (I've already done an 1890's McGonagall outfit, so this could be more casual.)
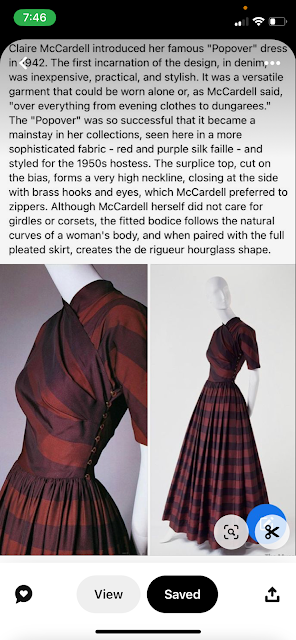
I decided a long skirt was a must, but did I want a shirt dress, or a wrap dress? Or something else entirely? I wasn't sure! I let the ideas linger in my mind for a few months while I worked on other projects. Finally, in November I decided I wanted the green plaid to be my Christmas dress, so I needed to nail down the design. I took to Pinterest and discovered this Claire McCardell dress saved to one of my boards.
I spent most of November keeping my eyes open for a good pattern to alter for my dress. I contemplated several - both in my stash and in the pattern books at Joann's. I needed a pattern with cut-on sleeves, no darts, and a high wrap front with some rouching. I knew I'd have to alter a pattern to get just what I wanted, but even so, finding a good pattern to start with was harder than I thought it would be!
Finally I picked Butterick 6318. It only featured one of the three elements I was looking for - cut on sleeves - but as it was a basic bodice pattern without any extra design details or fluff, it would make a good block to alter for the McCardell Design.
I started by tracing off the bodice in my size. For the bodice back I eliminated the center back zipper (my dress would close at the side like the original), and the waist darts. Since my fabric was stretchy due to the spandex content I knew I wouldn't need those back darts the way I would with a standard (non-stretchy) woven fabric.
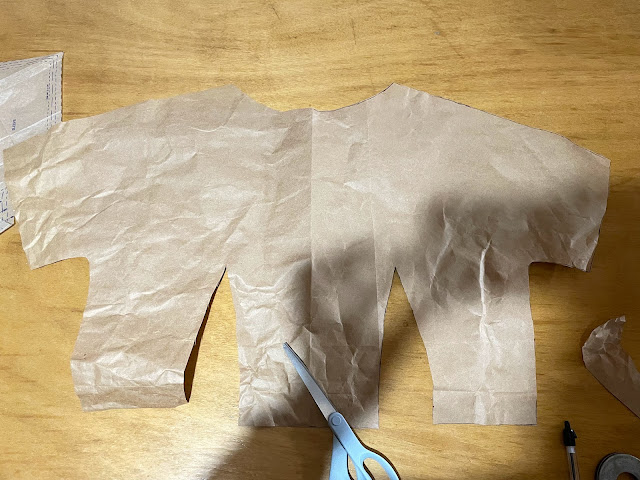
The front bodice alterations were a little more involved. First I cut out a full bodice front pattern piece from brown paper, rather than the standard half to be cut on the fold.
Then I messed around with folding down to top edge of the pattern piece to decide on the angle I wanted the wrap neckline to have. The original McCardell dress had a very high neckline, but that looked uncomfortable to me. I wanted mine to be a bit lower. Finally, I picked an angle I thought looked good, and chopped off the extra paper.
Next came the messy part. I eliminated the front darts by rotating that fullness over to the side seam to make the pleats featured on the McCardell dress. Once that was done my pattern was ready! I just wanted to make a mock-up to double check everything. . .
Yeah. That mock-up didn't happen. In fact, the dress didn't happen for Christmas the way I'd planned. I was too busy sewing other people's Christmas dresses and Christmas gifts to make my own happen. (Good thing I've got a collection of Christmas dresses from previous years, I still had plenty of options to wear to the various Christmas gatherings - and it was fun to wear old makes again!)
So, here was are the week after Christmas. I decided I still wanted the dress. So yesterday I made it happen.
Since I didn't feel like dealing with a mock-up I just cut the dress out yesterday with some extra length added to the sleeves and bodice - as those are the areas I often find a touch short. I also added a cut-on facing to the front bodice neckline, and decided to skip doing a lining.
I carefully cut out the bodice back so the two halves would meet in a chevron pattern.
I attempted to do the same with the sleeve seam, but since I had to cut the front at a specific angle so the front neckline would be on the straight grain, the sleeve pattern matching was less successful.
I sewed up the bodice, then tried it on to double check the fit. It fit beautifully, and I was very glad I'd added the extra length!
I made the skirt - two rectangles gathered up with side seam pockets and a placket on the left hand side, and attached it to the bodice.
To maintain the stretchy-ness of the fabric I sewed the waist seam with a zig-zag stitch and bound the seam with some red plaid fold-over elastic from my stash. I thought the red would add some Christmas cheer to the inside of my dress!
To finish off the dress I added button holes to both the under and overlap of the bodice, and the skirt placket. On the underlap side I added a piece of twill tape to the side seam to sew buttons onto. I used some black plastic buttons from my stash for this.
On the overlap side I used some beautiful black glass shank buttons for the bodice closure, and some standard plastic buttons for the skirt closures. The buttons on the skirt placket are completely hidden inside the pocket when the dress is worn, so those didn't need to be fancy.
The original Claire McCardell dress closed with hooks and eyes, rather than buttons, but I didn't feel like sewing on a bunch of hooks and eyes last night, so buttons it was!
Besides, there's a another McCardell dress of a similar design (just shorter and of a less expensive fabric than my inspiration dress) that does close with buttons down the left side - so I felt completely justified in my closure choice!
I sewed on the buttons sitting by the fire last night and my dress was done! I'd begun at 10 am with cutting the dress out, and it was finished by 9 pm, even with several breaks throughout the day to eat, do house work, visit with a neighbor, and cook dinner!

Probably my quickest and easiest Designin' December entry yet! There are a couple little things I wish I'd done differently, but for the most part I love the dress and am very pleased with my day's work!
I made my skirt from two panels of 44" wide fabric, and I wish I'd done 3. The extra fullness would have been luxurious! But I didn't have enough fabric for that - I really should have snagged all of this fabric when I found it at the City Sewing Room, rather than just taking half. Oh well, two panels still gives a comfortably full skirt.
My second regret is the bodice length. Remember how I said the bodice was the perfect length when I tried it on prior to attaching the skirt?
Well it was. . . but the weight of the full skirt certainly stretched out that bias cut bodice so it's a touch too long now. I should not have added that extra length. It would have been fine without it. Oh well, throw on a belt or sash and its an easy issue to hide!
All in all, I love this dress!
It's incredibly comfortable and I intend to wear it lots this winter!

I've even got one more family Christmas gathering coming up that I can wear it too!
So I can still call it my Christmas dress, right?
Merry Christmas and a Happy New Year to you! I hope you had a wonderful celebration of our Savior's birth with your family and friends!


