My pink corset. I love it, it was the first truly historical article of clothing I made. With a few alterations, I got it to fit me like a glove. However, it's not without a few issues. The biggest one? Well, technically it's too big for me.

When all laced up in a Victorian corset there is supposed to be about a 2 inch gap in the back. When I'm all laced into my pink corset there is no gap. With this in mind I have been thinking of making my self a new corset for a while now. I even bought the pattern I wanted to use, simplicity 2890. I just haven't had a really good reason to make myself a new corset. Well, finally I came up with a reason. I needed a gold corset for my Zelda costume.
Now I could have just made a costume corset for this, rather than a real one, but I figured if I was going to spend the time and money making a corset I ought to make one I'd get plenty of wear out of. So I decided to make a real, gold-colored, historical corset.
The first thing to do? Finding a gold colored fabric made of natural fibers, so not polyester. This proved to be a challenge. I spend over an hour in Joann's and found nothing! So I decided to go to Kohls to see if there were any gold cotton pillowcases in my price range. Well, I hit the jackpot! In the clearance section I found this gold cotton pillow sham, and it was 90% off!

So I bought it, went back to joanns to get some gold trim to go with it, then got to work.
Now the first step to making a corset is the most vital, yet also the hardest and most boring part of the whole process, making and fitting a mock up. I made my mock up from old jean legs (left over from making cut-offs), used a zipper in the front instead of a busk, put in some plastic boning that I had on hand, and added eyelets down the back. After making (approximately) 2.7 mock ups of the front, and around 6.9 of the back I finally had a perfectly fitted corset!

I did learn a few things throughout this process, first it's a really, really good thing I actually made a mock-up rather than immediately cutting into my gold fabric. If I hadn't made the mock-ups I would have had a very ill-fitting corset in the end. Next, I discovered why you should never ever use plastic boning in a corset. The plastic boning I used in the mock-ups wound up very warped by the time I was done with it. Finally, the smartest thing I did on the first mock-up was put in eyelets, then cut the strip of eyelets off and sew them onto each following mock-up. By doing this I saved a lot of time!

Once all the fitting issues were worked out it was on to the fun part, making the real thing!
I traced my lengthened, let out, taken in, and reshaped pattern pieces onto construction paper. (I actually used a different pattern entirely for the corset back, as I just couldn't get the back of my pattern to work for me.) Then finally I got to cut into my soft, lovely, gold cotton.
I traced my lengthened, let out, taken in, and reshaped pattern pieces onto construction paper. (I actually used a different pattern entirely for the corset back, as I just couldn't get the back of my pattern to work for me.) Then finally I got to cut into my soft, lovely, gold cotton.

This corset pattern is for a single layer corset, but I chose to make it double layer instead as my gold fabric wasn't stiff enough and had to much "give" in it to work as a single layer corset. So, I chose to line it with a sturdy cotton twill.
There are several different ways to make a double layer corset, and no one way is perfect, so I picked the one that made the most sense to me. I assembled the two layers separately, but didn't put the bust and hip gussets in. Then I sewed the two layers together at the front and back. Finally, I put the gussets in by sandwiching them between the two layers and top stitching them in place.


Around the gusset ends I used the buttonhole stitch to strengthen the fabric.
The gussets are my favorite part of this corset, I got rather creative with them. The pattern I used was a copy of a pattern from 1867, but when it comes to decorations my corset more resembles those from the 1870-80's, especially the gussets.


An original corset from the 1870's or 80's
Looking through pictures of original corsets for decoration inspiration I was really drawn in by the corded and embroidered gussets of this era, so I decided to attempt both. I was pretty confidant of my ability to cord the gussets (to make them stronger), but I knew nothing of embroidery.

The zipper foot, what a wonderful invention. It was very helpful for cording the gussets.
Well, the embroidery didn't turn out perfect, but I like what it adds to the corset. (though if I ever decide to attempt embroidering something again I will definitely do more research first!)

Once the embroidery was done and the gussets sewn in place it was time to bone the corset. I used spiral steel bones, as I have about a 25 yard roll of spiral steel boning on hand. Since this is a double layer corset making the boning channels was easy. I just stitched the 2 layers together where I wanted the bones to go then inserted the boning between the 2 layers.

Then it was onto the binding, and I discovered the best part of using a pillow sham for this corset.
The edges of the pillow sham had been bound with gold twill tape. I saved this when I took the sham apart. Well, that twill tape worked perfect as corset binding, so I didn't have to make any bias binding! I sewed on the binding and gold trim.

Then, I couldn't help but add this lace for an extra splash of gold. I'm not going to claim the gold lace is historically accurate, but it was the perfect accent to my Zelda costume!

In hopes of this corset lasting a while I flossed around the ends of the busk and plan to do the same on each bone when I get the time. Flossing keeps the bone ends from wearing through the fabric.
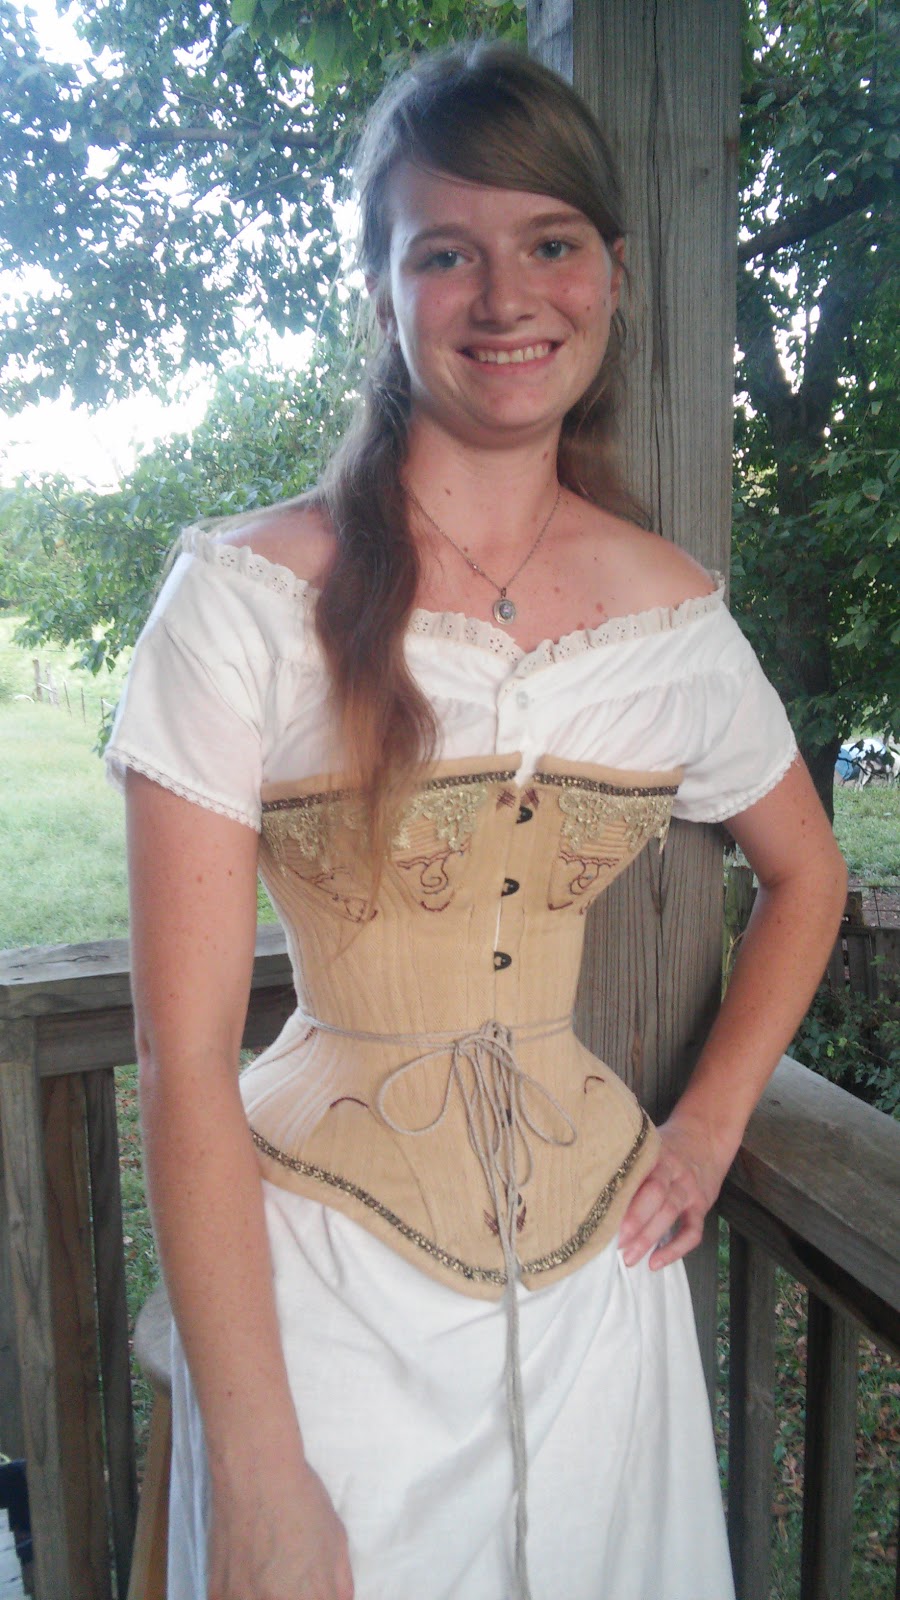
Once the corset was done, I wore it all day as part of my Zelda costume for the Japanese Festival. It was actually pretty comfortable (though I did have to loosen it once toward the end of the day). I am so glad I made the coset out of cotton, a synthetic fabric would have been horrendous in that heat!

Now, does this corset fit better than my pink one?

Not exactly. This one is actually a bit small in the waist (but perfect in the bust and hips at least!). When all laced up the gap in the back should be even all the way down, mine is a bit bigger in the middle. Now I could lace it tighter to try to get the gap even, but that would be uncomfortable. Also, laced this way I have the same measurements as I do in my other corset, meaning my historical clothing will fit over it perfectly. Any tighter and my dresses would be too big! I worked too hard on them for that. Maybe eventually I'll succeed in making a perfect corset, but for now 2 corsets is plenty.
Due to all the other sewing I had to get done in August, this is the only historical sewing I got done. The Historical Sew Monthly challenge was heritage and heirlooms, and while not perfect for the challenge I'm using this corset as my entry.

What the item is: A gold corset
The Challenge: #8 Heirlooms and Heritage.
Though not what had I hoped to make for this challenge, I feel it fits in two different ways. First, well, my female ancestors did wear corsets, and they had immigrated to America by the mid 1800's (when the corset is from) so it's very possible one may have had a similar corset. Second, while I don't really think this is going to become a family heirloom, I did attempt embroidery on it, (something I've never done before) which I consider an heirloom sewing skill. Also I flossed the busk and intend to floss the rest of the corset when I get the time so that it will last longer.
Fabric: A gold cotton pillowcase, lined with ivory cotton twill
Pattern: Simplicity 2890, with alterations
Year: The pattern is taken from a corset from 1867, but I made the corset to resemble those from the 1870's
Notions: spiral steel boning, steel busk, metal eyelets, linen lacing, cotton cording,all-purpose thread, upholstery thread, gold trim and lace
How historically accurate is it? The fabric is accurate, the notions not so much. A mixture of hand and machine sewing. The look is right, except for possibly the gold lace. So about 70%?
Hours to complete: Not really sure, I worked on it on and off all August.
First worn: September 5th
Total cost: about $30


It looks good Alyssa. Glad I had a tiny hand in it.
ReplyDeleteThank you for your help! I couldn't have gotten it fitted right without people to lace me up in the mock-ups!
Delete