Thursday, February 27, 2020

Sewing Up Some Sister Love

Last fall I ran into a Joann's in a different city looking for a specific fabric my Joann's was out of. This Joann's didn't have it either, but I didn't exactly leave the store empty handed. No, I left that store with exactly 1 yard of fabric, which I hadn't intended to buy, but I couldn't resist when I saw it.


It was a cotton/spandex jersey featuring the crests of all the Hogwarts houses in gray scale. Immediately, I thought this would be a neat feature fabric for a color-blocked top. I just needed to figure out the right color-blocked design.


Picking the design proved to be harder than I expected! I looked online for inspiration, but nothing seemed just right. The project took a back burner while I sewed for my brother's wedding, and then Christmas. I used some of the fabric for the sleeves on my sister-in-law's Christmas night shirt, but I still wasn't sure what style top I wanted to make for me using this fabric!


Then January rolled around and Winter Wear Designs released a new pattern, the Vivacious V-Neck - and it proved to be just the color blocked top pattern I was looking for! As soon as I saw it, I knew I'd found the pattern for my Hogwarts fabric, and requested it for the next blog tour!


This month it's the "Sew Yourself Some Love" blog tour, all about taking time to make yourself something fun! I decided my color-blocked Hogwarts shirt idea fit perfectly with this theme - it's definitely something fun I've been wanting to make myself for a while now.


As my Hogwarts house is Gryffindor, I chose red and gold for my accent colors. The red is a cotton/spandex jersey (left over from my sister-in-law's night shirt, bought at Wal-Mart a couple years ago) and the yellow/gold is a cotton rib-knit given to me by a friend who was de-stashing.


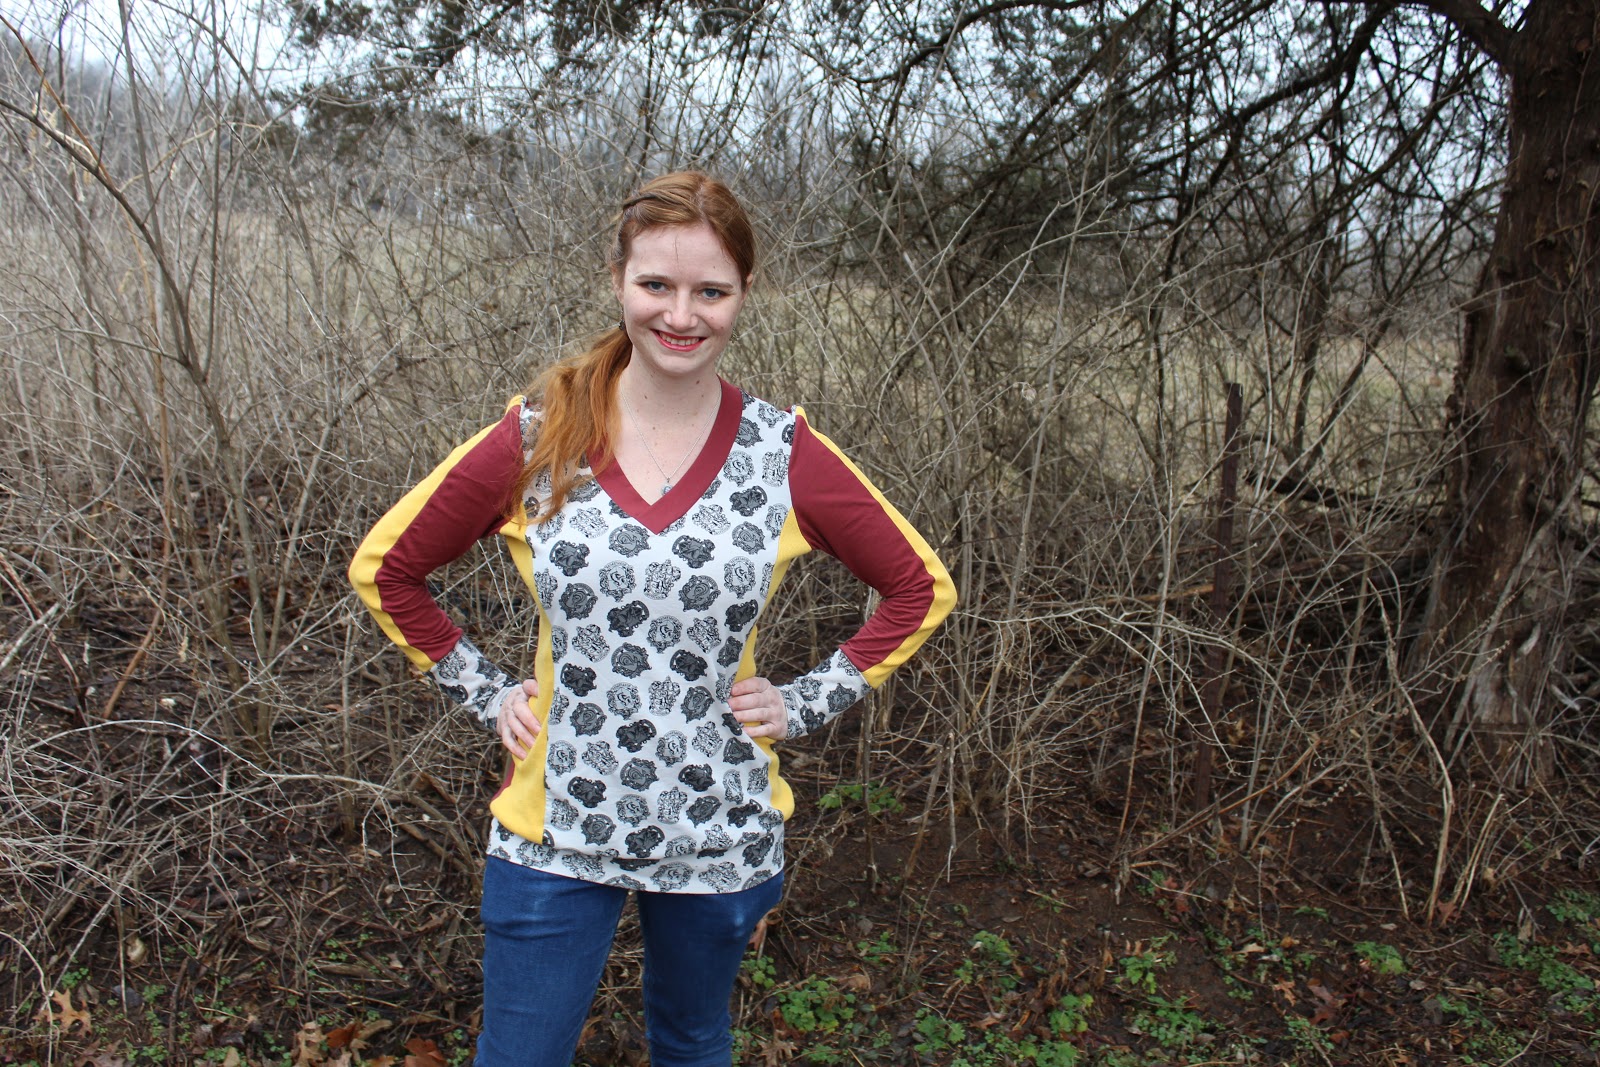
The Vivacious V-neck offers a ton of different design choices. Solid front or color blocked front? color-blocked sleeves or solid sleeves? Fancy thumb-hole cuffs, regular cuffs, or no cuffs? Bottom band or hem? Narrow neckband, wide neckband, shawl collar, or hood? I'm really excited out all the different neckline finishing options! How often do you come across a hooded V-neck pattern?


For my top I picked all the color blocking, regular cuffs, a banded hem, and the wide neck band. I really like the look of wide neck bands on V-necks! (I've hacked patterns to have similar necklines in the past, so it's exciting that this neckline treatment is actually included in this pattern. No hacking required!)


With the gold stripes down the outside of the sleeves and the faded red color I picked, I feel like this shirt has a bit of a "Vintage Quidditch Jersey" look to it. I generally avoid anything "sportsy", but hey, I'll embrace it this time! (Magical sports are different in that way.)


After I cut out my shirt, I took stock of how much house crest fabric I had left and decided to make my sister a Vivacious V-neck as well. Some things are just better if you have someone to share them with, and shirts celebrating your place in a fictional school are one of them.


As my sister is a Slytherin according to Pottermore, I pulled out the green and black cotton/spandex jerseys from my stash. (Yes, Slytherin colors are green and silver, not black, but my fabric stash seems to be a bit short of gray/silver knits at the moment, so black it had to be.)


For my sister's shirt I opted for all the color blocking, just like mine, along with the kangaroo pocket and hood. My sister is a fan of hoods, and I was excited to try out this hood specifically drafted for a V-neck.


I really like how this hood fits into the neckline and how it looks on the finished garment. I think I'll be transplanting it onto other V-neck patterns in the future!


I made my sister's shirt without telling her anything about it, so she was pretty surprised and thrilled when I gave her the finished garment.


She and I have about the same measurements now, so making her clothes is easier than ever. Whatever size I make for me, I also make for her. However much width I have to add to shoulders for me, she also requires it. When I was a teenager almost all of my tops were too tight in the shoulders so nothing fit right. I'm glad I now know how to adjust patterns for wide shoulders so my sister can avoid the same experience!


Last year my sister whittled wands for all of us siblings, and these wands seemed the perfect thing to photograph our new shirts with.


Who will win? Gryffindor or Slytherin?


Courage or Ambition?


In the end, I think sisterly love takes the day!


Meanwhile, not even magic can make an energetic dog sit still for pictures.


Oh well, we tried.


It's almost magic the way color blocking can make 1 yard of awesome fabric stretch for multiple different garments!


So far I've used this 1 yard of fabric for 3 different garments, and I still have a bit left - which I definitely have plans for! Thanks Suzanne for coming up with such a magical color blocked pattern!

I received this pattern free of charge in exchange for blogging about it, but all thoughts and opinions are my own


Sew Yourself Some Love Blog Tour


2/24


2/25


2/26


2/27


2/28


Patricia of Sew Far North

Monday, February 24, 2020

The Dress From the Lavender and Gold Uganda Fabric

I bought two lengths fabric on my trip to Uganda back in September. Both beautiful wax prints. One in teal and one in lavender and gold. The plan was to turn these two 6 yard cuts of fabric into dresses which I could wear on my return trip to Uganda in January. I had all fall to make these dresses, so I was sure I'd get them done with plenty of time to spare. Of course, me being the procrastinator I am, "Plenty of time" turned into "Oh, I'm going to Uganda next week. I should start on those dresses." Thus, around the first of January, I cut out the first of the two dresses. The lavender and gold one.


With 6 yards of each print, I had plenty of fabric to play with. So I decided to use a couple of real fabric hogs in my pattern stash - 1950's re-print patterns from the "Vintage Vogue". They called for at least 5.5 yards of fabric apiece.


For my lavender and gold fabric I decided to use Vogue 9106. This pattern features cut-on sleeves, a button front, a gathered bust, and a wonderfully full, unique, skirt.


As with any design featuring a seam directly under the bust, I knew I would need to lengthen the bust section, otherwise those under bust gathers would be sitting about mid-bust on me.


I added about an inch of length to the gathered section of the bodice. It turned out this wasn't quite enough extra length as the gathers still sit more on my bust than under my bust. Whoops. I should have made a mock-up, oh well. The dress is still wearable.


This pattern recommends bound buttonholes down the front of the bodice, and the first step in the pattern instructions is making said bound buttonholes.


I do not often do bound buttonholes, as they take more time to make than normal, machine-sewn, buttonholes, and I'm impatient. Thus, I did considered skipping the bound buttonholes. However, bound buttonholes are so nice looking, and it's a good technique to practice every now and then. So I decided to make the bound buttonholes this time around.


I appreciate the bound buttonholes being at the beginning of the project, when you're fresh, ready to go, and excited about the project, rather than at the end when you just wanna be done. The bound buttonhole instructions included in the pattern directions were very good and my button holes turned out well.


Along with the buttons down the front of the bodice, the pattern called for a side-seam zipper. I decided this was silly - if my dress looked like it opened down the front, gosh darn, it was going to open down the front!


So I stuck an invisible zipper in the center front seam of the skirt, beginning at the waist where the button placket ends. The zipper pull is covered by the belt when the dress is worn, so you can't even tell its there!


This invisible zipper in the front of the skirt turned out amazingly well, and I'm very glad I choose to do it! The dress is much easier to get on and off with the front opening than it would have been with the side seam opening.


The only other pattern alteration I did was to add sides seam pockets to the skirt - because we all know I must have pockets!


I had to re-configure the construction of the skirt a bit to allow for the pockets, but it worked out just fine!


The hard part on the skirt was getting the area where the gathers end and the flat part of the skirt begins to lay smooth. The ruffled and flat portions of the skirt are all cut as one piece, slashed, and gathered, and sewn back together. I had to do some seam ripping there until I got it right, but eventually I was satisfied.


The finished skirt really is delightful!


Once the dress was finished, it was worn to church the Sunday before I left, then packed for Uganda.


I wore it to church our first Sunday in Uganda, then again at the end of the week for our celebration, when the kids did a good-bye performance for us, we shared a feast, and brought goats home to the new goat pen at the school.

Photo Credit: Sophia Smither
Yes, I wrangled goats in this dress. And it held up just fine!

Photo Credit: Sophia Smither
I made this dress specifically for my Uganda trip, but I quite like it, and it will be worn plenty at home as well!


Wednesday, February 19, 2020

Matelasse 18th Century Pockets and Baby Goats

When preparing for my trip to Uganda, I knew I wanted to take two hand sewing projects with me. A primary hand sewing project and a back-up project just in case I finished the primary project. I already had my red wool petticoat all cut out and ready to go, so I just needed to figure out what my second project would be. After rejecting a couple different ideas because I didn't have time to gather supplies or to properly prepare patterns, I settled on a rather simple, but supremely useful, project - Pockets.


In the 1700's pockets were not sewn into dresses, rather pocket bags were made separately and attached to tapes which were tied around the waist and worn under dresses and petticoats. The pockets could be huge and were easily accessible slits in the side seams of the petticoats and gowns.

Reaching into my pocket worn beneath my petticoat.
When you think about it, this is such a practical idea! Why sew pockets into every dress or skirt when you can just sew one set of pockets and use them with all your garments?


  I did not yet have a set of pockets, and that seemed like a travesty to me. (Ok, so I do have a set of pocket hoops, which serve much the same function, but they only work under 18th century gowns of a certain silhouette, so I needed something a bit more universal.) Thus, I decided I was going to make myself a set of pockets during my Uganda trip.


Pockets are a rather simple garment over all, but there were still a couple decisions to make. Primarily, what materials would my pockets be made from? What would they look like? 18th century pockets can be quite elaborately embroidered. Now I would love a set of embroidered pockets, but I didn't feel like taking the time to do that at the moment. Thus, I took to the internet to see what other, non-embroidered, examples of pockets I could find. I could have just made a set of pockets from plain linen fabric, which I knew would be historically accurate, but that sounded boring. I wanted to see what other options I had.


I found several examples of matelasse pockets in online museum databases. (Such as this one from the V&A and this one from the MFA Boston) As I'd just made a matelasse petticoat, this made me super excited. I had fabric left over from my petticoat! I could totally make a set of matelasse pockets for myself!


I pulled my matelasse scraps out of my stash, drafted a pocket pattern based on the one in Janet Arnold's Patterns of Fashion 1, read about pocket construction in Costume Close-up, then cut out my pockets so they would be ready to sew on my trip.


The matelasse would be used for the front of the pockets, but most extent pockets were backed in plain linen or cotton fabric. So I needed to find something in my stash to use for the backing and binding of my pockets. Inspired by this set of pockets at the MET with its opening bound in red fabric, I decided I wanted to use something other than white material for my backing and binding. After some looking through my stash, I decided to use a lavender linen tank top as my backing and binding fabric. I made this tank for myself several years ago, but it never fit right, so it was time for it to become something else. There was just enough fabric in the top for me to cut out two pocket backings and binding.


I took my cut out pockets with me and began sewing them at the airport on my way out of the country. By the time I returned to American soil a week and a half later, I had a complete set of pockets.


The front and back pockets were stitched together with a back stitch and the binding, cut on the straight-of-grain, is applied with running stitches on the back and slip stitches on the back, according to the descriptions given in Costume Close Up.


At the top of each pocket is a channel, which the waist tape is threaded through.


After making my pockets this way I realized all the pocket examples I've seen actually have the waist tape sewn to the top of the channel, rather than sliding on the waist tape the way mine do, so I did that wrong, historically speaking. Oh well, I like the adjustability this way, so it can be historically inaccurate.


These pockets are my entry for the second Historical Sew Monthly challenge of the year - Re-Use: use thrifted materials, old garments, or bedlinens to make a new garment.

What the item is: Pockets
How it fits the challenge: These are made out of scraps of a cotton matelasse bedspread (left over from making my matelasse petticoat for the December 2019 challenge) and the lavender linen is harvested from a top I made myself, which never fit right, out of a pair of thrifted linen pants - so a double re-use on this material!
Material: Cotton matelasse from a bedspread and linen from a thrifted garment.
Pattern: The pocket pattern from Janet Arnold's Patterns of Fashion 1.
Year: 18th Century
Notions: Thread and cotton twill tape for waist tie.
How historically accurate is it? Well, linen and cotton matelasse were used to make pockets in this era, and they're all handsewn, however, in the era, the cotton matelasse would have been actually woven with a design shaped for pockets, rather than just cut from a bedspread scrap, and I've not seen any linen in this particular color on extent pieces, so probably about 75%.
Hours to complete: A little here and there as I was traveling so I'm really not sure, but probably around 10 hours for both pockets.
First worn: 2/1/2020, just for pictures
Total cost: All left over materials for other projects, so essentially $0. However, of you were to go back and count the cost of each little thing it would probably come out to around $5 or less.


After returning home from my trip to Uganda, when it came time to photograph my new pockets, I thought it would be fun to take pictures with my goats, a la 18th century shepherdess. My sister and I trooped out to the goat pen and expected the goats to come running, the way they usually do when they see me.


Only on this day the goats were a little grumpy with me. It was mid morning and I hadn't fed them yet. So I stood in the pen and called to them, and they stood at the feed trough and cried at me. "No pictures unless you feed us."


Eventually a very pregnant Florecita decided to join me and posed nicely for some pictures. (And as soon as we finished pictures, I hurried up and fed everybody!)


A few days later, kidding season kicked off, and Florecita was the second doe to kid!


My pocket pictures were taken on Saturday, and on Wednesday morning I came out to feed and found Zillah with a big single doeling in the kidding shed. I named the baby Flurry as it snowed that day.


Less than 24 hours later, at 2:30 am Thursday, Florecita followed with twin does, named Azalea (front) and Fresia (back).


Sweetie quickly followed with triplet does Thursday afternoon - Delacour (top), Dobbina (bottom left), and Dittany (bottom right).


Friday it was Ocarina's turn, with a doe (droopy ears, named Mandolin) and a buck.


Saturday I got a break, but Sunday afternoon it was a set of twin bucks, Fred and George, out of Sunrise. Sadly, she rejected the black baby, Fred, so he's a bottle baby now.


Monday it was triplets from Giselle, two does (the tan babies, Astoria and Dalia) and a buck (the black one, Ralph).


And, after making us wait several days, Milkyway finally kidded last Friday afternoon with a set of twin bucks (still unnamed). 


9 days start to finish. 7 mamas and 15 babies. All healthy. It's been my shortest and easiest kidding season to date!