Monday, October 31, 2016

Sleek, Sophisticated, and Little Girly?

For the past two weeks I have been at training camp in Georgia, getting prepared to go on the World Race come January. Meanwhile at home, my youngest two siblings were participating in the annual homeschool co-op play, and I was missing it! I was not happy at all about this. I was rather sad in fact. I'm well aware that I'll miss lots of things while I'm gone next year (think of how much my sister will grow! She'll be a teenager when I return late 2017!), but I wasn't ready to start missing things, like this play, just yet!
Ok, I'm done with my pity party. I really am thrilled beyond words to get to go on the World Race, it's just hard to leave my family behind.


Now, back to the play. It happened last week, and while I don't get to see it (my best friends were left with instructions to go in my place) I did at least get to make my sister's costume.
The play was called Cactus Pass. My little sister got to play a rich little girl stranded in Cactus Pass with the rest of her rich family. As such she needed designer-esque clothes. I googled "children's designer clothes" and discovered that as long as her outfit was cute and colorful it could pass as "designer" on stage, so I planned to make her something bright, colorful, and ruffly. Then the directors said they wanted her to wear something sleek and streamlined. Oh. That sounded like a lot less fun to make.
Not sure where to begin on the designing process my mom and I sat down one evening and began to look up ideas for a sleek and sophisticated little girl's dress. After a couple hours we found what we wanted.


Elegant, but with a touch of little girl. Off to the fabric store we went first thing the next morning. We picked out a pink textured linen (my sister was pretty insistent that since her character was a 5 year old girl the dress needed to be pink), a taupe matte satin for the details, and a gorgeous metallic lace. In my stash I had an incredibly soft cotton satteen sheet that would work perfectly as the lining.


Design figured out? Check. Fabric picked out? Check. Now for the pattern.
I adapted Simplicity , a basic A-line dress pattern, to have a center panel and a square neckline. Those adjustments didn't take long so soon I was ready to sew!


This dress needed to look high class so I was very methodical with my construction steps. I sewed the lining and outer fabric as one in such a way that every seam was entirely encased. There are no raw edges or seam allowances visible anywhere inside this garment! I usually don't take much time making the insides of my projects "pretty" so it was rather fun to do this for a change. I carefully inserted an invisible zipper in the back and used my sewing machine to finish the dress with a blind hem. (Surprisingly I didn't have to do any hand sewing on this dress!)


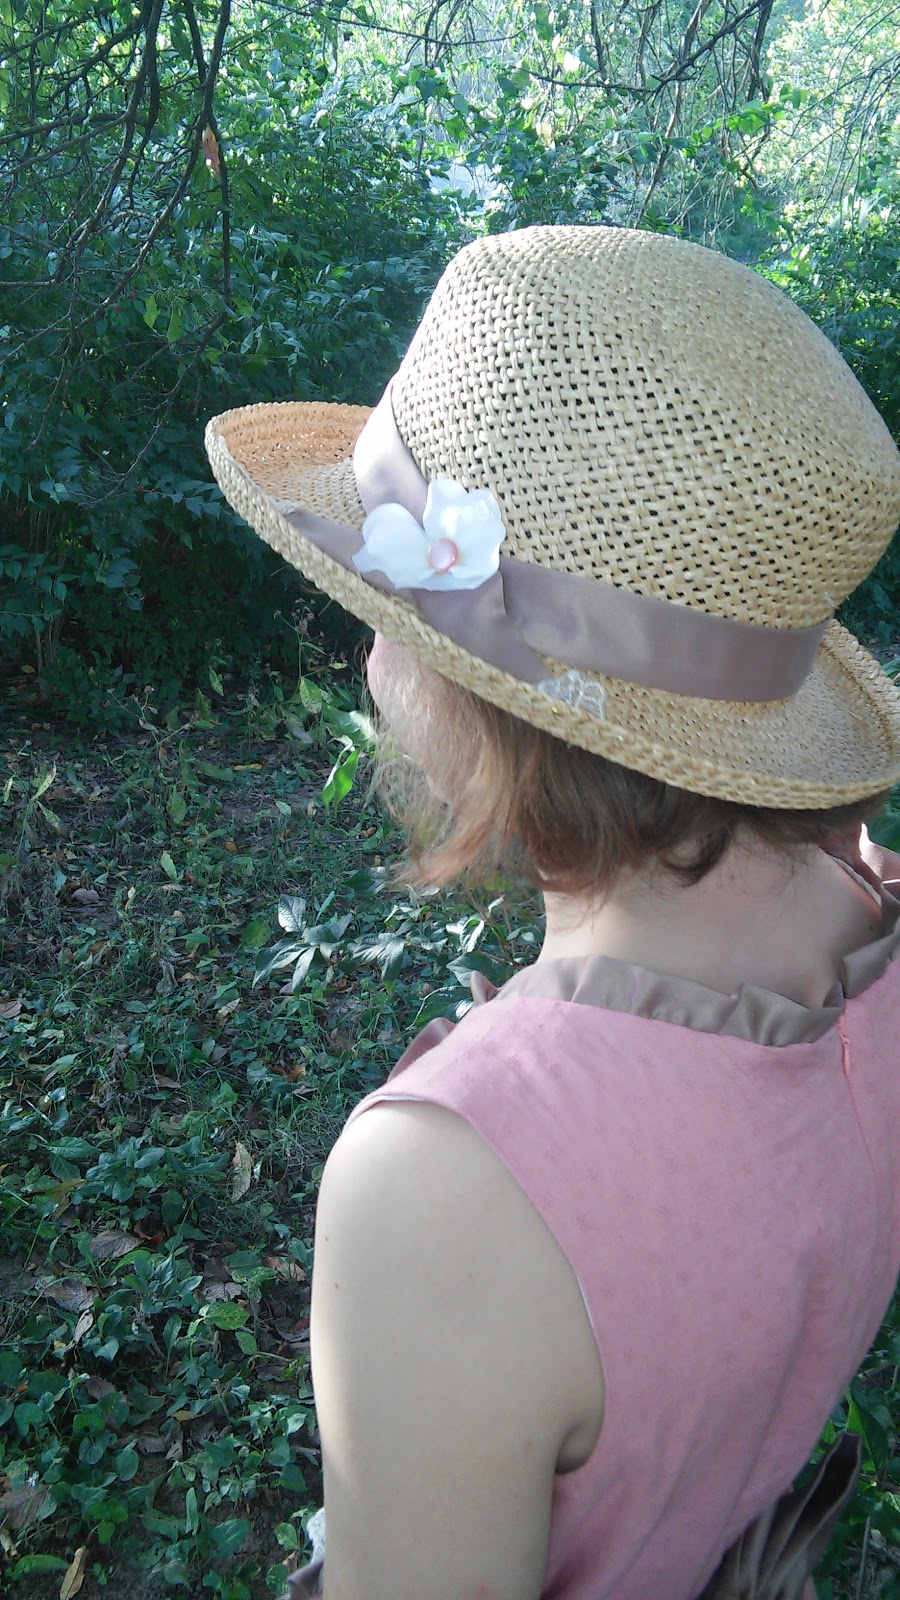
Finally I decorated a coordinating hat to complete the costume. (Now this I did hand sew.)


Costume done, I got to go see a dress rehearsal of the play the night before I left for training camp. Though the play was not completely polished yet (approximately 2 weeks before opening) I loved getting to see it! That night brought back a lot of memories from when I was in high school doing plays. I left feeling confident that come preformance night the kids would nail it and the play would be amazing. According to those who got to see the play, it absolutely was and the kids surpassed expectations! 


I'm pretty darned proud of these two! I'm sad to miss a year of their life next year, but I know God has called me to do the World Race next year and I'm excited to get to do it!


P.S. If you're interested in hearing about what I was up to while my siblings were stars check out my World Race blog!

Wednesday, October 12, 2016

Fixing the Pretty Shirt

I love wearing dresses, I really do. I make a lot of dresses, so the fact that I enjoy wearing them is a good thing. (Though if I didn't enjoy wearing them I guess I wouldn't make so many.) Thus, every Sunday I wear a dress to church. However, there are those Sundays when wearing a dress to church might not be the best plan. Like that week when immediately after church I was going to go volunteer at an event where I would be helping with horses. Yeah, that weekend a pretty shirt and nice jeans were the way to go.


I made this pretty shirt, using Butterick B5854, the year after I graduated high school, the year I got really into sewing. I picked out the soft, drapey, (did I mention soft?) peach fabric at Joann's and paired it with some ivory lace a lady at church had given me. Down the front I sewed on four pretty little shell buttons. I was rather proud of myself for making such a pretty shirt. I wore it a few times right after I made it, but not many. Why? The pleats on the front of the shirt just didn't lay right. They were too high up. So, for the past 4 years this shirt has mostly just hung in my closet. I'll look at it, think "that's such a pretty shirt" then move on to wear something else.


Finally, a few weeks ago, when I needed a pretty shirt to wear to church and then to volunteer, I pulled the shirt out and decided to fix it. It wasn't that hard really, I don't know why I put it off for 4 years.


I undid the center front seam that the pleats were sewn into. I re-sewed that seam. Then I put the shirt on and re-pleated the excess fabric into 3 new pleats a little lower down. I sewed them in place and sewed the pretty shell buttons back on. What I didn't do, and looking at these pictures I see I really should have done, was iron the whole shirt.


Oh well, I still wore it that Sunday and I got a few compliments on it, wrinkles and all!


Re-working this shirt I saw how much my sewing has improved over that last 4 years. That circle flounce on the bottom has stretched out so it's uneven. The seams are unfinished on the inside. That flounce hem? Yikes! Seeing how much better my sewing is now in comparison makes me feel really good about my current sewing. With that in mind, I really can't wait to see how much better my sewing will be in another 4 years! 


Honestly, I'm still not completely satisfied with the pleats on the front of this shirt. They still don't lay quite right. But you know what? This is a pretty shirt so I'm going to wear it, flaws and all, and I'm going to enjoy it! Maybe I'll make another shirt from this pattern sometime, just to see if I can make a equally pretty but better fitting version. But meanwhile, I need to sew myself some T-shirts for the World Race!

Wednesday, October 5, 2016

The Susse Skirt

There are so many things I want to get sewn before I leave in January. Clothes for me to wear on the World Race. A new fall dress or two for right now. Some things for my mom. Things to sell in order to raise money so that I can actually leave in January. Then, of course, clothes for my sister, because she's growing like crazy and is really fun to sew for.


On one hand, since she's growing fast, and outgrowing her clothes, I have a good excuse to sew for her. On the other hand, she needs to stop growing, she's getting too big! Ok, no she's not. She's doing exactly what a 12 year old girl is supposed to do, but since she's my little sister, she's supposed to stay little forever. Ok, no she's not. It's actually fun to see her growing up (most of the time). There is one problem though, it's getting incredibly hard to find cute patterns in her size. Every time I sew her something now I have to first either size up a too small kids pattern, or size down a too big women's pattern, or totally re-design a basic existing pattern in her size. Most of the time I don't mind doing this. I love learning more about pattern drafting. Occasionally, however, I think of how nice and easy it would be to just pick a pattern and sew it, without having to re-make the pattern first.


On instagram Steph from "The Eli Monster" kids patterns put out a call for testers of her new girl's skirt pattern, the "Susse Skirt". I fell in love with it. I really like most of the patterns she puts out. The best part? The Eli Monster patterns come in sizes 12months to 12 years. Yes! Size 12, not 8 or 10, but 12, my sister's size! This new pattern was a full gathered skirt with shoulder straps and a scalloped hem. I knew my sister would love it! So, of course, I applied to be a pattern tester, and was excited to hear I'd been picked!


Step one, picking out the pattern, done, next came finding fabric. I showed my sister a picture of the skirt and she had definite opinions on what fabric she wanted. Finally she decided on a pink and red cotton floral print for the skirt and a pale pink cotton for a matching blouse. 


That done, I received the pattern to test and received a very nice surprise, this pattern has pockets! (As you know, pockets are mandatory in almost any dress or skirt I sew.) This PDF pattern consists of three things, the instructions with clear pictures illustrating each step, the pattern pieces, and the cutting chart. There are pattern pieces for the scalloped hem facing, the waistband, the shoulder straps, and the pockets. The skirt itself consists of three rectangles, cut out according to the cutting chart. This makes it really easy to cut out with a rotary cutter.


So, I got the skirt cut out one Saturday evening before I went to hangout with my friends. Then the following Sunday afternoon I got the skirt sewn together. This skirt is easy to sew with each step nicely explained in the instructions. Before long the skirt was done and it was time to make the matching blouse.


I adapted the bodice pattern of Simplicity 1174 (used here to make the Gryffindor Dress) to make the blouse. I made the plain short sleeves slightly puffed, added a keyhole neckline and a ruffled collar, eliminated the neckline facings, and finished the blouse off with some bias tape made from scraps of the skirt fabric. The resulting blouse turned out just as I'd hoped and paired perfectly with the skirt!


My sister was delighted with the whole outfit! I sewed the skirt a straight up size 12 and the fit is perfect!


The full skirt spins wonderfully!


The straps are removable. The pattern suggests attaching them inside the waistband with buttons. (I used snaps, but I think buttons might have worked better.) This means the skirt can be worn with or without straps, or you can crisscross the straps in the back so they don't fall off the shoulders.


This was a fun pattern to make, and the finished product surpassed my expectations. A huge thank you to Steph for letting me test it! The pattern is now finished and for sale here, if you're interested in it. I already have plans to make a couple more of these for both my sister and other little girls I know.


Meanwhile, my sister is wearing her new skirt as often as she can.


Saturday, October 1, 2016

The Upside Down Buttercup Jeanius Refashion

The Refashioners 2016 was drawing to a close and I still had two pairs of jeans in my stash I wanted to do something with.


Something. I really needed to figure out something to turn these jeans into. I'd picked them up for free at the beginning of August specifically for the Refashioners challenge, despite the fact I already had plenty of old jeans. So, for that reason they really needed to be turned into something else before the challenge ended yesterday evening (Midnight U.K. time, 6 p.m. my time)


Finally, early this week I came up with a plan for those jeans, and yesterday I put it into action. I cut a 20 inch section off the bottom of each leg.


I cut the seams off the edges. This gave me 8 rectangles, 4 light, 4 dark. I rounded one end of each rectangle into a scallop. Then I sewed the 8 rectangles together and added a waistband, a hem facing, and two snaps,


Oh, and two pockets. That's right. I made my sister a skirt. 5p.m. yesterday evening, no time to spare, my last jeanius refashion was done!


I called my sister to my sewing room, she tried on her new skirt and declared it looked like an upside down buttercup and she loved it! 


I'll put this last jeanius refashion down as a success! My sister loves it, I love it, and I used up those two old pairs of men's jeans! Time to move on to another sewing challenge, my wardrobe for the World Race!