Showing posts with label Sewing for Girls. Show all posts

Wednesday, September 17, 2025

Tractor Outfits for Everyone

 I did not finish everyone’s Easter outfits this year. The 4th of July outfits were finished 3 weeks late. I’ve already decided not to attempt to make everyone’s Halloween costumes and just buy those instead, however. . . 


The annual Steam Engine Show featuring old tractors and farm equipment? Yeah, I decided the week of that I was going to make alllllllll the kids (the 4 in my house plus my two nieces) matching outfits for that occasion.


As I obviously wasn’t going to have the time to make 6 complete outfits from scratch, I decided to start with a short cut - plain black T-shirts and tractor fabric pre-cuts from from Walmart. (Yes, I’m really feeling the loss of Joann’s. Half yard pre-cuts from a very limited selection does not satisfy the way picking just the right fabric and getting yardage cut does)


I picked up a plain black t-shirt in the correct size for each big kid, a plain black onesie for my baby niece, and 4 half-yard cuts of red tractor fabric. (We tend to be John Deere family, but I decided to go more generic this year to match the theme of the show.) I would cut out tractor motifs to applique onto the front of the boys' T-shirts, and I would do the same for the girls' shirts and onesie, along with adding skirts to turn the shirts into drop-waisted dresses.


The first thing I did upon unfolding and washing all the fabric was identify the best tractor motifs near the edges of the fabric cuts. From there, I figured out how much fabric I would have for the girls' skirts. If I cut everything just right I would have about a panel and a half of width to work with for each big girl's skirt, and the skirts should come out right around knee length. There should be just enough left over for a little skirt for the baby too. I cut the girls' skirts first then cut out each individual tractor from the remaining fabric. 


Next I picked a tractor to go on each T-shirt. I decided I liked the big rectangle patches best on the boys' shirts and the appliques cut closer around the tractors on the girls' shirts. The smallest applique still looked pretty darned big on the baby's onesie. 


Once each applique was picked and placed I began the long and tedious task of zig-zagging around each one to attach them to the shirts. The cat offered his assistance.


By contrast, making and gathering each skirt onto the girls' shirts was a breeze! But then there was the ribbon. Ohhhh the ribbon. The entire project almost failed with the ribbon, or rather the pursuit of acquiring the ribbon.


Upon gathering all the skirts, I decided to top stitch them with a zig-zag stitch onto the bottom edge of the shirts, just above the hem. I figured I'd cover the raw edge with ribbon and add off-center bows to finish everything off. Alas, my ribbon stash failed me. I did not have the correct color and width ribbon to do even one dress, let alone 4. So I did what one does and went to Hobby Lobby - their ribbon was on sale that week! I dragged my sister along for the outing, she and my mom were in town that day so my mom could attend the grandparents' day event at one of my kids' schools.


All started off well, I found some lovely gold ribbon that would work just right and my sister and I took our time browsing the store. The nearest Hobby Lobby to me is a good half hour away, so I rarely make it there these days and I try to make the most of it when I do. Upon making our selections we went to check out. As the person right in front of us in line was getting rung up the computer system for the entire store shut down. They couldn't do any transactions what so ever. We waited around for 20 minutes or so in hopes the system would be quickly restored. It wasn't. The poor employees were so stressed. We were told it would probably be a couple hours so they had us leave our phone numbers with our cart full of merchandise and said they'd call us when the system was up and running again. Thus, I left Hobby Lobby without the ribbon. And this was the day before the Steam Engine show. I had to get the dresses done that afternoon during nap time or they just wouldn't happen.  
My mom came to meet us when she finished at the school and we stayed in the area visiting a couple other stores to kill time. (I did manage to find 3/4 of the kids' Halloween costumes at one store, so the time wasn't an entire loss!) Not knowing how long it would take Hobby Lobby to call me back since they had a lot of customers to call once the system was back up and running, I tried calling the store after every stop we made. The phone just rang and rang. It was connected to the computer system, and obviously the system was still down. Finally, after we went to lunch my call went through - they were back up and running and we could return to get our stuff!
There was only one problem, it was time for me to go pick my kids up from school - I had no time to go to Hobby Lobby anymore, and once everyone got home from school it was unlikely I'd have a chance to sneak down to the basement and finish the dresses.
My mom came to the rescue! She offered to swap vehicles with me and go pick up the kids from school while my sister and I returned to Hobby Lobby. So that's what we did - now hopefully I'd find a bit of sewing time that evening.  
Thanks to my Husband getting home from work earlier than expected and taking care of the kids and dinner I did!!


The next morning the kids were thrilled to have new tractor clothes to wear to see all the tractors!


And oh did they have fun seeing the tractors! We arrived just in time for the tractor parade and the kids loved sitting on the hill, eating their picnic lunch, and watching all the tractors drive by!


 Once that was over it was time to explore!


The great big old steam engine tractors are great fun to see. . . and climb on!


Going even more old-fashioned than the steam engines, there were the draft horses - which my kids loved getting to see and pet!


We toured the old 1870's farm house, which is always one of my favorite things. Most of the kids found it a bit boring, and the one who found it interesting didn't understand why he wasn't allowed to play with the old toys on display. . .


Good thing there were more tractors to admire after that!


Through out the day we got so many compliments the kids outfits! And on a more practical level, having all the kids dressed alike made it super easy to do quick head counts to make sure we had everyone as we moved from one exhibit to the next. 


My parents took us kids to the Steam Engine show almost every year growing up,


And it was super special getting to share that with the next generation!


Sunday, August 11, 2024

The Goat Dresses

 Who wouldn't want a goat dress?


No, No, No. I don't mean a dress for the goat to wear! I mean a human dress, with a goat print on it!


Despite my years and years of raising goats, and my (slightly fewer) years of making myself what ever dress struck my fancy, I actually never considered making myself a goat dress, until The Dreamstress shared this Gilbert Adrian dress on Facebook last year.


It has Sheep on it! (Ok, lambs to be precise.) If a fashion designer in the 1940 could make a sheep dress, why the heck hadn't I made a goat dress yet???


All I had to do was find some goat fabric - and for some reason goats are just about the most under represented farm animals when it comes to animal prints. There are goat prints out there, but they're generally something I have to actually order, verses something I can just go into a local fabric store and buy (after a good half hour of feeling it, considering it, staring longingly at it, and carrying it around the store while admiring other fabrics. I have my method.)


Well, back in January I found a goat print at my favorite place for novelty print cottons - the Mennonite fabric store out in the middle of nowhere. It was blue, with cartoon goats all over it - quite different from the realistic looking lambs frolicking on a green background of my inspiration dress - but it was a goat fabric! So I bought 3 yards of it. 


I decided I could use the cartoon goat fabric to make goat dresses for my two favorite preschool-age girls. I'd already made both of these girls chicken dresses, and they both love my goats, so obviously they needed goat dresses!


For two months I intended to just make the little girls dresses out of this goat fabric, and I'd keep my eyes open for just the right goat print for a dress for me. Then it came time to cut the dresses out, and I couldn't do it - I wanted a goat dress right now too! So I shifted plans. All three of us would get matching goat dresses.


To make my three yards of goat fabric stretch I decided to take inspiration from the Gilbert Adrian dress and make the bottom section of the skirt green, just using my blue fabric for the bodice and upper section of the skirt. I found a 2 yard cut of a lovely green swirly fabric at the City Sewing Room for this purpose. And to make sure I'd have plenty of my goat fabric, I also bought 1 yard of a solid pale blue cotton for the collars, cuffs, and waist bands.


Next up, figuring out a pattern! In homage to the inspiration dress, I wanted something vintage(ish atleast), with cut on sleeves and some sort of a collar. To make things slightly complicated, said pattern also needed to come in both adult and children's sizes. Thankfully, I had something that would work in my stash!


 McCall's 7184 - it met all the requirements! This is one of my favorite blouse patterns (you can see my previous versions here and here), and thankfully it comes in both children's and adult sizes - and I own a copy of each! All I had to do was trace off the blouse pattern in the girls' size, shorten the sleeves, shorten the blouse length to the waistline, ignore the darts, add a waist band, sleeve bands, and a skirt, and I'd be set to go! That might sound like a lot, but it was really quite easy. I decided to make the dresses button all the way down the front, as that's been a favorite style of mine lately. 


Not wanting to distract from the design of the dress, and especially the goat print, I decided to use clear buttons on the dresses. I had a nice set of large transparent buttons off of a duvet cover (the duvet cover that became this skirt) for my dress, but finding crystal clear buttons for the girls' dresses proved slightly more challenging. I had one card of clear vintage patterns just the right size - but there were only enough for one dress. Neither Hobby Lobby nor Wal-Mart had any clear buttons, and I didn't have time to go check Joann's that week. So, in the end I I had to settle for a card of clear-ish buttons from my stash for the second little dress. Those worked fine, they just weren't my first choice.


Once the dresses were done, I needed an occasion to give the girls their dresses - and neither one had a birthday any time soon. So I decided to make an occasion, an occasion where we could all three wear our dresses together.


A tea party!! 


I fixed a tea tray with all the most kid-approved foods - chicken nuggets, cookies, and berries. After asking each girl individually ahead of time if they preferred hot of cold tea, the vote was unanimous and I made some iced tea to fill the little tea pot with.


 When the girls arrived for the tea party I gave them each a gift bag. They unwrapped their new dresses, and were both very excited to put on the goat dresses right away!


After they finished their tea, we went outside to find the goats.


Because, if you have a goat dress, obviously, you must wear it to play with goats!!


Monday, January 1, 2024

Jingle Bells, Jingle Dress, Jingle All the Way!

 "Mommy, can Aunt Lyssa make me a Christmas Dress that jingles?" my niece asked.

"I don't know if you can do this," my sister-in-law said over the phone, "but she has requested a Christmas Dress that jingles."

If I can't make my niece the exact dress she wants, then what even is the point of sewing for her? Of course I could make her a dress that jingled! I didn't know what it would look like (other than jingley), but I was sure I could make it happen!


I've stuck with fairly casual, kid friendly, easily washable, fabrics for my niece's Christmas dresses thus far, just barely dipping my toes into the fancy fabrics realm with last year's organza trimmed dress. This year however, I thought my niece would appreciate something fancier, almost princess-like. Satin and lace it would be!


I had a lovely cranberry colored embroidered net lace in my stash. (I believe I picked it up from the City Sewing Room at some point.) There was only a yard of it, so not a whole lot to work with, but enough to make it a focal point of the dress. (Along with the jingle bells of course!) One of the great things about kids clothes is they require way less fabric than adult clothes! Perfect for the smaller cuts of beautiful fabrics I've collected!


With the feature fabric and jingle bells decided on, I spent weeks pondering the design. How did one make an elegant, jingley, dress? I took to Pinterest to find some inspiration in vintage and historical kids clothes. The above lace child's dress from the early 20th century gave me a starting point. I liked the basque waist, bows, short puffed sleeves, and of course the lace overlay. All it was missing? A good place to attach jingle bells! (Also, I didn't think I had enough cranberry lace to use it for the entire dress. gone are the days I could make my niece a full skirted dress from only 1 yard of fabric. We're firmly in yard and a half territory now.) I found solutions for these two issues in mid-19th century children's dresses.


Those shoulder strap thingys? Called bretelles? (These were a feature on my purple ball gown you may remember. . .) They looked like an excellent base to attach jingle bells to! And, the way they divided up the bodice would give me a good way to break up the lace and make it stretch.


Plan formed, I went to my pattern stash to find a starting point.


I picked McCall's 3023, a recent acquisition from a thrift store. It featured a basque waist like I wanted, a square neckline (my favorite!), and the bodice was already divided up the way I wanted it to be. I would just need to lengthen the skirt and replace the shoulder ruffles with flat bretelles. 


Pattern picked, I went fabric shopping. After considering all the different options at Hobby Lobby, my mom helped me choose a bright gold satin for the bretelles and sleeve bands and a champaign colored satin to go under the cranberry lace. This would be a Christmas Dress fit for a princess!


Along with the fancy fabric, this dress would require some fancy sewing as well. I did more hand sewing on this dress than her previous three Christmas dresses put together! It started with basting together the lace and satin for the center sections of the bodice. . .


And ended with sewing on buttons, shoulder bows, and, of course, Jingle Bells!

I finished the dress in time to give it to my niece at Thanksgiving, so she would have it to wear the whole Christmas season. And she loved it!


I think the face says it all! 


She wore the dress for Christmas and spent the whole day showing off her bells to the whole family, shaking them, and singing "Jingle, Jingle, Jingle!"


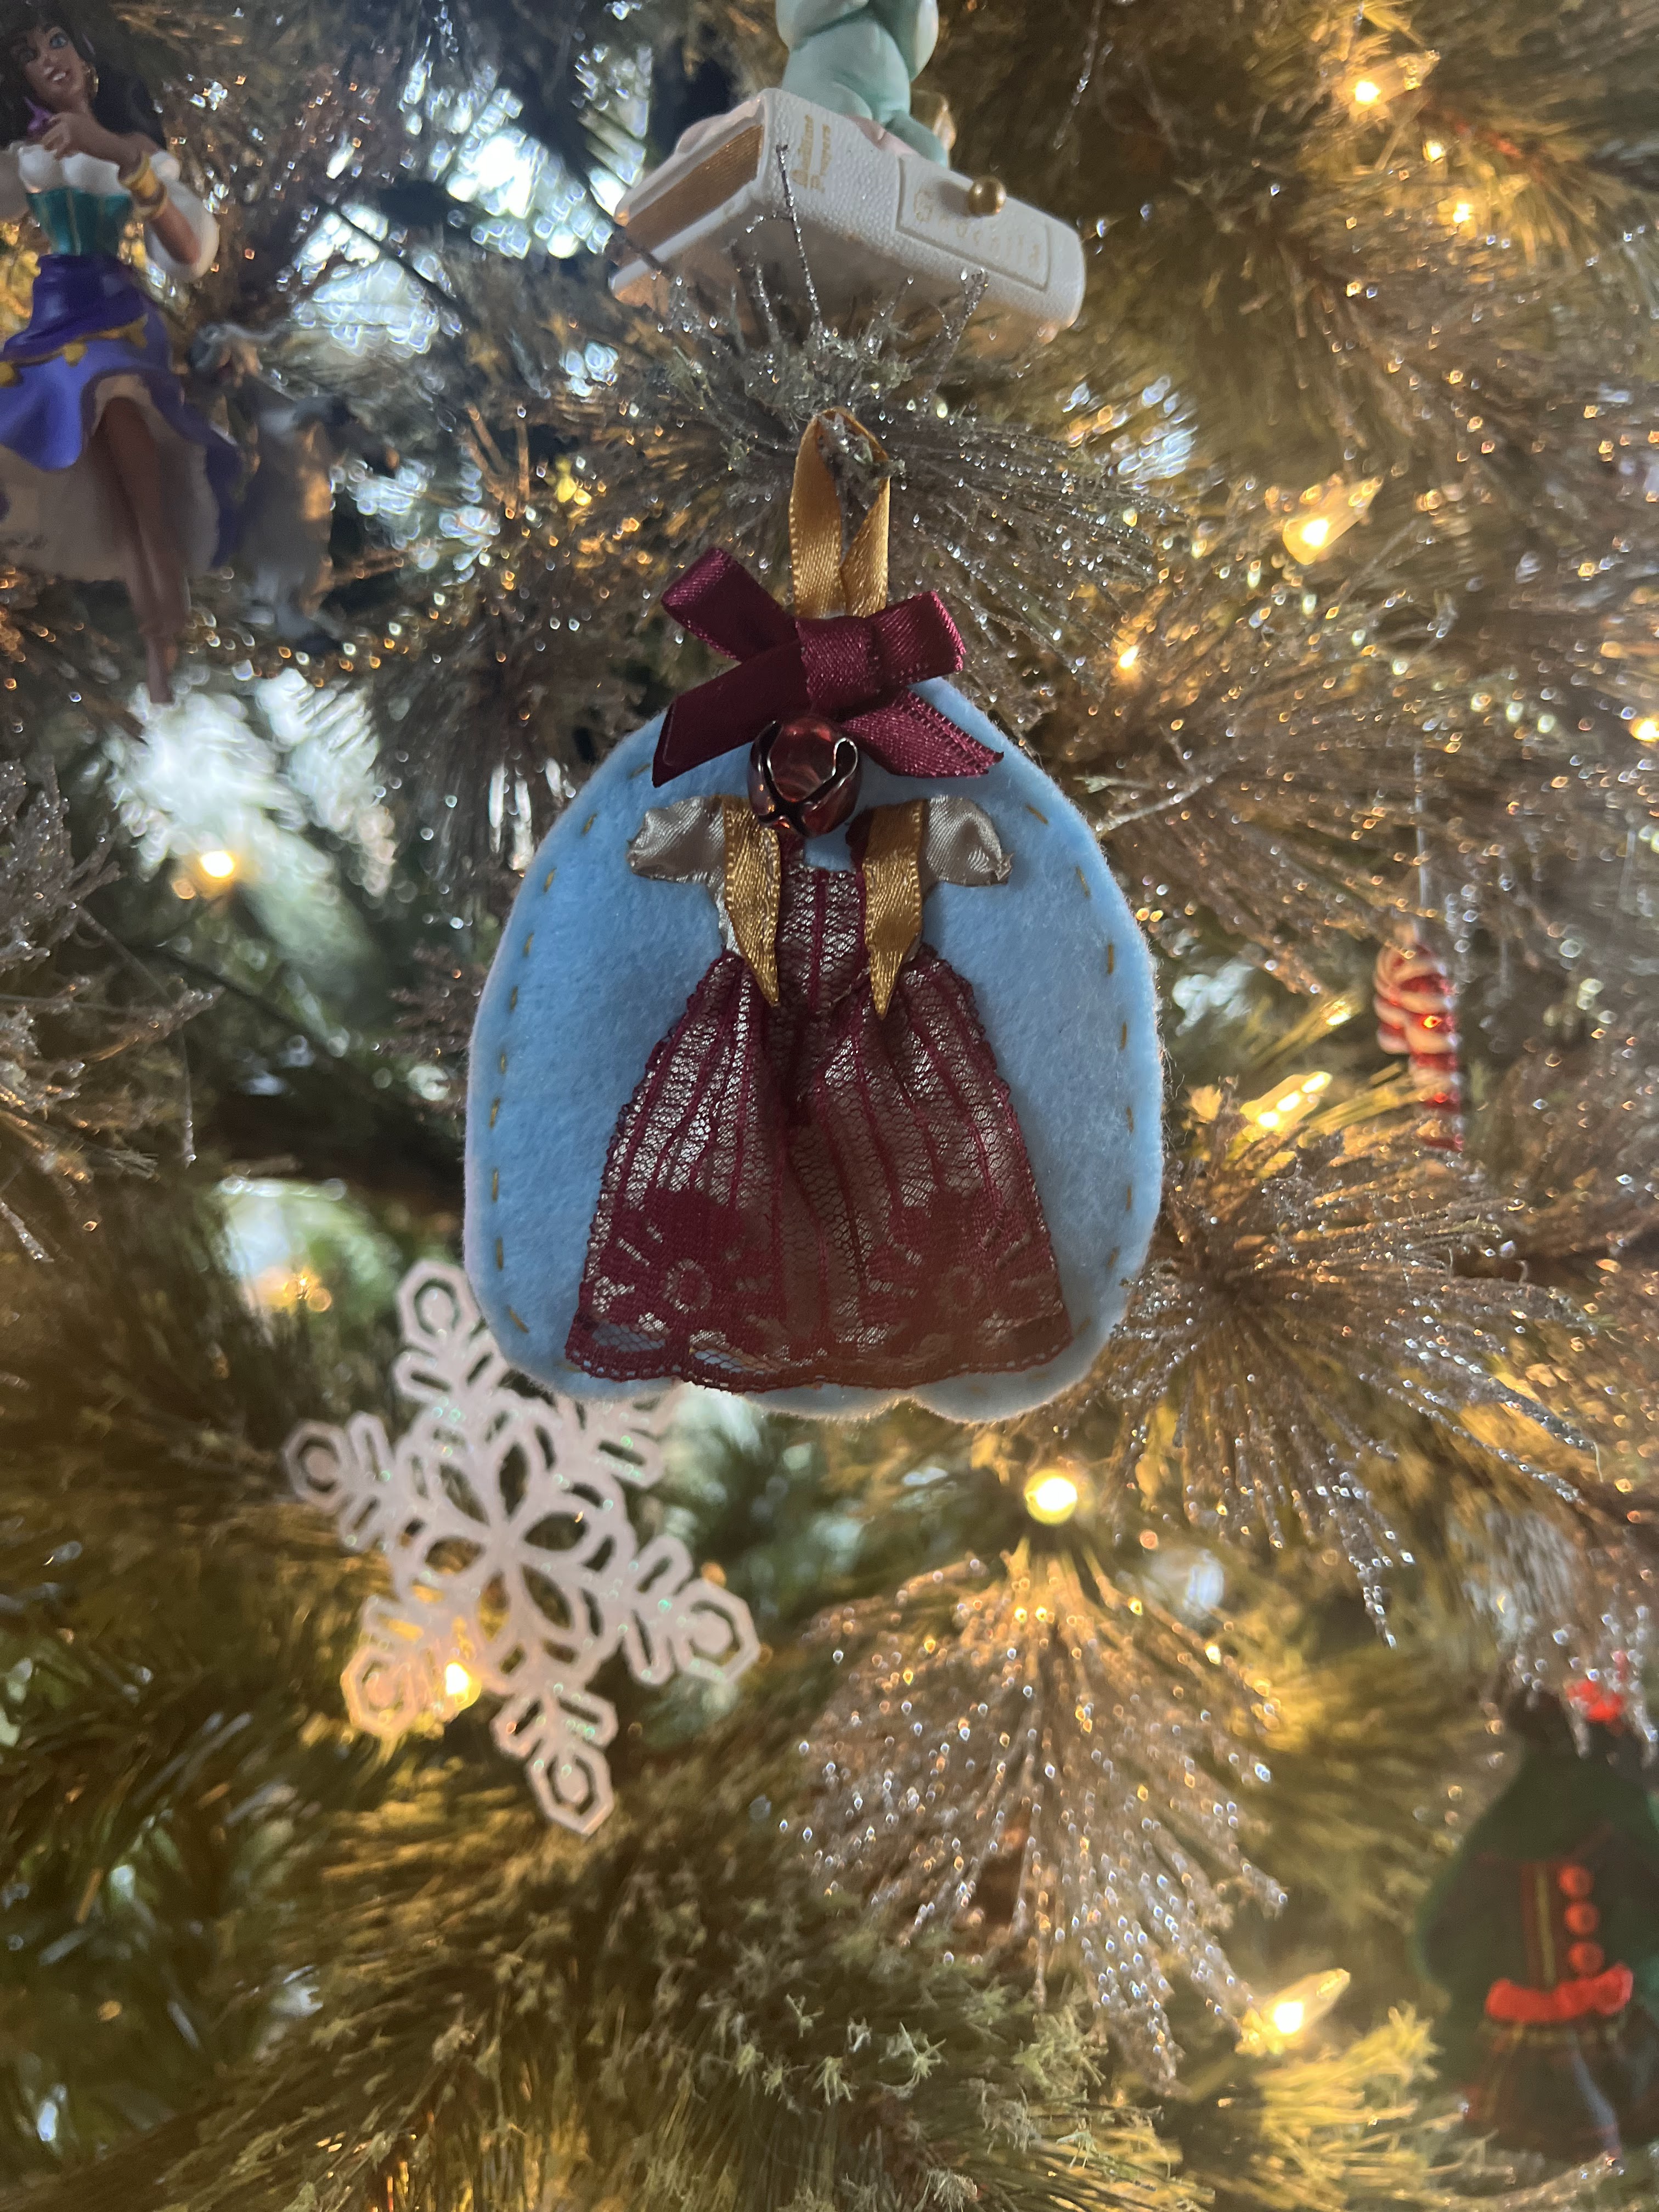
As with previous years, I continued the tradition and made an ornament to match the dress. Thankfully I found a cranberry lace trim at a thrift store that worked for the skirt of the ornament! With the lace border at the hem of the dress being so distinctive, I wasn't sure how I was going to replicate it in ornament size! 


My sister-in-law tells me my niece loved hanging all her dresses on the Christmas tree this year, so the ornaments are definitely a tradition I need to continue!


I also wanted to continue the tradition I started last year of making my niece's baby doll a mating Christmas Dress (I loved dressing up like my dolls as a kid!), however, I ran out of time to get the doll's dress done before Christmas. I had it cut out, I just couldn't fit in getting it sewn. (much like my own Christmas dress. . .) So, as of this morning, a week after Christmas, I finished the doll dress. (My first finished sewing project of the new year!) I'll give it to my niece as a belated Christmas gift next time I see her. Sadly it's too late for her and Dolly to match at the Christmas gatherings, but atleast she'll have it for the memories right?


Doll dress aside, I think it's safe to say I made my niece's Jingle Dress dreams come true this Christmas - and I'm not sure I'll be able to top this next Christmas!

Happy New Year!