Wednesday, October 9, 2019

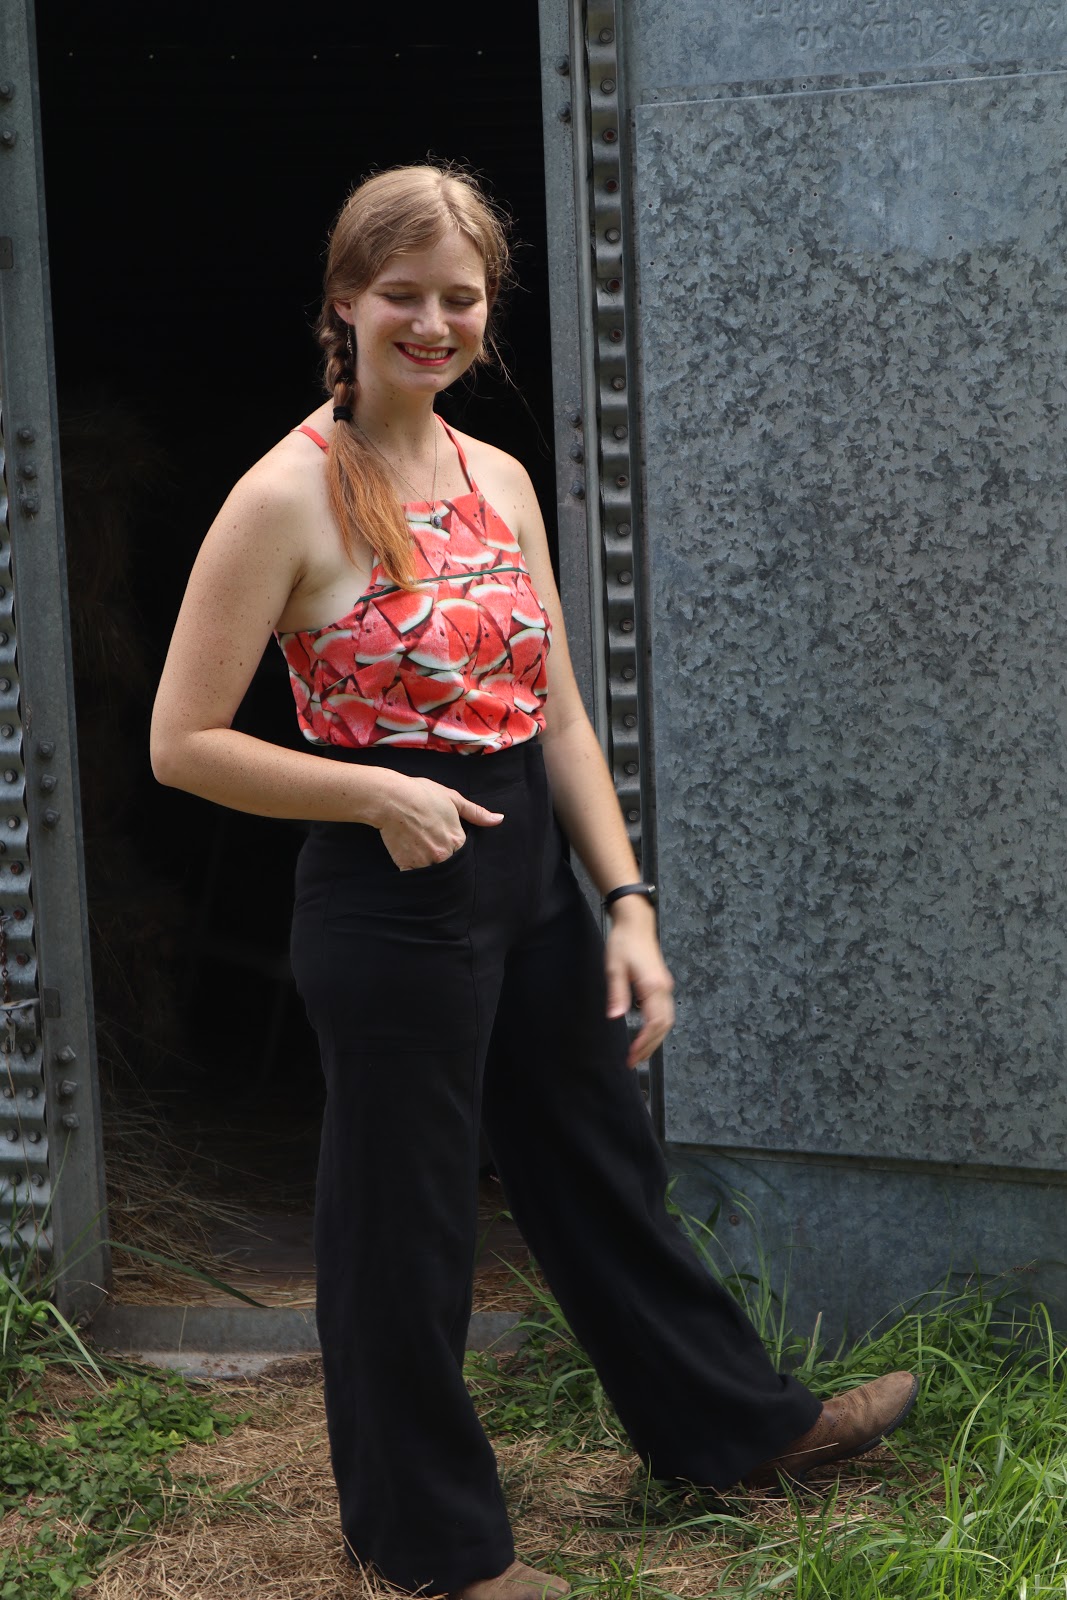
The Black Linen Parasol Trousers

I made myself a pair of black linen pants, and I really, really, like them!


That's more or less the summary of this blog post, but I guess some details about the pants and why I really, really, like them would be good too, huh?


And so, back to the beginning. . .


It was the pockets which originally caught my eye.

Over a year ago, I saw a testing call from Ensemble Patterns come across Instagram. They were looking for testers for the Parasol Jumpsuit and Trousers. As I don't wear or make jumpsuits, and currently have no desire to do so (though they are cute, I'm just really more of a dress girl) I scrolled right on past that testing call.


After the pattern was released however,  I saw multiple different versions of it on Instagram, and I really liked the trouser version of the pattern. I'd been so distracted by the bodice, I hadn't paid much attention to the bottom half of the jumpsuit in the original testing call. However, apparently the bottom half of the pattern could be made up on it's own as a pair of trousers. The pockets on those trousers were just fabulous!


A patch-pocket type thing, with an angled opening and one edge sewn into the front leg seam. More natural looking than most patch pocket designs, but more interesting than plain ol' inseam or slanted pockets. I really liked the look of these pockets! The overall look of the trousers was nice as well, and definitely something I would wear.


And so, mostly because of those pockets, when Ensemble Patterns decided to upgrade the Parasol pattern this summer, I eagerly jumped on board to test the trouser upgrade! I needed a pair of pants with those pockets in my wardrobe!


I decided to make my parasol trousers from a heavy black linen I had in my stash. Last winter a friend from church gave me a half-circle cloak type thing which was black linen, lined in green linen. It had been part of his garb when he did SCA events. As he no longer did SCA events, he wanted all the beautiful linen in the garment to go to good use, so he gave it to me to use as fabric. As I began to seam rip apart the two layers I felt a little guilty about disassembling the costume piece. But as I'd been given the item so the fabric could actually be put to use and appreciated once it was no longer needed for the original purpose, I forged on. 


I decided to use the black linen for my parasol pants and save the green linen for some future fabulous project. It really is beautiful fabric and was a delight to work with!


After cutting out, I made the pants in one morning and afternoon, and wore them to an event that same evening.


After wearing my new trousers for a few hours, I found them to be a bit loose in the waist. So I took them in a bit at the center back seam until they fit just right!

(Pictures were taken before the waist was taken in)
The slightly unusual seam placement on this pattern (front and back leg seam, no side seams) gives a striking silhouette and makes it very easy to perfect the fit on the finish garment!

(The "bubble" of fabric right below the waist seen here disappeared when I took in the waist at the center back seam)
After taking in the waist a bit, I decided to use these as my travel pants for my trip to Uganda last month.


They remained super comfortable for the entire 24+ hours of travel each way. I think, along with being worn regularly in daily life, these will be my travel pants from here on out. The pockets are even the perfect size to fit a passport and a boarding pass when those things need to be kept handy in airports.


 And so, that is the story of the black linen pants I made myself and really, really, like!

*If you're interested in the Parasol Pattern, it can be found here.
*I received this pattern free of charge in exchange for testing, but all thoughts and opinions presented here are my own. I was not required to write this blog post or share about this pattern at all. 

Thursday, October 3, 2019

Mary Queen of Smocks (How I Began My 16th Century Ensemble)

For my Renaissance Festival outfit this year I had grand plans of just picking a costume pattern I liked and making myself a pretty vaguely historical-ish dress, mixed with a dash of fantasy-ish, and princess-yness. Historical Accuracy and the Renaissance Festival honestly don't even know each other. The Ren Fest is a fantasy-ish type of event, mixed with a dash of vaguely historical-ishness. There would be no need for me to fall into the pit of somewhat obsessively researching the clothing of the era before sewing a single seam for my costume for this event. No need at all.


And yet. . . even with this decision made before I began anything. . . once Erentry and I started talking about what we would actually wear to the Ren Fest, the historical costumer in me took over. All intentions of "quick, easy, fun, fantasy-ish, not historically accurate at all" flew out the window. I pulled out books. I started googling. I ordered more books. I ordered 6 yards of linen. I looking at paintings from the 16th century online. I read 16th century re-enactors blogs. I starting reading my new books as soon as they arrived in the mail. I made lists of all the different elements my costume needed. And I had to talk myself out of hand sewing everything. 


Now the Renaissance era is a good 300 years earlier than my standard costuming era (Victorian), and 200 years earlier than the earliest I'd gone with my historical costuming thus far (Georgian). Thus, this was new, uncharted territory for me, and my costuming library, which I've been building up over the last few years, was sadly lacking in books to help me on my way. I owned one book featuring clothing from earlier than 1600 - Patterns of Fashion 4, by Janet Arnold. So, as mentioned above, I ordered a couple more books, then dove into the pages of Patterns of Fashion 4 (PoF4, from here on out) while waiting for the rest of the books to arrive in the mail.


Now PoF4 is all about the linen clothing items of 1540 through 1660 - shirts and smocks (The under garments, worn beneath all other clothing) and ruffs, and coifs, with a few other accessories thrown in. I began reading it July and learned a whole lot about linen garments and their construction in the second half of the 16th century. Soon I knew the first thing I needed to make for my Renaissance ensemble was a linen smock (what is known as a shift or chemise in later eras) to wear underneath everything else.


Looking through PoF4, I fell completely in love with the "Mary Queen of Scots" smock (Photographs found on page 57, pattern found on page 115). With cutwork lace and very full sleeves, this smock was definitely more high-class than what I intended my other garments for this ensemble to be, but it made me happy. As mentioned earlier, historical accuracy is not a top priority for the Ren Fest (so wearing a fancy late 16th century smock with a basic wool gown from the early 16th century would be permissible in this instance). Thus, the "Mary Queen of Scots" smock I would make! Those incredibly full sleeves were too delightful to resist.


I cut my linen (pale pink due to a laundry incident) into squares, rectangles, and triangles according to the pattern diagram in the book. I cut out the neckline with my rotary cutter, which proved to be a mistake, as I accidentally cut a bit too far on one side while cutting the back neckline. So, I had to patch that before I could even begin constructing the smock in earnest. At least it was the back neckline, not the front neckline.


Crisis solved, next I picked out what lace I would apply to my smock. Lace which would be historically accurate to this era does not exist anymore (unless you make it yourself I suppose, but that is not in my realm of expertise). Honestly, the most historically accurate option probably would have been to skip the lace entirely, but the lace trimmed neckline and sleeve ruffles were one of the things I loved about the original smock, so my smock would have lace. I went through my lace stash and picked a daisy lace to use.


The square shape of the motifs reminded me of the lace on the original, so I decided it would evoke the right feel, even though it wasn't historically accurate.


I narrowly hemmed the edges I wanted to attach the lace to, then sewed the lace on with a zig-zag stitch.


Around the neckline and onto the sleeve ruffles the lace went!


The remainder of the smock was constructed with flat-felled seams - all on the sewing machine.


The sleeves and sleeve ruffles were tightly gathered into a narrow band at the wrist. This band pins closed, which would be this historically accurate fastening choice.


The finished smock feels quite luxurious to wear! Almost queenly, one might say.


Full and flow-y with puffy sleeves!


When my sister saw me wearing it she said it reminded her of a ghost.


Thus, when we went out to take pictures one morning last week we had to play with the light for a more ghost-ish effect!


Ghost-ish or not, I'm very pleased I fell down the historical costuming rabbit hole for my Ren Fest outfit and made this smock!


The puffy sleeves and lace make it a fabulously splendid garment to own, and I plan on using it in daily life as a nightgown, as it's too fantastic not to wear regularly! 


Historical Sew Monthly Challenge 9: Everyday

What the item is: Renaissance Smock

How it fits the challenge: Smocks were the base layer which got worn every day underneath all the other garments.

Material: Linen

Pattern: The "Mary Queen of Scots" smock from Patterns of Fashion 4, by Janet Arnold.

Year: 1560's - 1580's

Notions: Thread and lace

How historically accurate is it? The pattern is accurate, as is the fiber content of the material. It's all machine sewn however, so that's not accurate. Also the lace around the neckline and cuffs is modern, nothing like the cut work lace on the original. So, all in all, maybe 6/10

Hours to complete: 5 or 6 I think, gathering the sleeves into cuffs and attaching the lace took a while.

First worn: 9/29/19 for the Renaissance Festival

Total cost: The linen was $8 a yard and this took 3 yards. I got the lace for free. Add a dollar for the thread used for a total of $25

Wednesday, October 2, 2019

The Renaissance Festival

It has been 4 years since I last attended the Renaissance Festival. And that is a shame as this annual event is a fabulous, awesomely fun, excuse to dress up.  Over the summer, Erentry and I decided we would absolutely be attending the Ren Fest this year - and we were going to make ourselves some fantastic new renaissance clothing for the occasion. Our outfits last time turned out fine for something we threw together last minute, but this year we were going in prepared, so we would do even better!


That said, even with planning everything months beforehand, we still each finished our outfits the night before we planned to go to the festival. We might be chronic procrastinators. . .


We did get our outfits done however, and that was the main thing! Erentry choose to go as a Viking. She drafted the side lacing apron pattern herself and I draped the pattern for the linen kirtle directly on her.


I attempted 16th century German for myself in an orange wool gown (made from an altered McCall's pattern, I'll blog it in more detail later), with accessories and undergarments made based on patterns in books. (Yes, I am wearing my Regency chemisette with this gown!)


Possibly due to the fact we were tired from sewing late the night before, we got a later start than we intended to Sunday morning, but after filling up with gas, we were off!


And before too long we had arrived!


A large metal dragon greeted us at the entrance, so a quick picture with it seemed a fitting way to start the day. 


We were hopeful the weather would be reasonably cool as it was the very end of September, and supposedly fall is supposed to arrive around then. Fall did not arrive in time. It was hot! Thankfully, I had two fans, which I picked up on my trip to Japan back in June, buried deep in my purse. We carried those fans with us all day, and greatly appreciated their existence! 


Thus, equipped with our personal cooling devices, we set forth to enjoy the fair! We wandered through vendor shops, admired the wares, and picked out a few items to take home. We found the historic craft demonstration and chatted with the ladies there about weaving and lucet cord making for over an hour. We left the weavers with a lucet cord fork apiece and a strong desire to take a weaving class together sometime.

Once I learn how to use this thing I'll be able to weave my own cording for future projects!
I would say talking with the weavers was my favorite part of the day, but honestly, I enjoyed the entire day immensely and don't believe I can pick a favorite activity! Upon leaving the weavers, we stopped at the blacksmiths' shop, watched a blacksmith work and got a bit of a lesson on blacksmithing as a trade throughout history. This was followed by a bit more wandering around before we found ourselves at the mead tasting event.


I'd never had mead before, but all 4 varieties we got to sample were very good! 


We were given chocolate to go with our mead, something we absolutely did not complain about!


After finishing our mead and chocolate, we sat down to watch a jousting match. The guy falling off his horse was very clearly staged, but can you actually say you've been to the Ren Fest if you didn't see any jousting? 


We wrapped up our day with a visit to the petting zoo - because, if there are goats, I must see them! Thankfully, Erentry was of the same opinion.


I found this little Angora goat to be the prettiest thing! Maybe I should add a fiber goat to my herd. . .


Look at those ringlets of mohair!


There was something delightful about hanging out in a goat pen in historical clothing!


We lavished attention on the goats and sheep until leaving to finish up the shopping we'd put off until the very end and stopping to talk with the weavers just a little bit more before heading out.


We stopped at a nearby park to get pictures of each other in the sunset, then it was on the road for home.


We left very pleased with the day as a whole, and more than a little pleased with ourselves for how well this year's outfits had turned out!