Tuesday, November 5, 2019

Francaise Dinner, Lard, Cornstarch, and Lace

A Francaise Dinner with the Saint Louis Georgian Sewing Society. It sounded like great fun, and a fabulous excuse to dive deeper into 18th century costuming and make a new gown for myself. Well, it was fun (though I completely forgot to take pictures sadly!). There were over 20 of us dressed up in 18th century fashion from the 1740's through about 1800. We enjoyed dinner at a restaurant in a building which had been around since the colonial era. The food was good and the company was wonderful.


When I signed up for this dinner months ago, I thought for sure I'd have time to sew a new gown for the occasion. However, that was not the case, large family events come up in the ensuing months, and my sewing time was otherwise spoken for. Thus, my 1760's, sacque-back, bird gown was to be worn again! And really, I can't complain about re-wearing this dress. I love how it turned out, so the more I get to wear it, the better!


I dressed up my gown with a new green silk petticoat, some fresh white lace, and a bejeweled costume brooch. Then, to finish off the look I attempted to coerce my hair into a 1760's hair style and topped it off with a fluffy, lacy, triangular, white cap.


Actually doing my hair for this event was one of the most intimidating parts of historical costuming I've encountered thus far - either it was going to go ok, or it was going to go horribly. And I was fairly sure "horribly" was the more likely outcome. 


I began, weeks in advance, by pulling out my copy of The American Duchess Guide to 18th Century Beauty, which I received for my birthday this summer. I read up a bit on styling hair, looked at some 1760's portraits online, and decided I would attempt to do the 1765-1772 style in the book - the "Coiffure Banane", as it matched the time period of my dress.


Along with the hairstyle, I also needed appropriate head wear for the occasion. So I picked the fluffy triangular cap, called the "Proto Pouf" in the American Duchess book, which went along with my proposed hairstyle.


I started, two days before the dinner, by sewing the triangular base for the cap using the dimensions given in the book (page 82). I used a very stiff, slightly sheer, mystery fabric I found in a box of fabric someone gave me. It resembles silk organza (it's definitely not a synthetic, I could tell that from a burn test), but I'm not entirely sure that's what it is. I had about 1/2 a yard of the fabric, which was just the right amount for this project.

I sewed the base triangle by machine, two layers of fabric, sewed right sides together, then turned right side out and pressed. I skipped the wire around the edge, which was recommended in the book, and it turned out just fine.


I then sewed some pre-gathered lace around the edges of the triangle, also by machine.


Finally, I cut the remaining mystery organza-ish fabric into strips, which I sewed into tubes to make puffed trim from. The tubes were turned right side out, and the following day, the day before the dinner, I proceeded to trim my little triangular cap. 


I gathered up the narrower strip of fabric into poofs about 1"-2" long. I then arranged this poofed trim around the edge of the triangle, covering up the line of machine stitching I used to attach the lace.


While I was at it I added a bit more lace to the back of the cap then tacked everything in place by hand.


I considered calling the cap done like this, but then I decided it needed a pit more poof. So I took the second, thicker, tube of organza stuff, and gathered it up by sewing a long running stitch along the center seam, being careful to only sew through one layer of fabric so the tube was still a tube.


I gathered the tube up tightly until it looked like this:


I stuck this poofiness in the empty space on the top of the cap, poking, and prodding, and squishing it until I was satisfied with the general random arrangement.


I tacked it in place with some large hand stitches and called it finished! My cap was ready to wear the following day!


The morning of the dinner, I read through the hairstyle instructions in the American Duchess book, pulled out my hair styling tools, and got started.


Lard, cornstarch, and hair donuts. That's how I was going to style my hair. The book heavily emphasizes the importance of pomade and hair powder in 18th century hair style, but I didn't have either of those things, or all the ingredients to make them. However, the pomade recipe in the book is primarily animal fat, and I did happen to have lard on hand, left over from making goat milk soap. So I decided lard was better than nothing and proceeded to grease up my hair with it. Once it was nice and greasy, I used a make-up brush to powder it with corn starch. (Yes, 18th century hair powder was primarily starch, so I used corn starch as that's what I had on hand.) It worked.


I cut up the hair donuts into sections, and rolled my hair up around the sections, approximately following the directions in the book.


I pinned the rolls in place, then pinned more hair over top of them. I braided the back section of my hair and pinned the braids up as well.


Then I pinned the triangular cap to the top of my head to hide the mess of pins, and my very first attempt at 18th century hair was done!

Photo by Jennifer Old-d'Entremont

My hair was far from perfect, but it was done! And I'm pretty darned pleased with myself for actually attempting it.


I had a lovely time at dinner, greatly enjoyed the company, and am eagerly looking forward to the events we will do together next year! And, now that I've done 18th century hair once, it's not quite so scary.


Oh, and just in case you were wondering, the lard and starch washed out of my hair just fine with my regular shampoo. Here I am the following morning, dressed and ready for church - no sign of lard left in my hair!


Thursday, October 31, 2019

A Golden Wrap Crossroads Sweater

Gold sweater knit. It was pretty, and only $1 a yard, so I bought 2 yards of it. I brought that fabric home with no idea what the heck I was going to turn it into - but it sure was pretty!


It only took me over a year, a request from my sister, and a blog tour, to get around to actually using the metallic gold sweater knit for something. The resulting garment? Well I think it was worth holding onto this fabric for over a year for.


And so, with that said, welcome to my slot on the Winter Wear Designs "Fall into Sewing" blog tour! Now let me tell you how we got here.


Back in the summer, my sister and I were going through my fabric stash, looking for a fabric to complete an outfit I was making for her. We happened across this rather thin, very stretchy, metallic gold sweater knit, and I asked my sister if she liked it. She answered the affirmative and I asked her what she'd like from it. After thinking a moment, she decided it would make a brilliant wrap sweater.


Fantastic! After a year of lurking in my fabric stash this fabric was finally earmarked for a project! I was excited to turn it into something my sister would enjoy wearing, and I knew just the pattern I would use for this wrap sweater of hers.


The Crossroads Sweater by Winter Wear Designs! It's a mock-wrap sweater pattern, which I sewed for myself last fall. I figured it could easily be used for a true wrap sweater with just a couple modifications. 


I cut out the front, back, and sleeve pieces as usual, no changes, except to add cuffs to the sleeves. (personally I prefer cuffed sweater sleeves to hemmed sweater sleeves.)


What I did not cut out was the collar. Instead I cut out two long lengths of fabric about 5" wide for ties, and  two 4" wide bands of fabric for finishing off the bottom and neckline edges.


I sewed up the shoulder seams and side seams, without stitching short sides of the front pieces into the opposite side seams, as you would if you were making a mock wrap sweater. Instead I left the short ends free. I set the sleeves like normal then proceeded to finish the neckline and bottom edges with the bands of fabric I'd cut.


The "short ends" of the front I gathered up and stuffed inside the open end of the long ties I'd made.


I folded in all the raw edges then zig-zag stitched the ties to the sweater.


Finally, I sewed a large button hole, interfaced on the back with a scrap of cotton muslin, into one of the side seams at waist level for threading the tie of the under lapped side through.


And with that the sweater was done - two months after my sister requested it. 


Life got busy and this sweater got pushed off, and pushed off, until this blog tour came around. I feel a little bad about how long it actually took me to get around to fulfilling this request, but at least she has it now - right in time for cold weather!


All in all though, this really wasn't a project worth putting off - it only took a total of two hours to make, including cutting, and the finished product turned out even better than I'd expected! With only a two hour time commitment, I could have easily fit making this sweater into my sewing schedule sooner than I did. I just didn't realize it would take that little time!


An easy one evening project with excellent results and the gold sweater knit out of my fabric stash and in my sister's closet? I have nothing to complain about here!


The finished sweater is just what my sister wanted, and I'm pretty darned pleased with it!


Don't miss any of the stops along the tour:

10/28

10/29

Laura Hinze of Custom Made By Laura

10/30

Laurie Roberts of The Bear and the Pea Atelier

10/31


Patricia of Sew Far North

11/1

Livia of Liviality

Laurie Roberts of The Bear and the Pea Atelier

Tuesday, October 29, 2019

A Regency "Tunic with Points" from Japanese Silk

When I bought a bundle, several yards in total, of narrow silk at a recycle shop in Japan back in June, my first thought was that I could use this silk for something Regency.


Now, this magenta and yellow slubby silk with a cross-hatch pattern really isn't historically accurate for the early 1800's in the western world. Among other things making the fabric rather historically inaccurate, Japan wasn't even opened for trade with the western world until 1853, 50 years after the era of the garment I wanted to make. So, yes, Japanese silk. The year 1801. Technically they don't work together. But did that stop me? No, and I don't regret it one bit!


I brought home the silk with a vague idea in the back of my mind about what I wanted to make from it. I began by looking at Regency era fashion plates and extant garments online to see if I could find something close to the idea I had - and I did!


(I can't seem to find a source for this beyond Pinterest, sorry!)

Saved to one of my Pinterest boards I found this 1804 fashion plate. The yellow sleeveless spencer jacket thing was exactly what I had in my mind!

Source
A bit more Pinterest browsing brought me to the above 1801 fashion plate featuring a magenta version of a similar garment. I studied both fashion plates, paying close attention to how the "skirts" of the garments appeared to be laying in the depictions, and came up with a plan for how I would cut my garment from the narrow silk in my possession.


For the bodice of the garment, I decided to adapt the drop-front gown bodice lining pattern from Patterns of Fashion 1, by Janet Arnold, which I'd used to make my Regency gown 3 years earlier. As I'd already altered these pattern pieces to fit me and used them successfully in a previous project, I decided to just skip the mock-up and go straight to cutting out the final garment. Amazingly, this worked out fine!


First I cut the bodice lining from the same pink striped linen/cotton blend shirt I'd used to line my turban cap with. (The fabric from that old shirt is now completely used up!) As I wanted the front of this sleeve-less spencer jacket type thing to fasten right under my bust, I lowered the front neckline considerably.


After I cut out the lining from the linen, I cut out the silk from the same pattern pieces.


The bodice front pattern pieces were a bit too big to fit on my narrow silk, so I had to piece together the front pieces. No big deal - piecing together narrow fabric to cut out large pattern pieces is period accurate!


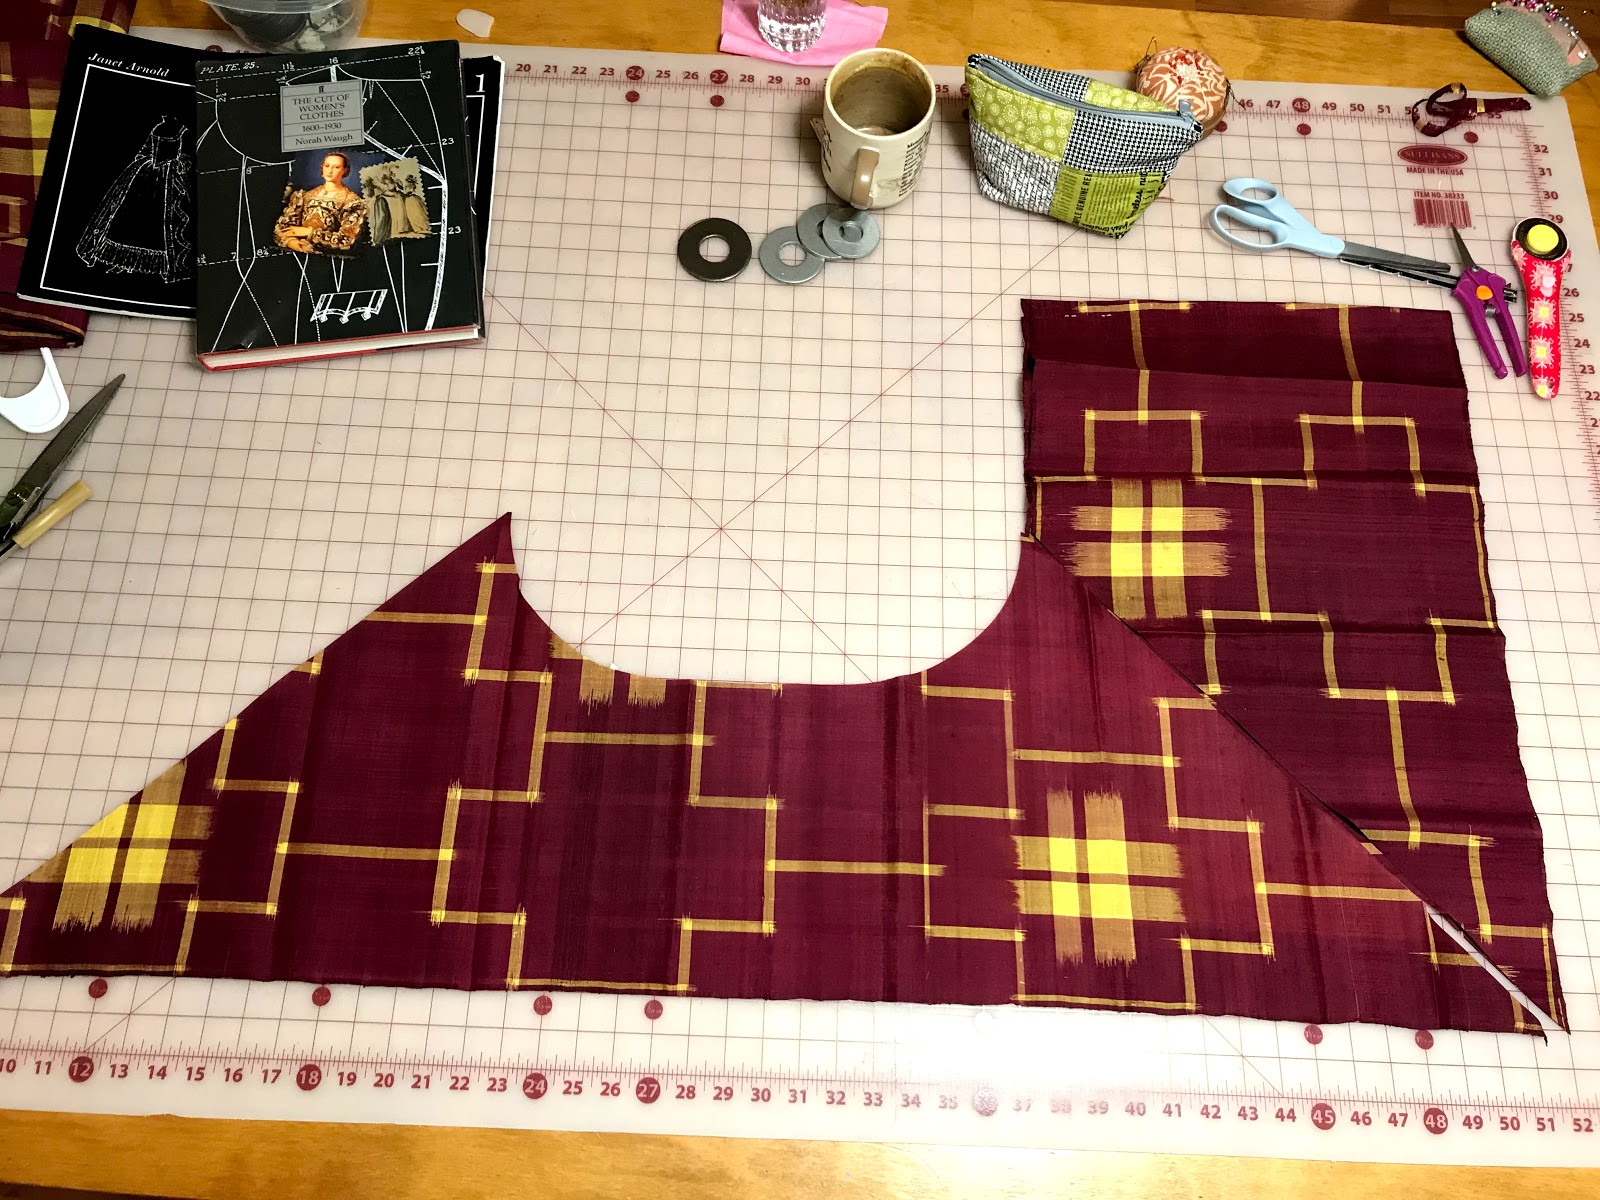
I didn't use any pattern for the skirt section of the garment. I formulated a rough idea in my mind of how the skirt panels must be shaped based on how the skirts lay in the fashion plates, measured a couple things, then cut right into my silk.


The back skirt is cut almost like a triangle with a half circle cut out at the waistline. The side seams are cut on the bias, at a 45 degree angle, to get those delightful "points" which I fell in love with in the fashion plates. The front skirt panels are cut as straight widths of fabric with no shaping except for the side seams, which are cut at a 45 degree angle for the points.


On the finished garment I'm very pleased with how the back skirt turned out, but I do wish I'd patterned the front skirt differently and given it more shape. Oh well, it turned out well enough and I can't be bothered to change it now.


I sewed together all the main pieces by machine, then took the garment with me to Uganda and finished up all the hand sewing on that trip.


Before I left I pressed under 1/4" around all the edges of both the lining and the silk. While I was gone I slip stitched the edges together.

Sewing away a layover on my way to Uganda.
Once the bodice layers were sewn together, I attached the skirt. I'd sewn the skirt side seams prior to leaving with narrow machine-sewn french seams. I initially attached the skirt  to the bodice with a whip stitch, then decided I didn't like how the skirt was laying that way. I went over the whip stitches with a running stitch, and am very pleased with the way the skirt lays after that!


The skirt didn't require hemming as I'd cut the bottom edge on the selvage to save myself the bother. I did, however, have to narrowly hem the edges of the front opening. That went pretty quick.


With the construction done, I moved on to the trimmings - tassels, made from silk thread, to attach to the points!


I made the tassels and attached the tassels, and then, 3 nights into my trip to Uganda, the thing was done and wearable.


If I'd realized how quick it would go together I would have hand sewn the entire thing on the trip rather than machine sewing the long seams before leaving!


The one thing I didn't get done on my trip to Uganda was add some sort of fastening to the front overlap. I just couldn't find any buttons or anything I liked for this project!


Thus, for the time being, I opted to skip the fastenings. I wore the newly finished garment safety pinned closed in the front to my sister's birthday party the day after I returned home from Uganda. It worked.


Safety pins and all, I love how this thing turned out! It was just the thing to dress up my plain white regency gown!


Fabric bought in Japan. Design based on French fashion plates. Sewn in Uganda. Worn in America. What is this thing actually?


Is it a sleeveless spencer jacket with a skirt? A waistcoat? A short open robe? Well, according to the French description on the 1801 fashion plate, helpfully translated for me by a friend in the Saint Louis Georgian Sewing Society, the technical name is "A Tunic with Points".


So there you go, this trans-continental garment is a Tunic with Points - and I love it!