Saturday, June 26, 2021

My Wedding Dress - Patterns and Bodice Mock-ups (Part Three)

 I had my design. I had the majority of my fabrics. The big decisions were made before I even got engaged. Except for one. I didn't know what pattern I would use to make my wedding dress. Big 4? Indie? Make my own? All were options, but where to start? Let's look at my "final" design again. 


I wasn't concerned about a pattern for the skirt. My plan for that was just 3 panels of silk, sewn together and cartridge pleated to the bodice, just the way I've done before for early Victorian gowns, such as my black wool 1840's dress. As for the over skirt, I figured I could drape that easily enough. Thus, all I needed was a bodice pattern and there were a number of features I wanted it to have.

~ A point at the center front waist (basque waist)
~ A square neckline
~ A "v" back neckline
~No bust dart coming out from the side seam, but perhaps double darts coming up from the waist

I considered drafting my own pattern for this, but I'm much more comfortable majorly altering a pattern than I am making one entirely from scratch. (One day I will force myself to acquire some more pattern making skills, but I decided today was not that day) So, instead, I went through my pattern collection and pulled out any pattern I came across that met a couple, or at least one, of the above criteria. That left me with this.


Vogue 8729, which had a front square neckline, back v-neck, and could easily be altered to have a basque waist. 
Simplicity 4468, an original vintage pattern from the 60's which was in my size and had a nice back "v" shape, and some really neat darts. I could easily change the front neckline to a square.
The Charm Patterns Night and Day dress had the front neckline shape I wanted.
McCall's 4696 featured a basque waist, square neckline, and (unlike the Vogue and Charm patterns) no bust darts coming out from the side seams. In fact, it had no darts at all.
Simplicity 8404, the live action Beauty and the Beast Belle ballgown pattern, which had a square front neckline, a sight back v-neck, a basque waist and no side seam bust darts, only darts coming up from the waistline.

I could either combine a few of these pattern to get what I wanted, or just pick one and alter it until it was just right. As the Belle pattern had pretty much all the features I wanted, and would only require a bit of tweaking to get everything "just right" I decided to go that route. It did feel a little awkward however to use a Disney costume pattern to make my decidedly-not-a-costume wedding dress.


Oh well. The costume pattern envelope didn't matter. What was important here was the pattern pieces inside, and those would do just fine.


All I needed were the basic bodice pieces, numbers 1 (front bodice), 2 (back bodice), and 7 (center front bodice). Everything else was for the trim or skirts and didn't apply to my wedding dress at all. I cut out the bodice pieces in my size and got to work!


First I made a few preliminary alterations, lowering and widening the front and back neckline a touch. Then I cut out my first mock-up from some old blue curtains.


I sewed the mock-up together, pinned some wide lace around the neckline to simulate the collar idea I had in mind, and tried it on. I loved it. My wedding dress design was coming to life right before my very eyes and I just couldn't believe how much I loved the shape of it! 


Oh yes, I'd picked the right design! However this bodice pattern needed a few more alterations to get the fit just right.


First I needed to remove a little bit of length from the shoulder straps, then I needed to lengthen the bodice a bit over all, and lower the bust darts by about an inch. 


There was also some weird wrinkling across the back, so I tried folding that out of my pattern piece.
Mock-up #2 was then made, from the same blue curtain as the first. 
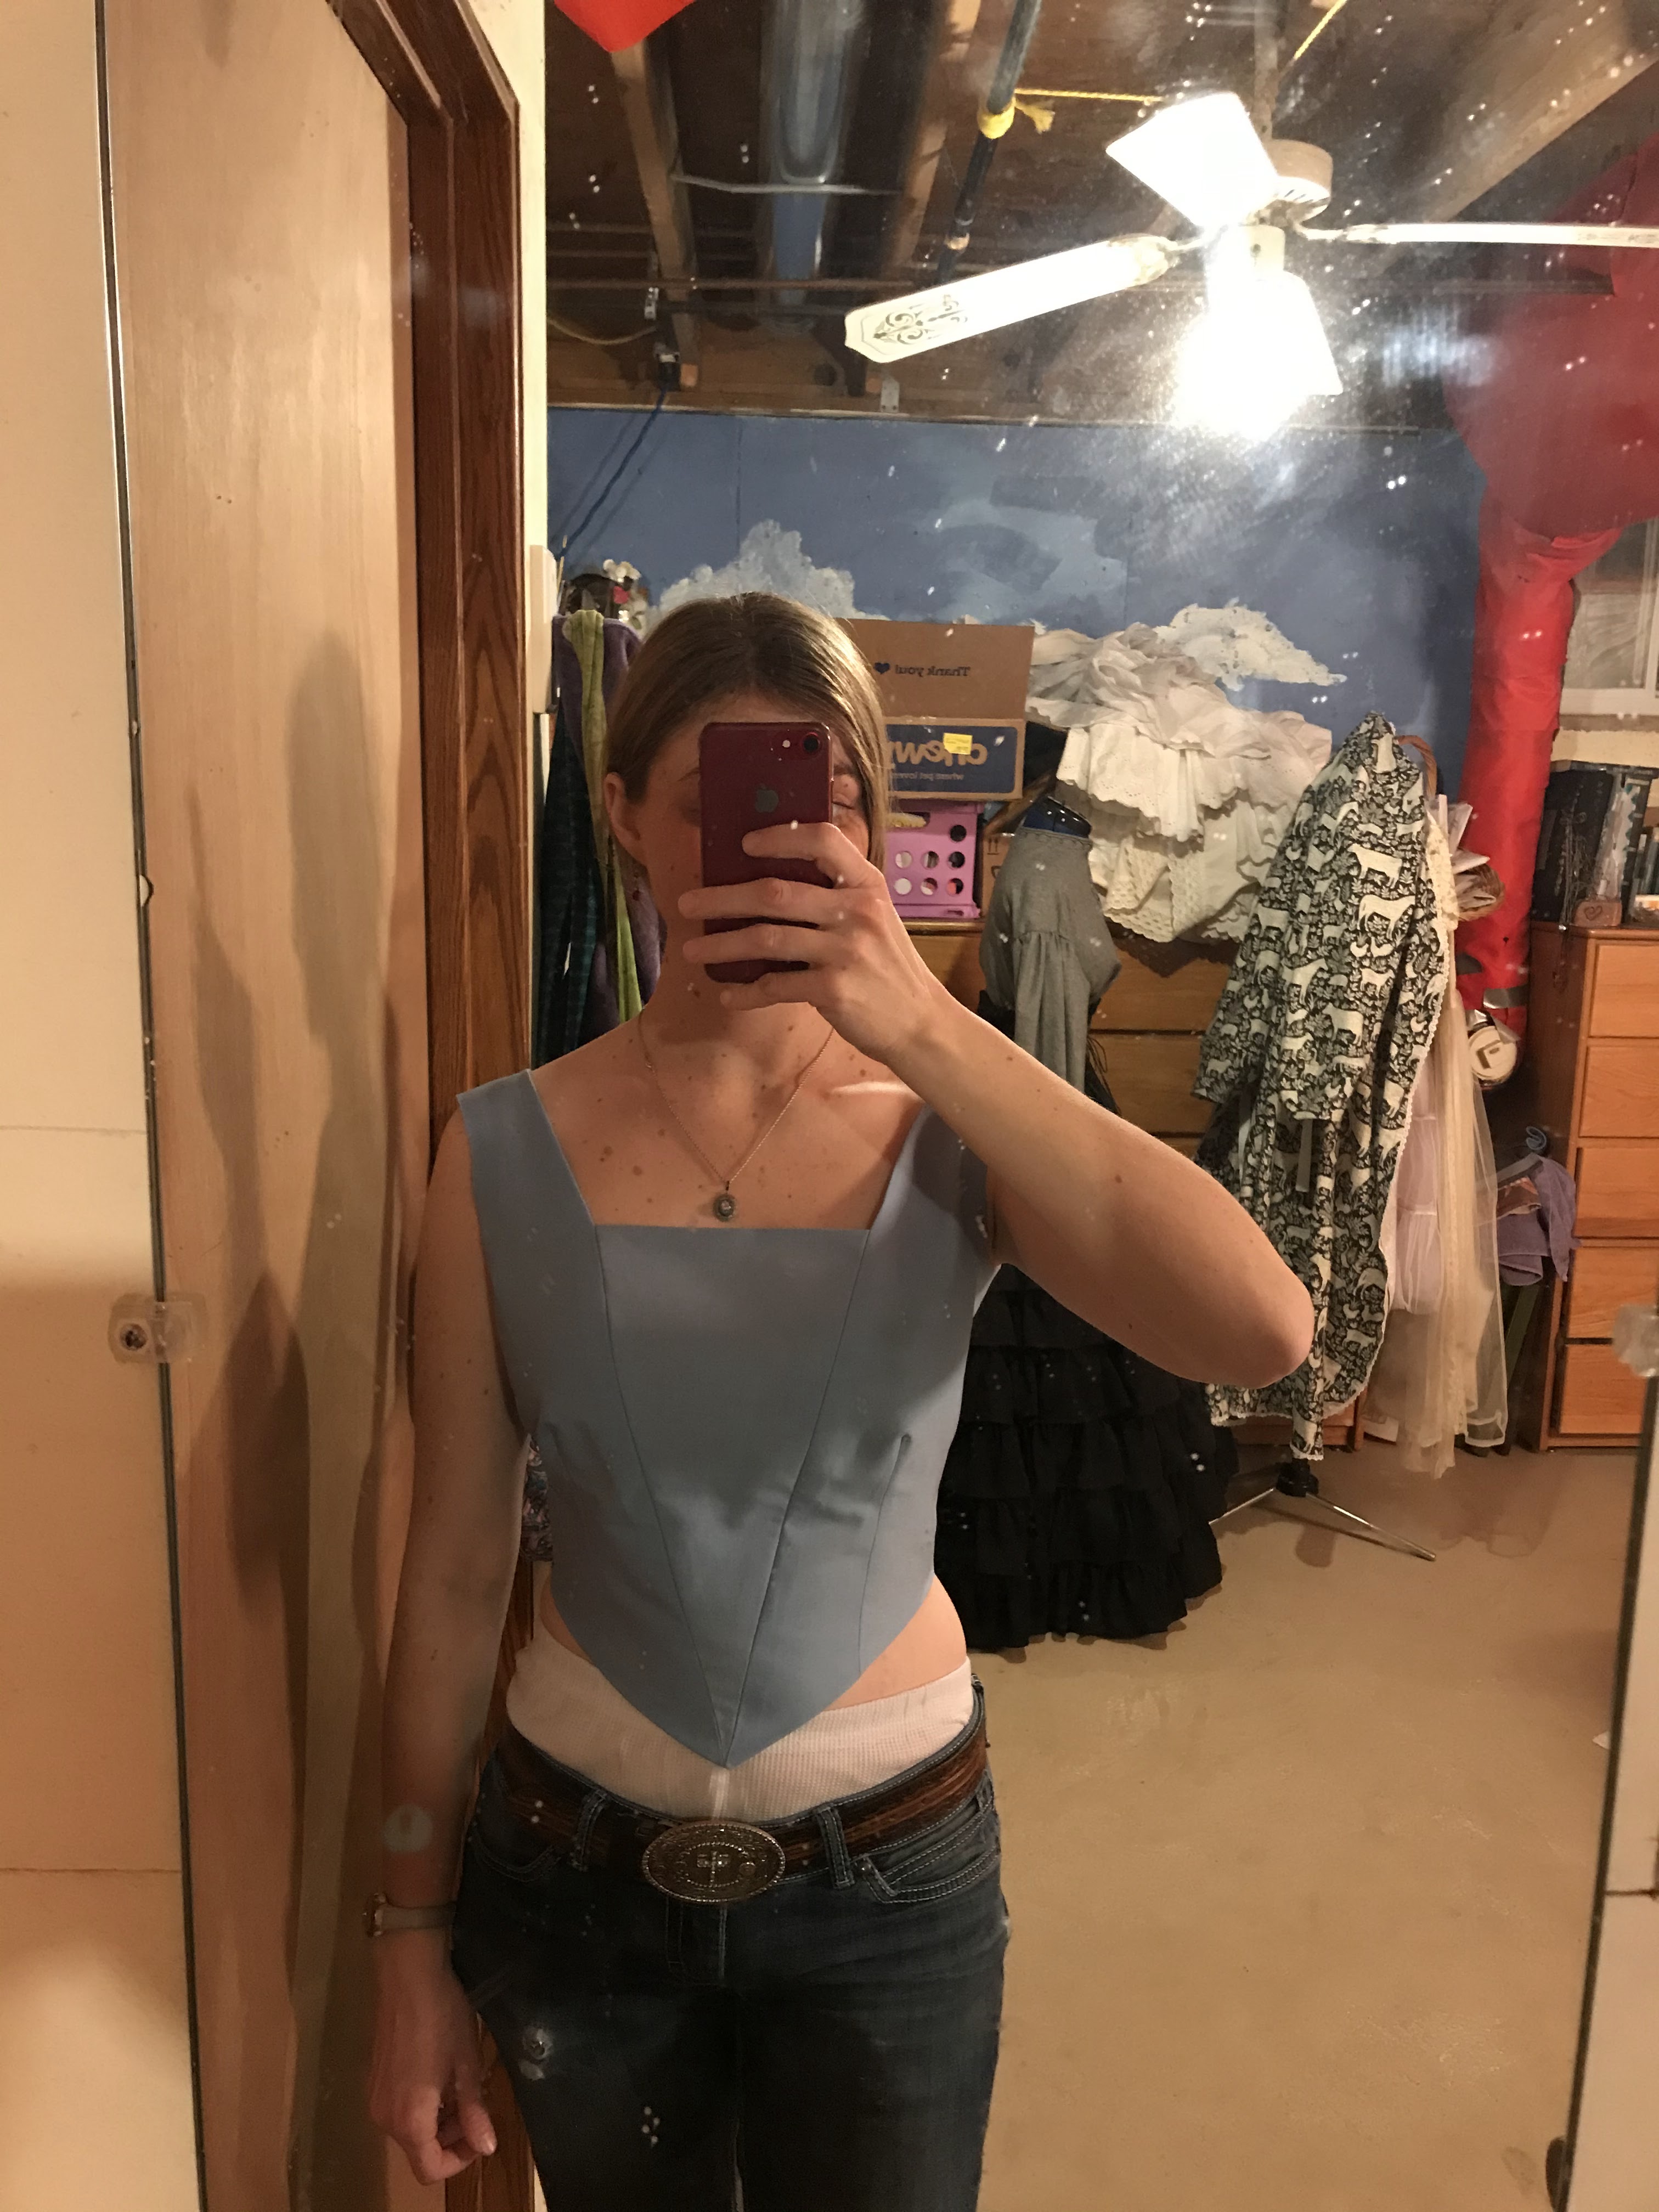

The waistline now hit me at the right place (yay!) but didn't like the shape of the darts. They just didn't lay nice!


Also, the back neckline was now too low (it revealed my bra strap, and yes, I did intend to just wear a normal bra under my wedding dress) and there was still that weird wrinkling across the back above the darts.


On to mock-up #3! 


First, I decided to cut the entire bodice out on the bias instead of the straight-of-grain as I had been doing. Then I decided to remove the darts entirely from the back bodice piece and pin a bit more length out of the top half of the pattern piece. Perhaps no darts on the bias would succeed where darts on the straight-of-grain had failed?


Then on my front bodice pattern piece I pinned a chunk of width out from waist to bust point. The darts were just too wide to lay nice, so by doing this I essentially transferred half the dart width to the seamline of the center front bodice. 


I did not mark my new narrow darts on my bodice front, but rather pinned them in place on my body after the mock-up had been assembled.


The results were more than satisfactory!


Between the bias cut and the new dart arrangement my bodice front fit was pretty much perfect! I had my final pattern ready to go!


The bodice back however was another story. It was still doing it's weird wrinkle thing.


I tried pinning out a new dart from the waist to about the bottom of my shoulder blade. Horribly wrinkly.


Then I tried pinning out a curved back side seam, like you see on Victorian bodices.


Lo and behold - it worked! That curved seam fixed the issue!


I disassembled this latest bodice mock-up, and carefully cut out the new back seam I had pinned. I did the same with my new front darts.


The only bodice piece which had not under gone alteration from the original pattern was the center front bodice. 


I traced my altered and cut up third mock- up pieces onto paper to make a new pattern.


I added 5/8" seam allowance to my new back side seam so it would match the the rest of the pattern.


I double checked and trued my new front darts.


And with that, I had a pattern.


I was fairly certain this was my perfect, final pattern and I could cut into my silk now and start on the actual wedding dress. But. . . I cut out one final mock-up just to be sure.

First bodice mock-up compared to final bodice front mock-up. 

The mock-up from my "new" pattern fit beautifully!


All was ready. I could cut out my bodice. My wedding dress bodice. I could hardly believe I was to this point! I was honestly a little nervous about messing something up. So, I ordered a book.


I've read an awful lot of blog posts over the past decade by people who made their own wedding dresses. A very large number of those blogs highly, highly recommended the book Bridal Couture by Susan Khalje.  Well, I had an Amazon gift card my grandma gave me for Christmas burning a hole in my pocket, so I used it to order a used copy of this out of print book. When the book came, I read it cover-to-cover.


While I read the book I took a break from working on my dress, and made a silk petticoat to wear under my wedding dress instead.

After I read the book I felt confident and ready!


I cut out my bodice. A layer of cotton twill for the interlining and a layer of silk twill. This wedding dress was happening! Actually, in-progress, happening!!


Of course I was beyond excited! I tried on my bodice mock-up again, this time with my mom's wedding hoop skirt just so I could envision the silhouette of my dress. And you know what? That hoop skirt was heavy. In the past I'd worn it with costumes over a corset so I'd never noticed the weight of of it. Without a corset to support the weight however? Dang, it was uncomfortable. There was no question about it. If I wanted to be comfortable on my wedding day I would need a corset. 
Dangit! Dangit! Dangit!


One really ought to fit bodice mock-ups over the undergarments the finished bodice will be worn with. Well, it was too late for that. I'd already mocked-up my bodice to perfection and cut it out of the silk. Now I would need make a corset specifically to fit under the bodice I'd cut out. Crap. 
Clearly a corset would slightly change my body shape no matter what, but hopefully I could keep the alteration minimal. Just to be safe however, just in case any alteration would be required to my bodice pattern, not a single stitch would be sewn on the bodice I'd just cut out until after I made a corset to wear it over.
Dang it.

Check back next weekend to hear all about the wedding corset from start to finish!
And stop by tomorrow if you want to know about the silk petticoat I made to wear on my wedding day!

In case you missed it, last weekend I shared about my dress design and fabrics - the foundation of this dream gown!

Sunday, June 20, 2021

My Wedding Dress - The Fabrics (Part Two)

 The lace over skirt was going to be the show-stopper on my wedding gown. That I was sure of. I just needed to find to right lace for the job. It would either make or break the design. Thus, at age 18 or 19, whenever I picked my skirt design, I quickly determined Joann's fabrics had nothing suitable for what I had in mind. So I took to the internet. Yes, it would be years before I needed lace for my wedding dress, but I wanted to be prepared.

I quickly discovered nice lace, like what I wanted, was expensive. Over $50-$60 per yard. Over $100 per yard in a lot of instances. Yikes. Well, this would be for a wedding dress, and those suckers are apparently rather expensive themselves, so maybe, just maybe, in several years when I was actually ready to make my wedding dress, I might be able to justify buying a few yards of nice lace.

I spent the next few years occasionally looking at lace online and dreaming of the day I would buy it for this dream project of mine. I educated myself on the different types of lace. I started a Pinterest board dedicated to lace. I began to figure out exactly what I wanted for my dress - subject to change of course!

Then, in 2017, as we all know, I ran off on the World Race. And I did a considerable amount of fabric shopping in different countries. While I was exploring foreign fabric stores, I kept my eyes open for lace. How cool would it be if my future wedding dress featured lace from a different country I had visited??

In Bar, Montenegro, I ventured into a little fabric shop and I found it. It was an embroidered net lace, and it was perfect.

Supposedly, it was meant for lace curtains. But it was much too pretty for that!! That said, it was rather inexpensive thanks to its intended purpose. So, I could easily afford it on my (very low) World Race budget. I quickly bought 3 meters and sent a picture to my best friends at home, telling them all about it!

Fast forward a few months and I was in Bangkok Thailand. A local dressmaker and I had struck up a friendship. One morning she invited me to come along on a trip to a fabric store. A fancy fabric store, full of lace!

Oh I had fun looking at it all!!


I decided I would get a piece of lace here, intended for the bodice of my dress. But there was so much to choose from!


Finally, I picked this lace. It was very modern and synthetic, not really what I'd had in mind, but I loved the swirly motif it featured! Thus, 1 meter was bought and packed away in my backpack to go home to the U.S. with me.


The following month I was in Malaysia and found myself in a craft store with a nice selection of beautiful embroidered net lace trim.


I left with several different cuts of lace trim, but one of them in particular I knew I would save for my wedding dress.

I brought home all these laces and carefully packed them away in a boot box to wait for the day I would use the.


Every so often I would pull out the box and open it up to admire and dream. Last summer, around the time I began to think I might actually marry this guy I was dating, a couple more things got added to the boot box.

First, it was buttons.


I didn't want plastic buttons or satin-covered buttons. I wanted glass or china buttons. I'm in a few different historical costuming fabric de-stash groups on Facebook, and one day I saw the perfect buttons come along. They were vintage glass pearl buttons. They were just what I'd had in mind. I quickly bought the two dozen the seller had available, then waited a month for them to arrive from Canada! (Good thing I didn't need them in a hurry!) When they came I was thrilled with them! It had been worth the wait.

Those fabric de-stash groups came in useful again about a month later. I had Covid and was quarantined with my, at the time, boyfriend who was also sick with the virus. I'd long known I wanted the base fabric of my wedding dress to be real silk, not polyester. I was thinking a silk taffeta would be nice. Something with a bit of a sheen to it, but not as shiny as satin. Then a "candle-light white silk twill" came across my Facebook feed. It was described as a sturdy twill, similar in hand to a heavy taffeta. Oh, it was pretty, and I liked the idea of a twill weave - something a little more interesting than a plain taffeta. I glanced across the room at my sick boyfriend (Who had no idea what I was looking at, of course.), thought "Yes, I'm probably going to marry this guy sometime within the next year.", and ordered 8 yards of silk.


When I returned home once quarantine was over, the fabric was waiting for me. I excitedly tore open the package! The fabric turned out to be a bit more ivory in color than what I'd thought I wanted, but once I laid my skirt lace on top of it I fell in love. 


The slight off-white shade of the silk made the white lace stand out beautifully! It was going to be perfect.

My husband purposed to me when he came to visit one weekend in January. As soon as he left my parents' to return home that Sunday night, I excitedly pulled out my boot box of silk and lace and notions and delighted over everything with my mom and sister.


In doing this I discovered there was one more fabric I needed. The lace from Thailand was just too heavy and modern for the bodice of my design. I'd use that lace somewhere else on the dress and buy something else to cover the bodice with. After all, it stood to reason that I should probably buy atleast one of my wedding dress fabrics after getting engaged!


I found the perfect lace at a local fabric store about 20 minutes from my, at the time, fiancé's apartment. A beautiful Chantilly lace, just the same shade of white as the net lace I was using for the skirt. (I never knew how many shades of white there were until I started making a wedding dress!) It had a nice swirl motif similar to the one on the lace from Thailand. Similar, but more delicate. It was a nice lace, of the quality, and price tag, of those I'd long admired online. I bought 1 yard. Just enough for the bodice.  


With this last piece of lace I had everything I needed! Except, there was one thing bothering me in the back of my mind. My dress would feature lace from Europe, Asia, and North America, but what about the other two continents I'd visited? What about South America and Africa. I didn't have any lace from any country in either of those places!

No lace, but I did have fabric. Fun, colorful prints. Those would need to be included in the design somehow. 


After some consideration, I decided the fabric I had left over from this dress would make an excellent hem facing. I'd purchased 6 yards of this print on my first trip to Uganda. There was my Africa material.


As for the South American contribution, I'd only bought 1 piece of fabric there. One meter of rayon from the market in Peru. I turned the majority of that into a nice springy top, and turned the remaining scraps into bias tape for finishing the seams of my wedding dress bodice.


There we go. All 5 continents I have been on would be represented in my dress. All my materials were gathered. The engagement ring was on my hand. It was time to get started!


If you missed part one of making my wedding dress yesterday, that post can be found here.
The next instalment in the "Making my Wedding Dress" series should be up next weekend!

Saturday, June 19, 2021

My Wedding Dress - The Design (Part One)

 I'm married. That still feels weird to say. I said the vows, got the husband, and moved in with him. The other day I received my first piece of mail at my new address with my new name on it. I'm a Mrs. now. It's sinking in.

So, now that it's all official and I have begun my married life with this man, it's time to start sharing that thing I know you've all been waiting for since I became engaged about 5 months ago. My Wedding Dress!!!

Of course, there is way more to this dress than I can fit into one post, so today we're going to start at the beginning. About 10 years ago, give or take a few.

There are two things I have long known I wanted for my wedding dress. 

#1 I wanted to wear the hoop skirt my mom made and wore for her wedding. Thus, my wedding dress was going to have a very full skirt.

#2 I wanted my dress to fasten with a long row of buttons down the back. My mom's wedding dress has buttons down the back and I've always loved the look of that. Unlike on my mom's dress however where half the buttons were decorative, used to cover up a zipper, I wanted all of my buttons to be real. I wanted my husband to have to undo every last button to get the dress off of me on our wedding night. 

Hoop skirt and buttons, that's what I've known I wanted on my wedding dress since childhood. (Though don't worry, I'm sure I didn't think about the husband removing the dress when I was a child, I just liked buttons. The unbuttoning fantasy came later.) Now when did I decide I was going to make my dress? It's hard to pinpoint an exact time, but it was probably my senior year of high school. I sewed my prom dress that year, and it turned amazing! After this sewing success, I felt like I could make anything - even a wedding dress. One day.

Like all the other girls in the late 2000's and early 2010's, I kept a secret Pinterest board full of wedding ideas for my happily ever after, which of course I hoped would come sooner rather than later (Dear 18 year old me, be patient. It'll be worth it.) One day, while scrolling through Pinterest and pinning anything of interest (on a computer of course, as these were the days before everyone had a smart phone), I came across the most beautiful picture. 


This one. That swoosh of lace across the skirt. I loved it instantly, and from that day on I knew my dress would have a lace over skirt just like it!


Initially I didn't think too much about the bodice design, I just thought I'd do a strapless lace bodice with a sweetheart neckline and a bit of a basque (pointed) waist. Pretty typical style of the early 2010's. Over time however, my bodice design ideas got a little more interesting.


It started with the idea of gathered lace straps, just like the tulle ones in the picture above.


After that I found this picture of a high lace back, and fell in love with that idea.


I figured the lace could come over the shoulder and in the front it would still look pretty similar in shape to my initial gathered strap idea.


By the mid-2010's, this was my wedding dress sketch. As you can see, along with the bodice additions, the skirt plan had morphed a little bit as well.


I'd found this picture and loved the multiple different laces in the skirt.


And this picture! With that scalloped skirt yoke and those little cap sleeves! Even though my dress would have a different silhouette than this one, I still love this picture!


So, yes, about 5 years ago this was my plan for my wedding dress. 
Now 4 years ago, in 2017 I did the World Race. All the different clothing styles and fabrics I saw around the would definitely had a little bit of an impact on my dress design. 


The skirt stayed pretty much the same, with just a bit of adjustment to the proportions of the different lace elements, but the bodice changed to have off the shoulder lace sleeves with flounces at the elbow.


This is pretty much how my design stayed for the next 3 years. After the World Race I got rather depressed about my single state and didn't feel like dreaming about this wedding dress I would make in the future when I met and married the right guy. Because what if it never happened? What if I was destined to be single forever. (Be patient 25 year old me. Stop your crying. Enjoy your life as it is. Enjoy the freedom you have right now. As much as you love the man you will marry in a few years, as excited as you are to build a life with him, part of you will be sad to have the single chapter of your life come to a close. Your single years were good years, just as your married years will hopefully be as well.)


Last summer, a few months into dating my husband, I began to dream about my wedding dress again. Things might just work out with this guy, I rather liked him, and he seemed crazy about me, so I wanted to be prepared.


First, the sleeves changed from elbow length straight sleeves, to short little flutter sleeves like the ones in this 1930's painting.


While I was re-sketching the dress I decided to leave off the top tier of lace on the skirt as well, and go back to just the original "swoosh" of lace on the skirt that I'd fallen in love with nearly a decade earlier.

Last fall I came across this dress, made by Bella Mae Designs and was instantly intrigued by the gathering on the bodice. It reminded me of 1840's fan-front dresses (One of my favorite eras of fashion!), so I began contemplating how to incorporate that detail into my dress design. 

The final piece of my design puzzle came together late last fall, when I came across this 1940's dress on Pinterest.


A square neckline, made of lace. I'd always figured I'd have a sweetheart neckline on my dress, it's pretty classic after all, so I never really considered anything else. But I've long loved square necklines on different things. So why not have a square neckline on my wedding dress?


I could trim it in lace like on this 1890's fashion plate. A little different but reminiscent of the "bertha" that trimmed the neckline of most mid-19th century evening gowns.


Why not? I could keep the flutter sleeve idea, just look at how well the sleeve shape works on this 1840's dress!


A mixture of Victorian and vintage influence, and me.


Thus, when I got engaged in January, this was the design I had to work with. 


And I was about 90% sure it was perfect!

Come back tomorrow to see the fabrics I would be using to make this design!