Monday, February 12, 2018

Over-Under - The Overall Dress and Tunic

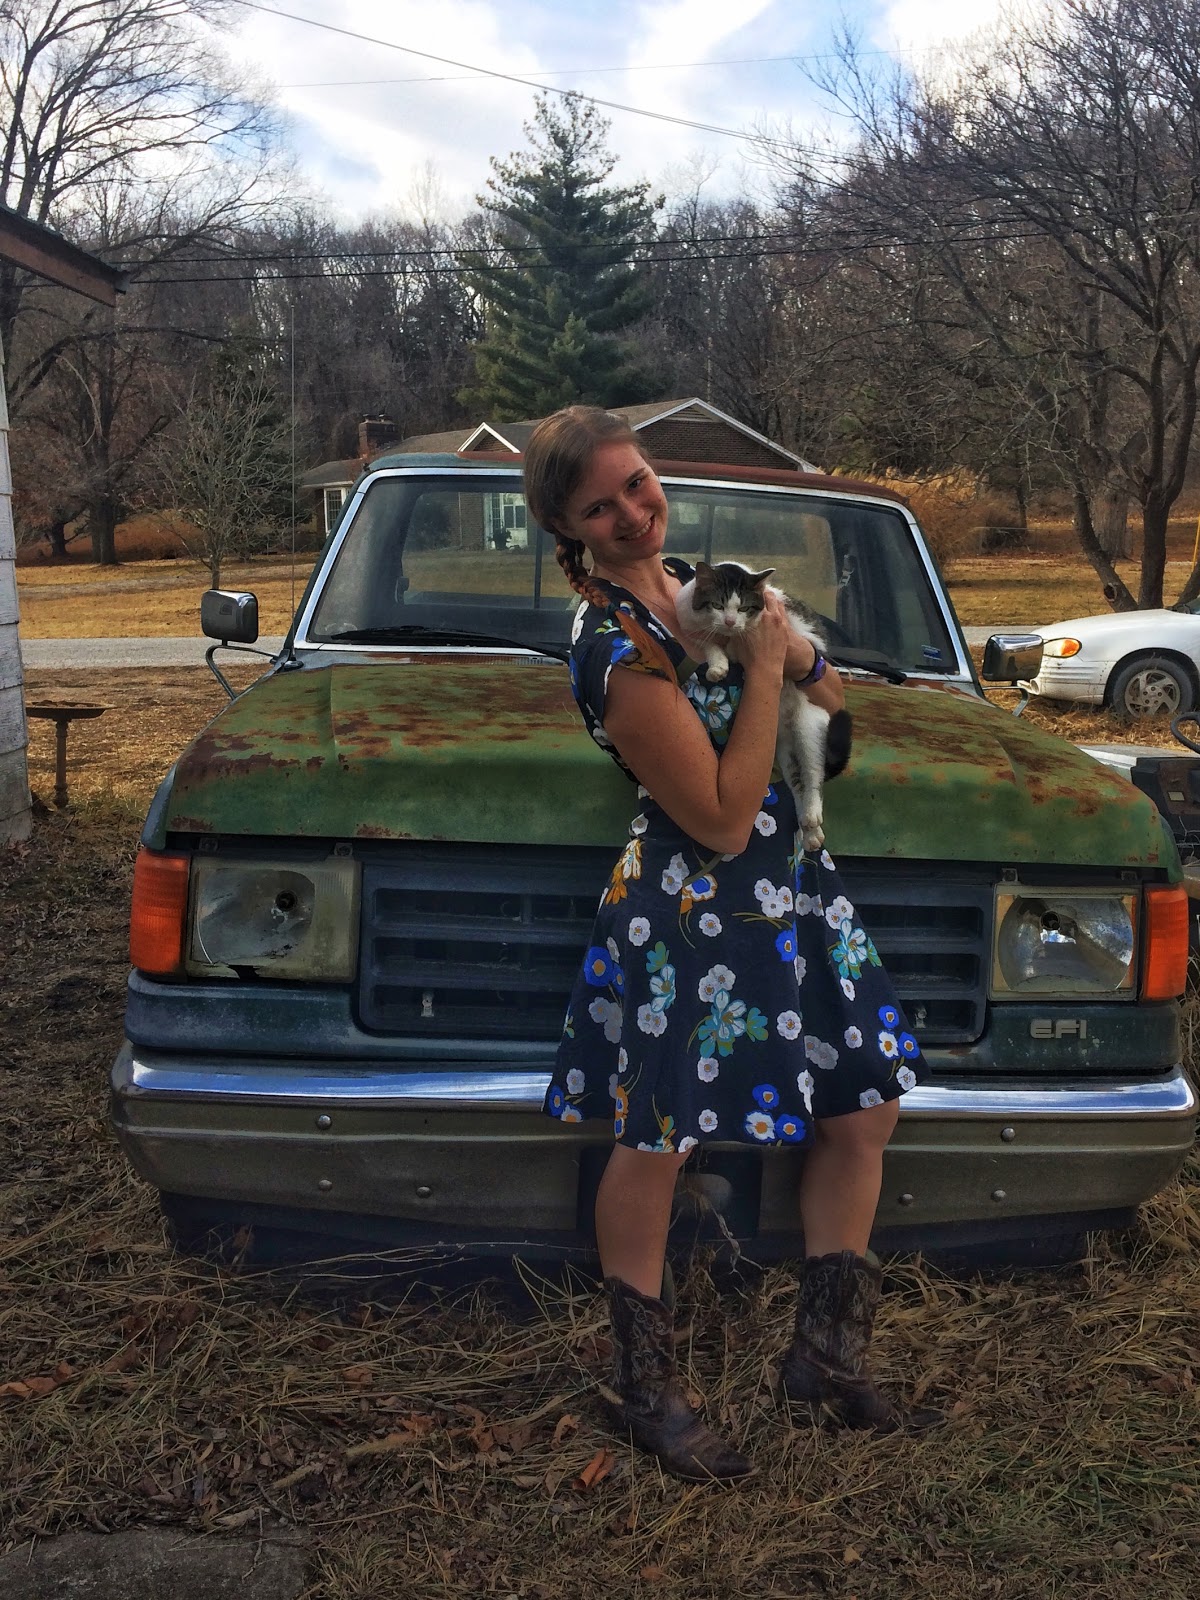
When I went pattern shopping on Black Friday I found two overall patterns that I just had to get and make for my sister - Simplicity 8487, the 1940's overalls I blogged about last week, and Simplicity 8301, a frillier, girlier, overall and overall dress pattern. I was excited to sew up both patterns, as they looked like fun and would fill some wardrobe gaps my sister had. However, contrary to my blogging order, Simplicity 8301 was up first, because I already had the perfect fabric in my stash!


5 yards of light blue needlecord made its way home with me from a thrift store once upon a time. It had been sitting in my stash for a couple years now just waiting to be turned into something. As soon as I saw the Simplicity 8301 overall dress I knew that I'd found the perfect pattern for that corduroy!


The corduroy had just enough stiffness to hold the pleats in the paper-bag style skirt of this overall dress and make them shine, while still being soft and flowy. I couldn't be more pleased with how this fabric and pattern pairing worked out!


For the facings I used a lightweight peach cotton (with little blue hearts printed on it) from my stash. Looking back I should have probably used a blue fabric to match the corduroy, as the facings like to peek out, but oh well. Those little glimpses of peach are rather fun!


While making this dress, I decided it needed a couple of small additions for maximum wearability. First, it needed a back yoke, rather than the straps just being criss-crossed and sewn into the waistband. So, I cut a triangle out of a scrap of the corduroy to serve this purpose.


 The yoke keeps the straps from shifting around and sliding off my sister's shoulders as they might try to do otherwise.


The second addition I made was a pocket on the front overall bib, because what pair of overalls doesn't have a bib pocket? Clearly this was a mandatory edition! And it was a lot of fun to decide on the pocket shape and embellish it with some fancy stitching! (I always enjoy an excuse to put to use some of the decorative stitches on my sewing machine!)


To tie the entire overall dress together and give it one cohesive look, I also used the decorative flower stitch to hem the skirt, and I adore the finished product!


Now once I finished the overall dress, I was struck by the thought that my sister clearly needed something to wear this dress over. 
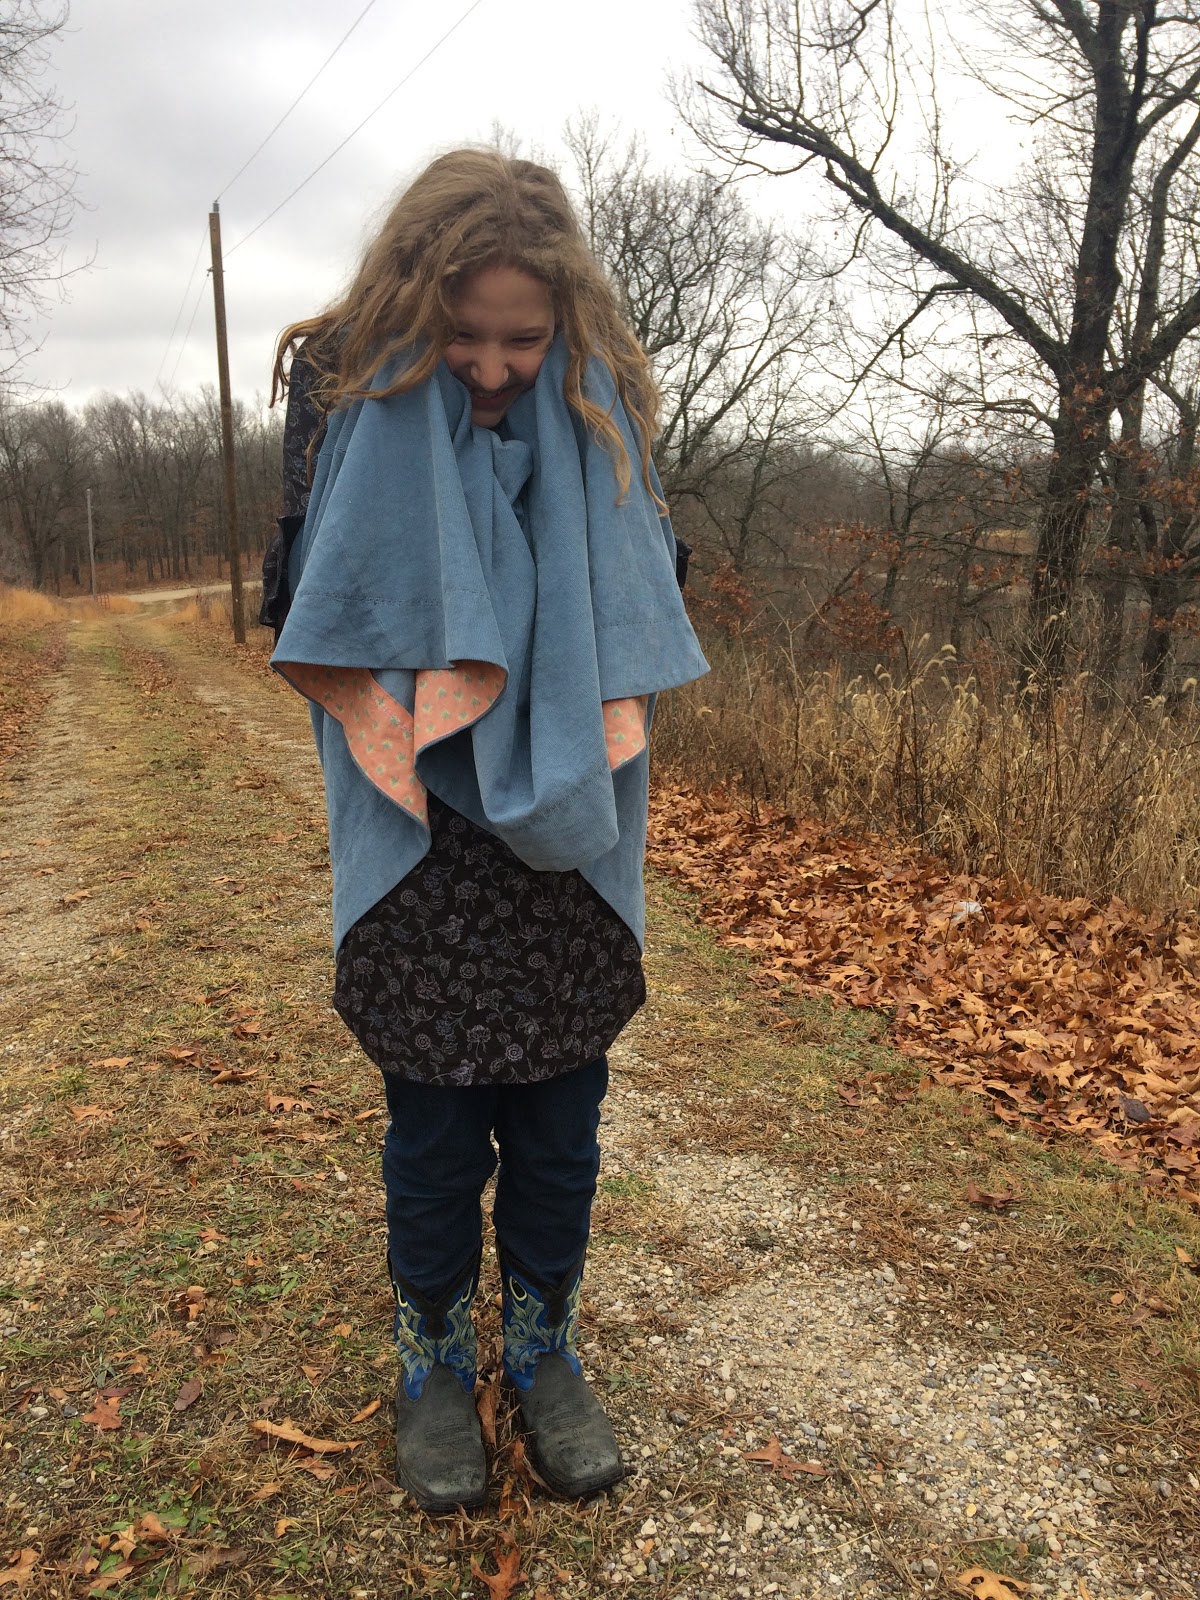
Here you get a lovely glimpse of the peach hem facing.
A tunic. Or a short dress. Whatever you want to call it. That's what I decided she needed to wear under her overall dress. And I had the perfect pattern and fabric to make her one.


My sister picked out Simplicity 8511 for herself at the Black Friday pattern sale. At first I was taken aback by the fact she'd picked a sheath dress pattern when she typically loves full skirts, but then I saw the sleeves. So many fun sleeve options in this pattern!

Even with the fun sleeve options however, I was in no hurry to make my little sister a sheath dress, until I decided to make her one to go under her overall dress. I had just enough fabric leftover from my gremlin dress to make it. So I dove right in and picked the double ruffle box-pleated sleeve option. The pleated sleeve ruffles just went perfectly with the pleated overall skirt!


For an extra little fun embellishment I added an exposed blue metal zipper down the back. It was my first "officially exposed" zipper and I like how it turned out!


I sewed up this tunic/dress thing and presented it to my little sister to wear with her overall dress. She was thrilled that I'd used a pattern for her she'd picked out herself! She had absolutely no complaints about this outfit and it's been worn time and time again!


While she loves both garments, the overall dress in particular has been a favorite, and I think she's worn it with just about every shirt in her closet! It goes over everything, just as overalls should. I suppose one of these days I should get around to making her the pant overall version of this pattern as well, and see if it is equally as loved.

Thursday, February 8, 2018

Flannel, Wheelbarrows, and Baby Goats

"Wait, just one more picture!" My sister said as we finished photographing her new dress and began to walk back to the house.
"Ok?" I agreed, as my sister flopped down in the wheelbarrow and posed.

My sister had spent most of the morning pushing that wheelbarrow back and forth across the yard, loaded with hay, as she prepared our kidding shed for the new baby goats due any day now. And it did make a fitting backdrop for the new plaid flannel dress I'd just completed for her.


I found the blue plaid flannel fabrics at a thrift store about a month ago. They were soft and I just can't resist a good plaid, so they came home with me. There was only one problem - the amount I had of each. With only half a yard of the large plaid and barley a yard of the small plaid, I wasn't sure what these flannels could become. Neither one was large enough to become a garment on it's own.


Inspiration finally struck one day when I was looking through one of my journals from the World Race and I found this sketch. 


I don't remember when I drew it, or what country I was in at the time, but as soon as I found that sketch I knew it was just the design I needed. I could use the large flannel plaid for the bodice, the small plaid for the skirt, and some scraps of navy corduroy (left over from my brother's shirt) for the waistband. The resulting dress would be soft and comfy - the perfect work/play dress for my little sister.


So, I cobbled together some patterns from my stash to get the bodice pattern I needed and went about using nearly every square inch of my flannels. I breathed a sigh of relief once everything was cut out and I could begin sewing!


The dress came out a bit roomier than I'd envisioned, but that just makes it extra comfortable and easier to wear!


Perfect for playing in, working in, and waiting for baby goats to arrive in!


And those baby goats have sure made us wait! My sister readied the kidding shed last Saturday, and we expected it to be occupied within a day, but the mama goats have their own schedule and will not be rushed! So, that kidding shed sat empty until this morning, when Giselle began our kidding season by presenting us with twins!


A doe and a buck! Soft, sweet, beautiful, adorable, healthy, and strong! 


Kidding season is finally upon us and I couldn't be more excited! I may be less productive in the sewing room over the coming weeks, but these baby goats are absolutely worth it!

Tuesday, February 6, 2018

Because, Overalls

Overalls. Are they not adorable? When I saw Simplicity 8447, a reprint of a 1940's overall and blouse pattern, I immediately knew I wanted to make the overalls for my sister.


This sister of mine, however, is 13 and has her own style and opinion on what she wants to wear, as she should. So, when I showed her the overall pattern and mentioned I'd like to make a pair for her, she kind of wrinkled her nose and shook her head. Apparently she was less enamored by the idea of a pair of 40's overalls than I was. Well, then. I supposed the overalls would just not be happening. 


Thankfully, after a few days of me casually mentioning the overalls, my sister changed her mind. She decided that they just might be cute, and gave me permission to make her a pair. Woo-hoo! The pattern was purchased and project overalls could commence! Once fabric was acquired.


The right fabric came along about a week later. My mom, sister, and I went to an Amish community near us, and in one quilt shop I found a small stash of clearance fabrics for 50 cents a yard. I snatched up about 2 yards of each fabric from the pile that appealed to me. One of those fabrics was this dark wash stretch denim. Once I got home with that fabric, I knew it was just the thing to make these overalls out of.


Finally, I was ready to sew the overalls! I asked my sister if she wanted rainbow or denim/gold top stitching on her new overalls, and she picked rainbow. Next, I sent her to my button stash with instructions to pick out a set of 9 large buttons for side button closure. She returned with these lime green flat buttons. There were exactly 9. Perfect!


The overalls proved to be much easier to assemble than they first appeared! I was amazed by how quickly and easily they came together! I sewed up the pattern exactly how it was written, except for a few small changes. Originally, the straps were supposed to button in the back, not the front. Well, that seemed unnecessarily annoying to me, so sewed the straps onto the back of the overalls, and made them button onto the front.


I'm a fan of how both the front and the back look with this alteration.


Second, I kind of messed up when cutting out the overalls and completely forgot to cut out the back facing piece. Well, I didn't discover this until I was ready to attach that facing, and I did not feel like digging the facing pattern piece out of the envelope and tracking down my fabric scraps to cut one out. So, I pulled out some bias tape instead and used that for the back facing. It worked splendidly!


Now, you will also notice that the ends of the straps stick out below the bias tape facing. What's up with that? The inside of the overalls would certainly look neater if I'd trimmed the excess length off and hidden the ends of the straps under the facing. Well, yes. But these overalls are for a young lady who just keeps growing at an astonishing rate! So, I left the extra length so the straps can be lengthened in the future if need be. 


Speaking of length - this pattern must be drafted for extraordinarily tall people as the legs required an 8 inch hem in order to fit my 5 foot, 3 inch tall sister. So, to use up that extra length, I made deep cuffs, which turned out adorable.


My sister was quite happy with the overalls when I finished them! However, she did request one slight addition to them.


I made the overalls according to the pattern with two pockets. One on the pants and one on the bib. Well, according to my sister, that's just not enough pockets. So, she's requested another. 


Thus, once they come back through the laundry, these overalls will gain a third pocket. And then, I hope they will get an excess amount of wear!


Saturday, February 3, 2018

The "Just Enough Fabric" Dress

Two yards of 45" wide floral linen. What would I make with it? This fabric, found in a remnant bin for less than 50 cents a yard, was begging to be turned into a dress for me.


Now two yards of 45" wide fabric is not a lot to work with when making a dress, so my first order of business was to figure out a pattern that would work. Which I did, quite by accident.


I wound up at Joann's last weekend when Butterick patterns were on sale. Did I need any new patterns? Probably not, but when patterns are on sale I can't resist just looking through the pattern book. Butterick B6380 caught my eye and made its way home with me. 


Once I was back in my sewing room, looking over my latest purchases, I realized that B6380 only called for 2.5 yards of 45" fabric! That meant there was a chance I could squeeze it out of my 2 yards of linen! Well, I was gonna give that a try!


Well, after a bit of maneuvering, I was easily able to fit the skirt and main bodice pattern pieces on my fabric. All that was left was the midriff pieces and the sleeves. I pulled scraps of olive green silk out of my stash (leftover from this hood and the accent pieces of this dress) and discovered that I had just enough of it to make the front midriff piece and the bands used to gather the shoulder pieces. 


Now, what about the sleeves and back midriff piece? I had teen-tiny bit of my floral linen left, would it be enough? Well, it was certainly not enough to make the sleeves that were included in the pattern, but it was just enough to make tulip sleeves! I pulled the sleeve pattern from B6217 (this blouse) and squeezed it onto my scrap of linen. Then there was just enough fabric left over to cut the back midriff piece out as well. Success!


As I was headed to the sewing machine with my cut out dress, I remembered something. Pockets! Yes, my dress must have pockets! I dug my fabric scraps (literally just scraps at this point) out of my scrap bin and started playing around with them. I discovered I had two scraps just barely big enough to make the visible part of my pocket bags out of! And I had just enough silk scraps left that I could piece together some flat piping to outline my pockets in. Woohoo!!!


With that my largest fabric scraps from this dress were less than two inches square and I was headed to the sewing machine for real this time, as it would be impossible to cut anything else out of my fabric. 

The flat piping cut out and pinned together, next to all the silk left over from the original yard, purchased 2 years ago.
I forgot to get a picture of the linen scraps, but they were about the same.

After the puzzle of cutting it out, the dress came together incredibly easily and was done in an afternoon!


My two yards of floral linen became a dress, and it's just what I hoped it would be!


Wednesday, January 31, 2018

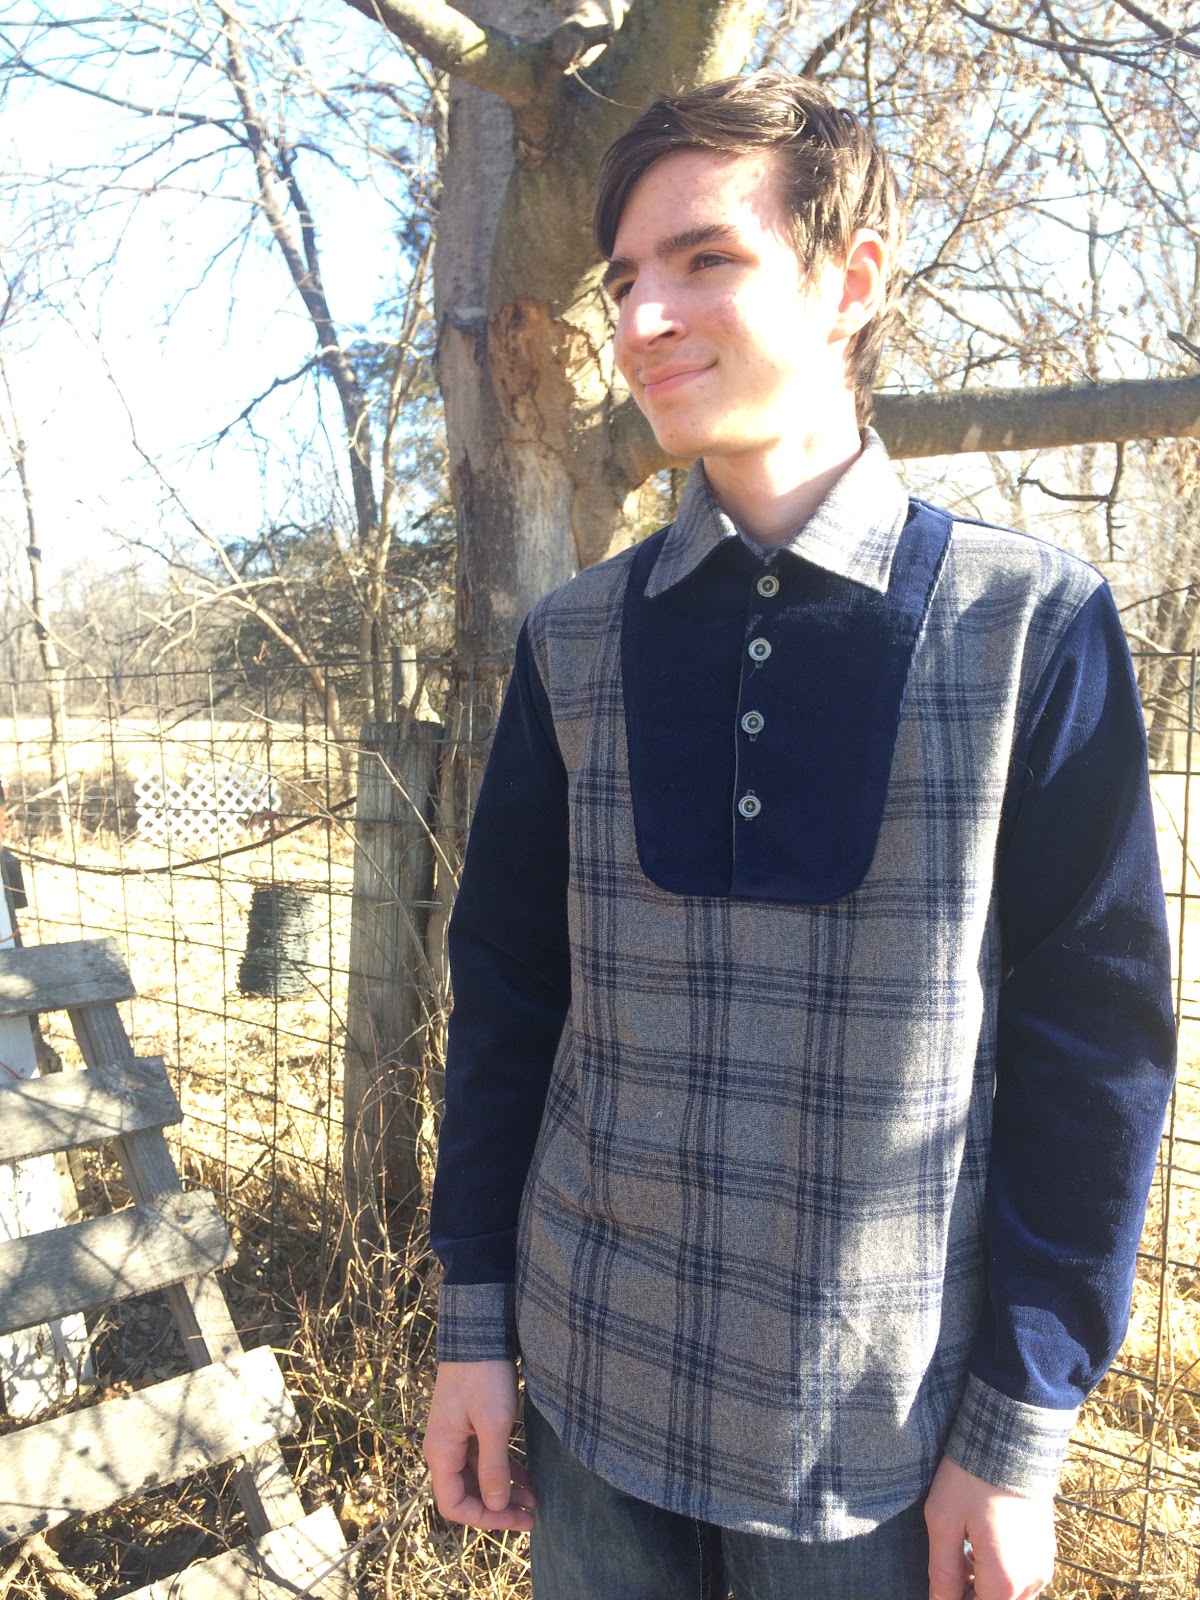
The Flannel and Corduroy Belated Christmas Shirt

"Wouldn't it be fun to make my little brother a shirt to match our Christmas dresses?"


That was my thought when I saw Burda 7525 in the pattern catalogue during a pattern sale back in December. "Wouldn't this shirt look nice made up in our gray and navy plaid flannel with some navy accents?"


Since I had these thoughts running through my mind, the pattern came home with me. A Christmas shirt for my little brother was going to happen! Only, it didn't. I ran out of time. And fabric. And motivation.


Once all three Christmas dresses were done I had no time to complete another project by Christmas Eve, and I had less than one yard of flannel left. Not enough to make a shirt. I checked 3 different Joann's stores in the area to see if I could get more of the same fabric. Nope, none of them had any left in stock. It appeared that this Christmas shirt was just not gonna happen.


Then inspiration struck when I found this navy needle corduroy on sale for 60% off. Wouldn't it look handsome paired with the flannel? I bought a yard of it, brought it home, and the Christmas shirt plan was back on! Other than the fact that I still didn't actually have time to make such a shirt. 


Christmas came and went and the fabrics and pattern sat in my sewing room, waiting to be made into a shirt. I just had no motivation to make the shirt now that Christmas was past. Until last week. 

At the beginning of this year I joined a "52 Week Sewing Challenge" group on Facebook. My hope is that by participating in this group I'll manage to complete most of the planned sewing projects I never seem to get around to. Every week a challenge theme is given, and the goal is to complete something that week which fits into the theme. Well, I have a lot of planned projects that I already have the supplies for, so it is no problem for me to find a project in my stash that fits the theme every week!

Well, last week was week 4, and the theme was "Sew something for a boy." This was just the motivation I needed to make my brother's shirt! The fabrics and pattern came out and shirt construction began!


As I've never actually made a guy's shirt before, I did something incredibly unusual for me and actually read the pattern instructions and followed them to the letter - mostly. I did make a change or two to the design of the shirt and the construction order, but how could I not? (And these changes were actually made due to fabric shortage, not 'just because'.)


The biggest change I made to the shirt was this - I added a back yoke. No, I didn't do this just as a cool design feature (though I love how it turned out!). I cut out the shirt with a back yoke because I didn't have enough flannel to cut out the back of the shirt all in one piece the way the pattern was written. So, I improvised, and it turned out pretty darned well! 


While I love the back yoke, it's not my favorite detail on this shirt. No, my favorite details are the sleeve cuffs and plackets. I made them exactly as the pattern instructions said, and I love the finished result!


Flannel, corduroy, and fun details - a month after Christmas and my little brother finally got his Christmas shirt! I'd say it looks quite handsome on him, but I might be a little biased :)