Friday, November 17, 2017

Costuming Pride and Prejudice - The Gentlemen

Last week my younger siblings' home school group preformed Pride and Prejudice. I have it on good authority that this young man, my little brother, played his part incredibly well.


His roll you ask? Mr. Collins. He proposed to Elizabeth Bennet, got turned down, and married her best friend instead. All while talking insistently about his patron, Lady Catherine De Bourgh.


 Yes, I am very proud of my little brother's acting ability. And I'm quite proud of my mom for the costumes she made for him and some of the other young men in the play.

Love these two goof balls!
Now, the ladies' costumes were relatively simple - find an easy dress pattern, sew it up, and add some accessories. The gentlemen's costumes were a bit more involved. Tailcoats, waistcoats, trousers, shirts, and cravats were needed for each and every gentleman. So, as neither my mom nor any of the other moms involved in the play had the time to sew regency suits for half the cast, they improvised. Refashioning to the rescue! 


Modern suit coats were obtained from thrift stores.


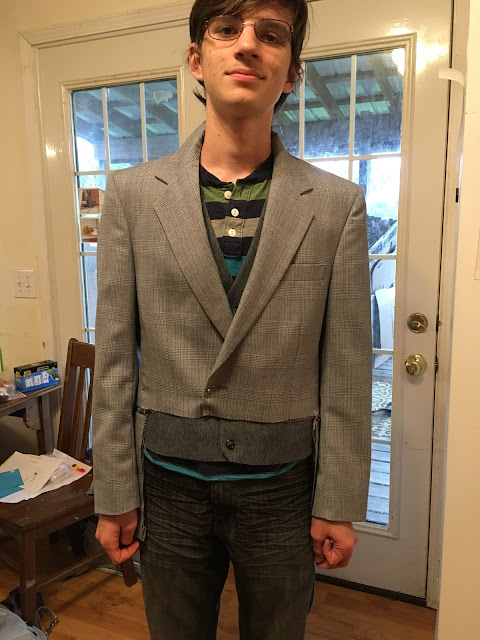
The lower front of each suit coat was cut away, so that the front of the coat ended at the natural waist rather than the hips. 


The fabric that was cut off the front of the suit coat was then sewn onto the back to make tails. (Now, due to pocket placement and such, some of the suit coats needed addition fabric from other sources added in order to make the tails) 


And there you have it - a tail coat! 


My mom made 3 of these tail coats herself, and led workshops during play rehearsals to help other moms make their sons' tail coats.


 But of course, the costuming didn't end with the tailcoats - oh no, other pieces were needed. Thankfully most of these pieces could be purchased. Modern trousers worked just fine, as by the regency era men were wearing long trousers rather than knee breeches. (Now regency trousers had fall-fronts, rather than zipper flies, but for the play I'd hope no one was paying that much attention to the guys' pants!) Modern dress shirts also worked for the costumes. The collars were flipped up and tied with a cravat. The cravats couldn't be easily bought, but they were quite simple to make - just a long strip of fabric hemmed on all sides.  


Then came the waist coats - the second most involved part of the gentlemen's costumes. Modern vests just don't have quite the right shape, so a little more refashioning was required.

A waistcoat in the middle of refashioning - and a brother who appears to be done with trying things on.

Primarily, the bottoms of the waist coats needed to be straitened out - the hem of a regency waist coat was strait across - not pointed! Some waistcoats required a little extra work as well.


This red one for example needed a back! So, my mom combined it with this black dress shirt to turn it into a real vest.

Didn't she do a great job?
Tailcoats, waistcoats, shirts, trousers, and cravats: after over 2 months of sewing it all came together so that my brother and his friends all looked like perfect regency gentlemen the night of the play!


From all reports the play came off beautifully! Of course, I was disappointed to miss it - but my best friend recorded opening night for me! So next week when I get home I plan on watching it! I can't wait to "see" this play I've heard so much about over the last few months!

The costume coordinator, the set builder, Mrs. Phillips, and Mr. Collins (already out of costumes)

But mostly, I'm looking forward to seeing these people again! I've missed my family this year! Just 5 more days till we're re-united!

Thursday, November 9, 2017

The Backpack Needed Pockets

Once upon a time, there was a girl who was traveling the world for 11 months. Her goal on this journey to share the love of Jesus with others. On this journey she carried 2 backpacks - one ginormous internal frame pack, and a day pack (the largest school backpack she could find). When she set out on her journey that ginormous pack weighed 47 pounds - it was heavy, but not too bad. But then, 6 months later, when it came time to fly from Africa to Europe that ginormous pack weighed 66 pounds! You see, the girl had done a bit of fabric shopping in Africa. . .


Big pack and day pack - packed and ready to leave Ghana

Well, thanks to a friend who had an extra bag, the girl was able to get all her belongings safely to Europe. While in Europe, this girl’s mom came to visit her - and agreed to take all of her fabric acquired in Africa (plus more that had been acquired in Europe) back to the United States! Thus, the girl's ginormous pack was lightened by 20 pounds!! Upon realizing how nice it was to have a lighter pack, the girl decided she also wanted to lighten her day pack. She decided the best way to do that was to find a new, smaller backpack that she just couldn't put as much stuff in. Less stuff =lighter weight. The girl’s mother was on board with this idea so she bought her daughter a new, smaller backpack, and took the old, large, school backpack and all the girl's extra stuff, back to the United States.


The big suitcase my mom and I bought in Romania so she could take a bunch of my stuff (and friends' stuff) home!

The girl then continued on to Asia, happy that her ginormous pack was now an acceptable weight and happy to have a smaller day pack.


Upon arriving in Asia however, this girl decided that her new day pack needed some adjustments - namely pockets. So she set to work to add those.


Digging through her pack she found a mesh drawstring bag, the perfect size to be cut up and turned into a water-bottle pocket on one side of the new backpack.


The other half of the mesh bag, along with the original drawstring, was hand-sewn on the opposite side of the backpack. This made the perfect travel pillow pocket!


Then some webbing (also found lurking in the ginormous pack) was sewn down one side of the front of the backpack, creating loops for things to be clipped to.


The perfect place to attach a coffee mug! (Something that always needs to be kept handy as this girl has a slight coffee addiction!)


To finish off the backpack modification project, loops of webbing were sewn onto the backpack above the side pockets.  A place to clip a water bottle to keep it from falling out of the pocket when the backpack is shoved under bus seats.


With these additions the girl's new day pack was good to go! Much smaller and more comfortable to carry than the big school backpack - and custom made to carry her water bottle, pillow, and coffee mug! The perfect backpack for the girl to carry during the last 3 months of her travels. 

Now, those final 3 months are almost done (Only 2 weeks left!!) and you can read all about them here


Thursday, November 2, 2017

Costuming Pride an Prejudice - The Dresses

Meet Mrs. Phillips,

photo credit: Clara Stark

Also known as my little sister. 
Yep! This year my younger siblings' home school group play is Pride and Prejudice! And my wonderful mother is coordinating the costumes.
 Upon hearing this bit of news from home, I briefly mourned the fact I wouldn't be home to see the play and help costume it. (This big sister, currently in Malaysia, wants to know why teleportation hasn't been invented yet?) Then I started talking costumes with my mom. Over the past 3 months we have had multiple video chats and a long-distance phone call or two (wifi was non-existent for me in Cambodia) to discuss the costuming of this play. (Not to mention the daily text conversations) 


Now, it is not uncommon in the home school group plays for moms to make their children's costumes. So, my mom's first order of business was to make resources for this task available to the mothers. She decided a basic regency dress pattern was needed.


McCall's M7530 fit the bill. A modern drawstring/elastic waist dress pattern, it promised to be easy to adapt and easy to sew.


The sleeves got slightly altered, the waistline got raised, and my mom put the pattern to the test by making my little sister's "Aunt Phillips" costume.


The dress turned out great! Exactly how my mom had envisioned it! So, she went on to suggest the same pattern to other moms and then made 2 more dresses herself for some of the other actresses.


This blue and white dress, modeled here by my sister, will be worn by Elizabeth Bennett in the play.
I think my mom did an excellent job adapting the pattern to have an over skirt for this dress! For just a little something extra on stage, she also added a navy blue ribbon sash and ties in the back.


Following the completion of Lizzy Bennett's dress, my mom had gotten the hang of the pattern and been bitten by the sewing bug! (I tell you, sewing, especially costumes, is addicting!) So she volunteered to make another dress. This green dress will be worn by Lady Lucas.  


Now, the play is in a little over a week, so it's costume crunch time! My mom tells me the dresses are all done. She just has some accessories and gentleman's costumes to finish up.


Check back here in a week or so, as I'll be sharing the rest of the costumes once my mom completes them. Caps, lace collars, bonnets, fichus, tailcoats, and waistcoats coming up! 


I'm quite proud of the costumes my mom has made and coordinated for this play, and I can't wait to see more pictures (and hopefully a video!) once the play opens!

To see what I'm up to this month (since it doesn't involve costuming a play) check on my World Race blog! I'm currently in Malaysia - my 11th and final country.