Saturday, December 30, 2017

Copy Cat Coat

I saw it in a movie. The perfect coat. The one I just had to have. It was green (My favorite color!), long, full skirted, and had the most awesome full sleeves, perfect for wearing over shirts and dresses with fun sleeves. Yes, in Cambodia I watched Age of Adeline for the first time and, while sweating in the Cambodian heat, I fell in love with Adeline's green New Year's Eve coat. I decided then and there that I would have to replicate it one day . . . eventually.

photo source
Then eventually came, and this coat got moved up in my sewing queue. While in Malaysia I found out about a challenge called "Designin' December", hosted by Linda of "Nice Dress! Thanks, I Made It! The challenge is to find a designer garment you would love to own, but can't for whatever reason, and make one like it yourself! (In the month of December). As I would actually be home and reunited with my sewing machine in December, I decided I would take part in the challenge! All I had to do was find the garment I wanted. Or so I thought.

After looking through tons of pretty designer dresses, and wishing I had time to make them all, I couldn't decide what I wanted my "Designin' December entry to be. Then I remembered this coat - could I make it as my entry? Did it count as designer made? Well, after some digging on Pinterest, I discovered that the Age of Adeline green coat was indeed designer made! Gucci, fall 2013. Thus, I had a deadline for making my coat - December 31, 2017. All that was left to do was to go home, be reunited with my sewing machine, and dig through my fabric stash for some coat weight wool.


A few weeks later I returned home and digging through my fabric stash commenced. Well, my stash appeared to be short on green coat weight wool, or any coat weight wool for that matter, but I didn't let that deter me! I figured that a mid-weight wool flat lined with a cotton flannel (found in my stash) would work just as well as a heavy weight wool for my coat, so I selected a gray wool from my bin of wool yardage and plowed forward with my coat project.


I made peace with the fact that my coat would not be green like Adeline's, but I still didn't really want a gray coat. No, my coat was going to be a pretty color. Blue to be exact, because that was the color of Rit dye I happened to find lurking in my sewing room. (I have no recollection of when I bought this dye or what I bought it for). So, one Sunday evening I dyed my gray wool blue, and I was all ready to start on my coat! Until I realized I'd forgotten to dye the 100% silk sheet (Also found in my stash)that I'd intended to use for the lining of my coat. So I had to make a trip to Hobby Lobby for a second bottle of dye. 


Once that white silk sheet was dyed a brilliant blue, I was really ready to start on my coat, but starting got delayed once again. First I had to make some Christmas dresses. Well, this delay gave me time to think about how I wanted to construct my coat, and I decided that I wanted a quilted lining for extra warmth. So, I bought some cotton quilt batting and my planned coat became 4 layers thick - wool, flatlined with cotton flannel, followed by batting quilted to a silk sheet.


This would make my coat rather bulky, but quite warm.


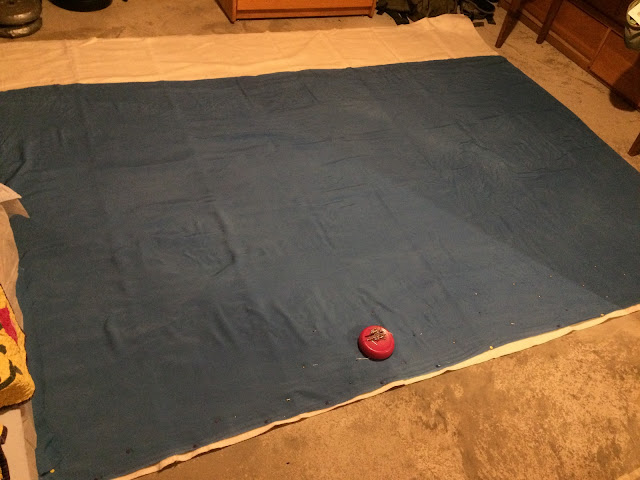
Finally, Christmas dresses, and everything else that needed to be finished by Christmas, were done, and I could really start on my coat! I began by quilting my lining. That step took longer than everything else I had to do on this coat put together! First I pinned the sheet to the batting,


 Then I sewed. And sewed. And sewed. While watching Harry Potter. (Something had to make sewing a bunch of straight lines less boring!) My quilting is nothing special, just a bunch of straight lines spaced 3-4 inches apart, but it does its job!


After taking up the dining room table for a day to quilt my lining, I was finally able to cut my coat out! I only had 2.5 yards of my wool, so getting all my pattern pieces out of it was tricky - but it happened! Just barely.


The collar, facings, and pocket welts were cut out of a coordinating wool blend. I acquired about 3/4 a yard of this deliciously soft, subtle, plaid fabric in Romania for about $1.25. I had no clue what I was going to do with it at the time, but I knew I had to have it! After I dyed the wool for the main body of my coat I discovered that my Romanian wool remnant would make the perfect accent piece! 

  
I'd intended to hodge-podge together a pattern for my coat, but it turned out I didn't have to do that! (Which shortened the time it took to make this coat considerably!) While in the midst of Christmas dress sewing, I happened upon a Vogue pattern sale, and found the perfect pattern - Vogue 8875, a 50's reprint pattern. It had just the shape I was looking for, without being a fabric hog.


All I had to do to make the pattern match my vision for my coat was extend the front coat pieces to make them cross over each other, rather than meeting in the center front, change the collar from a shawl collar to a notched collar, and slightly widen the sleeves. 


Pattern alterations made, the coat came together incredibly quickly! In what felt like no time at all, I was pinning, and then hand sewing, the facings and hems in place.

This coat is so thick the thimble had to come out for the hand sewing!

The resulting coat turned out even better than I thought it would!


It's soft, and warm, and pretty!  And it matches my original inspiration perfectly!


 Well, almost perfectly. I did make one slight change (other than the color) from the original.


Pockets. The original Gucci coat didn't have pockets. What is a coat without pockets?!?! Of course my coat needed pockets - so I added welt pockets. 


And I certainly don't regret it one bit!


My coat is exactly what I wanted it to be, and it should last me for many winters to come!


I am so glad that I actually got it made!


Now I just need to make or find gloves and a hat to go with it!


Do you have a project brewing on your mind that you can't wait to get started on? 

Friday, December 29, 2017

1930's Flannel and Velvet Christmas Dresses

Plaid, vintage-inspired, Christmas dresses. I had been looking forward to this project for months!


Whenever I had down time on the World Race, it wasn't unusual for me to daydream about future sewing projects. So, of course, I planned Christmas dresses for my mom, my sister, and myself, back in June or something - when I was sweating in Africa (a place I actually loved, and would love to return to one day) and dreaming of colder times.


I dreamed up green plaid Christmas dresses for the girls in my family. Green plaid variations of Simplicity 1587, the pattern I used to make my map dress.


 As you may have noticed by now, however, Our Christmas dresses are not green plaid, nor are they made out of my map dress pattern. Black Friday sales happened.


On Black Friday, my mom, sister, and I went to Joann's with the intention to buy a green plaid for our Christmas dresses. (All apparel fabric was 60% off that day!) There was green plaid to be had, but there were also lots of other pretty plaids. My mom and I fell in love with this gray and navy cotton flannel plaid. It would make beautiful and warm Christmas dresses! We just had to convince my little sister it was the perfect fabric. That proved easier said than done.


 Gray flannel was not what my little sister had in mind for her Christmas dress. Oh no, not at all. This young lady has some very definite opinions on what her clothes ought to look like - as she should at age 13. Gray flannel was just not going to cut it. So she started browsing other, prettier, fabrics, and found the perfect compromise - Navy blue velvet. It matched navy in the plaid and brought the flannel up to "Christmas dress worthy." Thus, we left the store that afternoon with yards and yards of gray and navy flannel for the dresses themselves, a bit of navy velvet for little details on the dresses, and patterns to make the dresses from.


Yes, patterns. Simplicity patterns were on sale, so we thought we might as well look through the pattern books to see if there were any patterns begging to be turned into flannel and velvet Christmas dresses. Right away my mom found one - Simplicity 0504, a new 1930's reprint pattern. She could easily picture this pattern as her Christmas dress, except for 2 things - She wasn't a huge fan of the neckline, or the sleeves. Well, I knew I'd be able to re-draft the neckline for her easily, and the sleeves wouldn't be a problem either. You see, Simplicity also re-released a 1930's sleeve pattern. That's right, a pattern just for sleeves. Simplicity 8506 has patterns pieces for 8 different 1930's era sleeves that you can add to any blouse or dress! Talk about a handy pattern to have around! My mom picked sleeve E, and I was all set to make her Christmas dress. 


My sister and I had a harder time deciding what we wanted for our Christmas dresses, nothing in the pattern book looked quite right to us, but the following week we got it all figured out. When we accidentally found ourselves at the American girl store, my little sister saw Kit's new Christmas dress, and requested that her's be made in the same style. As Kit is from the 1930's the same era as my mom's pattern, that was perfect! So, after a bit of pattern combining, altering, and drafting, a dress like Kit's is just what my sister got!


That just left me. What did I want for my Christmas dress? I wasn't sure, but since my mom and sister were both getting 1930's inspired dresses, I decided that's what I wanted too! So I picked Simplicity 8247, a 1930's reprint that was already in my stash. I combined looks A and C for my dress and wound up with something I really like! And that's a sentiment my mom and sister both echo with their dresses!


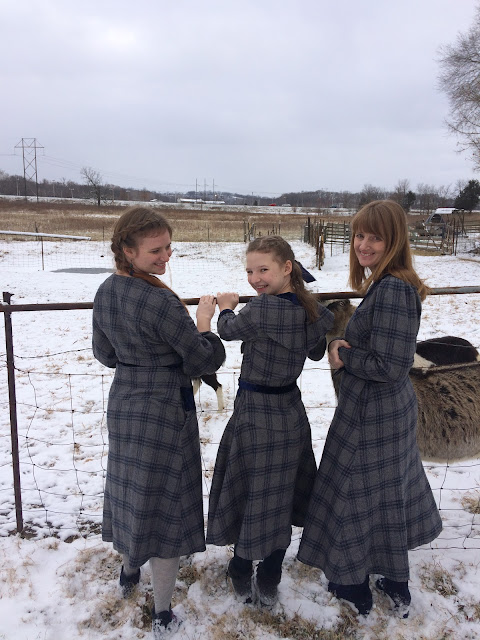
These dresses are soft and warm - perfect for wearing to church on a snowy Christmas eve to celebrate our Savior's birth!


We had a wonderful Christmas together as a family - and I hope you and your family had the same! Merry Christmas, and Happy New Year!


Sunday, December 24, 2017

The Elastic Red Bustle Outfit

If it were any other year, I would be staying up until at least until 1 a.m. tonight finishing Christmas gifts. But not this year. Nope, this year I'm not sewing Christmas gifts. My little sister will not find a new historical dress under the tree tomorrow, and my brothers will not find new jackets. No, this year I didn't sew all my Christmas gifts. This year the gifts I'm giving are the souvenirs I brought back from my travels this year. 


Two years ago, it wasn't that way. No, 2 years ago, after I made someone a gift I came up with another idea of what else I could make them, then I made that too. I did an awful lot of sewing, and my little sister was one spoiled little girl when Christmas morning came.


She found this jacket at a historical event we went to that fall, and fell in love with it. So, my mom bought it for her, and my little sister took it home. There was only one problem - she had nothing to wear it with! So, for Christmas in 2015 I fixed that problem. 


In my stash I had a red damask tablecloth, which had been acquired at a thrift store. It didn't perfectly match the jacket, but it was pretty close. With this I paired a piece of black velvet, also found in my stash (I can no longer remember where it originated from). The two together formed a "bustle" skirt.


For the table cloth portion of the skirt I used a pattern as a guide in order to make the skirt flat in front, gathered in the back, and full all around the hem. (as this was two years ago, I can't remember what pattern) Over that I draped the black velvet to form an overskirt. The two were then sewn onto an elastic waistband.


Now, you're right, an elastic waistband isn't historically accurate at all, but really, this outfit isn't supposed to be historically accurate. It's a costume inspired by dresses worn in the 1870s and 1880s, not a reproduction of those dresses. The best way to make children's costumes that will fit for a long time? Elastic waistbands.


And fit for a long time this costume has done! As I mentioned, I made this skirt two years ago for my little sister, and these pictures we just taken last week. Right now, this girl is growing so fast that almost nothing I made her a year ago still fits, let alone two years ago! Elastic waistbands are truly amazing things.


My little sister loves that this fancy, Christmas-y, "bustle outfit" still fits - and I'm hoping that will soften the fact that I didn't have time to make her a new historical costume for Christmas this year. (I've been too busy making her new everyday clothes! Have I mentioned that this girl has grown this year?)


Have you finished your Christmas preparations already? Or will you be sewing into the wee hours of the morning tonight? 

Friday, December 15, 2017

The Golden Tunic

My mom, sister, and I accidentally wound up in an American Girl Doll store. We took a day trip to  to go to an outlet mall, took a wrong turn, and found ourselves in the parking lot of a mall, right in front of an American Girl store.
Now, my family has been fans of American Girl dolls for over 20 years, but we've never been inside a store. (When I was really into AG dolls the only store was in Chicago! Too far of a drive.) So, since we happened to find ourselves right outside of a store, my mom, sister, and I decided we might as well go inside and look around. Oh, that was fun!
We wondered around the store, admired the dolls and how they were set up, and discussed some of our favorite dolls and outfits. My sister fell in love with the shirt this doll is wearing:


The shirt was available in Girls' sizes as well as doll size, and was even on sale that day, so we let my sister try it on. Lo and behold - that girl has grown this year! She tried on the largest size AG had, and it was too short! (When did she get so tall??) So, the shirt got left behind, but, as my little sister will tell you, there are a lot of advantages of having your own in-house custom seamstress. 


One of which is she can reproduce almost any garment for you - in your size, as long as she has the right fabric. Well, the right fabric appeared sooner rather than later. After we left the American Girl Store, we headed to the outlet mall we'd originally made the trip for. On the way to the outlet mall, we passed a fabric store. So, of course, we had to stop and check it out. Well, it turned out it was an upholstery and drapery fabric store, not an apparel fabric store, but it was still worth wandering through.


There we found this pretty embroidered cotton, in the clearance section for $5 a yard! My sister decided it would work to reproduce the American Girl shirt. So, we bought a yard, as the fabric was 60 inches wide, so we didn't need more than that!


The following week, the shirt got made. I used McCall's M7111, a very simple girl's dress pattern. It goes up to size 14, and is from their "Learn to Sew" line. I shortened the pattern from dress to tunic length and added a ruffle to the hem. 


The sleeve pattern also got changed to be a bit more puffed, and I cut the pattern right across the chest so that a knit yoke could be added to match that of the inspiration shirt.


Once the pattern alterations were made, and the fabric was cut, the shirt came together incredibly quickly. A couple hours after work one evening, and the shirt was done!


My sister was thrilled with her new "American Girl" shirt, and agreed to let me take pictures of it outside, despite the chilly temps - as long as a few of those pictures involved her sitting on top of the old chicken pen.


She loves getting to climb on things, so this is her current favorite photo prop. Florecita is a fan too - Just in case you didn't think goats could climb, here is proof otherwise.


The goats proved to be a little distracting, however, so after getting the required "chicken pen and goat" pictures, we moved on to other locations.


Trees and rocks hold still much better than goats do!


Although I have to say, trees and rocks are a little less fun!