Showing posts with label Pattern Hack. Show all posts

Sunday, August 11, 2024

The Goat Dresses

 Who wouldn't want a goat dress?


No, No, No. I don't mean a dress for the goat to wear! I mean a human dress, with a goat print on it!


Despite my years and years of raising goats, and my (slightly fewer) years of making myself what ever dress struck my fancy, I actually never considered making myself a goat dress, until The Dreamstress shared this Gilbert Adrian dress on Facebook last year.


It has Sheep on it! (Ok, lambs to be precise.) If a fashion designer in the 1940 could make a sheep dress, why the heck hadn't I made a goat dress yet???


All I had to do was find some goat fabric - and for some reason goats are just about the most under represented farm animals when it comes to animal prints. There are goat prints out there, but they're generally something I have to actually order, verses something I can just go into a local fabric store and buy (after a good half hour of feeling it, considering it, staring longingly at it, and carrying it around the store while admiring other fabrics. I have my method.)


Well, back in January I found a goat print at my favorite place for novelty print cottons - the Mennonite fabric store out in the middle of nowhere. It was blue, with cartoon goats all over it - quite different from the realistic looking lambs frolicking on a green background of my inspiration dress - but it was a goat fabric! So I bought 3 yards of it. 


I decided I could use the cartoon goat fabric to make goat dresses for my two favorite preschool-age girls. I'd already made both of these girls chicken dresses, and they both love my goats, so obviously they needed goat dresses!


For two months I intended to just make the little girls dresses out of this goat fabric, and I'd keep my eyes open for just the right goat print for a dress for me. Then it came time to cut the dresses out, and I couldn't do it - I wanted a goat dress right now too! So I shifted plans. All three of us would get matching goat dresses.


To make my three yards of goat fabric stretch I decided to take inspiration from the Gilbert Adrian dress and make the bottom section of the skirt green, just using my blue fabric for the bodice and upper section of the skirt. I found a 2 yard cut of a lovely green swirly fabric at the City Sewing Room for this purpose. And to make sure I'd have plenty of my goat fabric, I also bought 1 yard of a solid pale blue cotton for the collars, cuffs, and waist bands.


Next up, figuring out a pattern! In homage to the inspiration dress, I wanted something vintage(ish atleast), with cut on sleeves and some sort of a collar. To make things slightly complicated, said pattern also needed to come in both adult and children's sizes. Thankfully, I had something that would work in my stash!


 McCall's 7184 - it met all the requirements! This is one of my favorite blouse patterns (you can see my previous versions here and here), and thankfully it comes in both children's and adult sizes - and I own a copy of each! All I had to do was trace off the blouse pattern in the girls' size, shorten the sleeves, shorten the blouse length to the waistline, ignore the darts, add a waist band, sleeve bands, and a skirt, and I'd be set to go! That might sound like a lot, but it was really quite easy. I decided to make the dresses button all the way down the front, as that's been a favorite style of mine lately. 


Not wanting to distract from the design of the dress, and especially the goat print, I decided to use clear buttons on the dresses. I had a nice set of large transparent buttons off of a duvet cover (the duvet cover that became this skirt) for my dress, but finding crystal clear buttons for the girls' dresses proved slightly more challenging. I had one card of clear vintage patterns just the right size - but there were only enough for one dress. Neither Hobby Lobby nor Wal-Mart had any clear buttons, and I didn't have time to go check Joann's that week. So, in the end I I had to settle for a card of clear-ish buttons from my stash for the second little dress. Those worked fine, they just weren't my first choice.


Once the dresses were done, I needed an occasion to give the girls their dresses - and neither one had a birthday any time soon. So I decided to make an occasion, an occasion where we could all three wear our dresses together.


A tea party!! 


I fixed a tea tray with all the most kid-approved foods - chicken nuggets, cookies, and berries. After asking each girl individually ahead of time if they preferred hot of cold tea, the vote was unanimous and I made some iced tea to fill the little tea pot with.


 When the girls arrived for the tea party I gave them each a gift bag. They unwrapped their new dresses, and were both very excited to put on the goat dresses right away!


After they finished their tea, we went outside to find the goats.


Because, if you have a goat dress, obviously, you must wear it to play with goats!!


Wednesday, March 13, 2024

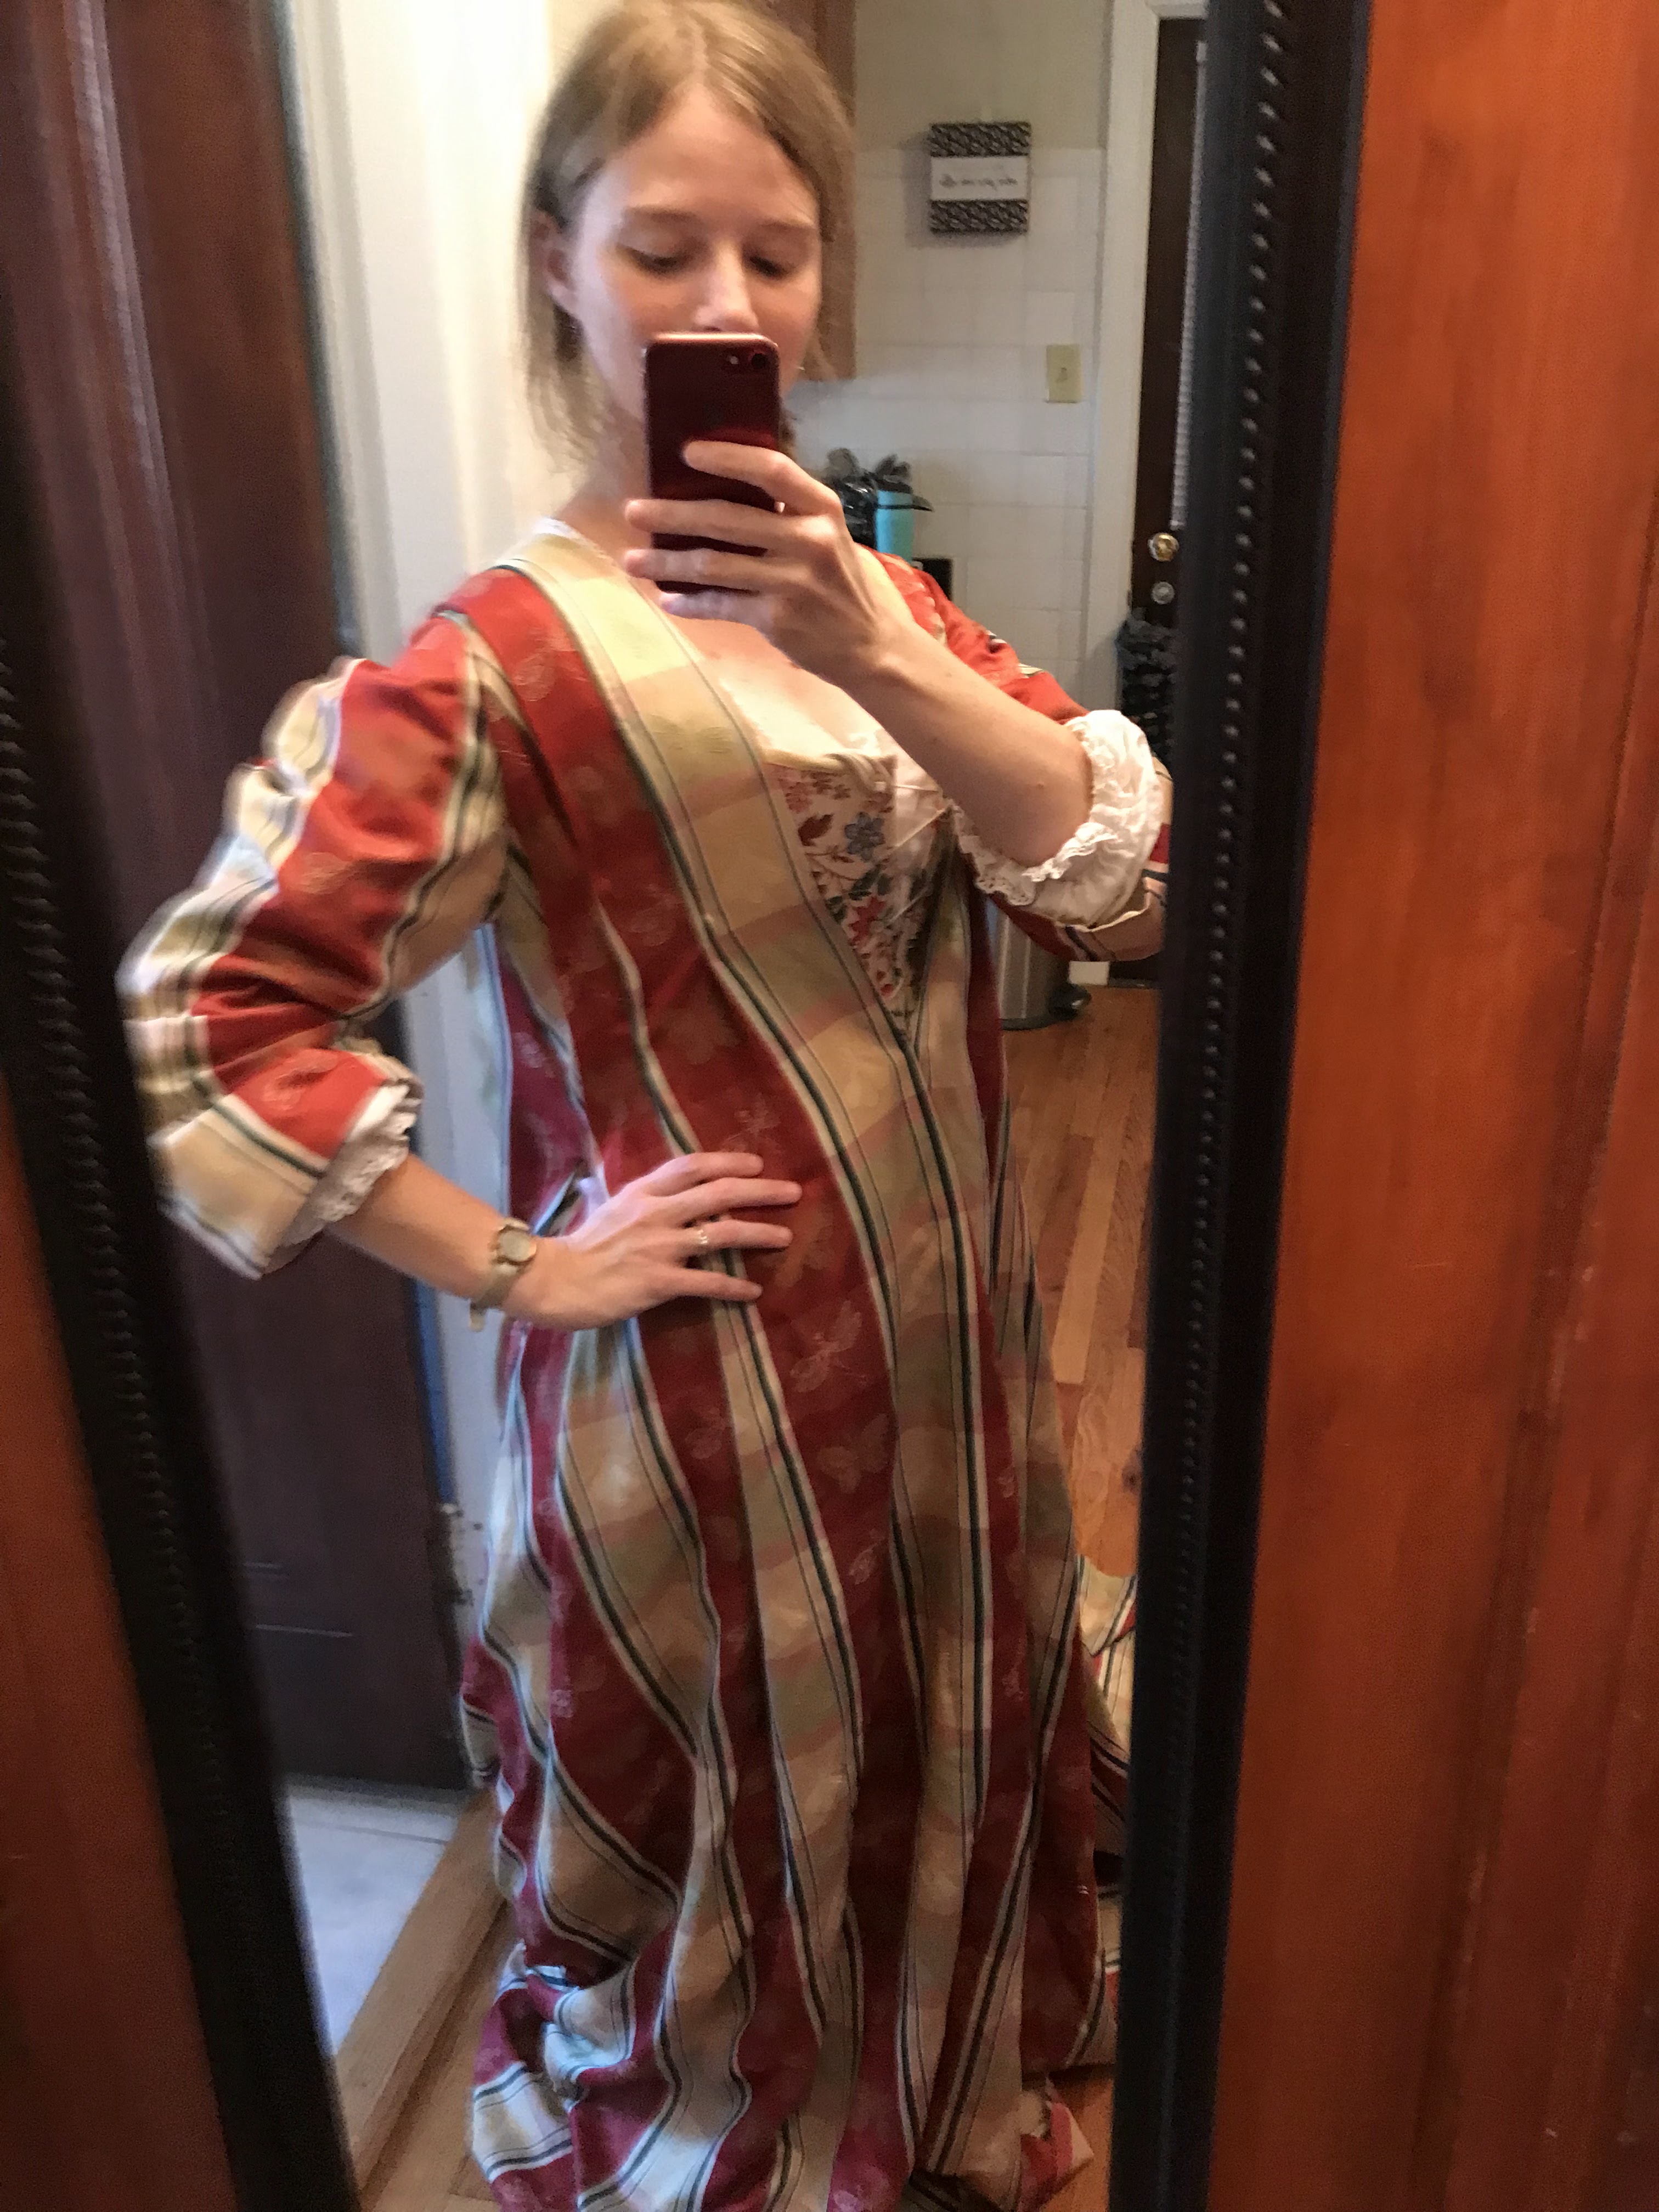
Making the Dragonfly Volante

 Historical Accuracy was already out the window for my Robe Volante thanks to my Spectacular fabric choice, so when it came to assembling the gown, I went straight to the sewing machine. No need to hand sew the whole thing!


Volantes could have a fitted bodice lining, with the loose outer layer draped over top. Or, the lining could be skipped entirely, giving you just a nice loose tent dress type garment. There are extant examples of both types. I chose the second option for my gown. A lining was one more thing to fuss with and fit - and I just wanted to make the pretty dress! Also, as I mentioned in my last post, I made this the summer I got married. At that time I was quite certain I would find myself pregnant very soon (too bad that plan didn't pan out. . .), so I figured a loose, almost completely unfitted, garment in my costume wardrobe would come in handy in the near future. If not all Volantes in the era had a fitted lining, I saw no reason to put a fitted lining in mine. 


Upon deciding to skip the lining, I forged ahead and sewed up the center front and back seams on the sewing machine, being sure to match the stripes n the fabric across seamlines. Where needed, I serged raw edges to prevent unraveling, but the center front and back were cut on the selvedge edges so this was unnecessary there.


Then I pleated the back. As I mentioned in my last post, early Volantes (1720's and 30's) could really have any arrangement of pleats and gathers in the back. My favorite arrangement of those I looked at was a set of 4 box pleats across the top, so that's what I did with mine. Four box pleats, each featuring butterflies and dragon flies in the center.


For the front panels, I sewed up the center front seam with a very large (several inches) seam allowance, and left the seam entirely open above the waist.


This gave me a V-shaped front opening perfect for showing off a stomacher on the finished gown.


The extra wide seam allowances were then folded back and stitched down on either side if the opening to form a facing. And yes, this part was handsewn. All the interior construction was done by machine, but anything that could be seen on the outside I tried to hand sew.

Once the center front seam and opening were addressed, I sewed up the side seams (leaving pocket slits open of course!), then pleated the front shoulder straps in a manner similar to the Volantes I'd seen online. I pinned the shoulders together then tried on the gown.


It resembled a shapeless tent, but that was kind of the goal, right? Things were coming along nicely! 


I proceeded to make the sleeves (by machine) and the pleated cuffs to go on them (also by machine, but with hand finishings.)


I hand sewed my shoulder straps in place. (really the best way to do any 18th century shoulder straps and sleeves.)


Then set the sleeves with a whole bunch of little pleats. Later 18th century sleeves are usually set with 2-3 larger pleats, but earlier sleeves could have lots of little pleats, and that sounded fun to me, so that's what I did. (Has it become obvious yet that this whole thing was a "that looks/sounds fun so I'm going to do it" type of project, rather than a heavily researched and planned project?)


As with the shoulder straps, the sleeves were hand sewn in place.


Thanks to their loose fit and all the little pleats, these sleeves were easier to set than later 18th century sleeves. (I now highly recommend the early 18th century, it's fun!)


Once the sleeves were on, I tried on the gown again and decided I really ought to make this shapeless tent a bit more shapely.


So I extended the front shoulder pleats, pinning them all the way down to the waist to make the bodice a bit more fitted.


I hand sewed those in place.


Then I bound the back neckline.


And put the whole thing on my dress form - it looked just about right now!


I trimmed up the hem to what I thought was about the right length, then finished it with a hem facing. 


The gown was done!


 To celebrate I embroidered my initials and the year into the back neckline - just for fun!

Now I just needed to figure out a stomacher, sleeve ruffles, and head gear to go with the gown, then I could find an excuse to wear it!


With this in mind, I put the gown away in my costume trunk - where it stayed for the next 2 years. . .

More on that, next time!


Wednesday, February 28, 2024

There's Nothing More Natural Than a Horse Hair Bustle, Right?

 I was getting carried away with my plans for the pink and burgundy 1882 gown. I was ready to mock-up the bodice and make some real progress on this thing! Then I had to halt and do a pivot.

I needed the correct under things to go under this new gown and give it the right shape. And it would really be best to make those things before going through the hassle of mocking up the bodice to ensure a good fit on the finished product. 

Thus, the bodice patterns I was contemplating got set aside for another day, and I fell down the rabbit hole of horse hair bustles.


1882, the year of my fashion plate, was at the tail end of what we call the "Natural Form Era." "Natural" as in the fashionable shape resembled natural women's shape slightly more than the fashionable shape of the years preceding and following this era - but it certainly wasn't entirely natural. Corsets, of course, were still worn, as were petticoats, and bustles. Yes, bustles. But not the large lobster tail bustles of the mid 1870's and 1880's. No, the bustles of this 1878-1882 era were much smaller and more natural looking - just a bit of extra "oomph" added to the back of the silhouette, rather than an extensive wire contraption. 


The book Victorian Fashions & Costumes From Harper's Bazar, 1867-1898, edited by Stella Blum, features a drawing of an 1881 "hair cloth bustle" on page 135 - this became my primary inspiration for my own horse hair bustle. Then I took to the internet to see if there were any of these bustles in museums that I could find pictures of - and that yielded rich results!

LACMA, Woman's Bustle

Turns out there's a wide variety of extant horsehair bustles which have found their way online. The above bustle from LACMA was particularly intriguing to me and looked relatively easy to make.
In my internet search I also came across the Modern Mantua Maker's blog post about her natural form underthings - and the pictures she shared of her horse hair bustle (especially the inside of it) gave me a good idea of how to construct one.


Armed with my inspiration pictures, I ventured down to the basement to locate suitable materials in my fabric stash - hair canvas (bought in 2020 for a men's tailoring project I never did get around to) and a blue striped cotton (obtained from a church basement that was being empties out probably around 2018ish) for the base. Originally I was just going to use plain unbleached muslin for the base fabric, but the stripes called to me and I couldn't resist them!


I used the back and side back upper skirt pattern pieces from McCall's 8191 (The pattern I used for my sister's natural form gown) as the starting point for the bustle base - they looked like they would give me a similar shape to the bustle in the book I was using as inspiration. I cut 2 side back pieces, with the front edge straightened out, to use as the "wings" on my bustle. For the center back, I folded some width out of the middle of the pattern piece since I wouldn't be needing to gather the top edge the way you do for a skirt. Then I cut out two sets of center back pieces - one set slightly wider than the other.


I would use the wider back panel to mount my horse hair ruffles on, then I would pleat the upper edge of that panel to match the width of the narrower panel, essentially using the narrower panel as a stay to help the wider panel on top maintain a bit of extra "oomph" once all the ruffles were sewn on and the bustle was assembled.
Speaking of assembly,


I began by binding the the front and bottom edges of the side panels with linen tape to finish them. Then I sewed up the center back seams of both the top/wider "ruffle" panel and the bottom/narrower "stay" panel, and bound the bottom edges of each of those with linen tape as well.


After that I measured and marked ruffle placement on the top panel, and proceeded to hem all the horsehair ruffles.


The very top ruffle then had gathering stitches run along the top and through the middle. It would be gathered up and sewn on as a "poof" to match my inspiration images. 


I pinned on the ruffle according to the marks on my striped panel, then gathered it to fit.


Gathering horse hair canvas is no joke.


I regretted this decision almost as soon as I started.


Pleating this ruffle would have been wayyyyyyy easier than gathering.


Eventually it was done - but never again!


Once that first ruffle was all gathered and pinned on, I pleated the next ruffle.


Wayyyyyyy quicker and easier.


I did the same thing with the third ruffle.


Then I took the ruffly-puffly thing down to the sewing machine.


I sewed on the ruffles.


Then covered the upper raw edge of the two pleated ruffles with linen tape.


With that, the ruffe panel was done and the bustle was ready for final assembly.


I pinned the non-ruffled stay panel to the side/wing pieces, right sides together.


Then, right sides together again so the wing panels were sandwiched between the two back panels, I pinned the stay panel to the ruffle panel along the side seams.


 I sewed up those side seams, pinked them to keep them from unraveling, then turned the bustle right side out.


I slightly pleated the top edge of the ruffle panel to fit the top edge of the stay panel, then sewed the bustle onto the waistband I'd already made.


And with that - my Natural Form bustle was done!


It only took about 3 hours to make (One morning when I was home due to an ice storm), and the results are incredibly satisfactory!


And, it first the HSM theme "Colors of Nature", which feels fitting for something from the "Natural Form" era.

What the item is: Hair Cloth Bustle

The Challenge: Colours of Nature: Make something using undyed material, or material coloured with natural dyes. The horse hair cloth and linen tape are both undyed. The striped cotton base fabric does obviously have some dyed sections, but the shades of blue are all shades than can be achieved with indigo - a natural dye (Though as I received this fabric either second or third hand I have no idea what it was actually dyed with.)

Material: Horse hair canvas, and plain weave striped cotton

Pattern: I used some pieces from McCall's 8191 to get the base, then altered those and added ruffles.

Year: This is based on an image from 1881, but would be appropriate for about 1878 -1882 looks.

Notions: Linen tape and thread

How historically accurate is it? My hair canvas is modern, with some synthetic in it, so that's not accurate, but the striped cotton is good. My construction method is just what made sense to me without a lot of research, so I can't 100% vouch for it. The finished garment looks correct though when compared to similar pieces from the era, and it serves it's purpose well, so atleast 60% I'd say.

Hours to complete: 3

First worn: February 2024, but only for pictures and mock-up fittings so far.

Total cost: The hair cloth was about $8 a yard, and I think I used a yard and a half, so $12 there, everything else was stash, most of it obtained for free.