Showing posts with label Designing. Show all posts

Saturday, June 24, 2023

My "Rilla Blythe" 1916 Evening Dress - The Fabric, Pattern, and Plan.

 Well I thought I would begin blogging my 1910's and 1920's makes, from the Historical Sewing Society outing at the beginning of this month, in the order I made them - undergarments, 1921 day dress, 1916 evening dress. However, I have yet to get pictures of the corset, petticoat, and combinations, so rather than delay blogging the entire project for who knows how long until I get those pictures, I decided I might as well blog things in reverse order - and hopefully by the week I'm ready to blog the under things, I'll have some pictures!


And thus, without further ado, let's talk about my 1916 evening gown!

As with the majority of my historical sewing projects, I've been planning this gown for years. The 1910's was never really an era that had my attention, until 2017 when the Dreamstress shared her 1916 "Gather ye Rosebuds" evening dress. I fell in love with that dress! Suddenly 1910's, and specifically 1916, was on my to-do list!

2017 was also the year I did the World Race. In Cambodia (Asia really was the best continent for fabric shopping!) I bought some silk. 5 meters of of a stunning green and purple changeable/shot light weight silk, and one meter of a dark green heavier silk, which paired perfectly with the changeable silk.


By the time I made it home from the World Race I'd pretty much decided these fabrics needed to become a 1916 evening gown. And over the past 6 years I have spent an awful lot of time on Pinterest looking at inspiration and dreaming of my gown. 


I quickly realized I wouldn't be exactly replicating any one 1916 extant dress or fashion plate as I was rather limited by how much fabric I had. Yes, I had 5 whole meters of changeable silk, but that silk was only 32" wide - so 5 meters of it was the equivalent of 2.5 meters of the 60" wide silk I normally work with. Add to that 1 meter of 44" wide dark green silk, and we're talking less than 4 yards of "normal" width silk. I was sure it could be done somehow, but I would have to let the fabric dictate the style as I was making the dress, rather than getting hung up on one particular style I wanted to re-create. 


I was particularly inspired by both the blue and the pink dresses in the above plate, and came to the conclusion that I would use my changeable silk as a floaty over skirt and my green silk for most of the bodice. What either of these elements would look like or what the rest of the dress (primarily the underskirt) would be made from, I had no idea.


In December of 2018 I participated in "Designin' December" and won the prize of a gift card to the Vintage Pattern Lending Library.  I spent days drooling over all the options on the website, and finally decided to use my gift card on a couple of 1910's patterns. One of which was the 1918 Dinner Dress Pattern. Now this pattern didn't look exactly like the 1916 evening dress of my dreams, but I thought it would be a good starting point. 

Thus, when I was actually ready to start making my 1916 dress in May, that's what I had to start with - a limited amount of beautiful fabric, a vague plan, and a pattern to hack. 


While I worked on my undergarments and day dress, I spent my free time continuing to browse Pinterest in an effort to really nail down what I wanted this dress to look like within the fabric and pattern parameters I had. I came to the conclusion I would need a third fabric to use for the underskirt. A dig through my silk stash reveled the leftover silk from my mom's mother of the groom dress - it looked great with my Cambodian silks! And there appeared to be just enough left for a plain tea length skirt. 


With that my plan was formed, I would use the under bodice pieces from my pattern to make a cross-over bodice from the dark green silk, and I would leave off the "over bodice" from the pattern. I would use the skirt pattern to make the under skirt from my mom's left over light green silk. From my changeable silk I would make the over skirt and the sleeves - the short puffed ones from the pattern. The over skirt would be made using that pieces in the pattern, but. . .
I wanted it to be fuller. And I didn't like the points being at center front and center back, so those would have to be re-oriented. So my plan was to cut several of the over skirt pieces out of my silk to add extra points and gathers - but how many over skirt panels I would be cutting out was entirely dependent on how many I could squeeze into my limited amount of fabric.


 10 days before the event I cut into my fabric - the idea was still a little fuzzy, but it was there and it was time to make this dress happen!
Now that I've rambled on about how I "designed" this dress, check back later for the story of how it came together!


Saturday, May 6, 2023

Pretty Fabric Finally Used Up - My Easter Outfit

 I had several ideas for my Easter outfit swirling around my head in the month or so leading up to Easter. There are so many different patterns and fabrics in my stash that I really want to use! 


A week before Easter I was back at my parents’ for the weekend to take care of baby goats, and I still hadn’t really made a decision about my Easter outfit. All I knew is I really did want to make myself something new!


Next to my mom’s washing machine I caught sight of some fabric I picked up at the City Sewing Room last fall - and then forgot about in the craziness that was buying a house and moving last fall. A textured lavender cotton blend fabric and a brown floral quilting cotton. They looked amazing together stacked up next to the washer! My mind was made up, I’d use those two fabrics together to make my Easter outfit!


I traipsed down to the basement where my  pattern stash is still stored and started looking through blouse and skirt patterns for inspiration. I had two yards of the lavender fabric for a skirt, and a 3 yard long, 15” wide strip of the print for a blouse. This definitely limited my options a little bit.


For the blouse I picked Simplicity 1460. As long as I cut the back pieces with a center back seam, rather than on the fold as the pattern recommended, I was pretty certain I could fit all the pattern pieces on my narrow width of fabric. Besides, I’ve wanted to make myself another version of this pattern ever since I made my first one 5 years ago - it’s just taken me a while to get to it.


All the pieces did indeed fit on the width of fabric I had. There was even a bit left over for me to make sleeve ruffles out of. The blouse went together quickly and easily. I should make more versions of this pattern - it’s easy, fits well, and turns out adorable!


The scalloped neckline and angled darts are perfection!


I chose to hand-sew down the neckline and placket facing so as not to break up the print the way machine sewing would have.


As for the aforementioned sleeve ruffles I decided to add - those turned out rather stiff and overpowering.


So I added elastic to the bottle hem, turning them into cute little sleeve puffs instead.


Onto the skirt! I wasn’t thrilled with any of the pattern options available to me. All the patterns I liked required more than 2 yards of 45” wide material.


I gave up on the pattern idea and decided to just wing it. I wanted something ruffley, full, below knee length, and original. 


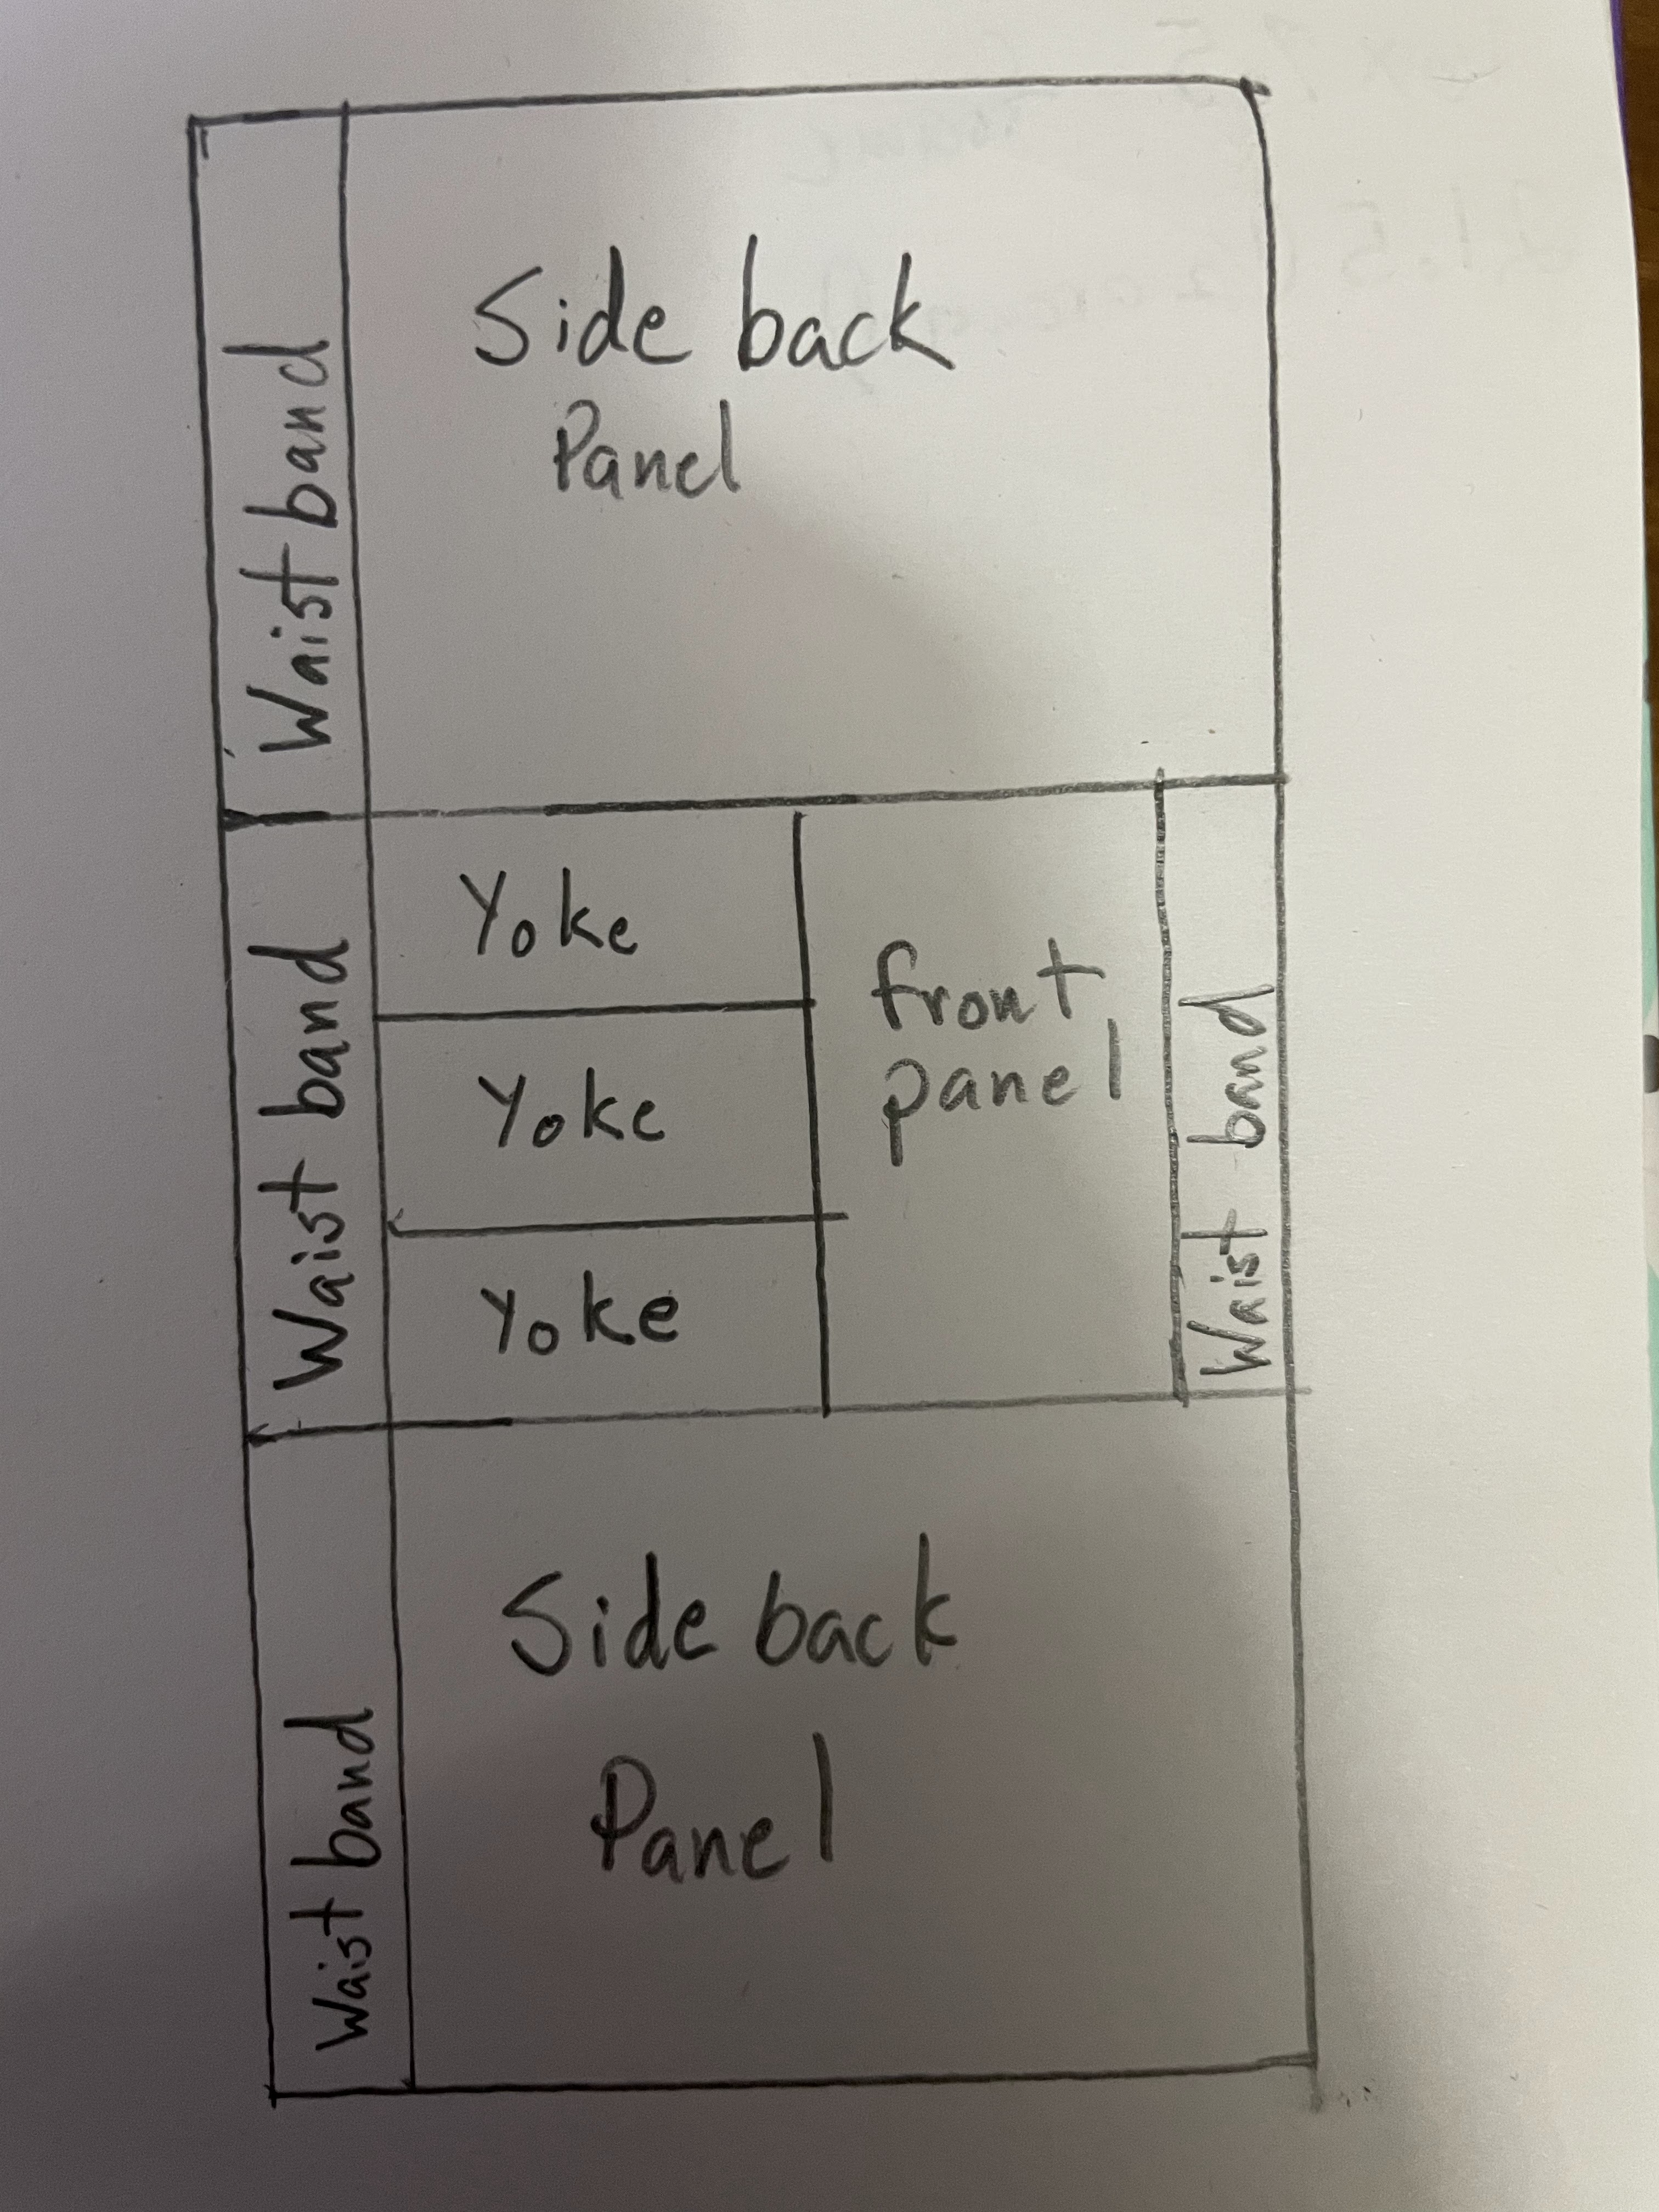
Without a real clear plan, I started hacking my fabric into rectangles, and here is how I wound up cutting it: 


2 wide rectangles for the back of the skirt, 1 narrow rectangle for the front of the skirt, 3 narrower and shorter rectangles for a yoke, and 4 long skinny rectangles for the waistband and ties.

If I’d put more forethought into the thing I would have cut a bit differently so I wouldn’t have had to piece the waistband together quite so much. But for this skirt I started by cutting my fabric into thirds, and then I chopped up the thirds to get my waistband and yoke pieces.

What about pockets you ask? Those I cut from some leftover cotton/poly broadcloth found in my stash.  I didn’t even try to cut them from my 2 yard length of textured cotton.

And here is how I decided to re-assemble all those rectangles to make a skirt:


The three yoke pieces were sewn together with pockets inserted in the seams where the two back yoke pieces were sewn to the front yoke piece.


The waistband pieces were sewn together and then divided so I had a piece approximately the length of my waist measurement, plus a little extra, to form the back waistband, and a longer piece to form the front waistband and ties. 


The three skirt panels were seamed together and hemmed.


Then the body of the skirt was gathered at the back and sides, the front was left flat to line up with the front yoke, and the body was sewn to the yoke -  I was careful not to catch the pockets in that seam.


Next the yoke was gathered to sew onto the waistband. The back waistband was sewn to the back and sides of the skirt, and the inside/back layer of the pockets. A button and buttonholes were sewn to the “tails” of the back waistband to be buttoned around my waist in the front.


The front waistband was sewn to the front panel and the outside/front layer of the pockets. 


Its tails were made as long as possible to wrap around my waist and tie in the back. 


I wish I’d had enough fabric to make the ties longer, as my resulting bow is pretty small.


Essentially this skirt is constructed to fasten like an “apron style” 18th century petticoat or a regency drop front gown.


The resulting skirt isn’t as ruffley as I would have liked, but it does meet my fullness, length, and originality “requirements”.


There are things I could do better “next time” to make this design, out of this amount of fabric, a bit more ruffley.


I do like how this lavender skirt turned out, but I don’t think I’m done playing with this “pattern” such as it is. I’ve got all sorts of ideas for different variations!


I’m quite pleased with my entire Easter outfit. I used up some pretty fabric, had something new and springy to wear on Easter Sunday, and added two new versatile pieces to my wardrobe.


The blouse will go with quite a few of my skirts and pants (I wore it last weekend with my purple skinny jeans!)


I didn’t yet have a lavender skirt in my closet, and this will pair well with any number of tops I own.


The skirt fabric has proven to be a cotton/poly blend, so it shouldn’t require any ironing, which is always a relief.  I do love natural fibers, but for modern everyday clothes I don’t mind some synthetic in my skirts as a wrinkle deterrent. My synthetic or synthetic blend skirts get worn way more often than my linen or cotton skirts for that reason alone - I don’t like bothering with ironing everyday skirts. Anyway, enough rambling about that!


The story is, I made an Easter outfit, had fun designing it and working with a limited amount of pretty fabric, and enjoyed wearing it for church and Easter dinner with my family to celebrate the resurrection of our Savior!


And my brother took some nice pictures of me climbing a tree in my Easter outfit - because Easter outfits are for climbing trees! (Well, 10 year old Alyssa thought so anyway, and grown up Alyssa must follow the tradition.)

Saturday, May 7, 2022

My Sister's Sewn and Crocheted Lacy Prom Dress

 And She's off to Prom!!


My sister came up with the idea for this spring's formal gown months ago. In the past 2ish years she has become a very talented crochet-er (crochet artist? crochet-ist?). She decided she wanted to crochet part of her formal gown and came to me with her design and ideas for the rest of the dress. 


The plan was a drop waist/trumpet style sleeveless gown with a full gathered skirt and she would crochet an overlay for the bodice and sleeves.


She went "shopping" in my fabric stash and picked out a gorgeous emerald green taffeta for the dress. I found this fabric at a thrift store several years ago and fell in love with the color. I was excited to make something worthy of this fabric! (This is the same fabric I used for my brothers' vests for my wedding last summer)


Fabric picked, I went to my pattern stash to find a pattern that would work for what my sister had described.


Vogue 8948 fit the bill! I decided to use view A, skip the notch at the neckline, and cut it off  straight across where the skirt started on views D, E, and F.


The bodice is flat lined with Joann's poly/cotton voile. Not a fabric I particular like (100% cotton voile is way nicer and easier to work with!), but it gave the bodice a bit more structure with almost no additional weight or bulk so it served the purpose I needed. 


The entire dress is then lined with some polyester lining from my stash and fastens up the back with an invisible zipper.


I don't generally like to use invisible zippers as, in my experience, they like to get stuck at waist seams and break. Thus, I almost always end up having to replace them after the first couple wears. However, since this dress didn't have a waist seam the zipper would have to go past I thought it would be safe, and so far so good!


After the dance last night my sister requested that next time I make her a formal gown I line it with cotton instead. Polyester is just too sweaty.


She has a point.


To give the skirt the poof my sister wanted, I attached 2 ruffles of stiff tulle to the skirt lining.


They gave the dress just the right shape!


The final piece of the dress was the lace at the hem.


My sister picked a silver and white ribbon yarn to crochet her bodice overlay out of so I suggested adding some silver lace to the hem of the dress to tie the whole look together. My sister agreed, and thankfully Joann's had just the right lace in stock in their "cosplay" collection. (Because of course I didn't think of adding lace to the hem until it was too late to order anything.)


And once that was sewn on my part of the dress was done!


My sister crocheted her bodice overlay and sleeves.


She and my mom made a sparkly silver belt to complete the ensemble.


A flower crown was added.


A matching reticule was crocheted.


Hair and make-up were done.


And she was ready to go!


My dad escorted her to the homeschool prom, known as Elegant Evening, wearing the matching tie she crocheted for him.


And they had a fun time dancing English Country Dances (like the kind seen in a Jane Austen movie) all night!


I'm thrilled with how this year's gown turned out!


It was so much fun to collaborate with my sister on a dress of her design!


And now we've got all sorts of ideas for future fancy dresses featuring crocheted pieces!