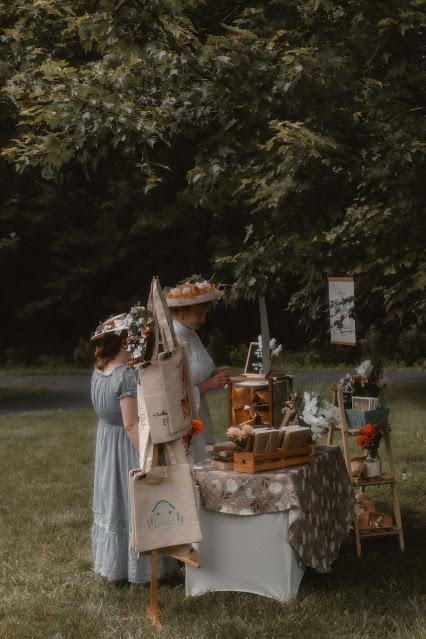
Wednesday, July 24, 2024

Anne's Hat of Buttercups and Roses

 "Her hat was a little, flat, glossy, new sailor, the extreme plainness of  which had likewise much disappointed Anne, who had permitted herself secret visions of ribbons and flowers. The latter, however, were supplied before Anne reached the main road, for being confronted halfway down the lane with a golden frenzy of wind-stirred buttercups and a glory of wild roses, Anne promptly and liberally garlanded her hat with a heavy wreath of them."

~Anne of Green Gables, L.M. Montgomery

Most of my ensemble for our Anne of Green Gables picnic last month was modeled after what the grown-up Anne would have worn, but my hat? That was straight out of Anne's childhood fancies.

Photo by @samithefae

As I listened through Anne of Green Gables to get myself in the mood for the picnic I heard the passage above and went "That's it! That's what I'm doing for my hat! Garlanding it with a heavy wreath of buttercups and roses!"


A quick glance through Edwardian fashion plates on Pinterest showed a hat trimmed thusly, was indeed right on point for the era. So I went to my stash of thrifted straw hats, picked one that would work for a base (a rather flat straw hat with a wide brim), and got started!


The hat I'd chosen unfortunately had some damage to the underside, so the first order of business was to either fix or hide that issue.


Back to Pinterest for inspiration, I came across this hat from the 1910's, held at the MET Museum, with a band of velvet around the underside of the brim.

Ah-ha! I could do that!!


Pink velvet ribbon was unearthed in my stash and sewn on - this was honestly the most tedious and time consuming part of the hat trimming process.

Photo by @samithefae

Once that ribbon was securely in place (and looking fantastic if I do say so myself!) the fun part could happen!

At a local farmers market/craft fair I picked up two pink, soft, hand made, and dyed, wooden roses. They were absolutely lovely, but it would have been cost prohibitive to do the whole hat in these. So, to supplement, I picked up some fake roses and buttercups at the craft store. Flowers obtained, there was still the question of what other trimming would go on the hat. Anne's fancied ribbons, or something else?


I pulled several options from my stash, and returned to Pinterest to settle the matter. 


I decided I really liked the look of the tulle on this hat (sold on Etsy several years ago apparently), so I decided to do something similar.


Funnily enough, I happened to have a piece of tulle, just about the right size, hanging out on my dining room table. A gift had come to me wrapped in it the week before. (Free trimmings!! Who could complain!?) I arranged said gift-wrap tulle around the brim of my hat, and it was perfect!


 Next up, the flowers! I gave the two wooden roses stems of floral wire, disassembled the store-bought floral bunches to give myself individual flowers to work with, and set about arranging.


Once I was pleased with the wreath of flowers I hand-sewed them in place.


The final touch was a green ribbon bow on the back of the hat - then it was done and ready to wear!

Photo by @samithefae

The perfect topper for my Anne Edwardian outfit!

Photo by @samithefae

I believe Anne Shirley would approve whole-heartedly!

Wednesday, July 3, 2024

A Green Herringbone Edwardian Skirt for the Anne Picnic

 Over the course of the two years I have owned this fabric, I’ve brainstormed quite a few ideas for my green herringbone Edwardian skirt. There are so many cool Edwardian skirt designs! I could make a dozen skirts from 1900-1910 and they would all be different! Heck, I might be able to manage that entire dozen just in the first half of the decade! Trying to pick just one style was. . . A challenge. 

Photo by @samithefae


That said, my green herringbone was a bit heavier than generally preferable for Edwardian skirt material, so that limited my choices somewhat. 


A month before the Anne of Green Gables Picnic I still had atleast 5 ideas running through my head, but it was time to actually get down to business and start the skirt if I wanted it done in time for the picnic - if I didn’t start soon I’d have to wear my 1894 blue paisley to the picnic, and as much as I love that dress it doesn’t fit quite right anymore and I really wanted something new! Thus, I’d better actually pick a design.


I couldn’t. So I drafted a pattern. Now that might sound contradictory, don’t you need a design for a garment in order to draft the pattern? Well, it’s helpful, but for this particular project it wasn’t necessary. I decided to draft a plain 5 gore Edwardian skirt pattern from the book Turn of The Century Fashion Patterns and Tailoring Techniques. When reading through this book trying to decide on a skirt design, I discovered that most of the fun Edwardian skirt designs I’d fallen in love with started with the basic 5 gore pattern and the flounces and pleats were added to that. So, draft the 5 gore skirt I would! 


And did.


Then I gave myself the weekend to think it over and look on Pinterest for inspiration. About this time I realized I ought to decide exactly what year I wanted to base my ensemble in. That would help me narrow down my options. Since I would be using the Black Snail Edwardian Blouse Pattern for my blouse I needed to first figure out what year the blouse appeared to be from and pick my skirt design accordingly. 


After a bit of reading online it appeared the blouse design was from about 1905-1906. Thus, 1905 and 06 fashion plates captured my attention - with a few from 1904 thrown in for good measure. (Fun fact, since I had to change the blouse sleeves to make it fit on my limited material my blouse now better resembles something from 1904 than it would have with the original pattern sleeves.)

. . . And I picked a skirt design that best matched a 1903 fashion plate. 


A basic gored skirt with an inverted box pleat near the bottom of each seam line for some extra fullness at the hem. I liked the look of it, and I knew this design would work well with my fairly stiff and heavy fabric. It seemed to be a basic enough design that it would work for a good chunk of the Edwardian era, rather than screaming "I'm from 1903!!"


It was also quite easy to add the pleated detail when cutting out the skirt - I didn't even really mess with the original pattern I'd drafted the week before. (Other than to split one of the gores so I'd have a 7 gore skirt rather than a 5 gore, thus more seamlines to add pleats to.) As I was cutting the gores out I just added a section to be pleated toward the inside at the bottom of each seam allowance. 


I made the pleats extend a bit higher up the skirt as I moved toward the center back. Last minute I also decided to add a single pleat at the waistline to the center back seam - and that turned out to be a very good decision.


Once I had the skirt cut out I used my serger to finish all the seam allowances, preventing the fabric from unraveling. Historically accurate technique? No. Practical one? Yes.
I then proceeded to assemble my skirt according to the chapter on skirts in Authentic Victorian Dressmaking Techniques. Despite the title, this book is actually an Edwardian sewing manual - a reprint of a book originally published in 1905.


  My one deviance from the instructions was to add large pockets, supported by twill tape extending up to the waist, at the side seams. From my reading it seems as though most Edwardian skirts, if they had pockets, had them at the center back seam (the way I did for my pink silk Edwardian gown). However, for this skirt, I wanted the pockets easily accessible at the side seams.


Pockets in, I sewed up the skirt and tried it on, over all my Edwardian under things - corset, hip padding, and princess petticoat.


With this try-on I learned two thing. First off - I loved it! The shape was perfect!! I loved it!!!
Second, it was a darned good thing I'd added that pleat to the center back seams. Turns out the measurements I'd used to draft the skirt were no longer accurate, and I needed a bit more room in the waist. If I hadn't added in that pleat last minute it would have been a whole ordeal to fix the issue - but thankfully all I had to do was let out the pleat slightly and the skirt fit perfectly!


Fit checked and fixed, it was finishing time!


I used some vintage hooks and eyes for the placket up the back of the skirt.


Supported the box pleats at the seam lines with twill tape along the inside, according to the directions in Authentic Victorian Dressmaking Techniques.


Made and attached the waistband.


And finally, hemmed the skirt with a pretty cotton calico hem facing.


With that, technically the skirt was done, but I decided to add one last little detail.


One of this year's Historical Sew Monthly themes is "New Stitch in Town - Make something that uses a new-to-you stitch!" I had been completely stumped on what to make for this challenge! Thus, as I finished my skirt I looked through Authentic Victorian Dressmaking Techniques to see if there were any new-to-me stitches I could try and add to this skirt as a finishing touch - and I found one!


There was a whole section on "Ornamental Tacks and Arrowheads" These fancy stitched triangles were recommended for ". . . at the end of seams, tucks, plaits, and at the corners of collars, pockets, and pocket laps." I decided to attempt the "crossed triangle" tack at the top of all the inverted box pleats in my skirt. First, I made a practice tack on a scrap of my green herringbone out of some embroidery floss I had on hand. When that turned out decently it was time to sew on the real thing.


I used ivory silk button hole twist, and once I got the hang of them the triangle tacks went pretty quick.


And they were so satisfying to look at as I finished them!


The perfect finishing touch on the skirt!

Photo by @samithefae

When I finally started on this skirt after over two years of hoarding the fabric and dreaming of it, I was a bit concerned that the finished skirt wouldn't live up to the vision in my head - especially since the fabric was stiffer than ideal.


But I needn't have worried - with the right pattern and embellishment it was perfect!

Photo by @samithefae

What the item is: Edwardian Skirt

The Challenge: #9, New Stitch in Town - I added crossed triangle tacks (a new stitch for me!) to the top of all the inverted box pleats.

Material: Pale green cotton herringbone, green floral quilting cotton for facings and pockets.

Pattern: Self-drafted, using the 5 gore skirt drafting instructions from Turn of The Century Fashion Patterns and Tailoring Techniques as my starting point.

Year: 1903 - 1907ish 

Notions: thread, cotton twill tape, hooks and eyes, buttonhole twist

How historically accurate is it? 80% I'd say. The fabric is a bit too stiff for the era, and I serged my seams to finish them. Also, I can't say my pockets are perfect. However, the pattern is accurate from a re-print of a period drafting manual, the construction is accurate from a 1905 sewing manual re-print, and the overall look is excellent.

Hours to complete: I don't know, I worked on it for a couple of weeks between other things.

First worn: 6/1/24 for an Anne of Green Gables Picnic

Total cost: I believe I got the fabric for $4 a yard and I had about 4 yards of it. Everything else was stash, picked up cheap over the years at thrift stores and estate sales. So definitly under $20

Photo by @samithefae


Wednesday, June 26, 2024

A Refashioned Edwardian Blouse for the Anne Picnic

 Well it has been a while now, hasn't it. This month has been something. A roller coaster really of ups and downs - high ups and low downs - and I still feel like I'm trying to catch my breath. The month started off fantastically with our Anne of Green Gables Picnic!

Photo by @samithefae

And that picnic was everything we envisioned it being! But before I get ahead of myself, let me tell you the story of my outfit. . .

Photo by @samithefae

As explained in my introductory post on the subject last month, the idea for this Edwardian picnic outfit of mine really began with this white cotton nightgown. It just begged to be turned into a frilly Edwardian blouse!


Thus, I procured the Black Snail Edwardian Blouse pattern for the project. 


Now, would this one summer nightgown yield enough material to make the blouse as the pattern was written, or would I have to supplement with additional fabric and/or make some major alterations to the pattern for my plan to work? There was only one way to find out!


I began by dismantling the night gown. In the interest of preserving every possible scrap of material, scissors never made an appearance in this dismantling process. Out came the seam ripper! 


First, I seam ripped the button placket off the pin-ticked yoke, but left it attached to the body of the nightgown - I intended to use the existing button placket down the back of my blouse, rather than making a new one. 


Next, I carefully removed all the cotton bias tape and "crocheted" lace trim from the neckline, armscyes, and hem. I made sure not to damage any of this trim so I could re-use it on my blouse.

Finally, I removed the pin-tucked yoke from the body of the nightgown. It would be re-used as the yoke of the blouse.

Disassembly thus completed, I carefully ironed all the pieces of material, then assembled the pattern. Once the pattern was all taped together and the pieces cut out in my size, I took stock of the pattern and decided that my best option was to combine elements of view 1 and view 2 - and maybe, just maybe, I'd be able to get this whole blouse cut out of the one nightgown's worth of material.


I decided to start with the smallest piece - the yoke. It took a bit of finagling to figure out the best way to piece together the nightgown yoke pieces to have a large enough piece of flat material to cut out the blouse yoke - but eventually it happened! Even better, where the piecing had to happen resembled a shoulder seam, rather than a "I didn't have enough fabric seam" - and I call that a win!

Finagling really was the name of the game when it came to figuring out the pattern layout for this project.


  It was easy enough to figure out where and how to layout the front and the back of the blouse - the center front of the blouse when on the center back of the nightgown, and the center back of the blouse went on the center front of the nightgown to utilize the existing button placket - but the sleeves. Oh the sleeves.


Those gave me trouble! I really wanted the view 1 ruffly sleeves, but that sleeve pattern piece was huge (along with the separate ruffle pattern piece. . .), and I just couldn't figure out a way to make it work. I contemplated making the sleeves out of a different white fabric, but nothing in my stash suited (and I did not want to cut up the second nightgown, though I did consider it.) I contemplated majorly piecing together the sleeves from alllllllll the tiny scraps of fabric, but that wouldn't really work either. I resigned myself to making the less full view 2 sleeves - but even that pattern piece didn't quite fit, and those were not the sleeves I wanted. I wanted ruffles!!

Two days. For two days the pattern was laid out on the dissected nightgown on my living room floor. Every time I came in the room I swapped out the sleeve pattern piece - view 1, view 2, view 1, view 2 - and I spent a lot of time on Pinterest considering Edwardian sleeve options.


 Finally, an idea struck. I would use the view 2 sleeve that mostly fit onto the fabric I had available. Out of the larger leftover scraps, I would cut ruffles to go at the bottom of the sleeves - similar to the view 1 ruffles, only less long and less full. Both the bottom of the sleeve and the top of the ruffle would be gathered into a narrow cuff cut from some of the smaller scraps. 

Photo by @samithefae

This solution worked beautifully! No, the sleeves weren't as floofy as the huge view 1 sleeves would have been - but they were still beautiful and gave the right impression.

Photo by @samithefae

And I believe, they had just enough "puff" that even Anne would have been satisfied to wear this blouse!

Once the sleeve conundrum was solved, it was pretty smooth sailing!


I pieced together the pin-tucked yoke, and trimmed it all around the edge with some of the lace harvested from the nightgown.


Then I sewed together the shoulder seams (using French Seams for a clean finish) of the body of the blouse.


The yoke then got pinned on top of the body, and topstitched in place.


Once the yoke was sewn on, the excess material behind it got trimmed away and the seam allowance was finished with a narrow zig-zag stitch.

I made the collar out of a scrap of fabric - adding a few pintucks for fun and finishing the top edge with more of the harvested lace.


The collar was sewn on to the neckline, and that seam allowance was finished by encasing it in some of the bias tape harvested from the nightgown. (Thanks to my seam-ripping at the beginning, the only "new" notion required for this blouse was the thread to sew it together - buttons, lace, and bias tape were all there for the taking!)


Once the collar was on, the button placket could be attached to the yoke and collar - effectively finishing the closure for this blouse!


The pattern actually recommended only having buttons up to the bottom of the yoke, then using hooks and eyes and snaps to close the yoke and the collar, but it was very satisfactory to be able to re-use the button placket from the original nightgown!

Photo by @samithefae

And I like the look of buttons all the way up the back - even though it does appear to gape slightly at the top.

Button placket on, the side seams were sewn up (French Seams again), and the body of the blouse was gathered into the peplum (view 2 option).


The peplum was, admittedly, not cut out of the nightgown material, but rather a lightweight cotton harvested from a bed skirt in my stash. The material didn't exactly match, being a looser weave and a less white white than the nightgown material, but, as the peplum would be tucked into my skirt and never seen when the blouse was worn, it didn't have to be perfect!

Photo by @samithefae

The peplum was sewn on with a French Seam. Then the sleeves were assembled, the ruffles finished at the bottom with more of the harvested lace, and set. That seam allowance was then finished with the harvested bias tape.

Photo by @samithefae

And the blouse was done!!

Photo by @samithefae

Delicate and floofy - everything an Edwardian blouse should be!! 

And everything I dreamed that nightgown could be turned into!

Speaking of, since this was a re-fashion project, it fits the HSM #5 theme for this year - New Clothes from Old:

Make something new out of a worn-out garment or accessory. Or make something using recycled materials.

What the item is: An Edwardian Blouse

The Challenge: New Clothes from Old - this blouse is almost entirely made from a thrifted nightgown, the only new materiel in it is thread!

Material: Lightweight embroidered cotton, harvested from the aforementioned nightgown, and a bit of lightweight cotton harvest from a bed skirt for the peplum

Pattern: Black Snail Edwardian Blouse, with slight alterations

Year: 1904-1906ish

Notions: Buttons, cotton lace trim, and cotton bias tape, all harvested from the nightgown - and thread (fresh off a spool, since re-using the night gown's thread would have been tricky)

How historically accurate is it? Pretty good, it certainly resembles blouses of the era. Its all machine sewn, but by the early 1900's that's not unheard of. I'll give it atleast an 85%.

Hours to complete: I didn't keep track, but it wasn't bad. Maybe 6-8 hours total.

First worn: 6/1/24 for an Anne of Green Gables themed Picnic!

Total cost: Less than $1! The nightgown was picked up at a "by the pound" place, and it weighed less than a pound. Being just a blouse, this didn't require a ton of thread, and the bed skirt I used a bit of was also thrifted cheap - plus I've got plenty of that left for future projects.

Photo by @samithefae

Thanks for reading! Now hopefully I can get around to telling you about the rest of the outfit before another month goes by!