Wednesday, January 28, 2015

Finishing Projects! (and another baby goat)

I'm getting more and more excited about this Civil War ballgown I get to make! I can't wait to get started on it, but I'm forcing myself to finish some other projects first. Like this dress.

I got it at Goodwill with the intention of refashioning it.

So I cut it up.

And then I drew on it.

(Look at the seams on the back of the dress here, aren't they cool?)

Why did I cut it up before drawing on it, you may ask? Well, there was this seam about a foot or so from the bottom of the skirt straight across the front of the dress. So I used that as my cutting guide. The line I then drew was at my hip level. Why? 
I much prefer full, gathered, skirts to straight skirts. Thus when I was figuring out what I wanted to do with this dress I knew right away that I wanted the skirt to be gathered. So that piece of skirt I cut off the bottom of the dress? That became the new skirt. I gathered the top edge and then sewed it onto the dress where I had drawn the line at my hips. The middle section of skirt, now hidden by the gathered skirt, I just cut off.
 I paid special attention to matching the seams on the back since I thought 
they added some nice lines to the dress. 

 I added an ivory crocheted belt, and then, after just a couple hours of sewing, ta-dah! I had a cute, brand-new dress, that only cost me $4!

I'm quite pleased with how it turned out!


Of course I also had a few dresses I was working on for my little sister, and this one is my favorite of those!
A couple months ago I found this flannel print at Walmart.
I thought it would be perfect for a dress for my sister, but there was only 1 yard of it. Not enough to make an entire dress, so I knew I would have to get creative. (and use some rather unorthodox means to get it to come out the way I wanted, like using fraycheck on the overskirt, rather than hemming it.)

I got some pink flannel to use with the print, and then got to work. I cut the bodice out of the print, and then saw that I had enough fabric left over to make an over skirt too! The main skirt and the sleeves I made out of the pink flannel.


To add some interest to the underskirt I sewed on some black ribbon in a zig-zag pattern on the front, and then just straight across the back.


To make the sleeves look like they matched the rest of the dress, I cut out part of the design from a scrap of the print, and appliqued it on. I love how the sleeves look now!
In fact I'm pretty happy with how the entire dress came out! I used part of a pattern I already had for the bodice, and then just made up the rest from there, so I had been rather unsure of what the final product would be.

Now that these dresses are done, I only have 2 more projects to finish before I can get started on my ballgown, so back to sewing I go!

Oh, and taking care of my goats. This little lady decided to arrive Monday morning.


Her name is Paisley, and she the first daughter I've gotten out of the buck we bought last fall,
 Du Bonheur Coach, so I can't wait to see how she turns out!


Monday, January 19, 2015

My coat

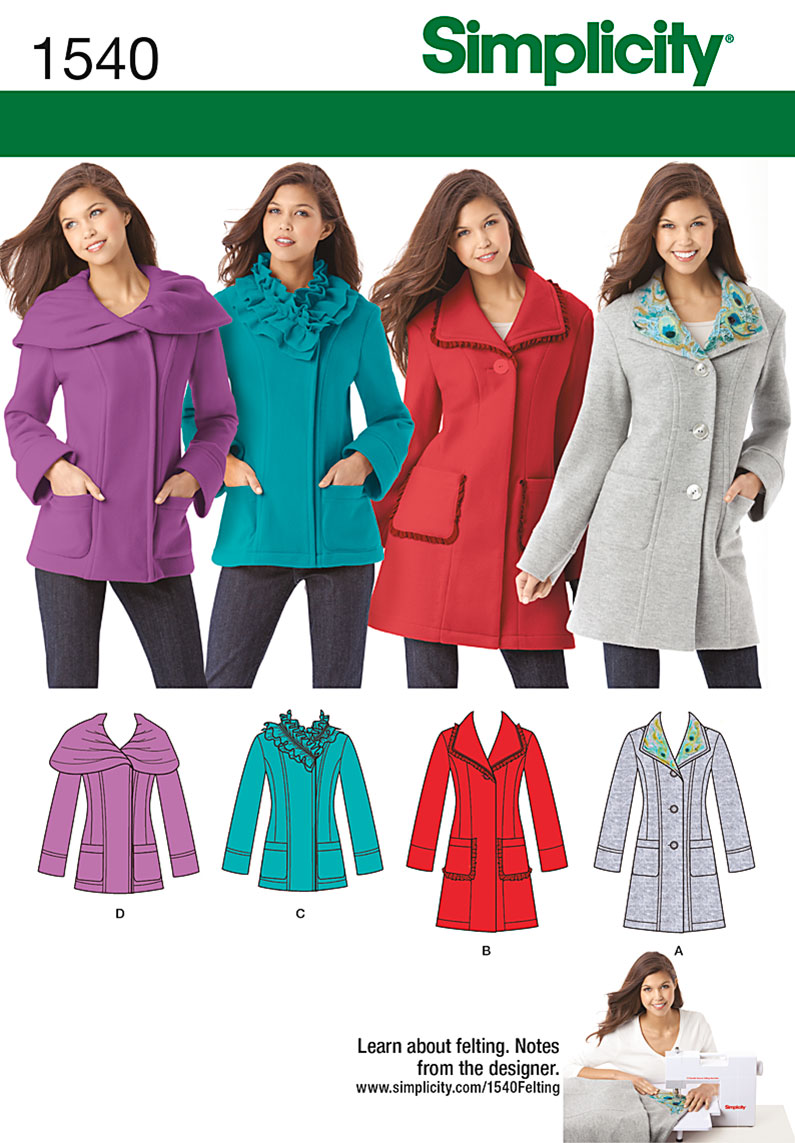
Whenever there is a pattern sale I have to look through the entire pattern book, even if I REALLY don't need any more patterns. Whenever I do this I come across patterns for things that I never thought I'd make, but the pattern looks cool, and it would be a fun sewing project to attempt, and the pattern is only a dollar, so why the heck not! This is how I wound up making my purple plaid 1830's dress. Well last time this scenario happened, this is the pattern I found.


I thought it was a cute pattern, and I really did need a nice coat. For the past several years my chore coat has been my only coat. The issue with that? It's not always the cleanest (imagine that, working with livestock isn't clean!) and it doesn't look great with dresses and such. Thus, with that in mind, I decided to get this pattern and make myself a coat!

To make it out of I found a very soft, thick, and warm dark brown wool blend. It was on clearance at Joann's, and that day the clearance fabric was an additional 50% the already clearanced price! So I grabbed two yards of it. 

The pattern didn't call for lining the coat, but I wanted to anyway because I wanted the coat to be plenty warm. Now I didn't want to coat to be too bulky, so I decided to use very pretty and soft teal cotton flannel for the lining.

I couldn't wait to get started! But I found the pattern and fabric in November, and at that time I had to make Christmas presents before starting anything for myself, so the project got put on hold, until last week. In under a week I got the coat cut out, sewn together, and finished!


After I bought the fabric I realized that for the longer coat (which I really wanted) the pattern called for closer to 3 yards of fabric than 2. So I was a little concerned that I wouldn't have enough fabric, but I figured that if I was careful with how I laid out the pattern pieces, I could make my 2 yards of wool be enough. Then I decided I wanted to make the cape-like collar, rather than the normal coat collar. That of course called for even more fabric, so I got a little more worried, but I decided to give it a try! Well, with some careful positioning of the pattern pieces, the 2 yards was just barely enough to make what I wanted! (I would have just made the regular collar if I hadn't had enough fabric, as I wasn't willing to sacrifice the length) 
I love how the cape collar looks!

Now the part of this coat that I'm the most proud of is the buttonholes!

I marked where the button holes went, and then did something I'd never attempted before, 
Bound Buttonholes! 

I found this tutorial for bound buttonholes on Pinterest, and it was so easy to follow. I'm thrilled with the results!
Aren't they pretty!

I sewed on some teal recycled plastic buttons I found at Joanns, and wah-la!

I have a nice, new, wool coat!
(that cost me less than $50, I love pattern and fabric sales!)


Wednesday, January 14, 2015

New sewing projects (and baby goat)

It's so nice to be done making Christmas presents! I love making things for my friends and family, but I have a few things I've been looking forward to making for myself, that I can finally take the time to make!
First off, this skirt!
On Pinterest I found this skirt, and decided to make one similar. I used brown polyester taffeta and altered a pattern I already had. The front buttons are functional, so I didn't have to add a side zip. This skirt is so much fun to wear, and it was really easy to make! I'd forgotten how much I loved wearing long skirts.

Now that the brown skirt is done, I have this dress to do something with.
I've been reading this blog, refashionista, and I decided I wanted to try my hand at refashioning something found at a thrift store, so I got this dress at Goodwill and have a plan for it!

And finally, the project I'm most excited about!
 I'm going to make this dress!!! A woman I know from church contacted last week. A few years ago, before she got married and started a family, she had started making this dress, and now didn't have time to finish it. She offered me everything she had for it if I wanted to make the dress for myself. Of course I said "Yes, please!"
She had the bodice mostly completed, and it's very close to my size so I'll only have to make a few adjustments.
(It's not laying very well on my dress form, but it's very well made and gorgeous!)\
I can't wait to get started on this gown!! But I have a few more projects I have to complete first, so it will be a few weeks.

Meanwhile, the baby goats keep coming! Meet Tigereye, a big buckling, who interrupted a good nights sleep for me by being born around 3am on Tuesday. At least he's cute!

Diamond, his mother (and Sombrita's granddaughter), is such a good mama!
She had him, got him dried off, and nursing, all on her own!


Tuesday, January 6, 2015

Chiffon

Well as of this morning I have one happy little sister. Her goat, Lacy, kidded with one HUGE doeling around 7 a.m.

I went out to feed around 6:30 this morning, when it was still dark out (dangit winter! I want more sunlight!), and I heard a goat crying out in the pasture, not in the lot with the rest of the goats. I went to investigate, and found Lacy, very much in labor. 
I got her moved into a kidding shed, but the heat lamps weren't hooked up yet, as all the extension chords were in use elsewhere, so I had to figure out how close Lacy was to kidding with the help of a flashlight. Well she was close, the hooves were emerging! But poor Lacy, she's not a big goat, and this was obviously a big baby, so I had to help her get the head out, by pulling as Lacy was pushing with her contactions. Thankfully Mama and baby got through it ok, and my sister got a doeling out of it! (last year Lacy had one big buck. . . so this was a long awaited doeling)


With a mama named Lacy, this baby needed a fabric-related name too, so several weeks ago my sister picked out Chiffon as a name for a doeling, if Lacy were to have one. Had this been a little buck, his name would have been Rick-Rack (yes, I have a creative sister, and I love it!)

I had to leave for work as soon as Chiffon was born, so I left my mom and sister to get her all cleaned up and make sure she nursed. Well, when I got home this evening I realized just how big Chiffon really is (my dad was still in the process of getting the shed lit and heated when I left this morning, so I only got to see the baby by flashlight) 
She's as big as Holly and Mistletoe, who are nearly 2 weeks old!
Now that is a big doeling! And a wonderful bit of joy on an otherwise bleak day.


Saturday, January 3, 2015

Completed Christmas Presents - My Brother's

What do you sew a guy for Christmas when he informs you that he does not want pj pants or a pillowcase again? (ok, so those may be the only things I've made for him for Christmas for at least the past 5 years, but still, you can always use them, right?)
Well, I had no ideas. So I asked my family, and they had no ideas. I considered making this brother the same thing I was planning on making my other little brother, but I really wanted to give the boys each their own unique presents. I was stuck. Then my little sister had a suggestion.
" Make him a blanket." She said.
"He has plenty of blankets" I said, "he doesn't need another."
Then I got to thinking. Several years ago my grandma gave my family a soft scrappy-looking flannel lap quilt. It was red and white with roses on it. My brother loved  how soft and warm it was, thus it became his. This thing happens to teenage boys though, they grow, a lot. The blanket that covered him when he was 10, only half-way covered him now.
This type of flannel quilt happens to be really easy to make, so I decided to make him a bigger (and more masculine looking) one for Christmas. I had plenty of grey, green, and blue flannel scraps left from other projects, so those would be the colors. I had to buy a few more pieces of fabric, but for the size of the quilt, not too many. I washed up and ironed all the fabric, then got to cutting out the squares (and a few rectangles).


I didn't have much time to sew this (less than a week, plus I working on other presents during that time), thus, the squares needed to be pretty big, 12"x 12". Then I realized I could make better use of the amount of fabric I had if also cut some 9"x 12" rectangles. I could alternate the sizes in my  quilt design. I could do a strip of rectangles, laid end to end, then a strip of squares, then more rectangles. I cut out nearly 100 pieces of each size, enough for both the front and back of the quilt. Next I had to lay out the quilt, figure out exactly what I wanted it to look like, before I started sewing.

Here's how that went. First I laid out the backing, comprised of solid colored squares, a light grey, a bright blue, a navy, a forest green, and a teal-ish green.
Then before sewing anything, I laid out the top of the quilt over the backing, matching up the edges of each top square with the edges of each bottom square. Then I got to start sewing.

I picked up 2 squares, both front and back. I put the squares back to back, and sewed one edge.


This put the raw edges at the top of the quilt. I sewed all the squares together this way. Then I put the binding on the quilt. For this I sewed leftover squares together in a strip, then folded the strip in half long-ways, leaving the raw edges on the outside. I then laid the strip along one edge of the quilt, on the back, pinned it in place, and sewed it on. Once again the raw edge was on the top of the quilt.  I did this on all 4 sides. Now the quilt was mostly done, only one thing left to do. 

From the back the quilt looks like this, no raw edges.

Remember all the raw edges of the fabric were on the top of the quilt. You may be wondering why. Well now it was time to take care of those. I sat on the couch for hours and clipped every one of those seams, to make them resemble fringe, like this,

By sewing the top and bottom squares of the quilt together as if they were one piece, with all the raw edges on the top, and clipping all of those edges, you get a really easy to make, awesome, scrappy-looking quilt.

And my brother loves it! This quilt is huge, big enough to cover a king-sized bed, so even if he's still growing (very possible) he won't outgrow it.

While easy enough to make, this was definitely the biggest and most time consuming present I made this year, but it was totally worth it to surprise my brother with something that I made him, but was not pj pants or a pillow case! (although, just because, I also made him a matching flannel pillow case from the left over fabric, which he obviously didn't hate as he has asked me to make him a second one. So should I make him another pillow case now, just because he wants it, or wait and make it for his birthday present?)