Monday, October 29, 2018

Completing the Professor McGonagall Costume

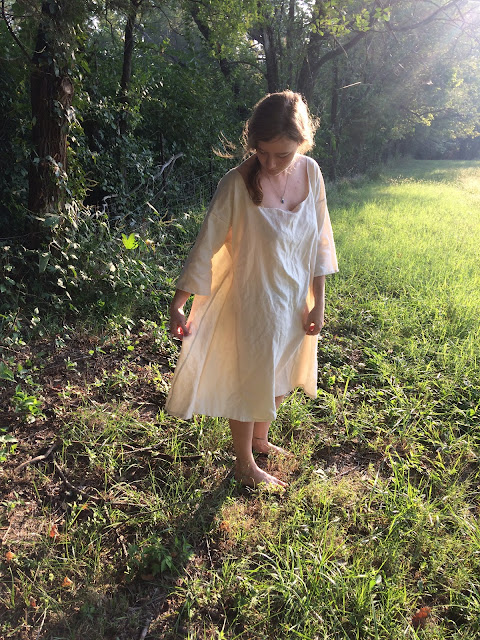
All year long, I've known who I would be for Halloween - Professor Minerva McGonagall. All because I went down a rabbit hole a year and a half ago, wondering what historical garments Harry Potter World wizard's robes might be similar to. Then I had to make said historically inspired robe, and when I say robe, I mean a full 1890's tea gown. Thus, back in May, I made the tea gown/McGonagall robe, and I've been waiting for Halloween to roll around ever since, so I'd actually have an excuse to wear it! (And to share it again thanks to the Halloween Costume blog tour I decided to participate in!)


Well, October arrived, a Halloween-themed croquet party made its way onto my calendar, and I realized my McGonagall costume was going to need a couple extra pieces to be truly complete.

First, when the kids I nanny saw the pictures from my photo shoot of this gown, they pointed out a glaring error in my costume - Professor McGonagall wears glasses, and I was not wearing glasses! Thankfully, this was an easy problem to solve. The day of the croquet party I just left out my contacts and wore my glasses instead. Easy Peasy.


The second accessory I needed was a witches' hat - a slightly crumpled one like Minerva McGonagall wears in the movies. This accessory would require a little more work than the glasses. Now yes, I did wear a witches' hat in the photoshoot, and yes, it did it's job, but it actually wasn't mine. I borrowed it from a friend. And for this costume, I actually wanted my own hat. My own velvet witch hat. I just had to find a pattern.


Finding the pattern for exactly what I wanted proved to be surprisingly easy. While browsing Pinterest for free PDF patterns one day, I happened upon the free "Bad Witch, Good Witch" pattern by Hot Patterns (made for, and available on, Fabric.com). The pattern was for a crumpled witch hat - exactly what I needed - so I immediately downloaded it, printed it out, and got started.


I wanted to make my hat out of black velvet, which doesn't have enough body on it's own to be a tall pointy hat, so I flatlined my velvet with cotton canvas. I cut each pattern piece out of both materials then hand basted the canvas to the velvet. For even more body, I decided to iron heavy fusible interfacing onto quilting cotton to line the hat with. I did not want a floppy witch hat - just a crumpled one.


The brim of the hat is lined with a scrap of black and gray printed quilting cotton I found in my sewing room. The crown of the hat is lined with a green cotton/polyester blend fabric - left over from a thrifted bed sheet I used for mock -ups once upon a time. There is also an internal hat band made from black twill tape.


To give the finished hat a crumpled appearance, the pattern instructions say to "gently push the crown downwards to create a crumpled look." I attempted that, and didn't particularly like the results. The hat felt unsteady that way. The crumples felt too flimsy. I decided they needed to be more permanent. So I pinched small sections of fabric inside the hat and stitched my crumples in place. This resulted in a much more satisfactory finished hat.


A very tall finished hat - but really, the perfect accessory for my Professor McGonagall costume!


And with a borrowed wand (because I didn't have time to make one for myself), the outfit was ready and Halloween croquet party worthy!


I paired the costume with my refashioned lace-up boots for an afternoon of looking fabulous (and doing much less fabulous at croquet. Turns out I'm not very good at that particular past time.) The boots were surprisingly comfortable all afternoon!


I may not have done well at croquet, but I did have a lovely time with friends and I greatly enjoyed wearing my costume!


Photo Credit, for nearly the entire blog post, goes to Art and Julea Gerhard!


Are you ready to see all of the new Halloween costumes on the DIY Sewing Pattern Blog Tour? Me too!! Go ahead and follow along with us!

October 8th: Seams Sew Lo
October 9th: Momma Newey’s Makes
October 10th: Itsy Littles
October 11th: Aurora Designs
October 12th: Mijn 11jes &ik
October 13th: Seams Sew Lo
October 14th: My Golden Thimble
October 16th: Duchess and Hare
October 17th: A Rose Tinted World
October 18th: Cute. Sew. Make
October 19th: Custom Made by Laura
October 20th: My Golden Thimble
October 21st: Crafty Curly Couture
October 22nd: Malounami
October 23rd: Seams Sew Lo
October 24th: A Rose Tinted World
October 25th: GYCT Designs
October 26th: Crafting Through Time
October 27th: Aurora Design Fabrics
October 28th: Sew Couture by Kathy
October 29th: The Sewing Goatherd
October 30th: Manning the Machine
October 31st: Seams Sew Lo (Roundup)

Thursday, October 25, 2018

A Wonderful Wool Winter Wear Peacoat

Let me tell you about a very exciting text I received earlier this year. It was from my aunt. She was at an estate sale. And she sent me something along these lines: " I found a box of wool fabric. Do you want it?"

My response was quick:"Yes! Yes, Yes, Yes! Wool is one of my very favorite textiles to work with!"


My wonderful aunt brought the box of wool to me the next time she came to town, and I enthusiastically explored the contents. One of the first pieces of fabric I pulled from the box was a length of thick, soft, twill-weave, turquoise wool coating. Instantly, in my mind, it became a warm, casual, winter coat. All I had to do was actually turn the material into that coat.


As mentioned, wool is seriously one of my very favorite materials to work with, and I have a great fondness for making outerwear. So, clearly this was going to be a fun project. As soon as I actually got around to making it that is. To be honest, if left to my own devices, this coat probably wouldn't have been made until nearly the end of winter, like sometime in February. It would have been one of those projects constantly put off because of "more pressing things" such as Christmas Carol Costumes, or Christmas gifts, or Christmas dresses, or other such things. You get the picture. However, I was not left to my own devices to make this coat, instead, I joined the Winter Wear Designs "Outerwear" blog tour - just the push I needed to actually take the time to make my fabulous teal coat with that amazing piece of wool.


As soon as I found the Provence Pea Coat pattern on the Winter Wear website I wanted to make it. The coat has an absolutely beautiful shape and some great details. The eye catching seaming and yoke on the back drug me in. This was the coat my teal wool would become.


As far as good, heavy, warm, winter coats go, I have two - my torn up, bleach stained, and usually dirty chore coat, and the wool dress coat I made myself last winter. I definitely needed something in between those two coats. Something more casual than the dress coat, but nicer, and more socially acceptable, than the old chore coat. The Provence Pea Coat filled that gap perfectly.


Unfortunately, once I received the pattern for this coat and opened the PDF file, I was disappointed. The sleeve pattern was meant to be cut on the fold, meaning the front and back sleeve head would be symmetrical. To accommodate this, the front and back armscye were also the exact same shape. As my upper back and upper chest are not identical to each other, and human arms naturally hang slightly more toward the front of the body than the back, these symmetrical shapes were just not going to give me a well-fitting coat. Some pattern alterations would be necessary. So pattern alterations I did.


Now, let me just say real quick, over the past 6 months I have made an awful lot of Winter Wear Designs patterns, and I have been very pleased with them. They have been well-drafted and yielded good results for me. This is the first Winter Wear pattern I've had an issue with, and it's an older pattern, due for an update. I talked to Suzanne, the designer, and she told me this pattern is on the list to be updated, and once that is done it will have "anatomically correct" sleeves. As, at the time of the writing of this blog post, the update has not yet happened, I opted to alter the sleeve head and armscye pattern myself for my version of the coat.

The easiest way to "fix" the sleeves would have been to just trace the different front and back armscye shapes from a different pattern (such as the Button Up Top, or Fashionista Jacket also by WWD, and both with good sleeves and armscye shapes) onto the Provence Pea Coat pattern, and trace the sleeve head from the same pattern onto the pea coat sleeve pattern. But did I do things the easy way? No, I did not. And (for once) I had a very good reason for that.


Sleeves and shoulders are two things I've always had issues with when it comes to clothing - both in ready to wear clothes and clothing patterns. I have wide shoulders (and/or a broad upper back?), inherited from my father, and clothing just isn't made to accommodate that. You may have noticed, by reading this blog that I make my own clothes. Thus, I can easily just make my shirts, dresses, jackets, and coats with wide enough shoulders, right? Well, sort of, but it turns out getting the right shoulder fit is much easier said than done. In the past, I've messed around with the shoulder width on patterns, and made my clothing to fit better than store-bought. However, I've never quite gotten the "perfect fit". The, less than ideal, cut-on-the-fold, sleeves in this pattern forced me to really evaluate all the shoulder and sleeve fitting issues I've had in the past, and get them truly fixed for once. So, in the end, I wound up with the least movement-restricting coat of all time.


To correct the armscye and sleeve situation, I curved out the front armscye a bit, and added more of and angle to the front shoulder. For the back piece I slightly straightened out the curve of armscye. And, while I was altering the pattern I also did a broad back adjustment to accommodate my annoying shoulders. Then I moved onto the sleeves.


As the sleeves were meant to be cut on the fold, I essentially just had half a sleeve pattern. So the first thing I did here was trace that half of a sleeve onto some scrap paper, then tape the two halves of s sleeve together.


Just like with the armscye, I added a bit more curve to the front of the sleeve, and slightly straightened out the curve on the back of the sleeve head. This change of shape allows for normal arm movement.

With my pattern alterations done, I made a quick mock-up of the coat before cutting into my wool. The shoulders fit amazingly. The sleeves hung nicely. I thought I'd done it, altered the pattern to fit me perfectly. Then I tried moving my arms around, and discovered my range of motion was still limited, just as it always is for me in sleeved garments with no stretch. So, as I'd already altered the pattern some, I decided I might as well do a bit more. I just had to figure out what exactly I needed to alter. 

 I began to google how to fix this range of motion issue which happens to be the bane of my existence. After reading a couple articles, and watching a youtube video, I came to the conclusion that by lowering the sleeve head on my pattern, I would have a better range of motion. So, I lowered the sleeve head by at about two inches, made one more mock-up, and was thrilled to discover I could actually move in it!


I've finally discovered how to alter patterns to actually fit me! From here on out, I will be doing a broad back adjustment to just about everything, and lowering sleeve heads. After years of shopping and sewing frustration, I've finally got it - a cute coat I can actually move in!


My arms can go all the way up!


And all the way forward, with no discomfort at all!


I have literally never been able to do this in any cute, tailored, coat, but in my Provence Pea Coat I can actually move!!


So, the current cut-on-the-fold sleeves of this pattern may be less than ideal, but, they forced me to, finally, actually tackle the fitting issues which have plagued me since forever.


The rest of the peacoat pattern is great, and required absolutely no alterations. As soon as the pattern is updated with new sleeves, I will heartily recommend it. As it is, I still recommend it, just be willing to adjust the sleeves and armscye as necessary for a good fit. The sizing for this coat, as with all Winter Wear patterns, is spot on. I cut my size according to my measurements, and it came out fitting just as it should. The sleeves fit perfectly over other clothing without being baggy! (And I made no adjustments whatsoever to sleeve width.)


The pockets are excellent.


The back seaming is gorgeous.


The double-breasted front was the perfect place to use these beautiful buttons I found on clearance at Hobby Lobby months ago.


And I got to line the coat with this printed lightweight satin I found at an Amish store last winter - it features a bunch of people walking all sorts of dogs. How fun is that?


This coat was a great one-weekend project, and I absolutely love it.


Thanks to this blog tour, I now get to go into Winter with my wonderful, warm, teal wool Provence Pea Coat, and I am super excited about that! Now, for more fabulous Winter Wear Outerwear, check out the rest of the tour! Suzanne has several more jacket patterns featured on this tour, and I'm tempted by all of them!


Fall in love with every stop on the tour:

October 22
Ilse of Sew Sew Ilse

October 23

October 24

October 25
Meriel of Elli and Nels
Jessica of Jot Designs USA

October 26
Livia of Liviality

Wednesday, October 17, 2018

The It-Took-Forever 18th Century Shift

I have wanted to venture into 18th century clothing for a long time. A very long time. Yet, for some reason, anything pre-1800 has intimidated me. So, I've delayed. Over the past 2 years, I've bought the fabrics, bought the patterns, read the books, read the blog posts, and just generally prepared to make myself some late 1700's garments. Yet, I haven't actually made them.


Actually, I can't say that. I have made myself an 18th century garment, just one, and it took me nearly 5 months to make - a shift.


Yep, a shift. The simplest of garments. The one that goes beneath all the others. The one that doesn't actually get seen. I've made it. Completely by hand. Out of linen. I feel immensely accomplished. And (almost) ready to move on to the rest of the outfit. But first, let me tell you all about this shift.


As I mentioned above, I've been wanting to make myself an 18th century ensemble for quite some time, and I've been gathering supplies for my endeavor. Now what's the first thing that must be completed when venturing into a new era of costuming? The undergarments, always the under garment - shifts, chamises, or combinations, stays or corsets, and petticoats. Without these things your finished garments won't have the right silhouette for your chosen era, and that silhouette is important! With the proper silhouette you can look like you stepped right out of the past. Thus, the undergarments must be made first, as tedious as that may be. Skin out. Shifts first.


Before the 19th century, nearly all undergarments were made from linen. With this in mind, I ordered a few yards of linen online, and when it arrived I chopped it up into my shift pieces - my 18th century project was finally beginning!


18th century shifts are really just a bunch of rectangles, and a couple rectangles cut in half diagonally to make triangles, so no true pattern is required. A quick google search for "18th century shift pattern" will bring up several blog posts, tutorials, and diagrams telling you how to cut a shift from a rectangle of fabric So, that's what I did, back in March. I googled it, found a diagram (I can't remember where now), took my measurements, and cut my linen into one long rectangle for the front and back of my shift, two smaller rectangles for my sleeves, two squares for underarm gussets, and 4 triangles (made by cutting narrow rectangles in half diagonally) for skirt gores. (I've actually made shifts in this manner in the past for my little sister)


That done, I set to sewing these geometric shapes together. By hand. Because, historical accuracy. I worked on sewing the shift while the kids I nannied were at gymnastics. It kept me occupied  while I sat on the hard metal folding chairs in the parent's waiting area for an hour every Monday night. During that time, I got the seams all sewn. Next I had to flat fell all the seams, but then summer came, and I was no longer taking children to gymnastics every Monday night. My sewing basket, with the half done shift, got abandoned and forgotten about in a corner of my sewing room as summer insanity took over.


August came, and I was off on vacation. A few hours before leaving town I stumbled upon the abandoned shift in my sewing room, and decided to bring it along to finish up on the long car rides.


So, I sewed as we drove from state to state, and somewhere between home and the ocean, all the seams got flat-felled. Then, between the ocean and home, the shift got hemmed.


I used a hotel room iron to press the sleeve hems and the bottom hems. Once those were pressed and pinned in place, I did one last thing. I cut my neckline.


Up until this point the shift had been completely unwearable as it had no head-hole. I waited until the very end to cut one, as I didn't want it to stretch out of shape while I sewed the rest of the garment. The neckline is cut wide and low so it hopefully won't be seen underneath the gown I will eventually get around to making. It's finished with a narrow rolled hem.


Two states, and 10 hours from home, on our last day of vacation, I sewed the last stitch on my shift. 5 months after starting it.


Now I'm ready to get on with the rest of my ensemble! Next up, stays! And hopefully those won't take nearly as long as this did to finish, once I actually get started on them. But no promises.


Thursday, October 11, 2018

Costuming The Brother

My brother is Scrooge. And I get to costume him.


Now, just to clarify, my brother is acting the part of Ebenezer Scrooge in a high school production of "A Christmas Carol" come December. In real life he doesn't generally go around crying "Bah Humbug!" On stage however, he is a very convincing hater of Christmas. So clearly, he needs the costume to fit the character, and I am having great fun designing it! 1840's grumpy old man here we come!


First up, his outerwear! My mom bought him a top hat, and I made him a cloak - just in time to share today on the costume blog tour hosted by Made For Little Gents "Magnificent Wizards". So here he is, my not so little anymore, little brother, transformed into a gentleman one might pass on a London street in the 1840's.


When this brother of mine got the roll of Scrooge, it didn't take me long to start researching 1840's men's clothing. I finally has an excuse to make something vaguely historical for my brother! I'm reasonably familiar with 1840's women clothing, having made a dress, or two, from that era, but men's wear is a whole new ball game. For starters, men don't have to (get to?) wear corsets, or petticoats. And they wear pants. And tailcoats. Definitely nothing like women's dresses! They do, however still get to wear cloaks, which is a historical clothing item I am familiar with. Thus, that is what I started with. A cloak for my brother.

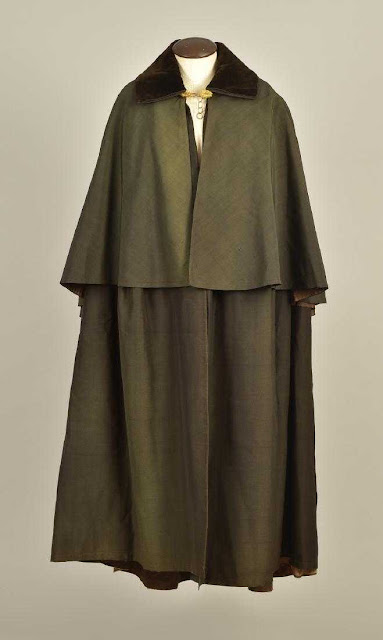
Gentlemen's 1840's cape, found on liveactioneers.com

I began where I always begin historical costuming projects - on the internet, finding extant garments similar to what I'm wanting to make. After a quick search I had a general idea of what a men's cloak in the 1840's would look like and I was ready to get started!


All the cloak examples I found showed a double layered cloak, one shorter over layer and one longer under layer. Luckily, I had the perfect pattern in my stash for a cloak like this - the same pattern I used to make my own 1840's cloak almost 4 years ago.


Yep, the Princess Anna cape pattern, McCall's M7000 (or MP381 if you grabbed it off of the display rack, like I did 4 years ago, rather than the normal pattern drawers.). Now this may look like a princess cape pattern, but it's an excellent base for early victorian capes! For my brother's I just made the corners right angles instead of curves, smoothed out the back hemline, and the cloak turned out about as un-princess-y as possible.


Though my brother does declare it as elegant, in a gentlemanly type way.  Especially in pictures where one happens to be running away from the camera.


Now, you know what's not particularly elegant, or gentlemanly, or historically accurate? Flip flops. My brother's shoe of choice for our photo shoot. Or sweatpants for that matter. However, this brother of mine does not particularly enjoy getting his picture taken, and he was actually rather amiable to the idea of a cloak photoshoot, so I didn't push the shoe and pants issue.


We had great fun with our little cloak photo shoot, as my brother went from grumpy Scrooge, to goofball, to mysterious vampire. He generally fell in love with his cloak, which absolutely thrilled me.


Now, honestly, while the cloak gives a lovely historical impression for the stage, it's not really historically accurate in and of itself. It's made of a rayon suiting (found on the clearance rack at Joann's), rather than wool. It's entirely machine sewn. And it's not lined or faced like an actual cloak from the 1840's would be, instead the edges are all finished with single fold black bias tape. But it's perfect for the play! 


Over all, I'm very pleased with how the cloak looks, and my brother is all around happy with it! 


This kid was thinking he wouldn't do anything for halloween this year, but now he's thinking he might wear this cloak to be a vampire! And I am not complaining about that!


So, Vampire, or Scrooge, my brother now has the beginning of some fabulous costumes! Now I just need to make the rest of the pieces!


As much as I enjoying sewing clothes for my sister and I, sewing things that my brother likes and wears is incredibly fun, and I'm excited to continue working on his costume! Next up, a dressing gown, to be finished sometime before dress rehearsal the first week of December. 


And possibly a second cloak, because now that he has one, the brother declares cloaks are awesome and he needs another for daily wear. One suitable for general wear with flip flops and sweatpants. Go figure.


See what other bloggers are making boys for Halloween by following along on our Magnificent Wizards Blog Tour! 
Mon. Oct. 1 | Angel Child Clothing
Tues. Oct. 2 | Made for Little Gents
Wed. Oct. 3 | Big Fly Notion
Thurs. Oct. 4 | Tenille's Thread
Fri. Oct. 5 | Sewing Novice
Mon. Oct. 8 | Paisley Roots
Tues. Oct. 9 | Custom Made by Laura
Wed. Oct. 10 | Fée bricolo
Thurs. Oct. 11 | The Sewing Goatherd
Fri. Oct. 12 | Manning the Machine

The cloak looking elegant, in a gentlemanly type way.