Of all the layers in a bustle dress, the underskirt certainly sounds like the easiest to make, so I decided, when it came to actually making my 1880's ice skating outfit, to start with that.

It's a pretty basic skirt, the closures are uncomplicated, and I had a pattern to use - that only involves 2 pattern pieces, a yoke and the skirt portion. Super easy!
 |
| Ladie's Kilt Skirt - 1888 National Garment Cutter |
There was just one issue. I drafted the pattern the wrong size. Ooops. That complicated things a bit.

The apportioning ruler is made for my bust measure. My bust measure is 10" larger than my corseted waist measure.
I cut out a mock-up of the skirt yoke, sewed it up, tried it on over my corset and bustle, and it was HUGE.
When the pattern says "draft according to waist measure" it means "draft according to waist measure. You're supposed to us the apportioning ruler that corresponds with your waist measurement. Not the apportioning ruler that corresponds with your 10" larger bust measure.
Yep, I should have made an apportioning ruler for my corseted waist measurement.

I stood in front of the mirror and fitted the too-big skirt yoke to me a little bit at a time. I trimmed it shorter, added extra darts, and curved the upper edge until it fit smoothly around my waist and over my bustle. I didn't get any pictures of the too-big mock-up or the fitting process, but once I was done I had a skirt yoke I was pretty pleased with. I measured from the bottom edge of the yoke to my ankle to figure out how long I needed to make the pleated part of the skirt.

Using my trimmed down and fitted mock-up as a pattern, I cut the yoke out of some red polished cotton. This would be the flat lining. Then I cut it out of my wool. As I only had 2 yards of wool I had to be careful to use as little as possible for the yoke so I would have enough for the pleated part of the skirt. Thus there's a bit of piecing at the front of the yoke and the waistband is pieced together from a bunch of little pieces of wool - and not all are on-grain. Once the yoke was cut out I measured the remaining wool and cut it in half to make the front and back pleated skirt panels.

I basted the wool to the polished cotton, sewed up the darts, sewed the center front seam of the yoke, and then attached the waistband - stabilized with some petersham ribbon from my stash.

The yoke fastens with buttons and button holes down the center back. I used some vintage metal buttons from my stash, and the button holes are just machine sewn because I didn't have the time to deal with hand sewing button holes.

I tried on the finished yoke and was pleased to discover it fit beautifully!


. . . And sewing a skirt hook and bar underneath.

You can't tell on the finished skirt that there's a secret hook and bar at the waist. It still looks like one long pretty row of buttons!

With that all sorted out, it was time to make and attach the pleated part. I flatlined the front and back panels with some plain cotton from my stash and added nice deep pockets to the side seams.


Once the panels were all sewn together and hemmed I pleated them onto the yoke. I'd marked on the yoke where the side seams needed to be with thread tacks and I'd marked on the panels the center front and center back. I matched up all the markings then figured out the pleats.


The skirt pattern called for about 225" for the pleated portion of the skirt and I only had about 120" of material to pleat. So my pleats wouldn't be very deep, but I would do what I could!

I made a box pleat at the center front and center back then made sure my pockets would be inside the pleats at the side seams. After that I eyeballed, pleated, measured, adjusted, measured, and eyeballed some more until the skirt was box pleated all the way around. There are 7 box pleats across the front and 7 across the back. They are all more or less the same size.

Once I was satisfied with the pleats, I sewed the pleated section of the skirt to the yoke, whip stitched the seam allowance, pressed all the pleats in place,

And the first part of my 1884 ice skating outfit was done!!

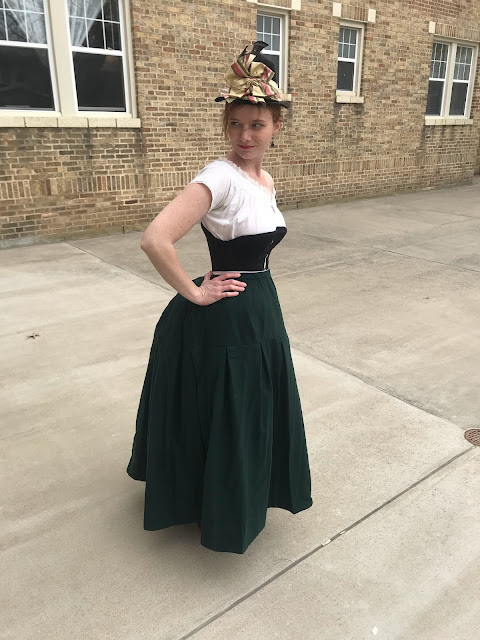
But I didn't have much time to daydream! Once this skirt was done I had just over a week until the skating event and I still had a bodice and overskirt to make! It was time to get back to work!

Love the hat and the shoes. And the dress of course! :-)
ReplyDelete