I wanted the front of my tunic to fasten with buttons, but what type of buttons? Nothing in my stash seemed quite suitable. Nothing looked right for the regency era. Everything was too modern, or too shiny, or just not what I wanted. I decided it was better to leave off the buttons entirely and pin the darned thing closed if I couldn't find just the right buttons.
After rejecting all exciting button ideas, wearing the thing pinned closed for my sister's birthday party, and taking a break from the project in general for a few weeks, I returned to it with a new plan. Since I couldn't find the perfect buttons, I would make them!
I started by googling "thread buttons" and discovered the type of button I wanted to make was called a "Dorset button". I then read a couple different tutorials (which I forgot to save, so I can't point you toward them now, sorry!) on how to make these wagon-wheel shaped buttons and decided to give it a go!
I easily found suitable supplies at Joann's fabrics - metal rings of assorted sizes from the jewelry making section and matching Gutermann silk thread that I used for the tassels that my tunic is trimmed with. All the tutorials I read recommended making your first few buttons with a heavier thread, such as embroidery floss or lightweight yarn since the button making goes a bit faster and easier with a thicker thread. However, I wanted silk thread buttons to match my silk thread tassels, so silk thread it was going to be! "Tricky to work with for a beginner" be darned!
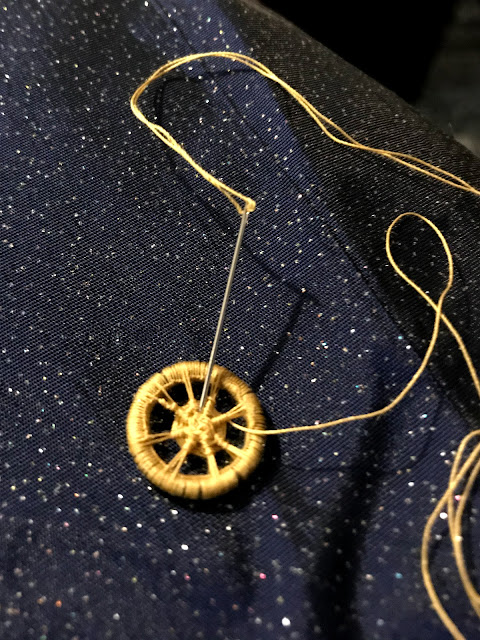
I started with one of the largest rings from my multi-pack, about 1" in diameter. Starting with a larger ring was a good idea. It gave me room to work, see what I was doing and get the hang of the technique, before moving on to the smaller buttons. First I covered the ring with a button-hole stitch, then I wove the middle "wagon wheel" section.
I ran out of thread before I managed to completely fill in the middle of this first button - but hey! I made a button!!! And for my first ever Dorset button, it doesn't look half bad!!
After that first button, I decided it was time to move on to smaller buttons, since that's really what I wanted for my tunic. I used the middle size of rings from my multi-pack, about 1/2" in diameter. It was definitely trickier to make the smaller buttons (less room to work and all that. . .), than it had been to make the large button. I don't think I'd want to try making Dorset buttons any smaller than these 1/2" ones!
I made 4 buttons this size. None came out absolutely perfect, but all came out decent enough.They would do the job, and, oh my gosh, I ACTUALLY MADE BUTTONS!!!!!!!
The best two buttons got sewn onto the front of the tunic to fasten it. I made corresponding buttonholes from the same yellow silk thread as the buttons and tassels. These buttons are functional!
The remaining two, slightly more imperfect, buttons got sewn onto the back of the tunic, where the curved bodice seams met the waist seam, for decoration.
After the buttons were on, I decided the tunic still wasn't quite done. It had tassels on the back points, but not the front. It needed tassels on the front. Thus, a couple more tassels were made, and onto those front points they were sewn!
And with those tassels and the 4 little thread buttons, my "tunic with points" was truly complete!
I'd intended to wear this ensemble to the symphony with the Saint Louis Historical Sewing Society back in April. But we all know how this year has gone. Clearly, that didn't happen. So, instead, I wore it last weekend, for a Zoom meet-up with the SLHSS.
We were joined by silhouette artist, Charles Burns, and he cut our silhouettes, right there on camera, while we took turns sitting for him! It was so cool and impressive to watch!!
I chose to wear this ensemble because I thought my turban and ruffled chemisette would make a really neat, distinctive silhouette - and I wasn't disappointed! Can you figure out which silhouette is mine?
A HUGE thank-you to Charles for doing this Zoom silhouette party for us! The virtual meet-up was a bunch of fun, the finished silhouettes are just amazing, and it gave me an excuse to finally wear my 1801 "tunic with points" in it's finished state!


My goodness girl, I guess there’s not much you won’t try! Good for you, which silhouette is yours?
ReplyDeleteYou continue to amaze me. ❤️❤️👍
Thanks Gram! My silhouette is the bust at the bottom right.
DeleteYou deserve an honorary doctorate if there was a costume/dressmaking institution in US
ReplyDeleteLovely! Absolutely stunning ensemble and button-work!
ReplyDeleteI had never even heard of thread buttons until recently, and now they're popping up everywhere! Yours are lovely. You might like this link I found on another style called Death's Head buttons: https://fabricnfiction.com/2018/02/12/tutorial-deaths-head-buttons/.
ReplyDeleteWow! There you go again! I made Chinese buttons for my 50’s silk Pyjamas. They took a long time but I still feel a huge sense of accomplishment when I look at them. Another wonderful job!
ReplyDeleteThose were the perfect little details your tunic needed! It always amazes me the tiny difference between a garment looking great or spectacular. Thread buttons is such an intriguing idea, I name tucking it away for some future project. I've seen buttons made by covering a ring with fabric and stitching around the inside of the ring, but never with just thread before!
ReplyDeleteI guess your silhouette to be on the bottom right.
My favorite part of this is your buttons. I am so impressed that you made your own, and they turned out so beautifully.
ReplyDelete