Friday, November 23, 2018

Deck the Closet in Christmas Clothes

It's been Christmas Carol costumes, Christmas Carol costumes, Christmas Carol costumes around here for the past two months. And now the end is in sight. The costumes are just about completely finished. (Which is good as the play opens in 2 weeks) So, with that, my personal Christmas sewing can now begin!


I have my lists, I have my plans, I have my fabric. Now that Thanksgiving is over and the play costumes are almost complete I just need to dive in and make some stuff! First on my Christmas sewing list, rather than a gift for someone or a Christmas dress for my sister, is a Christmas outfit for myself! (Don't worry, the gifts and sister's dress will still be done by Christmas!)


Why is my Christmas outfit the first thing to get made? Because today I'm participating in the Winter Wear Designs "Deck the Closet" blog tour, and Winter Wear happened to have just the patterns I needed for my 1950's inspired Christmas outfit.


The idea for this outfit started with an online fabric purchase that didn't turn out quite as I'd expected, or hoped. I ordered two yards of a green silk/rayon blend drapery fabric, thinking it would work for a historical project I had in mind. The fabric arrived and was absolutely beautiful, it just didn't have the right texture for a historical project. So, I stuck the fabric in my stash and figured I'd think of something else to do with it, eventually.

A few months later, inspiration struck. The fabric needed to become a skirt. A nice full knee-length skirt with some pleats. There, decision made. The fabric continued to sit in my stash, but at least I knew what I wanted to do with it!

November rolled around and it was time to pick my project for this festive Winter Wear blog tour. I could make PJs, a casual Christmas outfit, or a Fancy Christmas outfit to share. After a quick look through the Winter Wear Designs pattern catalogue my mind was made up. I would make a fancy outfit. The pleated circle skirt from the Bateau Garden dress was just what I had in mind for that green fabric. And is there anything fancier than silk?


I asked Suzanne if I could make just the skirt from the Bateau dress, and she agreed, even suggesting something to make my skirt truly fantastic - the contoured waistband from her Crop Dress pattern.


A contoured waistband has a slight curve to it, rather being a straight rectangle. A 1"- 2" wide rectangular waistband works just fine for a skirt, but, if you want a wider waistband, a contoured waistband will give a much better fit. Thus, when the ever gracious Suzanne offered to send me not only the Bateau pattern for the skirt, but also the Crop Dress pattern for the waistband, I gratefully accepted.

After receiving my patterns I printed off the pieces I needed and proceeded to cut out my skirt. Two yards of 60" wide fabric was just enough for a full circle skirt! (Though the back had to be cut as two seperate pieces, rather than one on the fold as the pattern directed). I cut out my skirt pieces two sizes larger than I needed so I could make the pleats at the waist extra deep and fabulous. When I said I wanted this fabric to be a full skirt, I meant a FULL skirt - deep pleats and a full circle!


Then I made a mistake. I wasn't thinking. I was on cutting autopilot. My thought process must have been, "Oh, I cut out the skirt this size, so the waistband also needs to be this size."
Yep, I cut out the waistband the at same size as I'd cut out the skirt. Two sizes bigger than I needed.
I didn't realize I'd made this mistake until after I'd sewn the skirt onto the waistband. The pleats were shallower than I'd expected them to be, given  that I thought I'd cut the skirt two sizes larger than the waistband, but I didn't think much of it. Then I tried the almost finished skirt on and it was falling off of me.
"Strange," I thought, "I didn't think I'd lost that much weight."
I re-measured myself. I double checked the measurement chart. The size I'd intended to cut was the correct size for my waist measurement. I was confused.
I happened to glimpse the waistband pattern still laying on my sewing table. I picked it up and looked at it. Then I figured out where I had gone wrong. The waistband was two sizes too big, no wonder it was falling off of me!
In my frustration I threw the too big skirt on the dress form and left it there for a week. Then, once I was less disgusted with my mistake, I ripped out that seam, cut down the waistband, and re-pleated and re-attached the skirt. I tried it on again and breathed a sigh of relief when it fit properly this time around!


Once the waistband issue was resolved, the rest of the skirt went together without incident. The pattern was meant to close with an invisible side zipper, but I decided to do a lapped zipper and buttons in my center back seam instead.

In order to do this I cut one side of the back waistband longer than the other so I would have an underlap for the buttons. It worked like a charm!


In my stash I found a green vintage zipper that matched my fabric splendidly and two bronze-colored plastic buttons which were the perfect finishing touch!


Now there's this thing you're supposed to do when you make circle skirts - leave them hang for a few days prior to hemming so if the fabric is going to stretch on the bias it can stretch and you can level the hem. This will give the finished garment an even hem that shouldn't stretch out of shape. Until this project I've been a bad seamstress and mostly ignored that step. Thus, I've made a circle skirt or two that are now no longer perfect circles and have uneven hems. Those skirts no longer get worn.

The chalk marks where the skirt needs to be cut for an even hem.
It stretched more than 4" in some places and none in others!

On this project, however, I let the skirt hang on the dress form for a week prior to hemming. (This was due more to the fact that the skirt was in time-out thanks to the too-big waistband, rather than any forethought about the hem on my part, but hey, it yielded good results!) At the end of that week, I used the hem-leveling apparatus on my dress form to even out the hem line.


Once the new, level, hemline was marked I trimmed off the excess fabric and hemmed my skirt using 1" single-fold bias tape. (1/2" bias tape was suggested in the pattern directions, but I decided I wanted the weight and body of the wider bias tape for the hem of my skirt.)


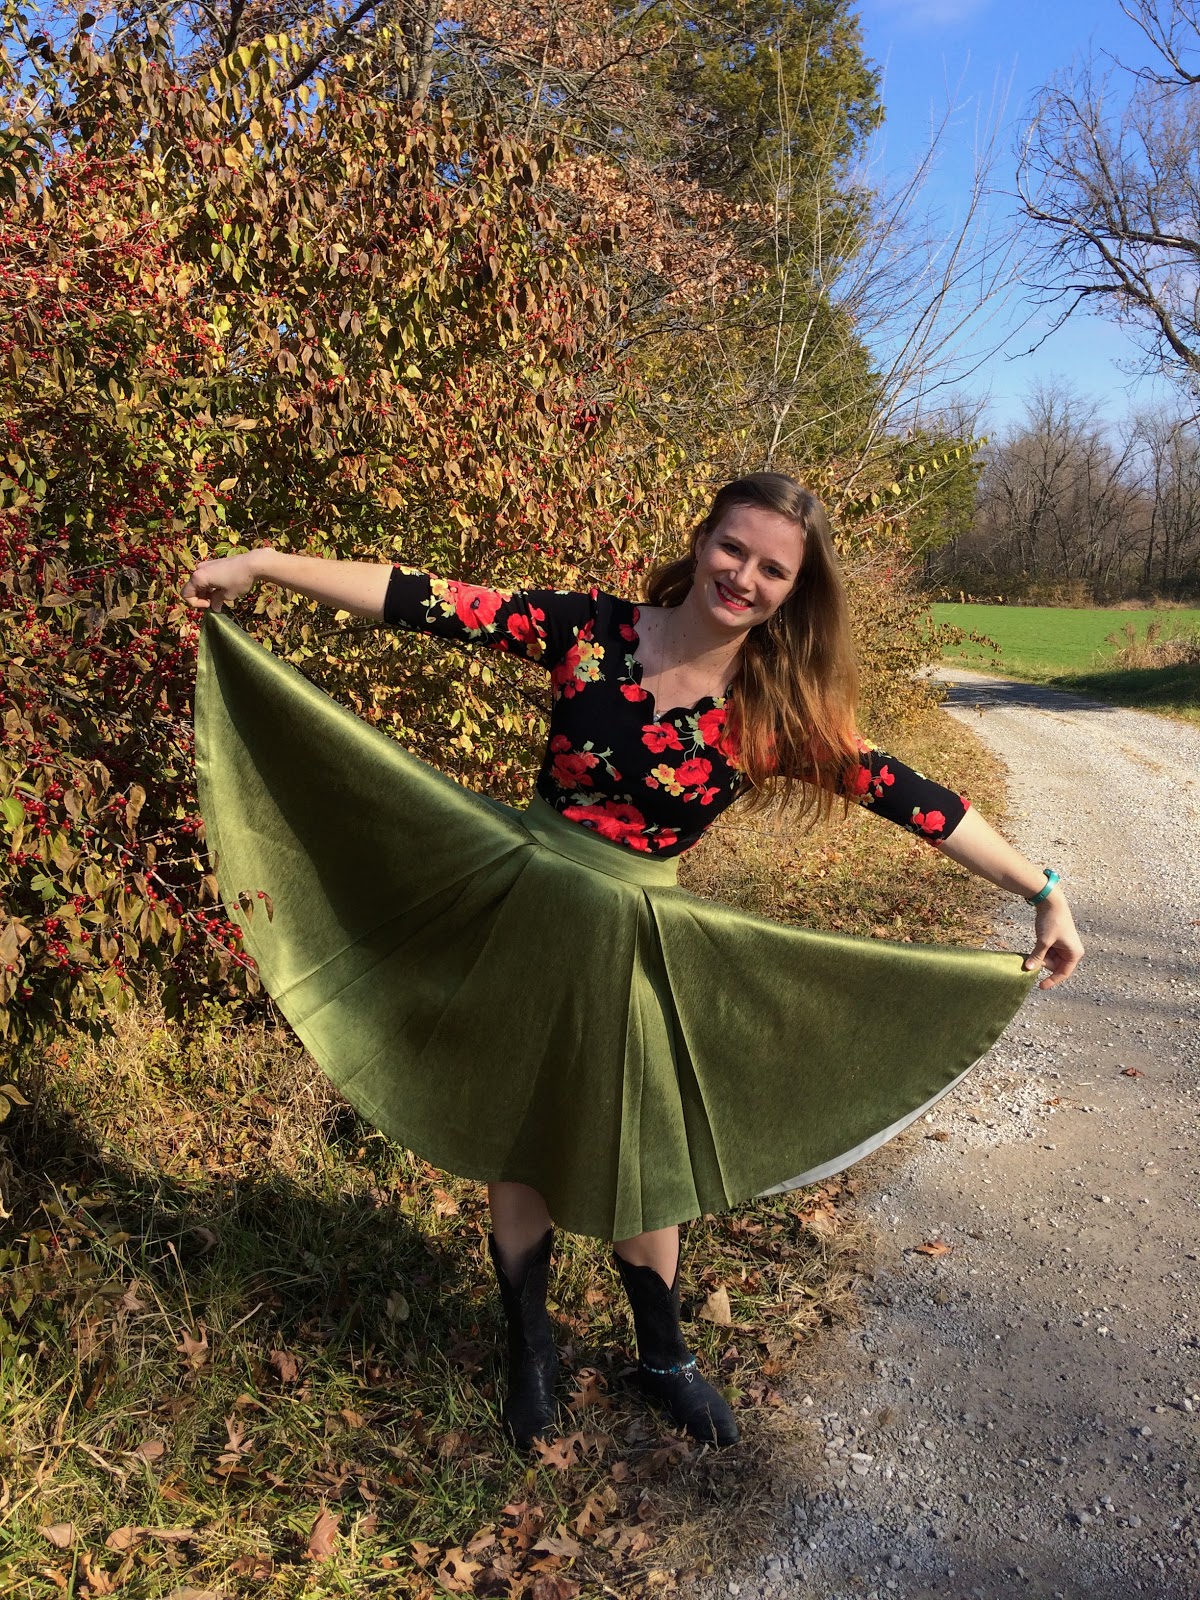
Once that bias tape hem facing was sewn on, my skirt was done! I just needed a top to go with it. I opted to use the Outer Banks Boat Neck pattern as my starting point for that.


Now, as I discussed in this blog post about my first Outer Banks Boat Neck, I have come to the conclusion that I do not like boat (or bateau) necklines on myself, but I do really like the overall fit of the outer banks boat neck pattern. So, it was the perfect starting point for a shirt to pair with my Christmas skirt. I just changed up the neckline shape a bit.


I cut the boat neck into a wide v-neck and added scallops to it. I continued the scallops around to the back neckline as well, and finished the new scalloped neckline with a facing. (The pattern already includes a facing as one of the neckline finishing options so it was really easy to alter the existing facing pattern pieces to match my new neckline shape.)


I made this shirt out of a floral knit crepe from JoAnn's - and I love the texture of it!


The large festive floral and the scalloped neckline make this shirt the perfect thing to pair with my skirt or jeans for that matter!


In fact, I wore this shirt with jeans yesterday for Thanksgiving dinner, and my aunts loved it!


So between my scalloped shirt and my green silk and rayon circle skirt, I'd say my closet is ready to go into the Christmas season!


Check out the rest of the Winter Wear Designs "Deck the Closet" blog tour for some more fun, festive, outfits! And, if we have tempted you to buy any Winter Wear patterns yourself, there is a 35% off sale going on through Monday, or, if you decide you need more than one pattern, there is a buy one get one deal happening, so head over to the website to check that out!


Get inspired to deck your own closet with all these inspirational posts!!!

11/19

11/20
Livia of Liviality

11/21
Meriel of Elli and Nels
Ilse of Sew Sew Ilse

11/22

11/23

Tuesday, November 20, 2018

1865 Pink and Lace Ball Gown - The Bodice

I love it when things turn out easier than expected, don't you? Like when you discover you already have the perfect pattern for a project in your stash, so drafting, draping, or adapting your own pattern isn't needed? And it's a pattern you've used before so you already know how it fits so a mock-up really isn't necessary?

Two weeks into October, after years of dreaming, and hours of searching for the original dress online, I finally began actually making the pink and lace ball gown of my dreams. I started with the bodice.

Balkänning. Detail. Midian. HWY Gr.XXII: In: A.03.

To figure out how the bodice was patterned, I first looked at pictures of the original dress to get an idea of the seam lines. Then I pulled out my copy of Patterns of Fashion I, by Janet Arnold, and looked at how the 1860's ball gown featured in there was patterned. The bodice seam lines on the dress in the book matched up with the seam lines on the dress I was replicating. So the book gave me a good idea of what shapes my bodice pattern pieces needed to be.  After that, I went diving into my pattern stash and pulled out Simplicity 2881, the pattern I was given 4 years ago with the pieces of my purple beaded 1860's ball gown. Amazingly, the bodice pattern pieces in Simplicity 2881 were almost the exact same shapes as the bodice pattern pieces shown in Patterns of Fashion I. Thus, I could use the Simplicity pattern to make my bodice and be confident the pattern was reasonably historically accurate - no pattern drafting, draping, or altering required (for the basic bodice at least).


I was pretty sure the pattern would fit me with no alterations. After all, the purple ball gown, made with this pattern fits me well and I didn't even construct that bodice myself! However, just to be certain, I made a quick mockup to check the fit. It fit. No major changes necessary (just a slight alteration to the angle of the shoulder straps), so I took the mock-up apart to use as my bodice flatlining, and cut into my pretty pink moire. The dress was actually happening!


With the pieces cut out, I sewed up all the bodice seams first thing, one morning before work. This was done by machine, for two reasons. First, I absolutely did not have time to construct the entire dress by hand. So no matter what, it was going to have to be primarily constructed by machine. Second, by the 1860's, sewing machines were in existence. And, according to the museum description I found, the original dress was made with a mixture of hand and machine sewing. Thus, it was perfectly historically accurate for me to use the sewing machine for this project.


I also used the sewing machine to apply boning channels (made from cotton ribbon) to the front and side seam allowances. Then I whip stitched all the seam allowances down by hand to finish them. Machine constructed does not necessarily mean finished. I decided, despite time constraints, I wanted this dress to be as historically accurate as possible, so the seam finishes, hems, and closures would be done by hand.


I boned the bodice with long, wide, plastic zip ties. I'd planned on using spiral steel boning, but I've read large plastic zip ties behave similarly to whale bone when used to bone bodices and even corsets. So, as I had large zip ties on hand, I decided I might as well use them. Time will tell how they hold up and behave compared to steel, but they are definitely easier to cut! (And they're cheap and easy to obtain.)


Once the boning was done, it was time to finish the top and bottom edges of the bodice. I finished the top edge with a standard single row of piping. For the bottom edge, I made double piping, as that's what I saw the original had (based on the picture at the top of this post). 


Double piping is a little more time consuming to make than single piping, but just as easy to apply.


Next up were the sleeves. The original dress has little puffed net sleeves trimmed with strips of pink moire and a lace ruffle at the bottom. Simplicity 2881 includes a pattern for double puffed sleeves, which I was able to easily adapt for single puffed sleeves.


The sleeves are made with a fitted lining of cream colored cotton sateen, and the netting is gathered on top of that. The fitted lining keeps the netting perfectly puffed at all times! (Without the lining, the netting would look droopy and sad.)


Bias-cut stripes of moire fabric were then placed over the net to match the original dress, and the bottom of the sleeve was bound in bias tape I made from the moire fabric. To finished the sleeves I add some lace trim found in my stash.


I attached the sleeves to the bodice, and then it was ready for closures to be added - hooks and eyes.


Now, an awful lot of mid-19th century ball gowns are fastened with lacing up the back. So, originally, that is what I'd planned to do with this one. Then I read the museum description if the dress I was replicating and learned it closed up the back with hooks and eyes. Now that suited me just fine. Lacing is a bit of a pain to do, and I personally find hooks and eyes an easier closure option. Thus, once I knew the original "hooked up", rather than "laced up", it was a no-brainer that mine would do the same.

Translated from Swedish (?) the description reads; "Buttons in the back with hooks and eyes of white metal." I found some what hooks and eyes at Joann's, but last minute I decided to use some vintage hooks and eyes I had on hand instead. 


As I had two different sizes of vintage hooks and eyes, I used the larger ones (size 3) for the high-stress points (the top edge and the waistline.) and the smaller ones (size 1) for the rest of the bodice.

I inserted a drawstring of rayon ribbon through the neckline, just for a bit of extra security to prevent any gaping when the dress is worn by my sister (who is smaller-busted than I). Then the bodice itself was done.


It still needed the neckline embellishment, called a bertha, but that would be a seperate piece, just tacked in place at a later date.


So, like I said, the bodice itself was finished and wearable. It fit both myself and my sister just as it should, and I could move on to the rest of the dress. 


The bodice came together easily, no pattern drafting or experimentation required of me, but the bertha and the skirt would be a bit more complicated!

Wednesday, November 14, 2018

A Velvet Shirt Break

So, clearly, I enjoy making historical clothing. I enjoy the challenge of puzzling out how a garment was actually made, then taking that information and making my own garment. I enjoy learning new techniques and tidbits of information. I enjoy the process of making historical garments, from planning to completion. And if course I enjoy having the finished garment to wear at the end. However, in the middle of a big project it's easy to get bogged down, discouraged, and burnt out.  For me these feelings often come from working on a project for a while, and having nothing finished to show for it. Or, they come from staring at and working with the same fabric hour after hour, day after day.
Sometimes, I just need a bit of a break from the big project to work on something else. A palate cleanser, if you will. A project that only takes a couple hours from start to finish, not weeks or months. A project I can pretty much sew on auto pilot, rather than thinking through every step and construction decision I'm making. A project just to prove to myself I can actually finish a project, rather than just trudging along in the middle of one for what feels like forever.

My 1865 pink and lace ball gown is progressing nicely, but last week I hit that point. I just had to take a break, work with a different material, make something else. Thus, my little sister got a new velvet shirt.


Two years ago, I made my sister a stretch velvet raglan shirt. She loved it and wore it a ton. Then she outgrew it. A month or so ago, she requested a replacement. And, during my short break from sewing the ballgown, I obliged.


In preparation for this project, I snagged a slightly-less-than-one-yard remnant of stretch velvet from the remnant bin at Hobby Lobby a week or two ago.


That slightly-less-than-a-yard, was just barely enough fabric for this shirt. As you can see, it was not enough fabric for a long sleeved shirt. So, instead I cut the sleeves as long as I possibly could, then pieced together my fabric scraps to make sleeve ruffles. My sister seems pleased with the result, but has requested long sleeves on her next velvet shirt. Yes, apparently I'm making her another, soon. 


The pattern I used is a free one from Dixie DIY - The Hot Cocoa Sweater. It's a basic raglan shirt, with just the right amount of swing to it - perfect for stretch velvet! It only comes in once size, and thankfully that size happens to be the size my sister currently wears.


The pattern is pretty great; it's well drafted, all the pieces fit together as they should, it's easy to assemble (the pages don't require trimming!) and it even includes pattern pieces for the neckband and sleeve cuffs (which I didn't use because I was unable to make the long sleeves). Most PDF patterns just included measurements for bands and such, no actual pattern pieces, so I found actual pattern pieces a pleasant change!  


This shirt was just what I needed it to be - a quick, pleasant sew. A short break from the big project, and not related to costuming at all. 


My sister seems pretty pleased with her new shirt - and the weather gave us the most beautiful background to photograph it against! 


Fall and winter collided last week when we got our first snow of the season before all the pretty leaves fell. Who could ask for a better background against which to photograph a gorgeous girl in her pretty new shirt?


Now, after that pleasant break, it's back to costuming for me, and line memorization for my siblings. The play is only three weeks away!

Monday, November 12, 2018

I Know it Exists, but Where? (Finding the Original 1865 Pink and Lace Ball Gown)

Finally, I had all my materials gathered and I had my excuse to make this pink and lace dream of an 1865 ball gown. I could actually get started on it! I could really, truly, begin making it!

Click on the picture to go to the museum database listing of the dress
Hallwyl House

Before I cut into my fabric, however, there was one thing I wanted to do. I knew this dress was in a museum somewhere, so I wanted to find it in that museum database, look at all the available pictures of the dress, and read the description of it. There's always something to be learned from reading museum or auction house descriptions of historical clothing! Before I began my recreation of this dress, I wanted to learn as much as possible about the original. 
Also, there are an awful lot of pictures of pretty dresses out there on the internet labeled as "Original 1800's" (or whatever) that are actually modern-made movie costumes or something similar. By finding the dress I wanted to recreate in a museum database (or on an action site, or this blog, or another similar site), I could be sure I was recreating an actual period piece, primary source material, not someone else's historically-themed artistic work.


There are millions of pins of the pink and lace ball gown on Pinterest - I know I've personally pinned multiple different pictures of it myself. Every time I've come across a picture of it from another angle, or a close-up picture of it I've saved that picture to my "Historical Clothing to Re-Create" board. Then, when I was ready to make the dress, I realized that none of my several pins actually linked back to a museum database or an auction listing. They all linked to random sites commenting on how pretty the dress was - and none of those sites linked back to a museum database, or auction listing, or any reputable website about extant historical clothing.  Gahhhhhh!

In an ideal world, all pictures of historical clothing on Pinterest would link back to museum or auction sites, like this 1880's dress pin does:


If you click on this pin, you can go right to the Met Museum's page about this bustle dress. It's fabulous! Unfortunately, we do not live in an ideal world. Pinterest is full of pins that do not link back to their primary source. And my beloved 1865 pink and lace ball gown appeared to have missed the memo that I needed to know where it came from. Thus, I had to take matters into my own hands to find out where the pink dress resided.

I started by reverse google searching for the image.


For just about any picture on the internet, you can right-click on the image and this menu will come up. Click on "Search Google for image" and another tab will open in your internet browser listing almost all the places on the internet you can find the picture. (Unfortunately I do not know how to do this on a smartphone or tablet, only a computer.)


When the results come up, a ton of them will link right back to Pinterest, but the goal here is to find a source that's not Pinterest. So I begin by ignoring those results and just look for results that link elsewhere. In the past, when I've been tracking down extant historical garments this way, I've only had to scroll through a page or two of results before I find a museum or auction listing of the item. This dress, however, was playing hardball. Page after page of results, and not one linked to the museum database I was hoping to find.

Eventually, on page 5 or 6, I found this blog post, featuring a picture of the dress. In the blog post, I not only found pictures of the dress, I also learned all about the woman who wore the dress, Countess Wilhelmina Von Hallwyland I discovered where the dress was - the Hallwyl House Museum in Sweden.

Thus, much to my relief, it was ascertained the dress was an extant 1860's piece, not a modern make. However, helpful as the blog post was, it did not link to the museum database. I still wanted to find that and read the museum's description of the dress to (hopefully) learn some key information about the construction of the original dress.

Even knowing the name of the museum, the database was hard to find. I found a webpage for the museum, but it had no database. I was almost ready to give up, thinking that perhaps this small Swedish museum just might not have an online public database. Then I stumbled across another pin of the dress - and this one linked to a site called "E Museum Plus" - and it looked promising.


So I followed the link, and found myself here:


The website explained it was the database for the Royal Armory, Skokloster Castle and the Hallwyl Museum Collections. Finally I had found the database I'd been searching for. Now I just had to find the dress. 


The database actually has a decent search feature, allowing you to search through all three collections at once, or each collection individually. You can do a keyword search, or search a specific year span. It took a few tries, with different year spans and keywords, before I finally found the pink and lace ball gown I'd been looking for.


And the description accompanying the pictures of the dress was well worth finding! At the bottom of the page, under the "Description" tab, there are two paragraphs of information about the dress and it's construction! By reading the description, I discovered things about the dress I couldn't have learned by just looking at it - such as the exact skirt dimensions and back closure method. (Unfortunately, there were no pictures of the back of the dress as I'd hoped there would be, but the lengthy description pretty much made up for that.

Once I found the dress, of course I wanted to save it so I could come back and reference the description later. That's when I discovered that if I just copied the url from the address box at the top of the window, and saved that link for later, it wouldn't actually get me back to the dress listing. If I used that link later it would take me to a page saying "your session has timed out" then redirect me to the database home page, and I'd have to search the entire database again to find the dress - rather inconvenient.


To save a link that would take me back to the dress listing, I actually needed to copy and save the "Bookmarkable URL" found on the page itself. So that is the URL I've copied, and saved, and used every time I've needed to link back to the dress on this blog, Pinterest, and Facebook. After as long as it took me to find the darned dress in a museum database, I am not sharing anymore pictures of it without sharing that link as well! (That means whenever I share a picture of the of the original dress, as I did at the beginning of this post, you can click on the picture or photo caption, and it will take you right to the database listing.)


Thus, after hours online, I finally found exactly what I was looking for - the Museum database listing of my dream 1865 ball gown. And I pinned the dress to my Pinterest board yet again - and this pin links to the museum database listing, just as it should.