Thursday, October 11, 2018

Costuming The Brother

My brother is Scrooge. And I get to costume him.


Now, just to clarify, my brother is acting the part of Ebenezer Scrooge in a high school production of "A Christmas Carol" come December. In real life he doesn't generally go around crying "Bah Humbug!" On stage however, he is a very convincing hater of Christmas. So clearly, he needs the costume to fit the character, and I am having great fun designing it! 1840's grumpy old man here we come!


First up, his outerwear! My mom bought him a top hat, and I made him a cloak - just in time to share today on the costume blog tour hosted by Made For Little Gents "Magnificent Wizards". So here he is, my not so little anymore, little brother, transformed into a gentleman one might pass on a London street in the 1840's.


When this brother of mine got the roll of Scrooge, it didn't take me long to start researching 1840's men's clothing. I finally has an excuse to make something vaguely historical for my brother! I'm reasonably familiar with 1840's women clothing, having made a dress, or two, from that era, but men's wear is a whole new ball game. For starters, men don't have to (get to?) wear corsets, or petticoats. And they wear pants. And tailcoats. Definitely nothing like women's dresses! They do, however still get to wear cloaks, which is a historical clothing item I am familiar with. Thus, that is what I started with. A cloak for my brother.
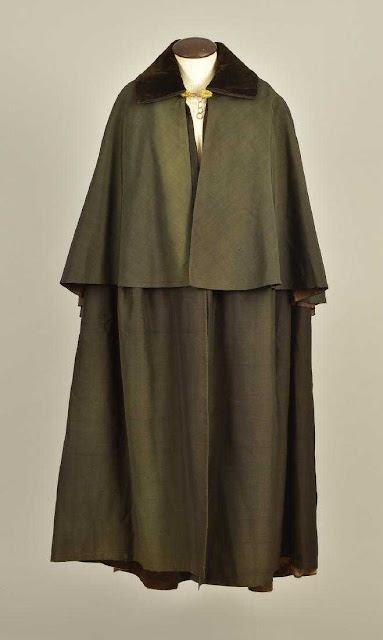
Gentlemen's 1840's cape, found on liveactioneers.com

I began where I always begin historical costuming projects - on the internet, finding extant garments similar to what I'm wanting to make. After a quick search I had a general idea of what a men's cloak in the 1840's would look like and I was ready to get started!


All the cloak examples I found showed a double layered cloak, one shorter over layer and one longer under layer. Luckily, I had the perfect pattern in my stash for a cloak like this - the same pattern I used to make my own 1840's cloak almost 4 years ago.


Yep, the Princess Anna cape pattern, McCall's M7000 (or MP381 if you grabbed it off of the display rack, like I did 4 years ago, rather than the normal pattern drawers.). Now this may look like a princess cape pattern, but it's an excellent base for early victorian capes! For my brother's I just made the corners right angles instead of curves, smoothed out the back hemline, and the cloak turned out about as un-princess-y as possible.


Though my brother does declare it as elegant, in a gentlemanly type way.  Especially in pictures where one happens to be running away from the camera.


Now, you know what's not particularly elegant, or gentlemanly, or historically accurate? Flip flops. My brother's shoe of choice for our photo shoot. Or sweatpants for that matter. However, this brother of mine does not particularly enjoy getting his picture taken, and he was actually rather amiable to the idea of a cloak photoshoot, so I didn't push the shoe and pants issue.


We had great fun with our little cloak photo shoot, as my brother went from grumpy Scrooge, to goofball, to mysterious vampire. He generally fell in love with his cloak, which absolutely thrilled me.


Now, honestly, while the cloak gives a lovely historical impression for the stage, it's not really historically accurate in and of itself. It's made of a rayon suiting (found on the clearance rack at Joann's), rather than wool. It's entirely machine sewn. And it's not lined or faced like an actual cloak from the 1840's would be, instead the edges are all finished with single fold black bias tape. But it's perfect for the play! 


Over all, I'm very pleased with how the cloak looks, and my brother is all around happy with it! 


This kid was thinking he wouldn't do anything for halloween this year, but now he's thinking he might wear this cloak to be a vampire! And I am not complaining about that!


So, Vampire, or Scrooge, my brother now has the beginning of some fabulous costumes! Now I just need to make the rest of the pieces!


As much as I enjoying sewing clothes for my sister and I, sewing things that my brother likes and wears is incredibly fun, and I'm excited to continue working on his costume! Next up, a dressing gown, to be finished sometime before dress rehearsal the first week of December. 


And possibly a second cloak, because now that he has one, the brother declares cloaks are awesome and he needs another for daily wear. One suitable for general wear with flip flops and sweatpants. Go figure.


See what other bloggers are making boys for Halloween by following along on our Magnificent Wizards Blog Tour! 
Mon. Oct. 1 | Angel Child Clothing
Tues. Oct. 2 | Made for Little Gents
Wed. Oct. 3 | Big Fly Notion
Thurs. Oct. 4 | Tenille's Thread
Fri. Oct. 5 | Sewing Novice
Mon. Oct. 8 | Paisley Roots
Tues. Oct. 9 | Custom Made by Laura
Wed. Oct. 10 | Fée bricolo
Thurs. Oct. 11 | The Sewing Goatherd
Fri. Oct. 12 | Manning the Machine

The cloak looking elegant, in a gentlemanly type way.

Tuesday, October 9, 2018

The Attention Grabbing Shirt, Tunic, and Dress Sleeves

Sleeves. I have a love/hate relationship with them. They're hard to fit, often motion restricting (because of the aforementioned fitting issue), and sometimes annoying to sew. But goodness, there are some fun things you can do with sleeves. You can make them long, short, puffed, ruffled, embellished, cuffed, flared, or a mixture of all of the above.


There are three basic types of sleeves. Sleeves can be set in (sewn in at the shoulder), raglan (attached at the neckline), or cut-on (cut as one with the body of the garment). All three types of sleeves have their strong suits and drawbacks. Over the past couple years, cut on sleeves have become popular, in both store-bought clothing and sewing patterns. And I can understand why, cut on sleeves, or more specifically, dolman style sleeves, are relatively easy to draft, quicker and easier than any other type of sleeve to sew, and seem to have fewer fit and range of motion issues than either set in or raglan sleeves do. There are some downsides to dolman sleeves, but overall they are easy to make and look nice on certain garments. And sometimes, all you want are easy sleeves.


When I first noticed the dolman sleeve trend, two years ago, I bought a dolman-sleeved T-shirt, and traced it to make myself a dolman pattern. Since then, I've used that pattern multiple times, and had fun embellishing the sleeves, but I've never thought of re-shaping the sleeves. Dolman sleeves are typically one specific shape, and it never occured to me to change that shape, and still keep the easy sleeves. Someone else however, did think of re-shaping dolman sleeves, and that immediately got my attention!


Mother Grimm designed a pattern with flared dolman sleeves, something I hadn't seen before. I'm a sucker for fun sleeves, so, of course, I signed up to test the pattern - The Lammas Tides Top, Tunic, and Dress Pattern


The pattern is for knits, so upon joining the testing group, I immediately dug through my stash of knit fabric to find something suitable. Well, my knits stash has majorly grown over the past few months, so finding something was no problem at all. Narrowing down what fabric I wanted to use was the hard part! Clearly, to use as many pieces of fabric as possible, I would have to make the pattern more than once, for both me and my sister.


The Lammas Tides pattern comes in 4 lengths, top, peplum, tunic, and dress, with 4 different sleeve lengths, short, medium, long, and longest. As soon as I saw the pattern, I wanted to make the dress with the longest sleeves - it's just such a fun, dramatic, combination! However, I also really wanted to use this black and white double brushed polyester jersey from my fabric stash. And this black and white double brushed polyester jersey was actually not a piece of fabric at all, but a thrifted knit maxi skirt.


There would be no getting a long flared sleeve dress out of a single, size small, maxi skirt. Thus, for my first go at the pattern, I used the skirt, and made a short sleeved top.


And I really, really, really like this short sleeved top! I used a sparkly black cotton/spandex jersey (left over from this tank top) for the waist and neckband to make my shirt a little extra special. And I lettuce-hemmed the sleeves (using a zig-zag stitch on my normal sewing machine), something I'd never done before. The lettuce hem was surprisingly easy and added to the fun flared-ness of the sleeves.


My finished top turned out so well, I couldn't wait to make something else from the pattern - something with the longer, flowy, sleeves that initially drew me in - a dress for my sister!


Once again, I cut a waistband and neckband from my leftover black sparkly jersey. This time, I paired it with a starry black and white jersey my mom bought for my sister back at the beginning on the summer.


The dress, with it's flowy sleeves (made from the "longest" version of the sleeve pattern), and pockets (yes, pockets are included in the pattern!) immensely pleased my little sister.


She wore it to class the day after I finished it, which I can only take as a compliment.


Once my sister's dress was done, it was time to make one for myself, out of some fabric I'd been hoarding for months - a cotton/spandex jersey featuring the Marauder's Map from Harry Potter.


As an avid Harry Potter fan, I bought two yards of this fabric when it first appeared at my Joann's this summer. Then I didn't know what to do with it. So in my fabric stash, it has sat all summer long.


Finally, I decided I might as well use it, and a Marauder's Map dress would be a fun thing to have. I pre-washed my fabric, bought some coordinating maroon jersey for the waist and neckbands, then set to cutting out my dress. 


At which point I realized, with the size of the flared sleeves ,(a) if I wanted to center the print on my dress and (b) if I wanted the print to be right side up on my entire dress then 2 yards of fabric just wasn't enough. At this point, I could have found a different fabric to make the flared sleeve dress out of... But no. 


I'd made my Marauder's Map dress plan, and I was sticking to it! Thus, I drove to Joann's, bought another 2 yards of the fabric, came home, and made my dress.


Once my dress was done, I cut out another set of Lammas Tides waist and neckbands from the Marauder's map fabric. I didn't have enough of the fabric left to make my sister a matching dress, or even shirt, but I could make her a coordinating tunic.


I found this maroon rayon/spandex jersey at Hobby Lobby. It was soft, and comfortable, and coordinated perfectly with the MM fabric! Thus, a tunic for my sister it became.


She'd been requesting some new tunics to wear with leggings for fall, so this was perfect!


After having made 3 different V-necks with this pattern, I decided to try out the round necked version. I think I prefer the V-neck, but the round neck version is also cute.


I lettuce-hemmed both the sleeves (the "long" sleeve pattern option) and the skirt for a little extra ruffly fun-ness. My sister was a fan of this decision. Which is good, since she's the one who actually wears the tunic.


And wear it she has done, with both the tunic and the dress!


Personally, I've worn my top and dress plenty as well (though admittedly, I've worn the top more often than the dress, which is rather dramatic). This pattern has been fun to make, wear, and generally experiment with. And now it's got me thinking of all the other ways I could re-shape dolman sleeves.


If the Lammas Tides pattern interests you at all, it can be found here, and is on sale 25% off through the end of today (10/9/18)

*I received this pattern for free in exchange for testing, but all thoughts and opinions are my own.

Monday, October 1, 2018

The 1887 Lace Up Boot Refashion

I decided to re-fashion a pair of shoes. Boots to be specific. Why not? It sounded like a fun challenge.


I came up with the idea 2 years ago. I wanted a pair of late Victorian button boots. After a bit of thinking I figured I could probably refashion a pair of modern fashion boots into button boots - if I found the right pair of boots to start with. So, for months, I checked the shoe racks at thrift stores until I finally happened upon just the right pair of boots - the right general shape, real leather, no elastic, no zippers, and, most importantly, they fit me perfectly!


I had the boots, I had the plan, what I didn't have was the time. Like I said, these boots came home with me 2 years ago. Since then, they have sat in my sewing room, waiting. In that time, among other things, I have gone on a year long mission trip, and, after the trip, I bought myself a pair of reproduction mid to late Victorian button boots. The first delayed this project by a year, the second made the project feel unnecessary, thus delaying it again. Finally though, I decided I had these boots, and they needed to be refashioned, even if that refashion took a different look than originally planned.  


I have a book, published by Dover, full of of Harper's Bazaar fashion plates and such from 1867-1898. In that book, in the pages from 1887, I found just the shoes my boots were destined to become - a pair of lace up, open fronted, boots which looked ridiculously easy to make.


The front of my inspiration boot was mostly open, so I started by cutting away most of the front of each boot.


I cut out the front of one boot, then used the cut out piece as a template to cut out the front of the second boot. 


Once the front of the boot was removed, I attacked the lining. The boots were lined in a thin foam, bonded to a plaid polyester knit. Not historically accurate at all! Unfortunately, there was no way for me to replace the entire lining, but I could at least replace the most visible portion of it. So I cut off the foam lining right above the top of the heel, and used the leather I'd cut from the front of the boot to make a new lining.


I attached the new leather lining to what I had left of the old foam lining by laying the new lining right sides together with the old lining, pinning, then wrestling the entire boot through the sewing machine. I couldn't find the leather needles I thought I had for my machine, so I just used a size 14 universal needle. That worked fine. The machine sewed through the leather like butter. The only issue was the lack of room under the machine arm for the boot.


After lots of twisting and turning of the boot, I got the seam mostly sewn on the machine and had to do very little hand sewing! (hand sewing the leather was considerably harder than machine sewing it.) Once the leather lining was sewn to the foam lining at the base of the boot, I smoothed the new lining into place, then topstitched it to the pleather facing at the top of the boot. (No, pleather isn't historically accurate either, I just didn't want to attempt to replace the facing.)


With the lining in place, my next order of business was to finish the front cut-a-way edges of the boot. First, I trimmed back the lining so that it sat about 1/2" inside the leather outer of the boot.


Next, I folded the outer leather over the lining and top stitched it in place by machine. This gave me a nicely finished outer edge and left me with two boots looking like this - a good start on my inspiration image.


All I had left to do was set a bunch of grommets and somehow hide the messed up leather on the sides of the boots.


The original boots sported some criss-crossed straps and buckles. You've seen the type. Upon acquiring the boots, I immediately yanked the straps off because I knew I didn't need them. (Yes, this took place before the before photos.) The straps left some messed up leather in their wake. I considered fixing this with some sort of leather stain, but that would require me to some how smooth out the messed up leather first, and I wasn't sure how to do that. So, instead, I just hid the messed up spots by sewing black satin ribbon over them.


I did this by hand, which actually wasn't too hard - though I did bend one hand sewing needle nearly in half in the process!


The end result looks very nice and polished in my opinion!


Once the ribbon was sewn on, all I had left to do, was set all the grommets - 8 up either side of each boot. This took about one evening. 


I threaded black satin ribbon through the grommets, and that was that. My refashioned 1887 boots were done!


Just in time to be my first entry for The Refashioners 2018 - "Inspired By. . .", hosted by Portia Lawrie of Makery. Throughout September, and now October, the challenge this year is to refashion any item, any item at all, to resemble an inspiration image - a designer look, a style you love, a specific garment - whatever inspires you! My boots fit this theme perfectly!


There was a small strap of leather on the back of the boots to hold in place the original buckle strap. This works perfectly to hold in place my ribbon ties and keep them from slipping down my legs!


The boots take a little bit of time to get on and off, but no more than button boots do!


Now, because one sewing challenge just isn't enough, these new historical boots of mine are also my Historical Sew Monthly project for September - Hands and Feet.


What the item is: Lace-up boots
How it fits the challenge: They cover my feet!
Material: A pair of thrifted leather boots
Pattern: none
Year: 1887
Notions: Thread, satin ribbon, and metal grommets
How historically accurate is it? Well, the look is right, and the main material of the boots is real leather. The construction is not at all accurate and the other materials are synthetic. So maybe 30%?
Hours to complete: About 5 or 6
First worn: The initial try on after finishing, 9/29/18
Total cost: about $10


Now I just need to make a set of fancy show clips to really match my inspiration picture, then I can be a stylish 1887 lady!